You are using an out of date browser. It may not display this or other websites correctly.
You should upgrade or use an alternative browser.
You should upgrade or use an alternative browser.
2002 Sequoia Limited 4WD
- Thread starter Sal R.
- Start date
Sal R.
Active member
Thanks for this write up, Sal. I just contacted solo about a similar front end before those ball joints get me killed. So many great ideas I'll be incorporation into my 2001.
Good stuff.
If you can swing it, have them rework your LCA so there are no installation issues.
Sal R.
Active member
Stumbled on your build. I was looking for a LC100 to build but wanted more space than my GX460, and I saw your Sequoia....Now I am looking for the big tree to build. Family of 5, the bigger platform will work better with all the gear! Keep up the work!
Thanks for the kind words.
Sal R.
Active member
Another "thing I wish I had" last time I was out.
Taking the guesswork out of leveling the Sequoia.
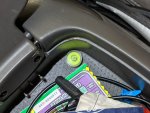
It's a repurposed bubble level I took from a broken tripod mounted in the upper center console. It has a relatively "level" surface reference to the car. It is neatly tucked away and accessible from the driver's seat when positioning the car at camp.
Last edited:
Sal R.
Active member
MODIFICATION: Roof and Alley Lights
GOAL:
Finish out the OCD roof rack.
PURPOSE:
I didn't really "need" this mod, but it came up on my local Craigslist and it was cheap.
DURATION: 2 Hours
MATERIALS:
44" single row light bar
4" (x4) flush mount light pods
Misc wiring and connectors
COST: $50
HOW-TO:
I had lots of wiring and connectors stockpiled so it became about just wiring them up. The dude I bought them from didn't even wire it up so all the lights still had pigtails. #OAF. This made the install process easy. Still hate wiring tho.
Given the above, I just had to add connectors, lay out and run wiring from the roof to my relay box, and set power and ground since I had an open and unused switch in my electrical setup.
Connectors added.
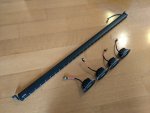
All wired up.
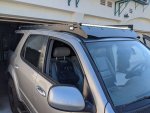
I did have to redo my awning brackets (hopefully for the last time) since the awning interfered with the light pods when it's mounted. I used a beefy 2"x 0.5" aluminum remnant.
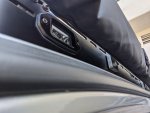
It's overkill, but I didn't want to spend money on more metal.
Dunno if it's any good or if it'll be useful, but it fills out the rack nicely. ??
GOAL:
Finish out the OCD roof rack.
PURPOSE:
I didn't really "need" this mod, but it came up on my local Craigslist and it was cheap.
DURATION: 2 Hours
MATERIALS:
44" single row light bar
4" (x4) flush mount light pods
Misc wiring and connectors
COST: $50
HOW-TO:
I had lots of wiring and connectors stockpiled so it became about just wiring them up. The dude I bought them from didn't even wire it up so all the lights still had pigtails. #OAF. This made the install process easy. Still hate wiring tho.
Given the above, I just had to add connectors, lay out and run wiring from the roof to my relay box, and set power and ground since I had an open and unused switch in my electrical setup.
Connectors added.

All wired up.

I did have to redo my awning brackets (hopefully for the last time) since the awning interfered with the light pods when it's mounted. I used a beefy 2"x 0.5" aluminum remnant.

It's overkill, but I didn't want to spend money on more metal.
Dunno if it's any good or if it'll be useful, but it fills out the rack nicely. ??
Last edited:
Sal R.
Active member
REPAIR: Stubby Radio Antenna
GOAL:
Stop replacing the motorized antenna.
PURPOSE:
Replace the easily breakable motorized extending radio antenna with something more sturdy.
DURATION: 5 Minutes
MATERIALS:
AntennaMastRUs replacement stubby antenna
COST: $55
HOW-TO:
It's an easy job, considering I've done this job 3 times with the motorized antenna and 2 using a stubby. This was, by far, the easiest to install.
The chrome locking ring just screws out by carefully using a flat head and a small hammer to turn the ring using the one of the four grooves.
After that, pull out the old antenna and slide the stubby in its place.
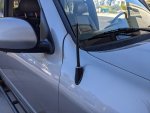
Of all the stubby antennas I've tried, this one is the closest in performance to the OEM motorized antenna. I can pick up 9 of 11 channels in my area as opposed to the others I've tried.
The other two stations aren't much of a loss. It's only a Spanish and country music station.
Hopefully this is the last time I do this job, too.
GOAL:
Stop replacing the motorized antenna.
PURPOSE:
Replace the easily breakable motorized extending radio antenna with something more sturdy.
DURATION: 5 Minutes
MATERIALS:
AntennaMastRUs replacement stubby antenna
COST: $55
HOW-TO:
It's an easy job, considering I've done this job 3 times with the motorized antenna and 2 using a stubby. This was, by far, the easiest to install.
The chrome locking ring just screws out by carefully using a flat head and a small hammer to turn the ring using the one of the four grooves.
After that, pull out the old antenna and slide the stubby in its place.

Of all the stubby antennas I've tried, this one is the closest in performance to the OEM motorized antenna. I can pick up 9 of 11 channels in my area as opposed to the others I've tried.
The other two stations aren't much of a loss. It's only a Spanish and country music station.
Hopefully this is the last time I do this job, too.
Last edited:
Kpack
Adventurer
Hmm. I'm going to have to look into this. My factory antenna was broken off before I got the truck and I haven't tried replacing it. Looks like my threads might be stripped though....so not sure if anything will work.REPAIR: Stubby Radio Antenna
GOAL:
Stop replacing the motorized antenna.
PURPOSE:
Replace the easily breakable motorized extending radio antenna with something more sturdy.
DURATION: 5 Minutes
MATERIALS:
AntennaMastRus replacement stubby antenna
COST: $55
HOW-TO:
It's an easy job, considering I've done this job 3 times with the motorized antenna and 2 using a stubby. This was, by far, the easiest to install.
The chrome locking ring just screws out by carefully using a flat head and a small hammer to turn the ring using the one of the four grooves.
After that, pull out the old antenna and slide the stubby in its place.
View attachment 618016
Of all the stubby antennas I've tried, this one is the closest in performance to the OEM motorized antenna. I can pick up 9 of 11 channels in my area as opposed to the others I've tried.
The other two stations aren't much of a loss. It's only a Spanish and country music station.
Hopefully this is the last time I do this job, too.
Sal R.
Active member
Hmm. I'm going to have to look into this. My factory antenna was broken off before I got the truck and I haven't tried replacing it. Looks like my threads might be stripped though....so not sure if anything will work.
The ring has a fine thread. Flathead and hammer. Work slowly and it'll come out. ?
Sal R.
Active member
Figure I'd test to see how well the new lights worked out on my way home.
For the cost, I guess I can't complain.
Glare off the hood isn't too bad. Reach is pretty good too. Go figure.
I wonder if it's worth the effort to create mounts to angle the alley lights downward to bring the beam closer to the car. ?
Parking lights only.
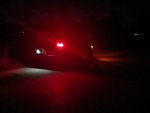
Roof and alleys lights.
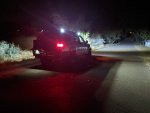
For the cost, I guess I can't complain.
Glare off the hood isn't too bad. Reach is pretty good too. Go figure.
I wonder if it's worth the effort to create mounts to angle the alley lights downward to bring the beam closer to the car. ?
Parking lights only.

Roof and alleys lights.

Kpack
Adventurer
The front looks good. Nice throw and reach. I think it would be worth moving the side lights to angle them down. As they sit now the area immediately around the truck is unusable during the night. I would think that angling them down will allow you to work next to the truck as well as throw light a little further out. Maybe just move one on each side, then you have the best of both worlds?
Sal R.
Active member
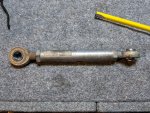
REPAIR: Replace Tierod Rod Ends
DURATION: 30 Minutes
COST: $310
SUMMARY:
After 47k, the tierod rod ends needed some love. In actuality, only one end really needed to be replaced since it was squeaking ever so slightly and the lining was worn out. Since I was down there, I thought I might as well do them all. Relegated the "still good" ones to spares.
I love the fact I can just remove and replace, in place, without even having to jack up the car. No alignment necessary either. What a time saver.

Last edited:
Sal R.
Active member
The front looks good. Nice throw and reach. I think it would be worth moving the side lights to angle them down. As they sit now the area immediately around the truck is unusable during the night. I would think that angling them down will allow you to work next to the truck as well as throw light a little further out. Maybe just move one on each side, then you have the best of both worlds?
I'm on a bit of a roll. Told myself that I would work on it AFTER putting in my rock lights. I mean, it's only been two years since I bought them.
toyotech
Expedition Leader
Figure I'd test to see how well the new lights worked out on my way home.
For the cost, I guess I can't complain.
Glare off the hood isn't too bad. Reach is pretty good too. Go figure.
I wonder if it's worth the effort to create mounts to angle the alley lights downward to bring the beam closer to the car.
Parking lights only.
View attachment 618335
Roof and alleys lights.
View attachment 618336
I had some 3D print angle mounts. Wasn’t worth it. The body is in the way. Rock lights will fill the gap. The side roof lights are more for visually from driver seat.
Sent from my iPhone using Tapatalk
Sal R.
Active member
I had some 3D print angle mounts. Wasn’t worth it. The body is in the way. Rock lights will fill the gap. The side roof lights are more for visually from driver seat.
Sent from my iPhone using Tapatalk
Shoulda made the rack 2" wider per side. ?
Similar threads
- Replies
- 2
- Views
- 582
- Replies
- 4
- Views
- 3K
- Replies
- 0
- Views
- 364
- Replies
- 5
- Views
- 2K

