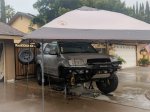
2002 Sequoia Limited 4WD

Sal R.

Active member
Great build! That heater solution cracked me up, it's pretty ingenious. I didn't realize you were so close to me until I recognized the RB Vons parking lot from a couple posts back. Maybe I will see you driving around one of these days.

Thanks! She's easily recognized so, yeah, feel free.

Any issues running the heater in the box on da roof?

How about a pic of the in-cab control?

No issues as far as I can tell. Much more convenient on the roof compared to being on the ground and having to pack/unpack the heater when caramping.

The controller is mounted loose for accessibility.
PXL_20201221_033033570-231.jpg
 
Last edited:

Sal R.

Active member
MODIFICATION: Diesel Heater 2.0

GOAL:

Apply some lessons learned and "fix" some annoyances about heater 1.0.

PURPOSE:
Moving the heater to the roof really worked out nicely. However, it presented some painful and inconvenient aspects to it. So, I decided to repackage it.

DURATION: 2 hours

MATERIALS:
Dewalt Toughbox toolbox

COST: $30

HOW-TO:
Steps are largely the same, so I'm sticking to the highlights.

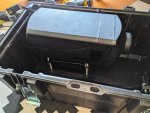
Instead of staying with the Rigid toolbox, I moved onto the Dewalt Toughbox toolbox. One of the biggest annoyances I had with the Rigid box was steps to keep it secure on the roof rack. It took two locks (one for each latch) and a zip lock for me to feel confident that it wouldn't get stolen. Not to mention they rattled like crazy. With the Dewalt box, all it takes is one zip lock. Another benefit is that the Dewalt box had more usable interior volume and a slightly smaller foot print.

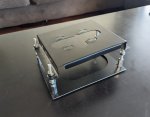
Instead of a tray system like the one used in 1.0, I opted to use a stand using threaded stand-offs. This made positioning the heater a breeze and didn't get in the way compared to a full-length tray when gaining access to the intake pipe or the exhaust pipe.
PXL_20210106_221904727-240-244.jpg

PXL_20210106_221639077-241-245.jpg

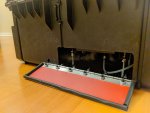
For convenience, I added an access panel to make troubleshooting, service, and disassembly easier.
PXL_20210114_201907460-242-246.jpg

PXL_20210125_043453628-254-257.jpg

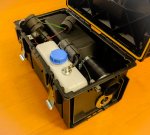
Lastly, I staggered the placement of the tank versus heater. This arrangement distributed the weight more evenly and doesn't result in an awkward balancing act when moving the heater to/from the roof. It's easy when you're in your driveway with a ladder, but not so much when at a gas station with the ground covered in wet, hard-packed ice. The new placement is also conducive to refueling without having to pull the heater from the roof. Open the lid and refuel. Accessible even when my snowboard is in the way.

I kept the filter and fuel pump where they are easily accessible for inspection, service, and/or replacement.
PXL_20210125_043246259-252-255.jpg

PXL_20210125_043308599-253-256.jpg
 
Last edited:

toyotech

Expedition Leader
MODIFICATION: Diesel Heater 2.0

GOAL:

Apply some lessons learned and "fix" some annoyances about heater 1.0.

PURPOSE:
Moving the heater to the roof really worked out nicely. However, it presented some painful and inconvenient aspects to it. So, I decided to repackage it.

DURATION: 2 hours

MATERIALS:
Dewalt Toughbox toolbox

COST: $30

HOW-TO:
Steps are largely the same, so I'm sticking to the highlights.

Instead of staying with the Rigid toolbox, I moved onto the Dewalt Toughbox toolbox. One of the biggest annoyances I had with the Rigid box was steps to keep it secure on the roof rack. It took two locks (one for each latch) and a zip lock for me to feel confident that it wouldn't get stolen. Not to mention they rattled like crazy. With the Dewalt box, all it takes is one zip lock. Another benefit is that the Dewalt box had more usable interior volume and a slightly smaller foot print.

Instead of a tray system like the one used in 1.0, I opted to use a stand using threaded stand-offs. This made positioning the heater a breeze and didn't get in the way compared to a full-length tray when gaining access to the intake pipe or the exhaust pipe.
View attachment 636804

View attachment 636805

For convenience, I added an access panel to make troubleshooting, service, and disassembly easier.
View attachment 636806

Lastly, I staggered the placement of the tank versus heater. This arrangement distributed the weight more evenly and doesn't result in an awkward balancing act when moving the heater to/from the roof. It's easy when you're in your driveway with a ladder, but not so much when at a gas station with the ground covered in wet, hard-packed ice. The new placement is also conducive to refueling without having to pull the heater from the roof. Open the lid and refuel. Accessible even when my snowboard is in the way.

Lastly, I kept the filter and fuel pump where they are easily accessible for inspection, service, and/or replacement.
View attachment 636807

Nice work. Should have just built a second fresh system and sell that first one. I know people would by finished products like that.


Sent from my iPhone using Tapatalk
 

Sal R.

Active member
Nice work. Should have just built a second fresh system and sell that first one. I know people would by finished products like that.


Sent from my iPhone using Tapatalk

Meh, I don't want to deal with people and whatever issues that comes up from a sale. You how finicky these heaters can get. Plus, I don't believe I could sell it for an amount to make it worth the effort.

I am, however, toying with the idea of rebuilding the Rigid case to keep as a spare...

Impressive build, do continue.

Thanks for taking the time. ?
 

Sal R.

Active member
MODIFICATION: Constant 12V Ports

GOAL:

Add some aesthetically pleasing, easily accessible, integrated 12V ports independent of the keyed ACC.

PURPOSE:
Really want to be able to charge my devices when boondocked without having to leave my key in the ACC position or have to use a battery pack.

DURATION: 2 hours

MATERIALS:
OCD4WD DPP replacement panel
12V USB ports (qty. 2)

COST: $20

HOW-TO:
The OCDDPP panel replaces the backseat LHS/RHS ashtrays. To install, pull it out, insert the replacement OCDDPP panel with 12V USB ports (sold separately), remove and replace some door and interior trim, run the 12V. Easy peasy lemon squeezey. Really nothing to it.
PXL_20210126_230950739-262-263-264.jpg

I opted to use only one side for now. I mean, I don't NEED 8 USB ports in the cab. NGL, really wasn't in the mood to route two sets of wires.

It's tied into a 12V rear bus that's temporarily installed next to my amp. But who am I kidding? It'll probably be temporary for an indefinite amount of time.

Never time to do it right. Always time to do it over...

Now that in have it in, it's pretty sweet. Modular, too. If by chance, I want to update the ports, it's just a matter of pulling up the panel and replace. No need to undo the door trim just to get at the installation.
 
Last edited:

Sal R.

Active member
REPAIR: Front Wheel Bearings

DURATION:
2 hours

COST: $400

SUMMARY:
It all started when the Sequoia started to make a chaffing noise. As I suspected, it was the fan pulley bracket. Between traveling for work and work and prepping to hit the mountains, I was pressed for time. So in the shop she goes. Pretty standard stuff. While she was in there, I had them look over my wheel bearings. They confirmed my suspicions that my wheel bearings were making noise and needed replacement. Again pretty standard stuff.

Once I got the car back, took the suspension apart. This time, I had the shop press in new bearings as I wanted to save on the labor and wanted to fix some open issues with the suspension.

FB_IMG_1612930660462-267.jpg

It was hard for me to determine if the bearings had gone bad. On the road, I could never tell if the noise was because of my MTs, the road, or something else. Jacking the car up did not yield any noise. There was no visible play in the wheel when spinning or by hand at the 12 and 6 o'clock positions. There were no odd vibrations thru the steering wheel or in the ride.

Why this was post worthy is because of a few things I noticed before and after the repair; something that doesn't get talked about a whole lot. Prior to the repair, I used to get a lot of bumpsteer. Just got used to it. I suppose it happened so gradually I never even noticed it happening or that it was adversely affecting my steering and tracking.

Once the both front wheel bearings got replaced, the ride was noticeably smoother, quieter (relatively speaking; MTs, afterall), and no bumpsteer. Made me feel more confident regarding controlability at higher highway speeds. I was dumbfounded just how much bad wheel bearings made a difference in overall ride quality.

So the lesson here kids is check the health of your wheel bearings every now and then. 60k on this set, all of it on 34-35s, and lots of hard miles thru desert and snow.
 

smokeysevin

Re-redoing things the third time
What bearings did you go with? When I was prepping for the my manual hub swap I read nothing but bead reviews about the aftermarket ones. The OE bearings cost almost as much as the drive hubs but I figured if they are what keeps the wheel in place, its worth the cost for peace of mind.

Sean
 

Sal R.

Active member
What bearings did you go with? When I was prepping for the my manual hub swap I read nothing but bead reviews about the aftermarket ones. The OE bearings cost almost as much as the drive hubs but I figured if they are what keeps the wheel in place, its worth the cost for peace of mind.

Sean

I used OE bearings, PN 90369-54002.

Personally, I'm not one to cheap out on parts that serve critical functions. Especially true when I'm so hard on the car. The 35s ain't no joke either.
 

Sal R.

Active member
Welp, it wasn't a spark plug that was causing an intermittent misfire resulting P0308 code (having the scangauge is really handy, btw).

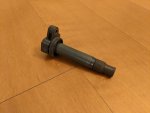
The culprit, no. 8 coilpack:
PXL_20210301_044952948-271.jpg

Visibly speaking, there are no cracks or whatever and all the terminals were clean.

Followed the advice of those who came before me. When one goes, the rest are sure to follow. $480 later, new denso coil packs and plugs.

If anyone has a good procedure to test coilpacks, I'm all ears. A quick search hasn't yielded good results.
 
Last edited:

smokeysevin

Re-redoing things the third time
Other than measuring the primary and secondary winding resistance there isn't much you can do. The problem is that you can have heat driven dielectric breakdown which is pretty much impossible to find using a meter since it is an intermittent fault.

Sean
 

Sal R.

Active member
Other than measuring the primary and secondary winding resistance there isn't much you can do. The problem is that you can have heat driven dielectric breakdown which is pretty much impossible to find using a meter since it is an intermittent fault.

Sean
Thanks for the explanation. More or less, what I found on the interwebz. I thought about keeping the "good" ones as trail spares, but on second thought, I'll probably purchase some new ones instead.
 

2.ooohhh

Active member
Other than measuring the primary and secondary winding resistance there isn't much you can do. The problem is that you can have heat driven dielectric breakdown which is pretty much impossible to find using a meter since it is an intermittent fault.

Sean
I’ve had good luck with a micro amp clamp and a lab scope looking for failing windings.
 

Sal R.

Active member
MODIFICATION: Center Diff Lock (Transfer Case)

GOAL:

Lock transfer case at will on 4Hi/4Lo under any gear.

PURPOSE:
Add some functionality to the 4WD system and bring it up to par with 03+ Sequoias. 1st gen Sequoias have open transfer cases and 01-02 can only be locked in 4Lo & L drive, which can extremely inconvenient off-road.

DURATION: 2 hours

MATERIALS:
TWTADE 14-Pin relay
Miscellaneous 18ga wiring

COST: $10

HOW-TO:
This mod builds on nem's old post in TundraSolutions (clicky) and it is fairly straightforward.

Instead of utilizing diodes and a DPST switch, I opted to use a SPST switch and relay combination. Considering that I had an unused switch (VSC Disable), it made perfect sense. VSC/ABS were disabled permanently when I upgraded to the Solo MS boxed spindles.
switchpanel08.JPG

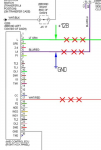
With some helpful lads over in the Toyota Sequoia Off-Road Facebook group, I was able to source a wiring diagram that included other safeguards that would help protect the 4WD control ECU.
Screenshot_20210311-125351.png

In addition to "re-working" the #2 LT GRN and #5 BLUE/RED wires, this method includes "cutting off" #17 WHT/RED wire as an additional safety feature to protect the 4WD ECU when the switch is in the "on" position while in "D," which sends a +12V signal to the ECU.

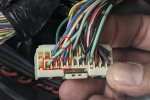
Below are the 3 corresponding wires from the diagram in the plug.
2021-03-11 12_37_57 PXL_20210311_203757486.jpg

To implement this mod, I did cut the above wires and extended both ends with 18ga wire to reach the TWTADE relay terminals. To best explain, each cut wire will have two designations:
  1. TO ECU PIGTAIL - Wire that feeds directly to the plug/4WD ECU
  2. HARNESS PIGTAIL - Wire that will be interupted by the switch
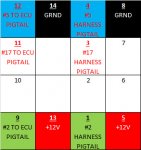
Here is how I assigned each corresponding wire into the relay terminal housing assembly.
Diagram:
RELAYPINOUT.jpg

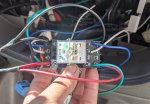
Actuality (before I cleaned up the routing):
2021-03-11 14_07_03 PXL_20210311_220703686.jpg

Basically what happens in this case is when the switch is in the "ON" position, relay terminal 4 will switch over to 8 (GRND), 3 will switch over to 7 (Disconnected), 1 will switch over to 5 (+12V).

The +12V is a direct feed from my "VSC Disable" switch output when it is in the "ON" position and used to energize the relay, thus switching contacts, as well as, provide the +12V signal to #2. Ground...is self explanatory. The relay is tucked away in the center dash after I bundled and cleaned up the wiring.

I'll eventually replace the switch with an appropriately labelled one, but for now, it works like a charm.

The transfer case will stay locked under any gear (R, D, 2, L) in either 4Hi or 4Lo.
 
Last edited:

Forum statistics

Threads
188,395
Messages
2,904,126
Members
230,274
Latest member
mbauerus1

Members online

Top