2005 Sprinter Van Low Top 118" w/b: Super-Custom Camper Conversion

G100

Adventurer
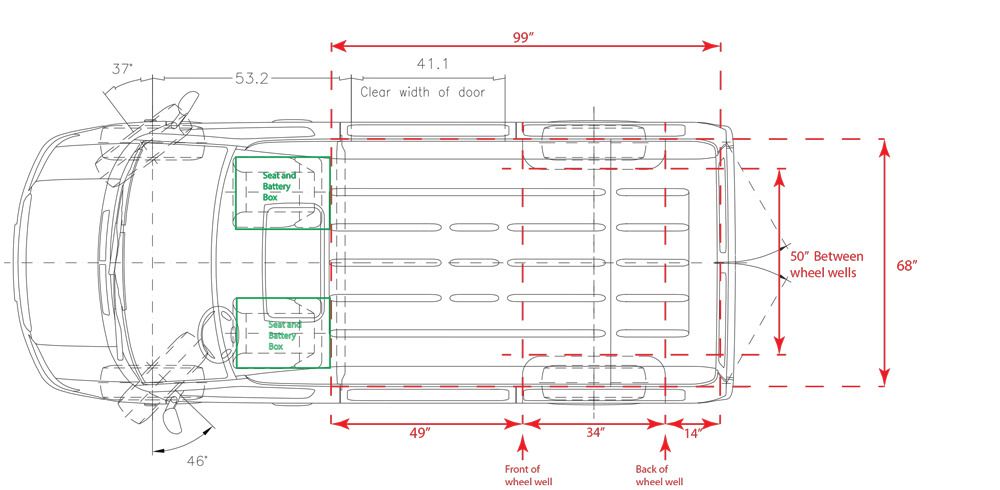
2005 2500 Low Top 118” wheel base Sprinter Van.

So here is what this project started out like, this is the smallest sprinter van you can get.
image7.jpg

Looking a bit like a really nice ice cream truck.

I thought I would start a build thread, mostly because I am running into some issues and have some questions that I am hoping some of you sprinter fanatics have some answers to. First off here is the quick back story on this.

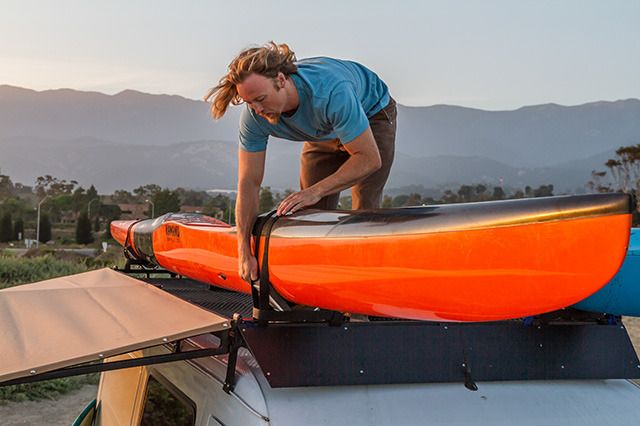
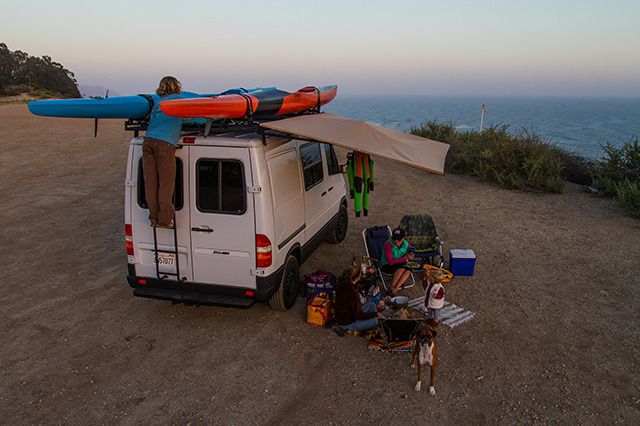
I am not the owner, the owner is a guy who became a friend of mine when he bought my first rig when I decided to sell it and start over from scratch and build a Version 2: Baja Explorer rig for myself. He loved the truck but decided to sell it and go the van route. He was really happy with rack setup on the truck and it worked great for him because her is an outrigger canoe racer so he needed a rack on the van to transport his canoes asap, so he hit me up to see if I was willing to build him a rack for the van. He wanted basically the same low profile type of rack that I built for my new truck but with some additions and modifications, you can see the build thread on my truck and rack here. He wanted to be able to carry two canoes and a couple SUP boards, at the same time. He also needed to come up with a way to get the canoes up there by himself without any help and very safely, because they cost $4000 . . . each and are very delicate. So there also needed to be a really safe way to them tie down. And of course he wanted the same awning system that I came up with for the other trucks. So here is what I came up with for the van rack.

VanBuild-01.jpg
VanBuild-08.jpg


VanBuild-03.jpg
VanBuild-04.jpg


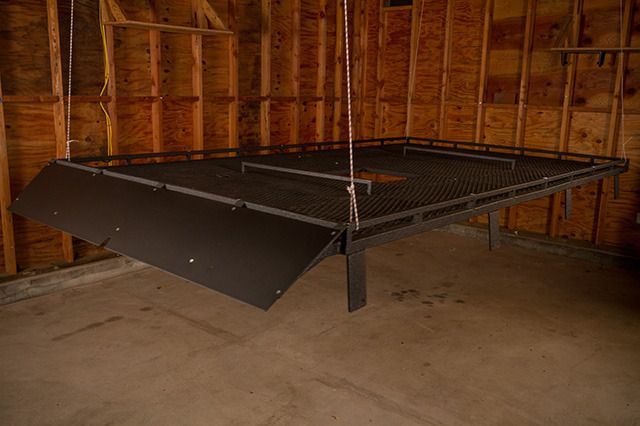
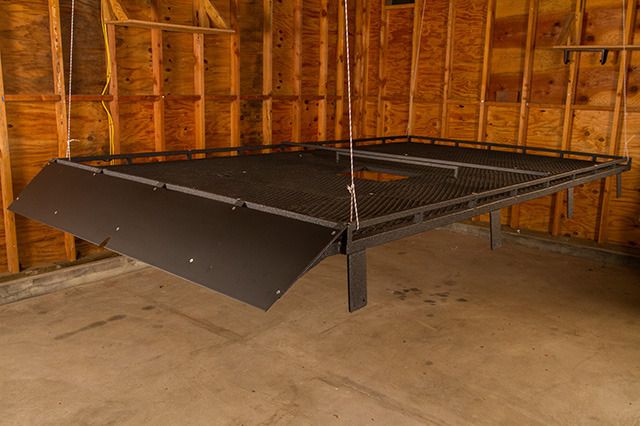
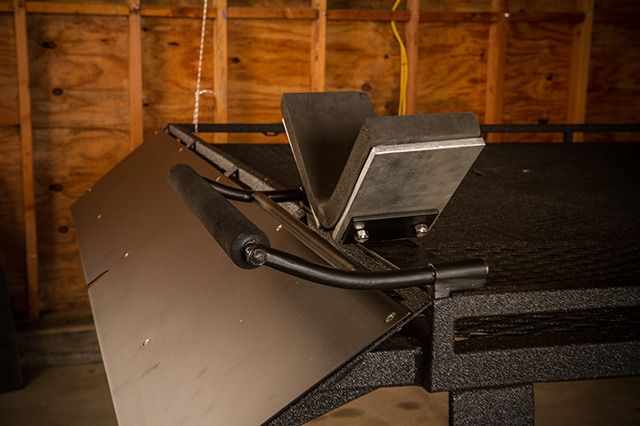
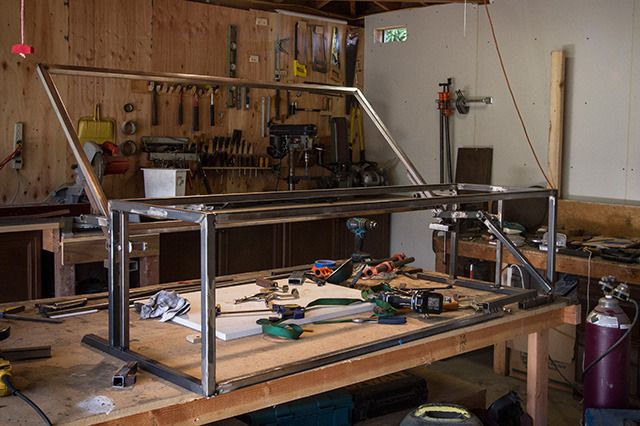
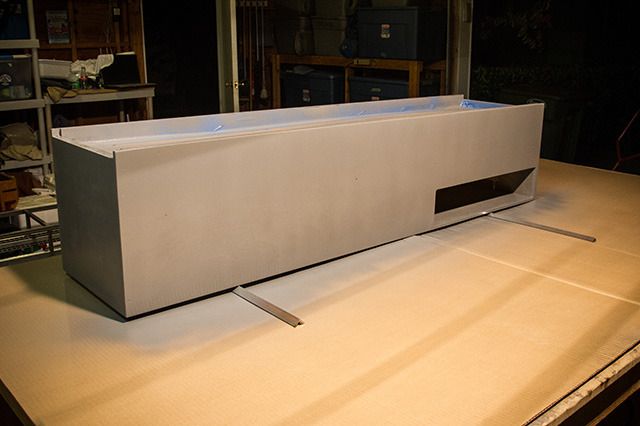
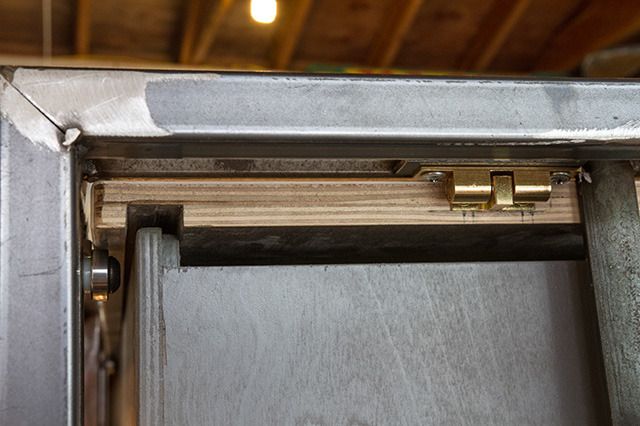
You can see it has a expanded metal floor so it is really easy and safe to get up there and move around to tie things down. All the load bars are interchange-able with front, middle and rear locations. The small center load bars sit at the same height as the side rails and can be put in place with the full width load bars to give support. The canoe cradles are also inter-changeable in all for corners of the rack and they just drop into place. They have a piece of 1” high density foam as padding. The roller bar is also removeable and inter-changeable with all four cradles so he can load and unload from both the front or the rear, it also can fit in slots at the rear center of the rack to assist in putting up SUP boards. The big square hole in the middle is obviously for the vent. The wind faring doesn’t go all the way to top rail so that you can feed webbing through the rail to be able to use to tie stuff down. The whole rack was line-Xed and I talked him in to getting the rocker panels done at the same time, which I think looks awesome and the rims got a quick coat of black paint. We also added and line-Xed the ladder and rear step which I did not fabricate. The wind faring, loadbars and cradels were powder coated.

VanBuild-05.jpg
VanBuild-07.jpg
VanBuild-06.jpg


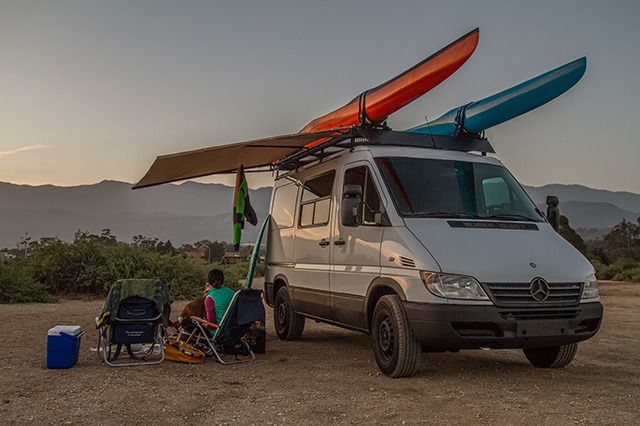
The awning setup on this van turned out awesome, the downward slope of the canopy is really nice to have especially in a heavy rain. We went camping together in central California and it poured on us really hard for a quite awhile, not a problem the water shed perfectly and we were happy campers.

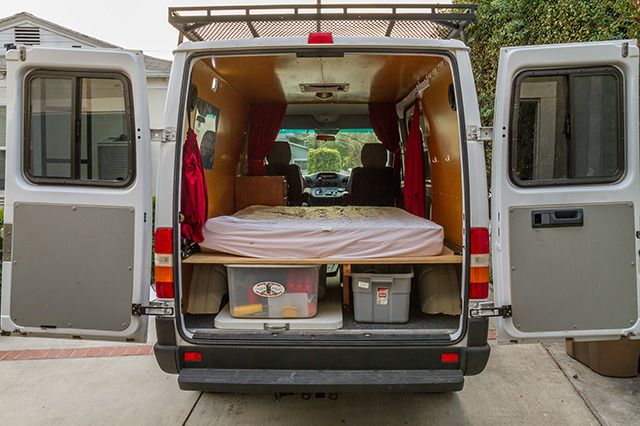
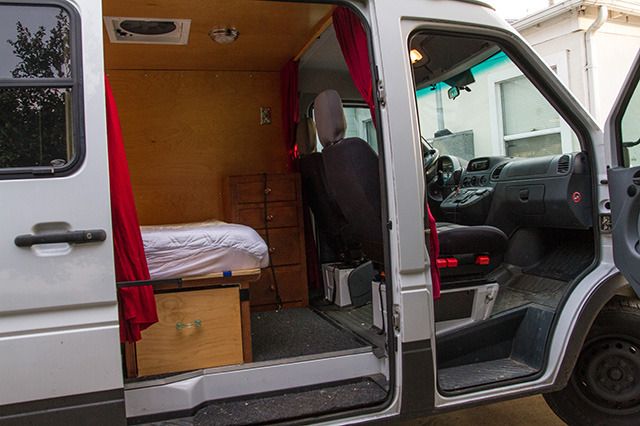
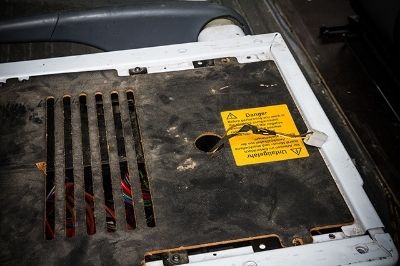
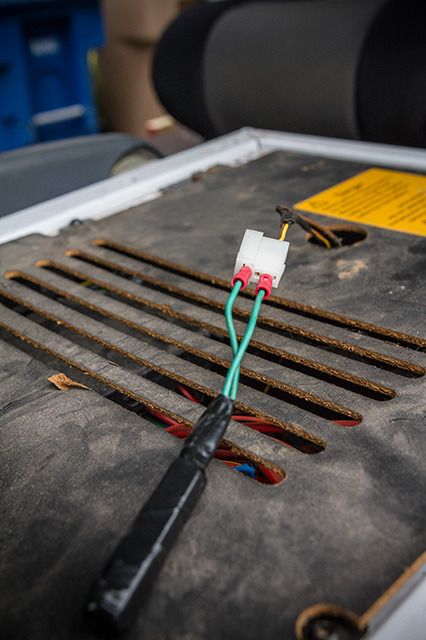
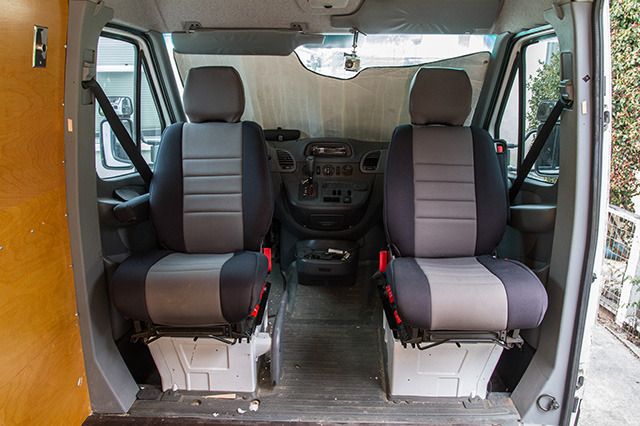
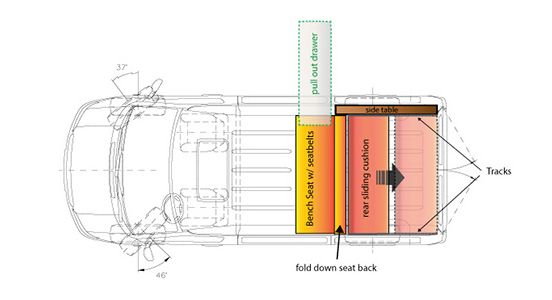
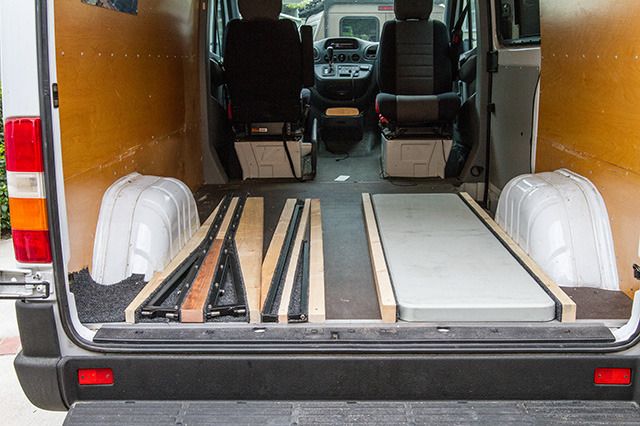
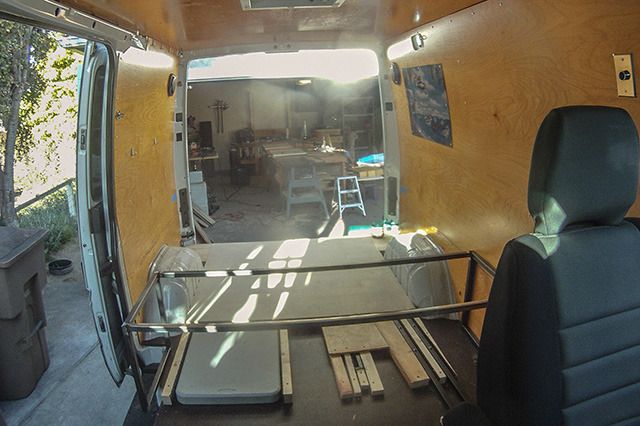
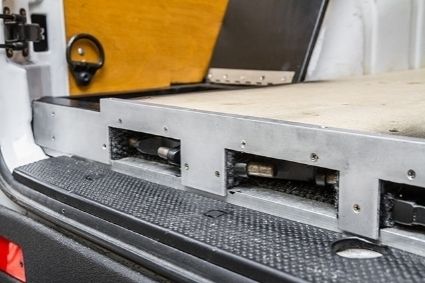
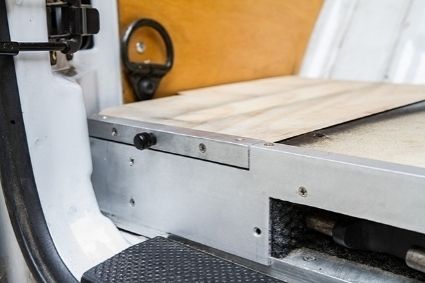
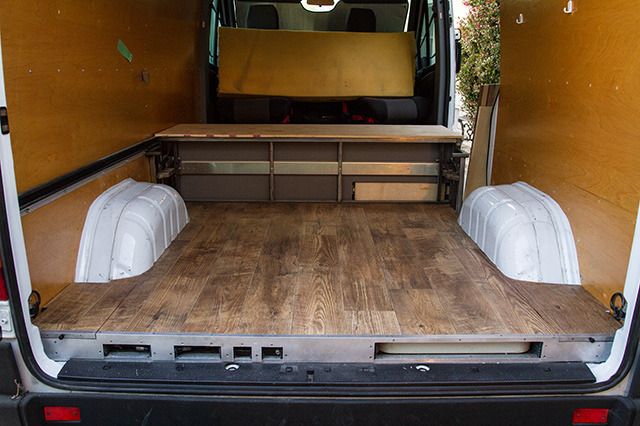
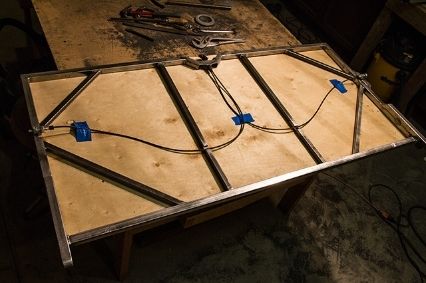
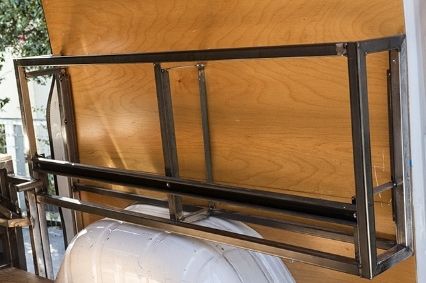
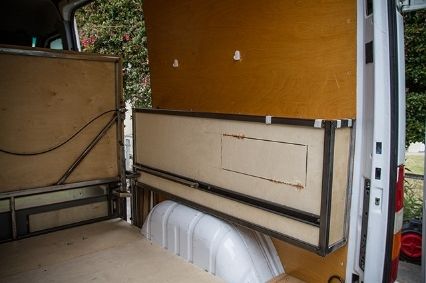
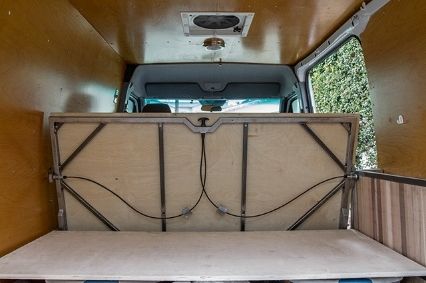
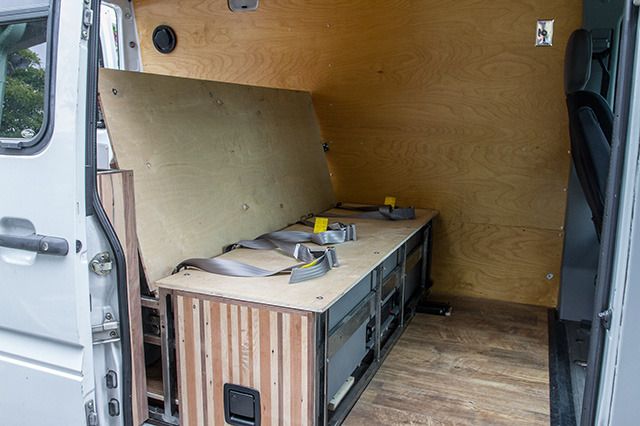
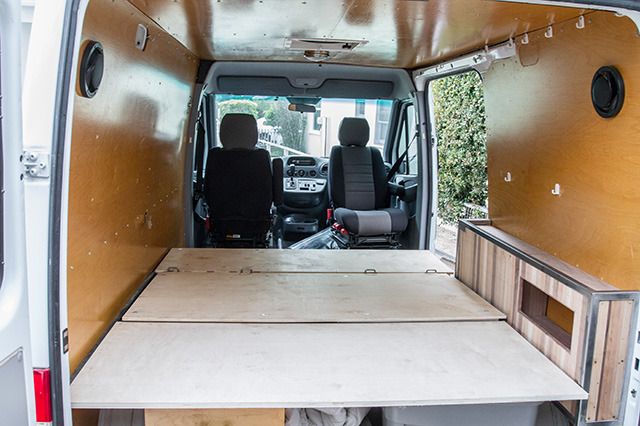
So that’s the rack, well a few months after I finished the rack, he tells me “I need to change the setup on the inside. I’m gonna need a rear seat . . . cause I am having a kid.” Whoa, big game changer!
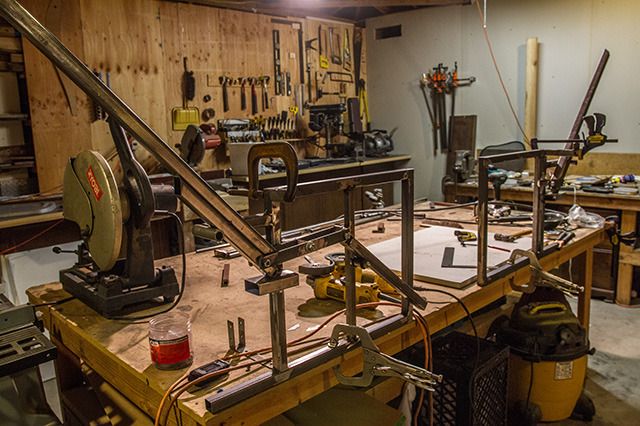
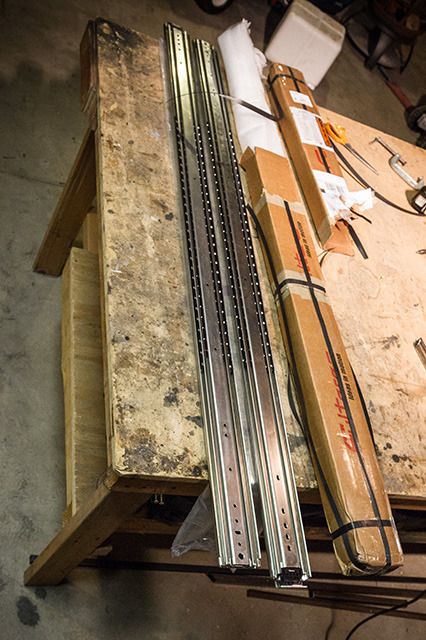
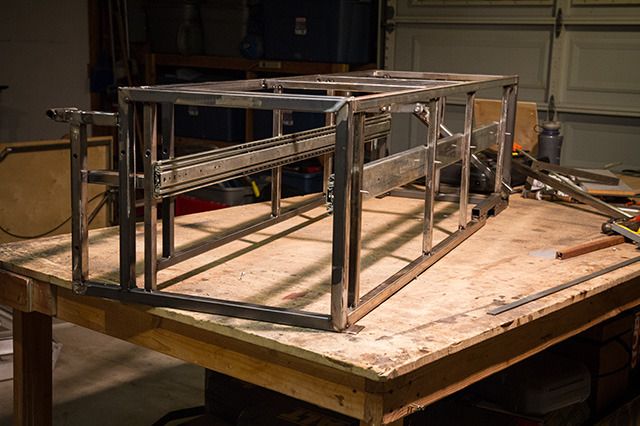
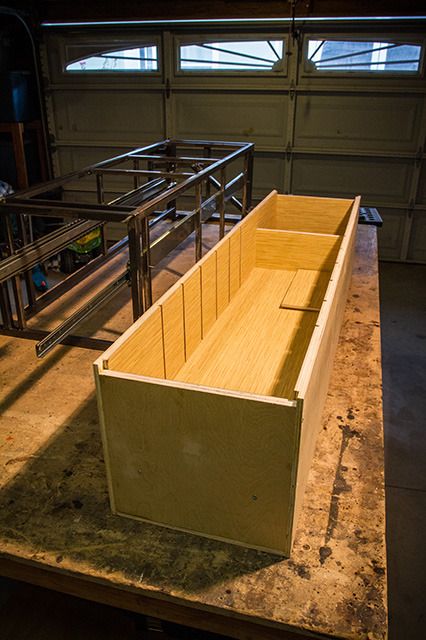
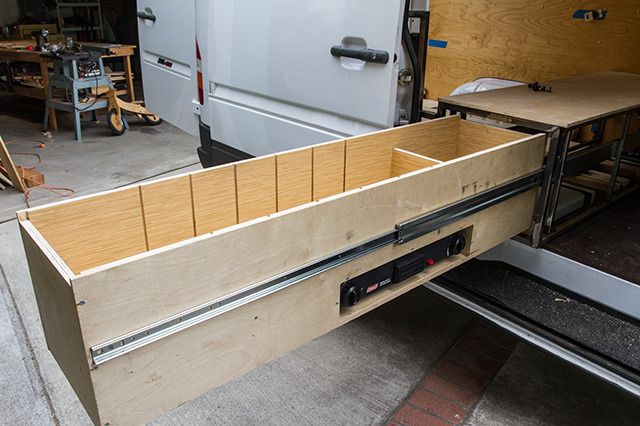
Well that’s what leads us into the build thread of the interior that I am currently working on. I look forward to would really appreciate hearing your guys’ expertise and opinions.
 

Haf-E

Expedition Leader
Very nice - I built a similar rack for my sprinter (158" WB high top) but made out of aluminum and also just helped a buddy build his as well which is steel and hot dipped galvanized. Mine is set up to carry two 17 foot sea kayaks and use a similar roller for self loading. The steel one is designed to carry surf boards and has holes in the sides to allow aluminum tubes to be inserted to support an awning and well as railing for using the roof rack as a viewing platform. I'll get some posts of it up when I get a chance.

Since that 118" van is a cargo the rear won't have the recesses for the factory seats installed - but many people have routed out the holes to install them into the floor - I think the attachment points are there but are just covered by the flooring. Pretty easy to find a factory rear seat either in a two person or three person (narrow so you can squeeze around it do get to the back) or three wide (goes all the way across). My friend now has two full sets of seats for his van and might be able to spare one or more - he's also driving down to oakland CA in a couple of weeks - let me know if you are interested.
 

G100

Adventurer
Interior start

So here is the interior before I started. It basically just had a big bed with some storage for plastic bins underneath. It worked for a while but really does not let him use any of the space his van provides. It was basically just a traveling queen size bed, which really limits what he can use his van for, and of course any time he travels the bed becomes the storage space for a bunch of bags and whatever else he can't fit underneath.
VanBuild-09.jpg
VanBuild-11.jpg


And so I just gutted it. I took everthing out except the paneling, which I am not that big of a fan of but it's not bad and it has some good DOW insulation behind it that the previous owner put in.

VanBuild-12.jpg
.

The Plan

So are the things he told me he wants to have:

- First and foremost is seating in the back that he can put a car seat on, and carry more passengers

- The biggest most comfortable bed possible

- A "trunk" or storage in the back. When I asked about having a living space in the front area, he said its not as important as the space in the back.

- Swivel seats

- Surf Racks

- Table

He really liked having the bed setup for sleeping all the time so that he can pull up and crash out with out having to make a bed, so he said he would like to have a setup that he can have the bed ready to sleep in just a matter of minutes. Thats about it.

So I looked all over the internet at just about every sofa-bed you can imagine. Found a couple promising ones, but for what he wants, a sofa bed is not going to give him, first of all a big comfy bed and second they all pull forward when layed flat into a bed. This is a problem because for you to be able to maximize having trunk space, you need that seat to be up closer to the front and if it pulls forward when it lays down then you are cutting off you room to walk in from the slider and climb into bed. I feel it would be awkard for the bed to not go all the way to the back doors and have some room up front to get out and put some clothes on. So what I need is a fold down bench seat where the back falls backward, which would mean the back would also need some type of support when layed down to bed position. The space I am working with is small less than 100", standard beds are 72" long, you might be able to get by sleeping side-ways in the van because it is 68" wide, but having walls at both the head and foot of the bed can be real uncomfortable and give you a cramped feeling. Here are some measurements I took and overlayed on CAD drawing I got off the internet.


SprinterDims.jpg


I thought that this was going to be a rather quick installation of a aftermarket sofa bed but realized that I was going to have to fabricate everything.

When you can't find what you want . . . make it.
 

G100

Adventurer
Swivel seat & problems

So I got two of these boxes on my door step. I ordered them from shop4seats.com.

Buildthread-17.jpg


Thought the install was going to be a piece of cake and only take a few minutes. Which it was for the passenger side. Then I pulled the driverside seat and low and behold the first hurdle the seat belt sensor switch.

4f899164-83e0-44ca-a2f6-8fa63069e3de.jpg


There is no hole in the center of these swivel seats, like the nicer more expensive ones, to feed the wire through so, should be easy enough just put a jumper in the connector and stuff it below. Then I thought I am sure that there are people who have mentioned this on the internet, before I make a jumper I will check the internet to see if that is what other people do and came across this thread on the forum, which if you don't want to read it, says use a 100ohm resistor as a jumper to trick it. Not sure why just jumping it with a solid piece of wire doesn't work, but I guess I'll give it try. So I ran down to radio shack real quick and bought this.

Buildthread-19.jpg


. . . and then used this stuff . . .

Buildthread-20.jpg


. . . to make this . . .

Buildthread-21.jpg


pluged it in and put the seat on.

Buildthread-22.jpg


At this point I was stoked, I figured I had dodged a bullet by looking at the internet first and found the trick for the seatbelt sensor. The swivel seats worked great and they open up a bunch of room when turned around. Well thats one check mark on the list . . . NOPE!

Buildthread-23.jpg


Well a day later, I jumped in, rotated the seats around and went to move the car out of the drive way for a bit and . . . the shifter won't shift out of park, its stuck, the only way to move the shifter into drive is to stick a pencil in the manual over-ride hole. Now I am not completely sure that this problem is from the installing the swivel seats it doesn't seem like a seat belt sensor would do this. So its possible it just seamed to happen the first time I tried to move the car after I had installed them, the car has been parked in my drive way for a little while now. The other issue which is related is the the seat-belt light is flashing, so I don't think the 100ohm resistor trick . . . did the trick. I haven't messed around much since, but what a pain in *****.

Does anyone have any information on these problems that might help me save some time solving these issues??

obviously I could pull out the swivel seat and plug the seat sensor connector back in and see if that solves anything. But I am hoping you guys might be able to help me out here and save me some time and energy. Should I just put a regular loop of wire in to jump it, does anyone know if this works? Do I need to unplug the battery to reset anything?
 

G100

Adventurer
Some progress

Okay so I am starting to get some progress done now that I have a plan on the interior build out, I think that this is going to be the best solution for the needs and wants of the owner that I listed before but here they are again.

- First and foremost is seating in the back that he can put a car seat on, and carry more passengers
- The biggest most comfortable bed possible
- A "trunk" or storage in the back. When I asked about having a living space in the front area, he said its not as important as the space in the back.
- Table
- A setup that he can have the bed ready to sleep in just a matter of minutes.
- Swivel seats
- Surf Racks

Here is a diagram of the layout.

SprinterIdea.jpg


So like I was discussing before I need a sofa bed where the back folds down without the whole seat pulling forward. I can’t find this so I am going to have to build this, and in order to make the bed bigger there will be third section that can slide back and forth. When the seat is up it will be push toward the front of the car to free up space in the back, when you want to put the seat down you will slide this section toward the back of the car and the seat back will fold down to meet up with it creating a bed that is probably around 75” long and probably around 60”+ wide, which is pretty much a queen size bed. It would be weird for the seat to extend over the gutter all the way to the slider door so the whole bed setup will end up being 6” short of the passenger side wall so I am planning on putting a thin “side table” to fill that gap and I think it will be real nice to have in the long run to put stuff on.
Under the bench seat will be a full length 60” pull out drawer, the drawer glides are pretty pricey at this length but I think it will be an awesome storage compartment.

To start out though I have to build a raised floor in the back section to store the awning arms, accessory load bars, and folding table. This will be very similar to the raised floor I put in the T100 build. The folding table is the tallest so it will have to be a 2” raised floor.

VanBuild-14.jpg


Here is the layout of the where everything is going to go. I can't come up with any thing for the center 6" space so I guess it is just going to be closed up probably going to be stronger that way anyways. I put some of the carpeting, that I ripped out of the van earlier, below and on the sides of the awning arms and load bars so they don't get all scratched up and it is real nice and smooth when you slide them in and out.

VanBuild-13.jpg

I used contact cement to put down the carpeting, I believe it is some type of marine carpeting from the feel of it, at least I hope it is.

On top of this will be 1/2" ply and then I will put a linoleum floor over that.
 

PHeller

Adventurer
I love the sincerity of your build and your website. If I lived closer to ya I'd probably enlist your help with my truck.
 

Nsxdubs

New member
What seat covers are those on your seats and where did you get them? They look like they fit well and look nice.
 

G100

Adventurer
Seat base

Got started on the bench seat. This thing is going to be a little tricky. I need the seat to be no more than 20” wide or else it won’t be comfortable to sit on, and I need it to sit just in front of the slider door when open so that the drawer and pull out, which then sets my bed length at around 75". I don’t want the seat back to be over 24” above the seat base or else it will block the view through the back windows in the rear-view mirror. I want to back slider section to be 1/3 of the total bed length so the tri-fold mattress that will eventually be on there will fit perfectly. So this means that the seat back needs to be about 30” with 6 or more inches below the seat level when in the seat-up position. This took a bit of trial and error for where my pivot points need to be but I think that I have got a mechanism that will make this work.


Build02.jpg

Seat position will be right in front of the slider. Bench width is going run right up to the gutter.


Van159.jpg

This is the right and left sides. The right side which is going to be against the wall is going to have a lever to help with going to the different positions.

Van136.jpg


Van138.jpg

I am going to use these 58” full extension 500 lb. drawer glides.

Van139.jpg

The seat base is all mocked up with the glides now I need to build the drawer.
 

G100

Adventurer
Progress

Sorry for the long delay in posts but I have been super busy working on the van. I’ll start where I left off.

The Drawer:

Van143.jpg


I built the drawer, the outside walls are ¾ all the rest is ½ ply. The inside is all laminated with some bamboo looking laminate. It is kinda divided into three sections. The first two sections have a raised floor so that I can put the stove under one section and have a utensil drawer under the front section. The back section is full depth around 13”. There are multiple slots for the two removable dividers to slide into for organizing stuff. I painted the whole outside with a grey that kinda matches the existing interior.

Van146.jpg
Van149.jpg


I ordered a motorhome baggage compartment handle with sliding bolt to latch the drawer shut. I found some cool scraps of wood that I used to make skateboards out of that I think will look really cool for a drawer front.

Van147.jpg
Van148.jpg


So I got the whole thing installed and working really nice. I welded a small section of ¾ angle on the the bottom rail for the slide bolt to latch against. It really is solid feeling and sounding, very gratifying to shut, like shutting a meat locker.

Van152.jpg


The work table that slides over the top of the drawer is ¾ ply with dados cut out to run along the top of the sides of the drawer box. I had to add some skateboard like bearings to hold the table up, for when the drawer is pulled out and the table is still inside. The table is held inside when you open the drawer by a ball bearing latch. Its nice you almost wouldn't even know it was there until you pull it out.

Van160.jpg
Van161.jpg


I laminated the work table in a cool product I had some left-overs of, called Fenix NTM, you can google it, it is a new type of laminate that has a bunch of special properties, most of which I don't care about but the one that I like is it has scratch healing properties, supposedly you can heal cuts in the laminate by running a iron over it. It does have a really nice appearance and feel to it, a very smooth matte finish. I painted the bottom grey to seal it and then waxed the channels with furniture wax so it glides real nice when you pull it out.

Van162.jpg
Van163.jpg


Next up the fold down bed system.
 

G100

Adventurer
The Bed System

Okay so before I dove into the fold-down sofa bed I decided to put down some linoleum floor in both the front and back. Before I did the back though I attached an aluminum edge to protect the edge of the false floor because that edge is going to get beat up. I made it out of 3"X3"X1/8" aluminum angle. I cut the top edge down to 3/4". Then I trimmed out all the holes for the stuff that slides underneath the false floor. You can also see I added some storage boxes on both sides for whatever but seem like a perfect place for straps. They have a brass latch and very small knob help open it.
8bee7f74-f2be-418e-830b-b5d27194119b.jpg
2b376fcb-d296-4247-9b7f-14143279c841.jpg
69a15afe-2159-43a0-96f9-9dfce7d4f755.jpg


I attached the edging before the linoleum so I could butt up the linoleum up to the aluminum edge so that they are about the same height. I didn't want put the aluminum over the linoleum because that would create a 1/8" lip for things to catch on. I got a reclaimed wood print and I laminated it down with some contact adhesive.

VanBuild185.jpg


I am happy with the way it turned out, the storage boxes on the side are barely noticeable.

Now on to the sofa bed:

The back is 30" high and 61" wide, 7" of that height is below the seat when in the seat position so that you can still use the rear-view mirror to see out of the back windows. It latches up in the seat back position with this dual plunger type latch. The cables will eventually be hidden by a thin peace of black melamine on the back. The plungers will latch in to a bracket on the driver side wall and the other on the "side table."

Van165.jpg


The "side table" is a pretty important piece of the puzzle. It basically brings the passenger side wall in about 7" because of the door gutter. It will help hold the seat back in the upright position, will house one side of the track for the rear siding 1/3 of the bed. It will also have switch panels on both ends for lighting and power ports and I think it will be really convenient to have a shelf to put stuff on next to the bed like water, your phone, headlamps, ect. I have some more of that wood that I used for the drawer front so I will be wrapping it in that.

Van164.jpg
Van151.jpg


The track system is very similar to a garage door setup with just some simple rollers that run in a channel. They are rated at 500lbs. I am just using a piece of 1X1 angle as my moving bracket that holds the rollers. There then be a piece of 3/4 ply screwed to the moving angle brackets. The ply will be strengthened by a piece of angle in the front and a samll headboard in the back, I believe this will be sufficient to keep the ply from bending. The driver side track is held to wall with few machine screws but mainly supported by piece of angle underneath.

VanBuild181.jpg
VanBuild172.jpg


The system works great, the plunger latches feel real solid when you click them in place. The track system is not as smooth feeling as I had hoped but is very solid. You can see I added three seat-belts, child-seat anchor points and a cubbie hole in the side table. The seat belts just slide between the seat back and the seat if you don't want them and for when your put the bed down.


VanBuild171.jpg
VanBuild173.jpg


Off to Upholstery!
 

Forum statistics

Threads
186,743
Messages
2,887,710
Members
227,160
Latest member
roamingraven
Top