2022 Ford F550 - DIY - Adventure Expedition Vehicle Build Thread

Vance Vanz

Well-known member
Sounds very familiar :) Again....AWESOME work Sir!

Cheers,

Craig
Thanks Craig!

The portal just sent me an email related to your recent update on your thread. I'll be heading over to check out the new progress ?.

It better be good ;); I need some eye candy. Staring at an unfinished shell and CF cloth all day is making me cross eyed ?.
 

Vance Vanz

Well-known member
Two of my FW tanks are 110g roto molded. There must be 20gal of plastic because the tanks only hold 90gal.

Two other 110g tanks are fabricated with 3/8" HDPE. The shop wanted to use 1/4" LDPE (easier to weld) but I didn't want it because I've seen what (strech/sag) happens to it over time. We settled on 3/8" HDPE for the bottom and sides (welded both sides) with a 1/4" (weded one side) reinforced (1/4"x 1 1/2" strips) HDPE top.

Clearance on the plumbing/electrical/framing was really close (ideas/designs change) so I made the mandrels and spun the fitting in myself after everything was test fit.

For frost protection there is 2" XPS on 6 sides and the bottom XPS is sloped 1/4 / ft to the drains and pick-ups. For sanitizing It's best if the FW tanks drain 100%.
Thanks for all of the info and specifics on what you did with your FW tanks Alloy. That was going to be one of my first questions when calling vendors, what wall thickness they recommend and internal baffle design/orientation.

Yes, great point, the thickness of the material used on the tank can greatly reduce the capacity. I factored this into all of my original calculations and dimensions to ensure that I would be at an actual capacity of 90-100 gallons. This is also why I have waited to finalize the exact size of the tank, until the walls were up/bonded on the camper and the internal tabbing was completed. I'm going to make everything as snug as possible to maximize the tank size.
 

Vance Vanz

Well-known member
Fantastic build Vance, apparently, you're a pro!

Surprised someone hasn't ask you if you have weighed everything, you're putting in. But, obviously this is a light build.

First class, more pics please.
Thanks so much!

Not exactly a Pro, but definitely uncompromising on what I'm envisioning the end product to be and the quality of it all. Although, it should be comparable to something that would come out of a professional shop. It better be damn it, for as much as I am working my A@S off ;)?!

I will definitely be posting weights throughout the process of the build, so everyone will have a good idea of what each major component and/or system weighs. I won't be super light, but definitely lighter than an EarthRoamer and/or other similar sized rigs-I'm guessing.

More pics to come soon. Hopefully the back wall will be laid up by Friday and if I'm lucky, bonded to the camper over the weekend, and the roof panels dry fitted on Monday. Fingers crossed, I will have an actual completed (exterior) camper shell by the end of next week o_O:love:, excluding all of the tabbing that still needs to happen on everything ?.
 
Last edited:

Vance Vanz

Well-known member
Simply unbelievable. Do you have composite experience? Sure looks like it.
Thanks trackhead.

It is more unbelievable that I have not screwed something up yet and had to scrap it :ROFLMAO:?.

I only had some composite experience with fiberglass, not carbon fiber. Someone may shoot me for saying this, but the process for both (fiberglass and carbon fiber) is similar and easily transferable. I did my homework and asked a lot of questions before doing the larger vacuum bagging and resin infusion layups. I also used all professional/high quality materials and consumables. Being OCD, meticulous and uncompromising (as previously stated), also helps. Although..........., sometimes these qualities are not the healthiest. Hence the looooooooooooong hours, working seven days a week and basically no life until this build is complete ☹.

Ahh, in addition, many of the forums, chat rooms, blogs, YouTube videos, etc. that showed peoples struggles and failures with composite work (vacuum bagging and in particular resin infusion), simply had to do with them not using quality materials/consumables and basic industry layout/layup standards. These people were always trying to cut costs and use materials/consumables not designed for composite work, or reinvent the wheel as far as layup processes. I also went straight to the manufactures websites, YouTube channels, technical support lines and engineering departments for information and to get my specific questions answered. Sometimes a bold move, but when we are talking about raw materials/consumables in the tens of thousands of dollar range, I'm not taking any chances.

My first test panel with CF/resin infusion, ever, was a 4'x8' sheet. A BOLD move that could have cost me a LOT of $$, but I trusted what all of the professionals and manufactures recommended.

I'm rambling now, so I'll call it a night
 

StenchRV

Well-known member
Thanks so much!

Not exactly a Pro, but definitely uncompromising on what I'm envisioning the end product to be and the quality of it all. Although, it should be comparable to something that would come out of a professional shop. It better be damn it, for as much as I am working my A@S off ;)?!

I will definitely be posting weights throughout the process of the build, so everyone will have a good idea of what each major component and/or system weighs. I won't be super light, but definitely lighter than an EarthRoamer and/or other similar sized rigs-I'm guessing.

More pics to come soon. Hopefully the back wall will be laid up by Friday, if I'm lucky bonded to the camper over the weekend and the roof panels dry fitted on Monday. Fingers crossed, I will have an actual completed (exterior) camper shell by the end of next week o_O:love:, excluding all of the tabbing that still needs to happen on everything ?.

DETAILS....DETAILS....you know the drill.

Can not wait for the shell to be completed. You definitely have worked your @@@ off.
I think you will put most so called "professional" shops to shame, because it is yours you care more.
I called that the G.A.S. ideal, for DIY. DO NOT get me wrong there are some GREAT shops out there.

I have a close friend that built a fiberglass airplane. WOW..what a process. You have taken it to the NEXT LEVEL with all the infusion work.

TANKS....that seems to always opens a can of worms. The tank we had planned on with 3/8" walls and baffles went out of production a bit before we needed it. We tried to have stainless steel ones made but SS was CRAZY expensive at the time. Different $$ now. We got a few quotes for custom HDPE welded ones, almost as much as the SS. I agree totally, 3/8" walls are the MINIMUM, would love 1/2". There were VERY LONG wait times then. Maybe today is better. RONCO had such a HUGE selection we found tanks that would work for our build, just be careful as they do make the "same" tank in various thicknesses if you choose to go that way. I was THIS CLOSE to learning how to HDPE weld :)

Ordering a blank tank fitting wise helped us a TON. Spin welding is easy to learn, only one easily fixed one. Not long enough spin time :). The fixtures that are a bit pricey. I also made my own, 2 that do 2 size fittings each.

Keep the eye candy coming!

CHEERS!!

Craig
 

Alloy

Well-known member
DETAILS....DETAILS....you know the drill.

Can not wait for the shell to be completed. You definitely have worked your @@@ off.
I think you will put most so called "professional" shops to shame, because it is yours you care more.
I called that the G.A.S. ideal, for DIY. DO NOT get me wrong there are some GREAT shops out there.

I have a close friend that built a fiberglass airplane. WOW..what a process. You have taken it to the NEXT LEVEL with all the infusion work.

TANKS....that seems to always opens a can of worms. The tank we had planned on with 3/8" walls and baffles went out of production a bit before we needed it. We tried to have stainless steel ones made but SS was CRAZY expensive at the time. Different $$ now. We got a few quotes for custom HDPE welded ones, almost as much as the SS. I agree totally, 3/8" walls are the MINIMUM, would love 1/2". There were VERY LONG wait times then. Maybe today is better. RONCO had such a HUGE selection we found tanks that would work for our build, just be careful as they do make the "same" tank in various thicknesses if you choose to go that way. I was THIS CLOSE to learning how to HDPE weld :)

Ordering a blank tank fitting wise helped us a TON. Spin welding is easy to learn, only one easily fixed one. Not long enough spin time :). The fixtures that are a bit pricey. I also made my own, 2 that do 2 size fittings each.

Keep the eye candy coming!

CHEERS!!

Craig
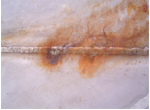
I can make stainless tanks but I don't. If the stainless isn't passivated (requires a plastic tank to put the stainless tank in) this happens1672928899095.png. In addition on a large tanks the material needs to 1/8" or 3/16" so weight become and issue.

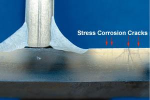
Finally there's stress and corrosion cracking1672929490765.png
 

Alloy

Well-known member
Thanks for all of the info and specifics on what you did with your FW tanks Alloy. That was going to be one of my first questions when calling vendors, what wall thickness they recommend and internal baffle design/orientation.

Yes, great point, the thickness of the material used on the tank can greatly reduce the capacity. I factored this into all of my original calculations and dimensions to ensure that I would be at an actual capacity of 90-100 gallons. This is also why I have waited to finalize the exact size of the tank, until the walls were up/bonded on the camper and the internal tabbing was completed. I'm going to make everything as snug as possible to maximize the tank size.

Wall thickness vs. weight is more of a factor with roto molded tanks and the material at the corners is thicker (3/4"-1" on my tanks) as the rest of the wall. It affects pick-up/drain fittings close to the bottom/sides.

Another consideration is level senders. I ended up using moda (strips of copper) sensors inside (due to the 3/8" wall thickness) PVC pipe from Tech-Edge Mfg.

Utrasonic are great for FW but not so much for grey/black because "stuff" can splash/block/stick to the transmitter. It doesn't happen often so ultrasonic are worth having if the senders are easy to install/remove. I couldn't do that which is a reason I chose moda senders.


Best to look over the install sheet.


RVngGEO

New member
Tabbing - Front Walls of Camper

After bonding and filleting, all of the surfaces were sanded and cleaned for tabbing. I did all of the tabbing for the interior joints (excluding the back wall and roof) in one layup. I wanted everything to be one chemical bond. I would have liked to do all of the interior tabbing in one shot, but the door for the MTB/gear locker did not arrive when it was supposed to, so the back wall still has not been laid up. I had to adapt and keep the project moving forward. Apparently, Santa did not grant me my one wish/present for X-Mas. I guess this was my year for a lump of coal!

I routed/rounded off the top edge of the bed platform (so the CF could lay nicely over the corner-no bridging in the cloth and/or air gaps) and also did a tiny bit of structural fairing where the bed platform met the pass-through wall-before any tabbing went down (First picture). This was the only spot I needed to do any sort of fairing in the interior (1/32").

The tabbing schedule for the interior finished walls is: 4-1/2" width for the first layer (9.5oz plain) 6-1/2" W for the second layer (8.85oz biax) and 8.5" W for the third layer (5.7oz 2x2 twill). As always, I cut and dry fit everything prior to the layup: cloth, peel ply and plastic (to wet out some of the layers on and make it easier/cleaner to install them).

View attachment 758867View attachment 758868View attachment 758869View attachment 758870View attachment 758871View attachment 758872

I was supposed to have someone helping me for the layup, but that fell through last minute, so it was another LONG solo day. 16 hours straight to get it all laid up and peel plied in one shot. Since the walls were only bonded and filleted, I was not able to put any weight on the bed platform/get up on it. All of the tabbing for the front section of the cab over had to be laid through the windows while bent over and standing on a ladder. :LOL: Good times and a lot of deep breathing about 14 hours in.

Some pictures of the cured tabbing:
View attachment 758875

Bed platform rounded edge
View attachment 758873

Angled corner of pass through wall and side wall.
(This is the best shot to see how the layers of cloth gradually step down, which should make finished fairing easier and only require a thin layer of material)
View attachment 758874


This is amazing work! Did you vac bag all the edge support strips ("tabbing") in? Also, are you using epoxy "glue" adhesive connecting the panels or are you using the same infusion resin that you use to make the panels?
 
Last edited:

StenchRV

Well-known member
I can make stainless tanks but I don't. If the stainless isn't passivated (requires a plastic tank to put the stainless tank in) this happensView attachment 759354. In addition on a large tanks the material needs to 1/8" or 3/16" so weight become and issue.

Finally there's stress and corrosion crackingView attachment 759355


Stainless steel welding is something I would NEVER DIY. You MUST know your stuff!

I have a friend who is a professional welder, 30 plus years experience and has a shop. Teaches and certifies welders to the AWS standard in MANY different alloys for commercial, aerospace and airline industry. Delta Airlines number one welder, instructor, and inspector, just retired, who offered to weld the SS tanks. If I had to chose a guy to weld my tanks....he would be that guy.

Problem still was a 4x8 sheet of the correct SS was $1500! at the time. We would have needed at least 2 sheets plus paying him something FAIR for his time.

He mentioned using certain grades of SS for the intended purpose and environment was key to successes in the long term. He has seen my build in person and is well aware of the environment :)

HDPE was SO EASY and money well spent. I have had MANY HDPE tanks over the years and never had a tank failure. Fitting failures, yes, tank failure...no. I still might learn to HDPE weld some day. Spin welding was easy to learn and do. I would have loved a practice piece or two. Should have purchased one! HINT HINT! .....If Vance goes that route.

CHEERS!!

Craig
 

oskaratk

New member
with tanks and level sensors, I am rolling an idea around.

HDPE will flex at least a bit when fluid goes in. So if it is a flat tank and you allow say 1/8" space over a good part of the bottom - then a pressure sensor might be able to pick up. Like an electronic scale.
 

Alloy

Well-known member
Stainless steel welding is something I would NEVER DIY. You MUST know your stuff!

I have a friend who is a professional welder, 30 plus years experience and has a shop. Teaches and certifies welders to the AWS standard in MANY different alloys for commercial, aerospace and airline industry. Delta Airlines number one welder, instructor, and inspector, just retired, who offered to weld the SS tanks. If I had to chose a guy to weld my tanks....he would be that guy.

Problem still was a 4x8 sheet of the correct SS was $1500! at the time. We would have needed at least 2 sheets plus paying him something FAIR for his time.

He mentioned using certain grades of SS for the intended purpose and environment was key to successes in the long term. He has seen my build in person and is well aware of the environment :)

HDPE was SO EASY and money well spent. I have had MANY HDPE tanks over the years and never had a tank failure. Fitting failures, yes, tank failure...no. I still might learn to HDPE weld some day. Spin welding was easy to learn and do. I would have loved a practice piece or two. Should have purchased one! HINT HINT! .....If Vance goes that route.

CHEERS!!

Craig

WOW $1500! i paid $950USD for 0.120x48x96 in Oct. . We can also get 4x12 and sometime 5x8 or 5x10.
 

StenchRV

Well-known member
WOW $1500! i paid $950USD for 0.120x48x96 in Oct. . We can also get 4x12 and sometime 5x8 or 5x10.

$950....I WISH!

Was more than that in June of 2022, even with my friends shops discount we could not break the $1250 barrier in the Atlanta area for the 48X96 inch panel, .120 thick also....if my memory serves me well.

The HDPE route worked out well, so no complaints.

CHEERS!!
 

Vance Vanz

Well-known member
DETAILS....DETAILS....you know the drill.

Can not wait for the shell to be completed. You definitely have worked your @@@ off.
I think you will put most so called "professional" shops to shame, because it is yours you care more.
I called that the G.A.S. ideal, for DIY. DO NOT get me wrong there are some GREAT shops out there.

I have a close friend that built a fiberglass airplane. WOW..what a process. You have taken it to the NEXT LEVEL with all the infusion work.

TANKS....that seems to always opens a can of worms. The tank we had planned on with 3/8" walls and baffles went out of production a bit before we needed it. We tried to have stainless steel ones made but SS was CRAZY expensive at the time. Different $$ now. We got a few quotes for custom HDPE welded ones, almost as much as the SS. I agree totally, 3/8" walls are the MINIMUM, would love 1/2". There were VERY LONG wait times then. Maybe today is better. RONCO had such a HUGE selection we found tanks that would work for our build, just be careful as they do make the "same" tank in various thicknesses if you choose to go that way. I was THIS CLOSE to learning how to HDPE weld :)

Ordering a blank tank fitting wise helped us a TON. Spin welding is easy to learn, only one easily fixed one. Not long enough spin time :). The fixtures that are a bit pricey. I also made my own, 2 that do 2 size fittings each.

Keep the eye candy coming!

CHEERS!!

Craig
Thanks Craig and thanks for your input related to tanks. Much appreciated!
 

Vance Vanz

Well-known member
Wall thickness vs. weight is more of a factor with roto molded tanks and the material at the corners is thicker (3/4"-1" on my tanks) as the rest of the wall. It affects pick-up/drain fittings close to the bottom/sides.

Another consideration is level senders. I ended up using moda (strips of copper) sensors inside (due to the 3/8" wall thickness) PVC pipe from Tech-Edge Mfg.

Utrasonic are great for FW but not so much for grey/black because "stuff" can splash/block/stick to the transmitter. It doesn't happen often so ultrasonic are worth having if the senders are easy to install/remove. I couldn't do that which is a reason I chose moda senders.


Best to look over the install sheet.


Thanks for the additional info on level sensors Alloy. I will take a deep dive into all of this in a few weeks (If I'm lucky ?) and may shoot out some additional questions/suggestions from you/others.
 

Vance Vanz

Well-known member
This is amazing work! Did you vac bag all the edge support strips ("tabbing") in? Also, are you using epoxy "glue" adhesive connecting the panels or are you using the same infusion resin that you use to make the panels?
Thanks!

All tabbing for the exterior walls is wet layup, no vacuum bagging. The only tabbing that I vacuum bagged was for the boxes that were mounted to the floor-top side only. Pretty much all of my tabbing will be wet layup. I use a combo of a plastic spreader and fiberglass roller to get the tabbing to to lay tight/smooth and ensure all of the air bubbles are pressed/rolled out.

Infusion resin is only used for the infusion process. For bonding the walls together: I'm using laminating epoxy, specifically ProSet LAM-135 resin and LAM-229 hardener, and mixing in West Systems 406 colloidal silica. This is also what I use for all of my fillets and structural fairing.

FYI: ProSet does make an Assembly Adhesive line of products as well that can be used for bonding different structures/materials https://www.prosetepoxy.com/standard-products/assembly-adhesives/
 

Forum statistics

Threads
188,046
Messages
2,901,583
Members
229,411
Latest member
IvaBru
Top