1 Bored Clerk
Explorer
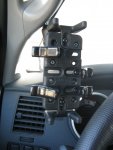
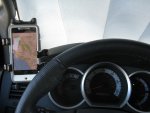
Simple problem that needs a simple solution: Mount Garmin 60CSX in my Tacoma without drilling anything or messing up anything expensive.  I know this has been done at least a few times on a 2nd Gen Tacoma but this is EXACTLY how I did it. I figured I'd post up what I did along with a list of what I used...just to make it easy for anyone else who wants to do the same.
Stuff you need:
RAM-B-367U (ball mounted to A-pillar)
RAM-B-103-A-238U (short arm with flange to attach to GPS cradle - two other length arms are available if you have a different requirement)
RAM-HOL-GA12U (Garmin GPS 60CSX specific cradle - get the one that works with your specific GPS)
6mm x 1.00 (thread pitch) x 60mm (length) Socket Head Cap Screw
4) 6mm small washers
4) 6mm larger washers
Small straight blade screwdriver
5mm Allen Wrench
10mm socket
Short socket extension
Ratchet
Approximately 4 minutes
Let's get it done:
Remove cover on lower grab handle bolt on Drivers side A-Pillar. Grab your small straight slot screw driver and carefully inset it into the upper corner as shown. Don't pry against the grab handle...you may mar it. Just pull the screwdriver and plug away from the grab handle (not prying). It will pop right out. This corner is the best place to insert the screwdriver because of the bracing on the back of the plug.

This is what you see under that plug.
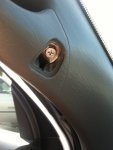
Get your socket setup ready and remove the factory bolt.

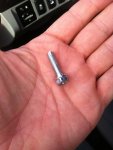
Get the Ram ball (go ahead, laugh...it's okay to be immature) and hardware. Thread it all together as shown in this photo. Don't forget to put one of the small washers under the head of the 6mm SHCS (socket head cap screw). The Ram ball is designed for an 8mm bolt so the small washer for the 6mm fits perfectly and makes sure that the head of the 6mm SHCS is as fully supported as possible. I may make a spacer that replaces the big stack of washers...or I may not. It's really not a big deal. Also, I used stainless steel for all of these pieces because that's what was available to me...not because I felt it was necessary.

Screw that whole mess into the now vacant factory grab handle bolt hole. Use your 5mm allen wrench to tighten it down. Now you are Ram ballin'!
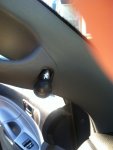

Attach the rest of your RAM accessories, clip your GPS in and adjust to your liking.
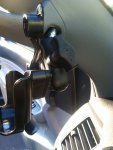
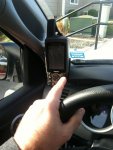
Future plans:
Trim the factory screw cover to fit around the ram mount ball and paint black any part of the aluminum ram ball shaft that can be seen afterward.
Hardwire the GPS, running the wire through the trimmed factory screw cover, down the A-Pillar and into my forthcoming aux fuse block.
Stuff you need:
RAM-B-367U (ball mounted to A-pillar)
RAM-B-103-A-238U (short arm with flange to attach to GPS cradle - two other length arms are available if you have a different requirement)
RAM-HOL-GA12U (Garmin GPS 60CSX specific cradle - get the one that works with your specific GPS)
6mm x 1.00 (thread pitch) x 60mm (length) Socket Head Cap Screw
4) 6mm small washers
4) 6mm larger washers
Small straight blade screwdriver
5mm Allen Wrench
10mm socket
Short socket extension
Ratchet
Approximately 4 minutes
Let's get it done:
Remove cover on lower grab handle bolt on Drivers side A-Pillar. Grab your small straight slot screw driver and carefully inset it into the upper corner as shown. Don't pry against the grab handle...you may mar it. Just pull the screwdriver and plug away from the grab handle (not prying). It will pop right out. This corner is the best place to insert the screwdriver because of the bracing on the back of the plug.

This is what you see under that plug.

Get your socket setup ready and remove the factory bolt.


Get the Ram ball (go ahead, laugh...it's okay to be immature) and hardware. Thread it all together as shown in this photo. Don't forget to put one of the small washers under the head of the 6mm SHCS (socket head cap screw). The Ram ball is designed for an 8mm bolt so the small washer for the 6mm fits perfectly and makes sure that the head of the 6mm SHCS is as fully supported as possible. I may make a spacer that replaces the big stack of washers...or I may not. It's really not a big deal. Also, I used stainless steel for all of these pieces because that's what was available to me...not because I felt it was necessary.

Screw that whole mess into the now vacant factory grab handle bolt hole. Use your 5mm allen wrench to tighten it down. Now you are Ram ballin'!


Attach the rest of your RAM accessories, clip your GPS in and adjust to your liking.


Future plans:
Trim the factory screw cover to fit around the ram mount ball and paint black any part of the aluminum ram ball shaft that can be seen afterward.
Hardwire the GPS, running the wire through the trimmed factory screw cover, down the A-Pillar and into my forthcoming aux fuse block.
Last edited:

