3rd Gen Toyota Pickup - Budget Expo Build

tom83

New member
This has been a really awsome build Richard! I was wondering if you can go into a bit more detail about the unistrut rack you built. I really like the way it looks with the shell.

tom83
 

DeskToGlory

Adventurer
This has been a really awsome build Richard! I was wondering if you can go into a bit more detail about the unistrut rack you built. I really like the way it looks with the shell.

tom83
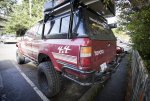
I'll get some more detailed photos when we get back down there... but for now:

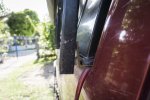
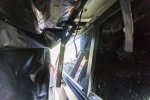
I used a lot of materials I had lying around for this. If you had to buy everything new it would probably still be less than $100. Originally I was going to buy a rack, but couldn't find one that would work for the truck, then I was going to "properly" fab together a rack, but in the end I ran out of time/money and needed to bolt the tent on somehow. I ended up doing this in the underground parking of our condo building before anybody noticed what was going on.

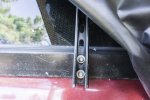
1. I sandwiched 3"x3"x3/16" angle iron between the bedrails and the canopy. This is all bolted together.

2. I drilled two holes in the angle iron for each Unistrut upright. I put a 1/2" spacer on the bottom hole between the angle iron and the Unistrut so that the angle would more or less follow the lines of the canopy.

3. To bolt the upright to the crossbar I just made a little 90 bracket out of the 3x3 angle iron. I cut off a 1.5" wide piece of it, drilled a single hole on each side, and then bent it to an angle of 120 degrees or so. I made four of these and bolted the two crossbars to the uprights. To make this more structually sound I added gussets using flat steel (1" x 1/8"?) cut to about 10" long and bolted them on the outsides of the crossbar to the upright.

Hope that makes sense...

140122_DeskToGlory_SecurityUpgrades-15.jpg

10175801345_fddf3f7146_c.jpg
 

tom83

New member
I'll get some more detailed photos when we get back down there... but for now:

I used a lot of materials I had lying around for this. If you had to buy everything new it would probably still be less than $100. Originally I was going to buy a rack, but couldn't find one that would work for the truck, then I was going to "properly" fab together a rack, but in the end I ran out of time/money and needed to bolt the tent on somehow. I ended up doing this in the underground parking of our condo building before anybody noticed what was going on.

1. I sandwiched 3"x3"x3/16" angle iron between the bedrails and the canopy. This is all bolted together.

2. I drilled two holes in the angle iron for each Unistrut upright. I put a 1/2" spacer on the bottom hole between the angle iron and the Unistrut so that the angle would more or less follow the lines of the canopy.

3. To bolt the upright to the crossbar I just made a little 90 bracket out of the 3x3 angle iron. I cut off a 1.5" wide piece of it, drilled a single hole on each side, and then bent it to an angle of 120 degrees or so. I made four of these and bolted the two crossbars to the uprights. To make this more structually sound I added gussets using flat steel (1" x 1/8"?) cut to about 10" long and bolted them on the outsides of the crossbar to the upright.

Hope that makes sense...

View attachment 278594

View attachment 278595

Thanks for the details, can't wait to see some more detailed pics! Was the crossbars also made with unistrut? And lastly how does the tent attach to the crossbars? Looks like some kind of aluminum channel?

tom83
 

DeskToGlory

Adventurer
Thanks for the details, can't wait to see some more detailed pics! Was the crossbars also made with unistrut? And lastly how does the tent attach to the crossbars? Looks like some kind of aluminum channel?

tom83
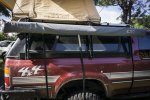
Yup, the crossbars are Unistrut as well. The aluminum channel is part of the tent... it comes with a couple of bolts and a steel flatstock to bolt to most roof racks. I had to buy slightly longer bolts to attach to the Unistrut since it's a bit thicker.
 

DeskToGlory

Adventurer
Our very good friends put this short video of us together before we left on the second leg of our journey. It still gives me goosebumps when I watch it. :snorkel:

"We all define home in different ways. To a lot of people it's a specific city; for others, it's their parents' house. But, for some, home is a red Toyota pickup and the person sitting next to you.
Ashley & Richard are the overlanding duo that make up Desk to Glory. They hail from Vancouver, but you'll currently find them on the road, somewhere between Panama and Patagonia. That's all we'll say for now... for more of their story, check out the video below!
If we were able to capture even a fraction of their passion and drive, then we've done our job
." - Koyo Photography

[video=vimeo;128329489]https://vimeo.com/128329489[/video]
 

deadbeat son

Explorer
Fantastic video, congrats on your journeys! I really wish I would have done something similar before becoming a parent. Now that I have obligations, it's tough to do anything so daring. Sure, I could wait until the kiddo is grown and go then, but when she's 18, I'll be almost 60. At that point, I may as well wait it out for retirement...
 

DeskToGlory

Adventurer
Unistrut Roof Rack

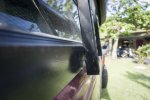
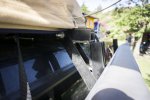
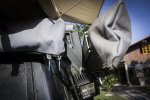
Tom83, here are those photos of the Unistrut roof rack I promised you awhile back:

expoportal-1.jpg
expoportal-2.jpg
expoportal-3.jpg
expoportal-4.jpg
expoportal-5.jpg
expoportal-6.jpg
expoportal-7.jpg

I used nyloc nuts throughout and have never had a problem with them coming loose. The CVT tent frame and ARB awning help add support. The plan was to use additional lengths of Unistrut connecting the two hoops, but I never got around to it before we left.
 

tom83

New member
Thanks so much for the pictures! Also loving the pics and videos you two are posting on instagram and youtube!

tom83
 

DeskToGlory

Adventurer
expoportal-1.jpg

Stoked to be putting our new ARB 1250 rear awning and ARB Wind Break to good use in Colombia. A little bit of a pain hauling an awning on multiple flights, but totally worth it to stay dry in the mountains :)
 

89s rule

Adventurer
Fantastic video, congrats on your journeys! I really wish I would have done something similar before becoming a parent. Now that I have obligations, it's tough to do anything so daring. Sure, I could wait until the kiddo is grown and go then, but when she's 18, I'll be almost 60. At that point, I may as well wait it out for retirement...

I kinda feel the same way although as of now I want to keep everything in North America. I have been watching a ton of RV, Van, various other transportation, traveler videos/documentaries and look forward to the opportunity when we can do something similar long term. Everyone is obviously in a different situation, but finding a balance of the future and opportunities to enjoy today I think are the key. I hope to be able to retire by 55 or 60 when I hopefully still have my health to be able to enjoy and afford a long term adventure.

DesktoGlory - Great build and trip. Many of us are envious of what you are doing and live through yours and others documentation of your trip.
 

Forum statistics

Threads
188,341
Messages
2,905,787
Members
229,959
Latest member
bdpkauai
Top