Ambulance Conversion - New Modifications.

yzeevy

Adventurer
22' isn't so bad...without the bumper Crestline E350s are about 20', but 22 would still fit most places. It's kinda funny, but 23' seems so much longer but 22' seems workable.


As for shelves, you'll want them to be secure and extra strong. I've found that the metal shelves in the ambulance quickly collapse if I have any weight on them and go over a bump... the metal clips simply pop out of the rails.

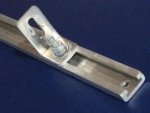
Do you mean this rails?
20151108_080621.jpg

I'm trying to find them for a week to add shelves, do you know who sells them?
 

Rich S.

New member
Welcome yzeevy,
Glad to see your thread. Your new truck ambulance really looks good.
Had to laugh at your questions about the electrical spaghetti and unique wiring solutions that ambos have.
Think you are right about the separate AC and generator that are needed in hot areas.
I have a 96 Ford E350 with an Osage ambulance package on the rear that served as an oilfield service truck/mobile office for 1.5 years all over Texas.
One of your pictures looks like you opened up your outside vertical compartment on the far back, driver's side. Looks like the generator could sit low, have a middle sealed compartment (with access inside or outside as you want,) and use the upper compartment for the 115 v AC unit. Both the lower and upper compartments could vent in two (or three) directions with easy mods. With additional openings/vents on the driver's side and the rear, hot air and gas fumes would dissipate rapidly. Additional openings in the top and bottom are easy also if further ventilation is needed.
On my ambulance, my preferred outside sitting and BS area is on the driver's side or to the rear, out both doors. The generator and AC on the rear corner might be noisy from the outside and perhaps the other side rear corner might be best. (On my ambulance, the oxygen bottle storage compartment is behind the driver and this would be my preferred generator and AC location. Would get additional ventilation from both sides at the body corners, be out of the way, and lower generator access from both sides.)
Took the light bar off, but still have the protruding aluminum mounting arms. Thinking about running two 6.5' long sections of 6” black plastic pipe up there to make a solar shower out of. Want to relocate my single spare to cab roof-top carry to free up storage compartments.
Took the red lenses off the ambulance body and painted them inside and outside white. Doesn't really take away from the ambulance look. On the driver's side, then removed the red flashing Whelen lights and riveted a white rectangular piece of aluminum with caulking. Those look good.
Some people of this forum have replaces their red flashing lights with pieces of the shiny aluminum tread plate, which looks ok. The white aluminum pieces look the best.
Keep us posted and remember to take some time off just to enjoy the good life.
 

yzeevy

Adventurer
Welcome yzeevy,
.
1. Glad to see your thread. Your new truck ambulance really looks good.
Had to laugh at your questions about the electrical spaghetti and unique wiring solutions that ambos have.
.
2. One of your pictures looks like you opened up your outside vertical compartment on the far back, driver’s side.
.
3. On my ambulance, the oxygen bottle storage compartment is behind the driver and this would be my preferred generator and AC location.
.
4. Took the light bar off, but still have the protruding aluminum mounting arms. Thinking about running two 6.5’ long sections of 6” black plastic pipe up there to make a solar shower out of.

5. Want to relocate my single spare to cab roof-top carry to free up storage compartments.
.
6. Took the red lenses off the ambulance body and painted them inside and outside white.
.
7. On the driver’s side, removed the red flashing Whelen lights and riveted a white rectangular piece of aluminum with caulking. Those look good.
.
.
Thanks for your respond Rich S.
.
1. It was Electrical Jungle but Spaghetti is much better and appropriate.
.
2 + 3. I opened 2 compartments, one is the oxygen bottle storage compartment right behind the driver seat (for kitchen stuff). I plan to put there the generator on a slide out base, but the AC wont fit there.
The other is at the far end corner behind the passenger side (for linen and bedding stuff)
.
4. I start removing the big light bar but I can't find a connector to disconnect the power cable. Looks like I have to cut the wires one by one and insulate them. ANY SUGGESTIONS?
.
5. I don't know what the size of your spare, but how you will lift and remove it from the top?
.
6. Great idea, did you left the power on? What kind of paint you used? Do they make it in RED ? ! ?
.
7. Can I find these rectangular pieces of aluminum at Home Depot? I'm sure you have noticed that my AMBULANCE IS COMUNIST ! !
.
Can I see some pics of your AMBO?
.
 

patoz

Expedition Leader
4. I start removing the big light bar but I can't find a connector to disconnect the power cable. Looks like I have to cut the wires one by one and insulate them. ANY SUGGESTIONS?

That looks to be a 'Code 3' light bar and it, and like most of the other name brands, it probably has the power cable connected on each end to terminal strips. One in the light bar and the other in one of your electrical panels in the rear, or possibly under the front control panel.

I would NOT cut that cable if at all possible. If you sell the light bar, the new owner will definitely need that cable intact to make it work. You should be able to disconnect it on the vehicle end and leave it connected to the bar itself, so that the function of each wire can be ascertained at a later date.
 
Last edited:

huskyhauler

Adventurer
You're going to end up spending most of your outside time to the rear of the vehicle and to the passenger side of the vehicle as that's where the access doors are located. I put my generator in the outside compartment on the driver side located just to the rear of the oxygen tank compartment. I have a Honda EU2000i generator and can barely hear it. It's mounted on a sliding tray to make it easier to fill, load, unload, etc.

As far as layout goes, I used all of the driver side compartments for utility purposes. The canopies and chairs are stowed in the oxygen tank compartment, the generator and fuel in the middle compartment, and the water tank, propane tank, water pump, tool box, and general support gear in the rear compartment. The shore power, city water inlet, and gray water outlet are all located on the driver side as well.

The Compartment on the passenger side to the rear holds the outdoor cook station.
 

patoz

Expedition Leader
Huskyhauler, my layout is going to be almost identical to yours and for the exact same reasons. It's the most logical arrangement for the average use, especially in pay campgrounds. All American commercially built RVs and Travel Trailers are built that way also.

The left (street) side is the 'Utility' side, and the right (curb) side is the 'Patio' or entertainment side. In Europe, the layout is reversed because they drive on the left side of the road and the driver is also on the right side.
 
Last edited:

Bikersmurf

Expedition Leader
Do you mean this rails?

View attachment 313930

I'm trying to find them for a week to add shelves, do you know who sells them?

No, those look much stronger. Mine are cheap tracks you can buy at Home Depot that have a 1/4" wide slot that the small bracket clips into... Tip them up a bit and they pop out. Bounce something on the shelf, and the shelf falls down.
 

mk216v

Der Chef der Fahrzeuge
Huskyhauler, my layout is going to be almost identical to yours and for the exact same reasons. It's the most logical arrangement for the average use, especially in pay campgrounds. All American commercially built RVs and Travel Trailers are built that way also.

The left (street) side is the 'Utility' side, and the right (curb) side is the 'Patio' or entertainment side. In Europe, the layout is reversed because they drive on the left side of the road and the driver is also on the right side.

Great layouts guys, thanks for sharing. Post some recent pics for us all to drool over. :)
 

yzeevy

Adventurer
No, those look much stronger. Mine are cheap tracks you can buy at Home Depot that have a 1/4" wide slot that the small bracket clips into... Tip them up a bit and they pop out. Bounce something on the shelf, and the shelf falls down.
.
Well try to find who sell them and let me know
.
Untitled.jpg
.
.
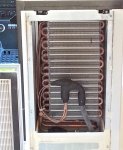
BTW, did you disassembled the rear air condition?
.

20151107_095813_009.jpg
 
Last edited:

Bikersmurf

Expedition Leader
Me? I've still got rear air... Need to get the line fixed, new pump installed, and the system recharged... Not much.
 

mk216v

Der Chef der Fahrzeuge
Yesterday and today, with the help of my new generator, I opened the back wall of the
two vertical external compartments.
.
Now I need to organize shelves and I'll find a carpenter to install me some nice wooden doors.
.
Any advice about the type of shelves, considering that this is a mobile / moving vehicle?!
Maybe a deep plastic rectangle container?
.
View attachment 313919
.
View attachment 313920
.
View attachment 313921
.

Can you tell us what your plan is in this area?
 

yzeevy

Adventurer
Can you tell us what your plan is in this area?

Well, the answer is in the quote.
The one behind the driver will be part of the "kitchen".
The one next to the bench / future bed will hold bedroom stuff.
Now I need to organize good shelves and install nice doors.
 

mk216v

Der Chef der Fahrzeuge
Well, the answer is in the quote.
The one behind the driver will be part of the "kitchen".
The one next to the bench / future bed will hold bedroom stuff.
Now I need to organize good shelves and install nice doors.

I saw that but still am not clear of your kitchen plans. Perhaps a sketch would help us understand what you're planning to do.
On the pass side for linens/etc, do you mean the tall cabinet that's to the right as you walk into the module?
 

yzeevy

Adventurer
Vacum pump

Hi,
.
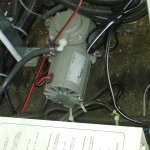
I have this vacuum pump next to the charger.
.
Is this pump for ambulance purposes only?
I can disconnect it and remove all the vacuum points?
.
20151107_101101_010.JPG
.
Thanks
 

Forum statistics

Threads
186,821
Messages
2,889,560
Members
227,160
Latest member
roamingraven
Top