You are using an out of date browser. It may not display this or other websites correctly.
You should upgrade or use an alternative browser.
You should upgrade or use an alternative browser.
Anyone with an AT Overland Summit?
- Thread starter Scoutman
- Start date
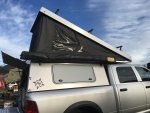
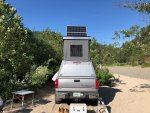
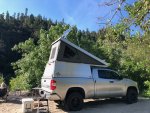
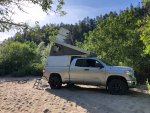
I have one and have been using it for a few weeks now. Mine sits on a 2015 Tundra, I will get some interior photos posted soon on this thread for you. We have been using it in Northern California and Oregon so far. I have way more gear in mine than I normally would because I started off on a work mission before I had the Summit. Do you have any specific questions?
Scoutman
Explorer
Nice video! I guess I'm just looking for general impressions, things you like and don't. What other platforms have you owned or used?
Looks like you didn't opt for any side windows or roof vents. How is the ventilation? How is entry and exit with having to pull the tailgate closed? Have you built out the interior or have you left it open for gear? Bed quality? Is there a rear panel that hinges up or just the main bed panel?
Additional pictures are always welcome.
I was a full time RV'er from 2003 till 2015. I have owned and operated several truck campers including 2 Lance campers, an Arctic Fox and a Four Wheel Eagle pop up. 2 Class A diesel pushers (32' and 40') and a 40 foot 5th wheel.
I didn't order any adons except the roof rack and thermal blanket for the inside fabric, I wanted to start with a clean slate and add things along the way. I am not afraid to cut into aluminum or honeycomb as I was an aircraft mechanic for 25 years. I do like not having any other points of entry except the rear door for security reasons.
I have a piece of webbing strap attached to existing screws on the inside tailgate to allow it to be closed while in the bed of the truck, it is very easy. Without that strap it was very difficult for me to close the tailgate.
The interior is filled with lots of stuff including too much work equipment that is preventing me from building it the way I want to so I will have to wait till I get home to SW Florida in a month or so to finish it properly. I did add a removable shelf that is at the bed rail height for some of my gear.
My wife has approved of the bed quality and does not complain about comfort in the morning, I agree with her. We are both in our late 50's and have no issues climbing in or out of the bed. We do keep a cooler or one of my drone cases on the deck to help get down when we get out or into bed.
I do have a full bed slide that all my gear is sitting on that allows easy access to almost everything including the 2 4D deep cycle batteries that power a 1000 and 2000 watt pure sine wave inverter to charge drone batteries that allow me to keep flying all day if needed. I also run my 12 volt fridge freezer off of the batteries. The batteries are recharged by my alternator and soon to be solar power assisted.
I am not sure if I understand your question about a rear panel that hinges up but I did have AT build me an additional filler plate that kind of creates an additional storage area for when the bed is in the retracted mode.
I will work on getting more images tomorrow before I head out of cell range for uploading.
I hope this helps. In my mind the Summit is a very durable and well built unit, I see it lasting for a very long time. The only things I can see that could need replacing would be the gas struts for the bed on and top and tent fabric but I think I have will have lots of use before that happens.
Jim
Scoutman
Explorer
Wow, you've definitely learned some lessons I'm sure. My one (and only) truck camper experience wasn't the best and has left a bad taste for 'traditionally constructed' rv's.
For the rear panel question... I guess I saw somewhere that after you lift the top there are 2 gas strut assisted panels that hinge up. One of those is at the rear and covers the 'standing' area and the other is what makes up the bed towards the front. I was just wondering how that works since I can't seem to find any pictures online.
How well does it seal up around the tailgate and bed rails? Did you do anything to seal up the tailgate to the bed (like at the bottom)?
How thick are the composite walls?
Wow, you've definitely learned some lessons I'm sure. My one (and only) truck camper experience wasn't the best and has left a bad taste for 'traditionally constructed' rv's.
For the rear panel question... I guess I saw somewhere that after you lift the top there are 2 gas strut assisted panels that hinge up. One of those is at the rear and covers the 'standing' area and the other is what makes up the bed towards the front. I was just wondering how that works since I can't seem to find any pictures online.
How well does it seal up around the tailgate and bed rails? Did you do anything to seal up the tailgate to the bed (like at the bottom)?
How thick are the composite walls?
After the top lid is up there is only one panel (the bed) that lifts up. Once the bed is lifted you can stand in the full length of the bed. When lowered there is still room to stand up and move around.
The rear door seals well to the top of the tailgate as well as the sides. I am having an issue with dust coming in from the sides and bottom of the tailgate. A friend of mine added a bulb type seal around the sides of the tailgate which helped with the dust problem. I will do the same.
The honeycomb walls are either 5/8th's or 3/4, maybe half inch. I will try to get the exact dimension today. I am getting ready to drill a holes for a solar panel install.
elcoyote
Supporting Sponsor, Overland Certified OC0004
After the top lid is up there is only one panel (the bed) that lifts up. Once the bed is lifted you can stand in the full length of the bed. When lowered there is still room to stand up and move around.
The rear door seals well to the top of the tailgate as well as the sides. I am having an issue with dust coming in from the sides and bottom of the tailgate. A friend of mine added a bulb type seal around the sides of the tailgate which helped with the dust problem. I will do the same.
The honeycomb walls are either 5/8th's or 3/4, maybe half inch. I will try to get the exact dimension today. I am getting ready to drill a holes for a solar panel install.
To confirm for you Jim, we use a 3/4" honeycomb composite in the construction of the walls, ceiling and for the bed platform. Super nice video by the way! Do you mind if we share it? Mario
Scoutman
Explorer
To confirm for you Jim, we use a 3/4" honeycomb composite in the construction of the walls, ceiling and for the bed platform. Super nice video by the way! Do you mind if we share it? Mario
Thanks for chiming in Mario. So if a strip of L-track or brackets for a solar panel were to be installed, would you use a rivnut to the layer of aluminum or do you typically use a through bolt (or something else)?
Still waiting to see what you come up with on a long bed version.
elcoyote
Supporting Sponsor, Overland Certified OC0004
If you're putting L track on the roof, mount centerline of track at 1.5" from outer edges of roof line with 1/4" - 20 rivnuts into the aluminum box beam. The material is .090 thick. If you wish to mount L track anywhere else on the roof, same applies but be careful to not drill all the way through the honeycomb. Be sure to seal your holes with a non-acetic sealant like a type-II silicone or sikaflex 227. Long bed version will be coming...Thanks for chiming in Mario. So if a strip of L-track or brackets for a solar panel were to be installed, would you use a rivnut to the layer of aluminum or do you typically use a through bolt (or something else)?
Still waiting to see what you come up with on a long bed version.
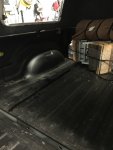
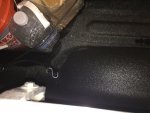
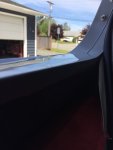
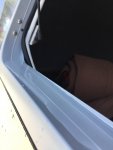
We just got our Summit and overall are very impressed. Ours is on a Ram 2500 (like AT's) and have only two things that we noticed that needed attention. First, the Tern Overland door leaks a lot. We washed the truck once and the bed had lots of water inside and the carpet below the door was soaked. The issue we found to be that on level ground, the water falling down the sides of the camper walls would fill up the door's bottom ledge and then spill over through the bulb seal. I tried to take a photo and will attempt to illustrate this for you. I have tries different types of sealant to remedy this, but I have not washed the truck since or has it seen any rain. Not sure if the issue lies with the angled walls and the door not being compatible or maybe some seal did not get installed? I will update this thread with the results of my "repair" after this weekend's trip to Forks. The other issue I have, and it is probably just my issue, but the Ram's tailgate has a lip at the rear edge of the tailgate that the bulb seal has to squish over each time the rear lift door is opened or closed. We have opened the rear lift door around twenty times so far and the bulb is starting to show signs of wear/ lifted adhesive. I believe that one of two fixes will solve this, and I will be trying one or both soon. The first, is a tailgate cap that I found from a major canopy mfgr. that adheres to the ram tailgate top, providing a flat edge at the rear and a lip towards the front which should help. I have also been thinking about making an aluminum "flap/rain deflector" that could be attached to the lift door that would cover the curved edge of the Ram's tailgate when closed, sort of like on the Leer toppers. In some of the pics, the bulb seal is removed, as we were trying to figure out where the water was entering through, and also to show the inner edge being lower (at least it appears to be since the water flows over the inside edge first) than the outside edge.
Attachments
elcoyote
Supporting Sponsor, Overland Certified OC0004
Did you purchase through one of our dealers or direct from us at AT? Either way, we will help you resolve any hatch leaking issues. My first suggestion is that if you have a gap in the bulb seal at the bottom of the hatch, remove the bulb seal and re-insert it to move the gap to the top. This should eliminate any pass through. If this does not work or you need any other assistance, please do not hesitate to contact us at info@atoverland.com and we'll work through this with you to resolve.We just got our Summit and overall are very impressed. Ours is on a Ram 2500 (like AT's) and have only two things that we noticed that needed attention. First, the Tern Overland door leaks a lot. We washed the truck once and the bed had lots of water inside and the carpet below the door was soaked. The issue we found to be that on level ground, the water falling down the sides of the camper walls would fill up the door's bottom ledge and then spill over through the bulb seal. I tried to take a photo and will attempt to illustrate this for you. I have tries different types of sealant to remedy this, but I have not washed the truck since or has it seen any rain. Not sure if the issue lies with the angled walls and the door not being compatible or maybe some seal did not get installed? I will update this thread with the results of my "repair" after this weekend's trip to Forks. The other issue I have, and it is probably just my issue, but the Ram's tailgate has a lip at the rear edge of the tailgate that the bulb seal has to squish over each time the rear lift door is opened or closed. We have opened the rear lift door around twenty times so far and the bulb is starting to show signs of wear/ lifted adhesive. I believe that one of two fixes will solve this, and I will be trying one or both soon. The first, is a tailgate cap that I found from a major canopy mfgr. that adheres to the ram tailgate top, providing a flat edge at the rear and a lip towards the front which should help. I have also been thinking about making an aluminum "flap/rain deflector" that could be attached to the lift door that would cover the curved edge of the Ram's tailgate when closed, sort of like on the Leer toppers. In some of the pics, the bulb seal is removed, as we were trying to figure out where the water was entering through, and also to show the inner edge being lower (at least it appears to be since the water flows over the inside edge first) than the outside edge.
TernOverland
Active member
We just got our Summit and overall are very impressed. Ours is on a Ram 2500 (like AT's) and have only two things that we noticed that needed attention. First, the Tern Overland door leaks a lot. We washed the truck once and the bed had lots of water inside and the carpet below the door was soaked. The issue we found to be that on level ground, the water falling down the sides of the camper walls would fill up the door's bottom ledge and then spill over through the bulb seal. I tried to take a photo and will attempt to illustrate this for you. I have tries different types of sealant to remedy this, but I have not washed the truck since or has it seen any rain. Not sure if the issue lies with the angled walls and the door not being compatible or maybe some seal did not get installed? I will update this thread with the results of my "repair" after this weekend's trip to Forks. The other issue I have, and it is probably just my issue, but the Ram's tailgate has a lip at the rear edge of the tailgate that the bulb seal has to squish over each time the rear lift door is opened or closed. We have opened the rear lift door around twenty times so far and the bulb is starting to show signs of wear/ lifted adhesive. I believe that one of two fixes will solve this, and I will be trying one or both soon. The first, is a tailgate cap that I found from a major canopy mfgr. that adheres to the ram tailgate top, providing a flat edge at the rear and a lip towards the front which should help. I have also been thinking about making an aluminum "flap/rain deflector" that could be attached to the lift door that would cover the curved edge of the Ram's tailgate when closed, sort of like on the Leer toppers. In some of the pics, the bulb seal is removed, as we were trying to figure out where the water was entering through, and also to show the inner edge being lower (at least it appears to be since the water flows over the inside edge first) than the outside edge.
Hi rbrownmr2,
We are sorry you are having an issue with leaking. Elcoyote is correct in that the seal was installed upside down. I would also like to know who did the installation, so that any training issues can be addressed. In the short term, reinstalling the seal with the seam at the top should stop the leak. Since the molding will have been worked a bit in the process, a small bead of non-silicone sealant should be used in the moulding channel. I'm not aware of any leaking issues on properly installed hatches in Habitats or Summits. Many people have them. I know that AT Overland is very diligent with their installations and we work closely together to insure that problems of this kind do not occur. We will make sure that this issue is resolved as well. Please contact me directly at davidsoza@ternoverland.com , and we will send you a new gasket free of charge. When you turn the old one around, the cut outs on the white rubber lip around the strut brackets will not line up. You can trim the new one to a perfect fit, and from there you should have no issues. I look forward to hearing from you! David
Scoutman
Explorer
If you're putting L track on the roof, mount centerline of track at 1.5" from outer edges of roof line with 1/4" - 20 rivnuts into the aluminum box beam. The material is .090 thick. If you wish to mount L track anywhere else on the roof, same applies but be careful to not drill all the way through the honeycomb. Be sure to seal your holes with a non-acetic sealant like a type-II silicone or sikaflex 227. Long bed version will be coming...
The roof would be one place if I didn't get load bars already installed. Another would be inside along the top and bottom of the side walls to attach backpacks, gear organizers, and gear nets.
BTW, what are the 2 stainless looking loop tabs on the outside walls towards the rear used for?
Attachments
elcoyote
Supporting Sponsor, Overland Certified OC0004
You could attach to inside on the upper box beam. If you want to attach to the inside of the wall, we advise bonding in place with UHB tape in addition to rivnuts as our honeycomb composite on the inside has a FRP surface. The two loops are Petzl climbing anchors that give you a place to hang a trash bag, hammock or whatever you choose. The Summit and Habitat share the same lower section. When used for the Habitat, those are the locations of the gas struts and support rods.The roof would be one place if I didn't get load bars already installed. Another would be inside along the top and bottom of the side walls to attach backpacks, gear organizers, and gear nets.
BTW, what are the 2 stainless looking loop tabs on the outside walls towards the rear used for?
Last edited:
Similar threads
- Replies
- 3
- Views
- 1K
- Replies
- 5
- Views
- 2K
- Replies
- 5
- Views
- 1K
- Replies
- 3
- Views
- 1K

