Barn Door for JK factory hardtops

jscherb

Expedition Leader
A while back I posted a few very simple sewing projects that even a beginner with a sewing machine could easily do: https://expeditionportal.com/forum/...factory-hardtops.127687/page-324#post-2951881

Here's another one. The other day a flyer came in the mail from NAPA and on the cover was this multi-tool hammer:
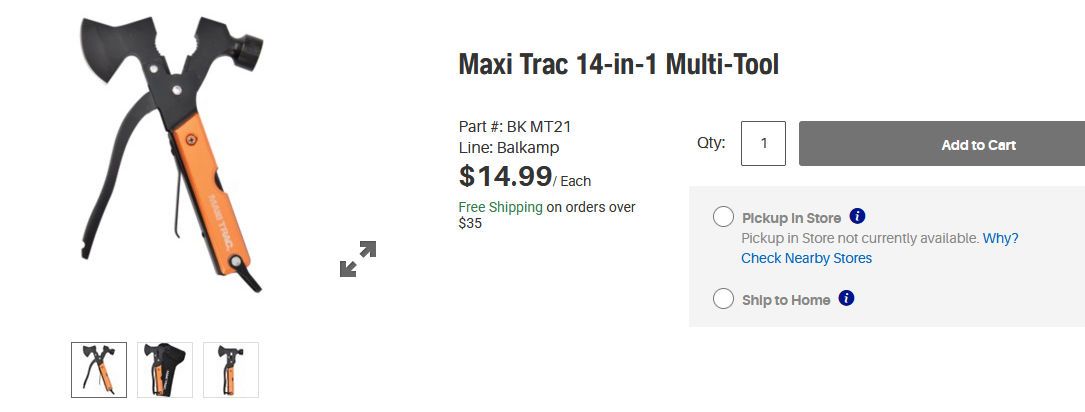
MaxiTracHammer.jpg


It looked like it might be useful at a campsite so I checked the local store and they didn't have it so I checked NAPA online and it wasn't available there either. Probably tied up in a supply chain delay since it comes from China. I found the same tool on Amazon for $12, and on Amazon it also included two other small tools:
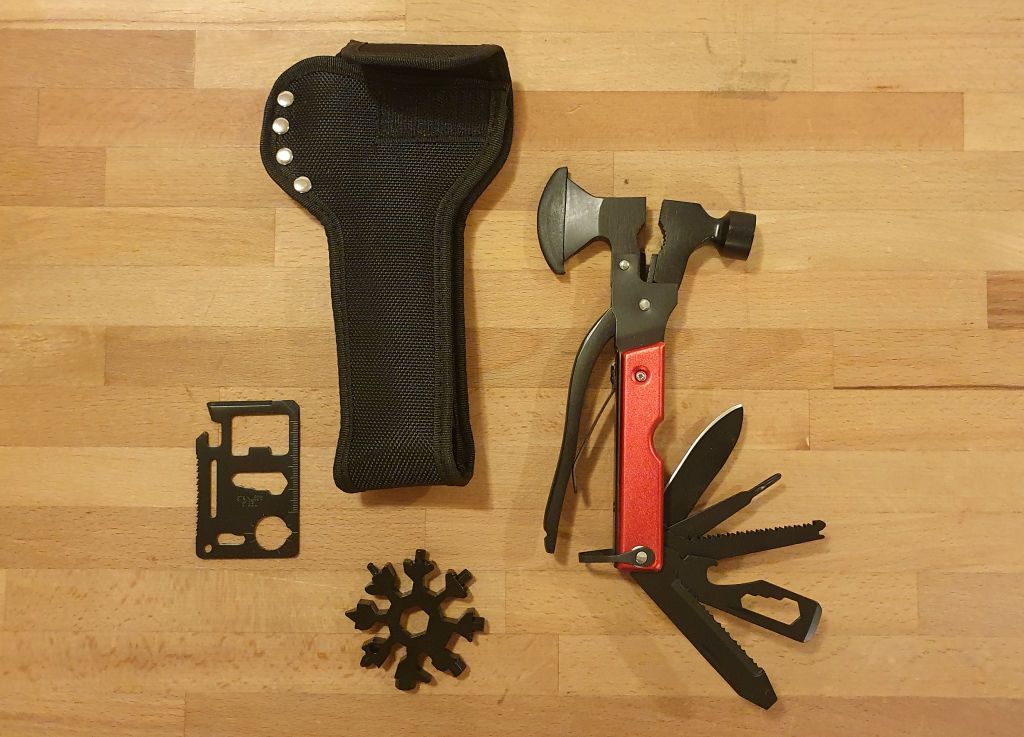
AmazonHammer.jpg


It's a very cheap tool as you might guess; the knife and saw blades might be good for cutting butter (no worries, I've got better multitools for cutting up front in the Roll Bar Buddies I posted about the other day), but the hammer/pliers/cutters aren't too bad. It comes with a nice pouch with a strap on the back for hanging on a belt or a PALS/MOLLE panel, but I wanted to hang it on the roll bar, so I sewed two pieces of double-sided hook & loop on the back.
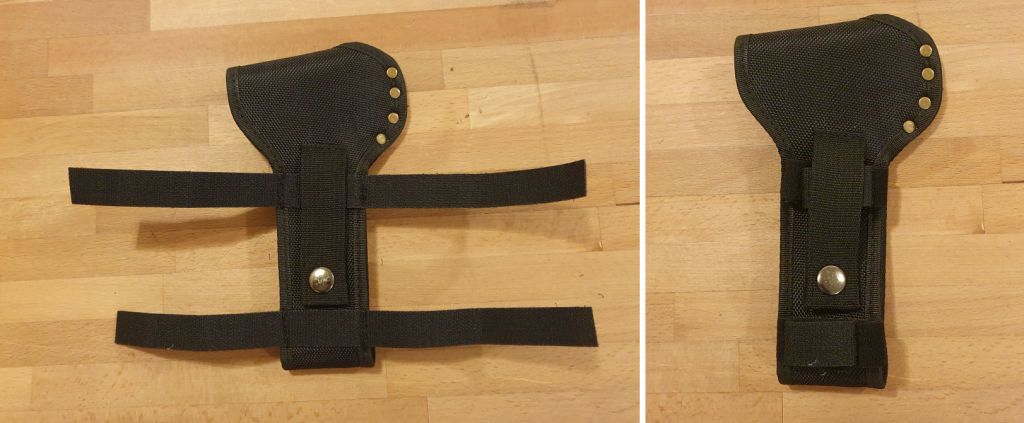
HammerPouchVelcro.jpg


Sewing the hook & loop on the back doesn't prevent it from hanging on a belt or MOLLE panel, in the right photo above the hook & loop is folded on itself. The hook & loop I used is from Harbor Freight:https://www.harborfreight.com/3-4-quarter-inch-x-35-ft-roll-hook-and-loop-cable-strap-96215.html

Attaches very nicely to the roll bar now. Out of the way but always handy.
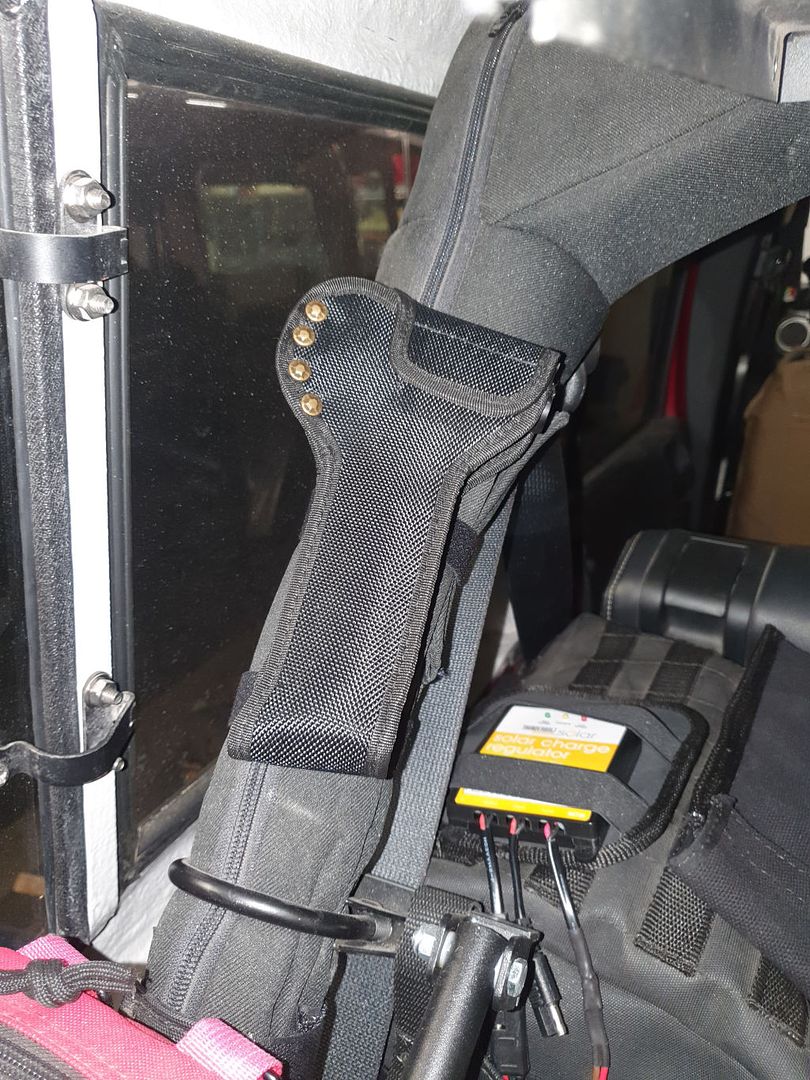
HammerOnRollBar.jpg


BTW notice in the first photo of the hammer the pouch has very shiny rivets, I didn't like them so I replaced them with nicer brass rivets.

A 5-minute sewing project that a beginner could succeed at.
 

jscherb

Expedition Leader
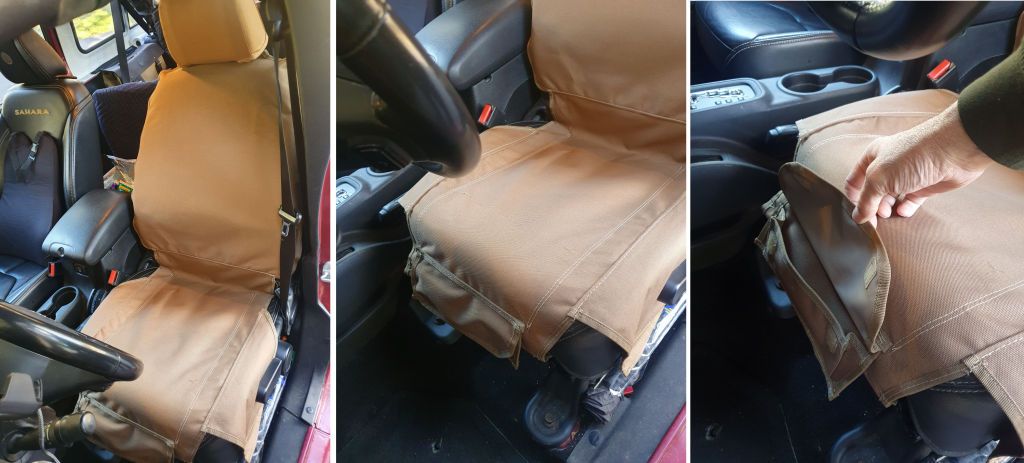
A week or so ago I wrote that I had been asked to do seat covers. I've been working on a design and here are some very early work-in-progress photos. They're very rough still and need more fitting. The seat back will get details similar to those on the seat bottom to pull the fabric into the concave shape of the seat. The base isn't fitted properly all the way around the sides yet and the headrest is not close to final either.

EarlyWIPSeatCovers.jpg


The goal is quick installation/removal so they could be used for a specific expedition but not all the time if that's the way someone wanted to use them, but fitted well enough so they could remain on all the time if that's what someone wants. The base, for example, can be installed with only a clip on each side, but for a better fit there are two optional straps the pull the fabric into the concave shape of the base.

Haven't decided if the pocket on the front of the seat base will make it into the final version, but it doesn't interfere with my legs at all and seems like it might be handy.

The fabric is heavy DWR (durable water resistant) treated, so spills won't go through the seat cover to the seat.

I'm not sure if I'll actually finish these all the way to production-ready. Looking at the many seat cover options on the market, it's not clear to me that there's room for yet another product in this space. I was asked to do these by a company, but whenever I do a design, either for myself or directly for a company, if a company is thinking of bringing the design to market I also give them my thoughts on where the design will fit in the market. In this case, I'm not sure there's a need for yet another seat cover option out there, even though I believe these can be done at a higher quality level than other options that will be at a similar price point.
 

Zeep

Adventurer
The base pouch you show in the photo's is interesting. I have a driver's side under seat vault. From the photo's posted,
it doesn't look like it would interfere with said vault. I wonder if a zipper like used on your headrest pouches, would make a nice option?
Just a thought!
 

akpostal

Adventurer
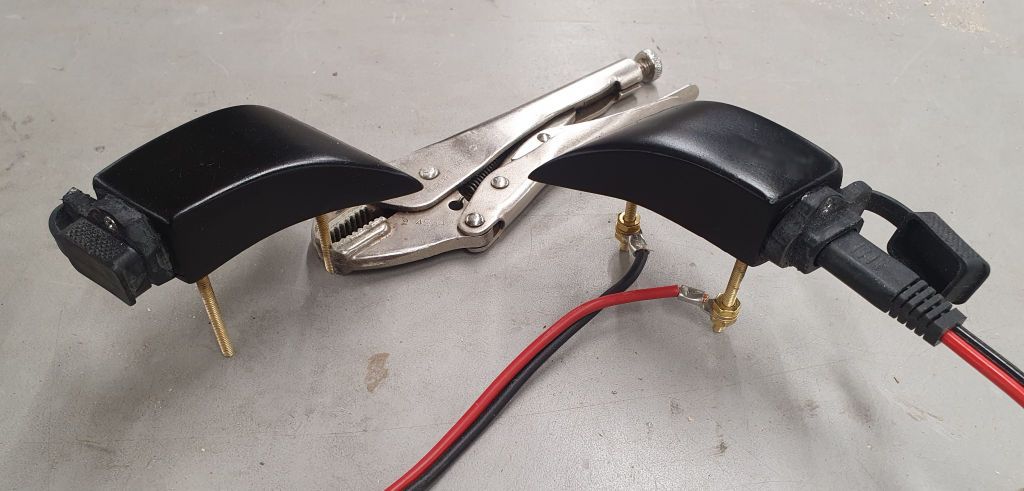
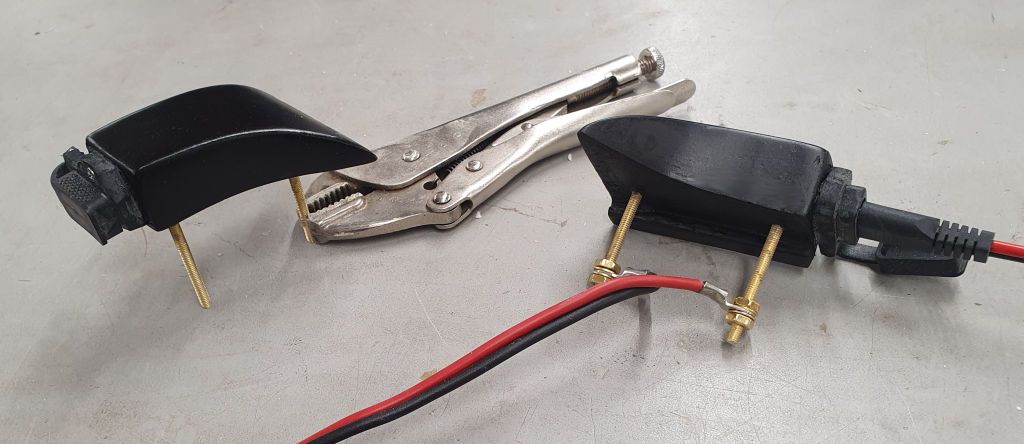
I finally had some time to finish the rooftop power pods, they're now ready to install.

PowerPodDone1.jpg


PowerPodDone2.jpg


The studs on the bottom are both to secure the pod to the roof and to conduct power through the roof - I'm using them as conductors to minimize the number of holes to make (and seal) in the roof. I've left the studs long for now but I'll trim them to the right length when I install them.
This is hot diggity well done. Rhino Rack, Teraflex, and Maximus-3 really need to get a look at this for their racks. Should be pretty easy for the Backbone system from RR.
 

jscherb

Expedition Leader
This is hot diggity well done. Rhino Rack, Teraflex, and Maximus-3 really need to get a look at this for their racks. Should be pretty easy for the Backbone system from RR.
Thank you. I designed these because the configuration on top of my Jeep varies based on the trip or expedition being planned - sometimes I'll plug the solar panel into these outlets, other times perhaps high-power LED driving lights will be mounted on the rack, and often I'm testing something sent to me for review by a Jeep accessories company. I'm not sure most people would be changing their configuration very often, but having a nice way to pass power to accessories on the roof still might be a nice thing to go with racks other than just the XJ Cherokee rack I designed these for. I don't think it would be hard to design something that would integrate nicely with some other rack, so any person or company that wants to do so should feel free to use this idea :).
 

jscherb

Expedition Leader
The base pouch you show in the photo's is interesting. I have a driver's side under seat vault. From the photo's posted,
it doesn't look like it would interfere with said vault. I wonder if a zipper like used on your headrest pouches, would make a nice option?
Just a thought!
The pouch isn't deep enough to interfere with either an under-seat vault or with the seat adjuster bar. The way I've sewn it to the prototype seat cover, it could be deeper and even hang down in front of something like a vault because it's only sewn at the top - because it's only sewn at the top it can be flipped up out of the way to access something under the seat if it were deeper. The same would be true if I put a zipper there instead of just sewing it along the top as I did on the prototype. Might do a zipper though, then different size/type/configuration pouches could be used.

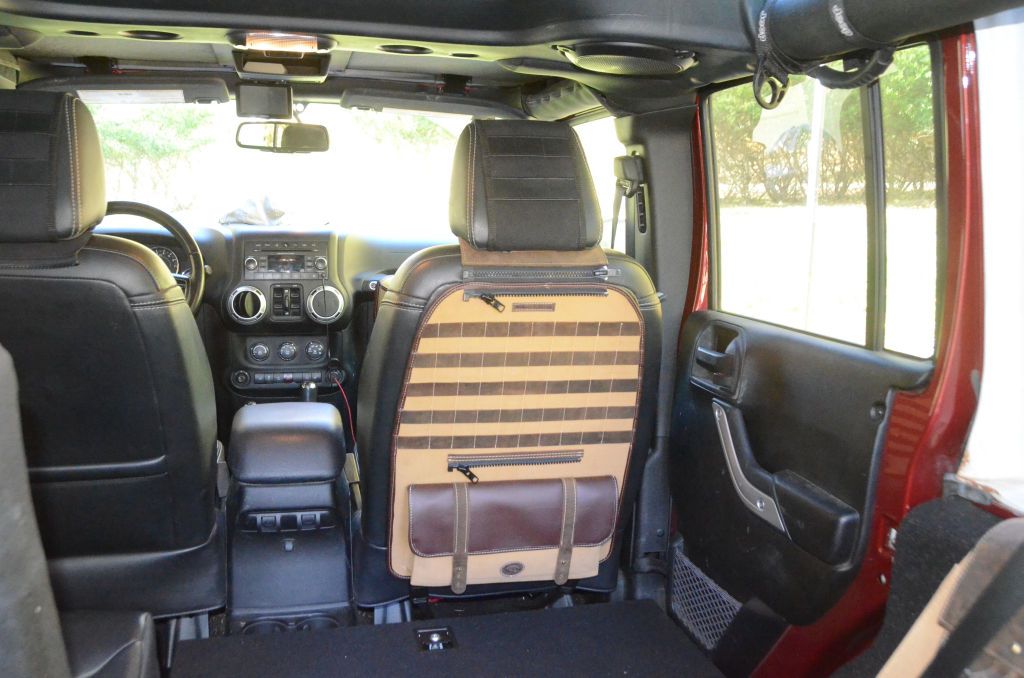
I do plan zippers on the back, I'm thinking I'll integrate something like this seat back organizer I sewed a while back into the seat cover design. This one has two zippers, so two Zip & Go bags can be attached; might only do one zipper plus the MOLLE panel on the back of the seat cover.

SBOEmpty.jpg


Still not sure the seat cover project will go to completion though. I've got several other sewing project ideas that I think will be more interesting than this project.
 

jscherb

Expedition Leader
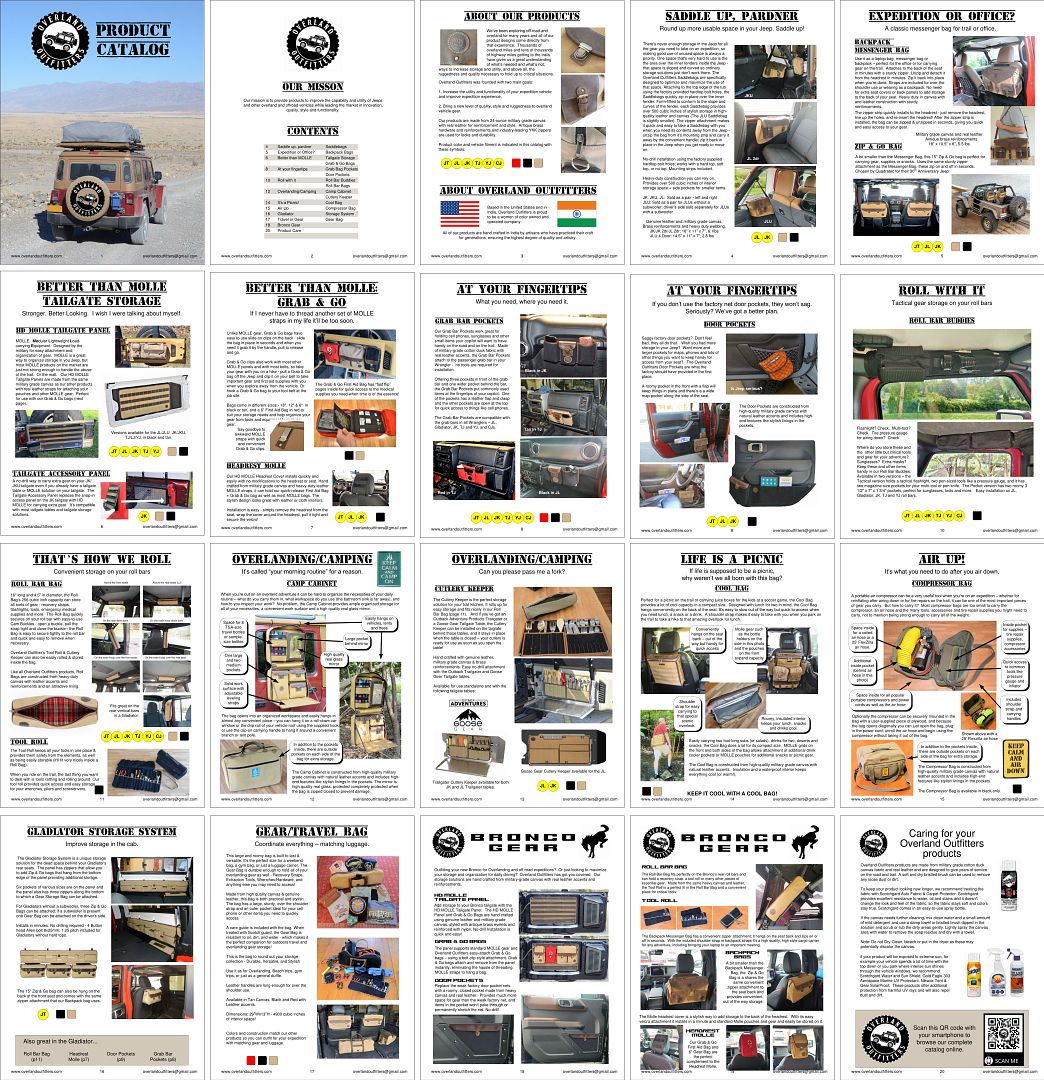
Overland Outfitters sent me their new paper catalog, they tell me they're including it in the package with all of the products they're shipping now. They say if anyone wants a paper copy it can be requested from their contact page (https://www.overland-outfitters.com/contact.html#/). A PDF version is also available for download on that page.

If you can't wait to see it, here's a small version... :)

CatalogPages.jpg


They borrowed some of the photos from me, you might recognize some of them from this thread as I've tested things.
 
Last edited:

jscherb

Expedition Leader
I've got a number of surplus and specialty places that I use to find components for many of my projects - for example Coleman's Military Surplus (https://colemans.com/).

For electronics I like Skycraft (https://skycraftsurplus.com/) and also MPJA (https://www.mpja.com/).

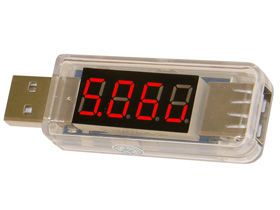
MPJA is especially interesting, they have many items that can't be found elsewhere. For example, I find this USB voltage/current monitor very useful (https://www.mpja.com/Battery-Low-Voltage-Disconnect-Module-12V-30A/productinfo/36622+MI/):

MPJAUSBMonitor.jpg


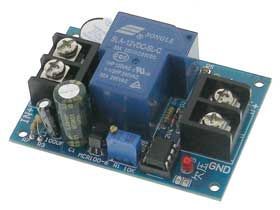
I've also been thinking about building a low voltage alarm/cutoff to protect the Jeep battery out in the wild, they've got this inexpensive circuit that would be perfect(https://www.mpja.com/USB-Port-Volt-Current-Monitor-Straight/productinfo/31568+ME/):

MPJALowVoltage.jpg


Just sharing a few of my favorite sources; I regularly scan their sites and I'm signed up for their email specials. Items from all of the above have been used on many projects I've done over the years, maybe these sources will help others.
 

jscherb

Expedition Leader
Back in 2008 when I was building my Wrangler pickup I installed an Airlift 1000 air bag helper kit in the rear springs to assist with heavy loads in the pickup bed. They worked so well I installed them in both my LJ and my JKU to help with overlanding loads - roof top tent, kitchen with fridge and all the other gear one carries on such adventures.

I've had a slow leak in the JKU system for the past few weeks so this morning I got underneath to investigate and repair the leak.

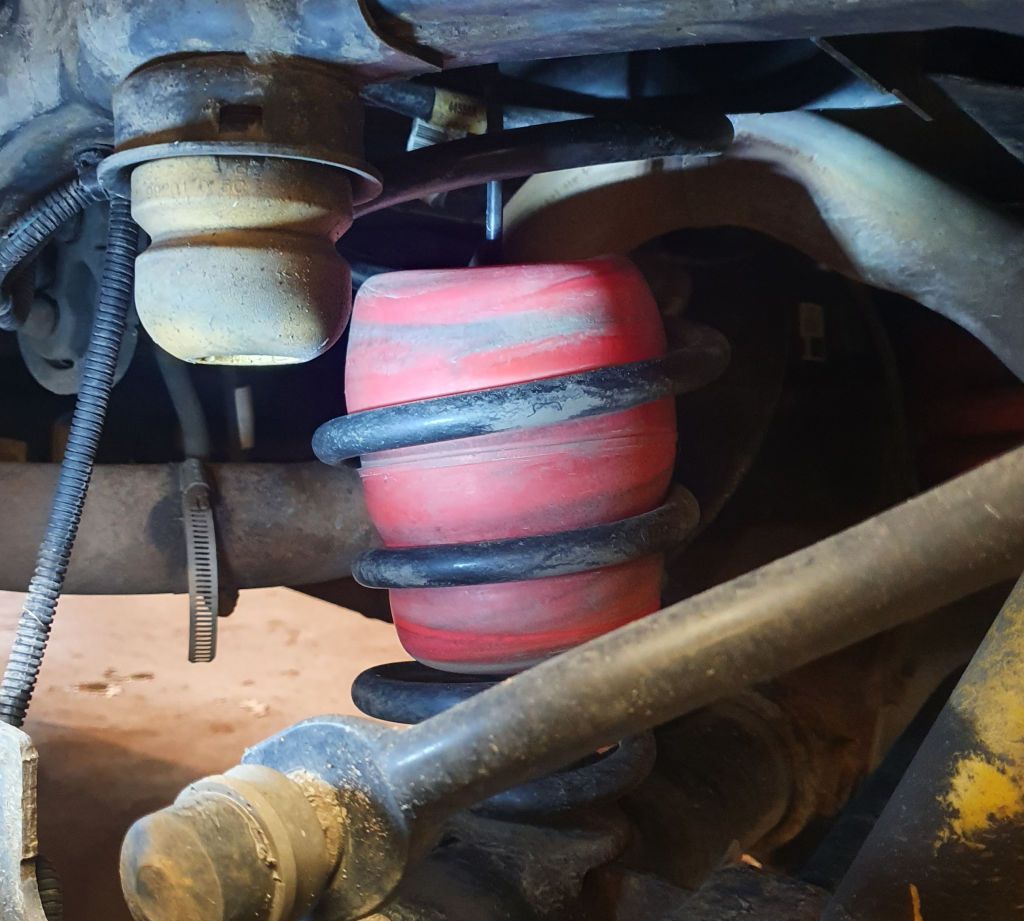
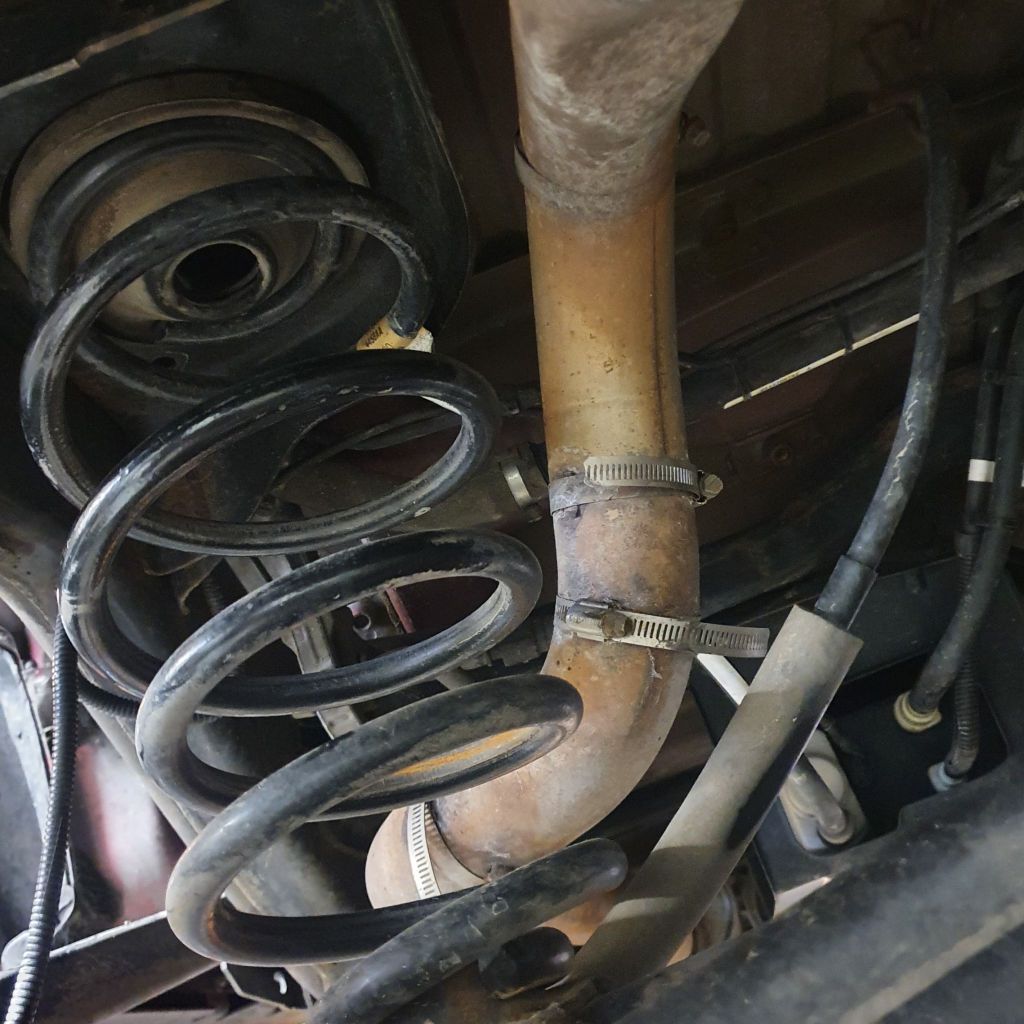
The driver's side bag is a bit stretched, although mostly that's due to it conforming to the spring, which is wider at the top than at the bottom.

BagDeformed1.jpg


The passenger bag is stretched as well, but not to the same degree. I think the driver's side bag may be more stretched because of what's not in this photo with the bag removed:

BagRemoved.jpg


Notice the hose clamps on the exhaust pipe - those are part of the air bag kit and hold heat shields in place to shield the bag from the heat of the exhaust. The shields are gone. The tabs that were part of the shields are still held in place by the hose clamps, but the shields have broken free of the tabs and fallen off. Could be that the excess heat from the unshielded exhaust pipe made the bag deform a bit more than the other side.

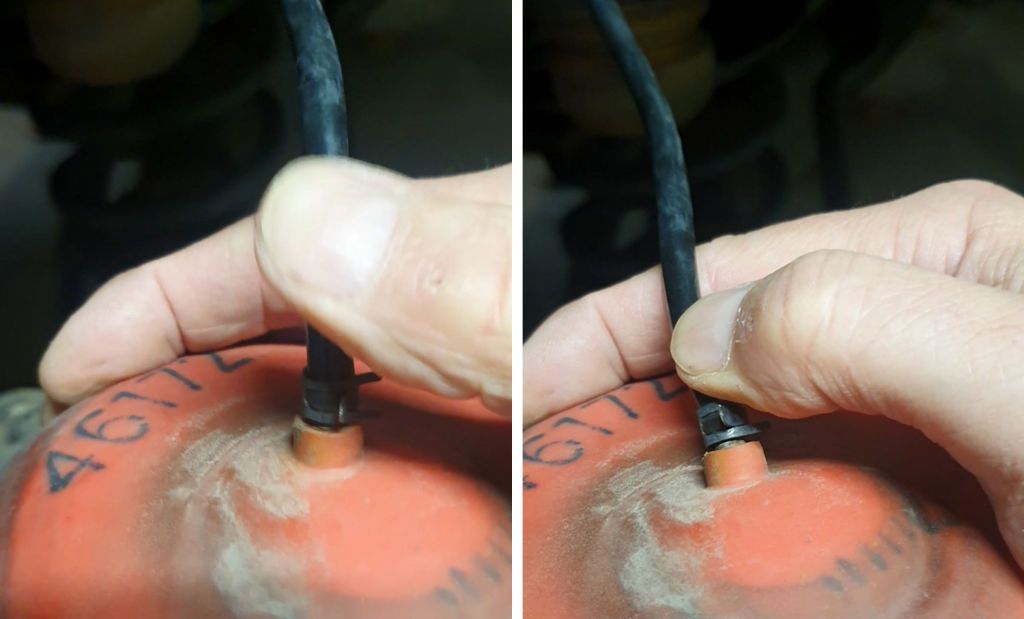
But that's not the reason for the leak. These next photos show the air connection at the bag. On the right I'm pushing it sideways with my thumb and air can be heard leaking out when I do that. This is the weak point in the bags - I've had this problem once in the LJ and also once in the pickup. Airlift is great about warranty replacements - the first time it happened in the pickup was year or two ago and the bags were installed in 2008. They sent me a replacement bag no charge.

BagLeak.jpg


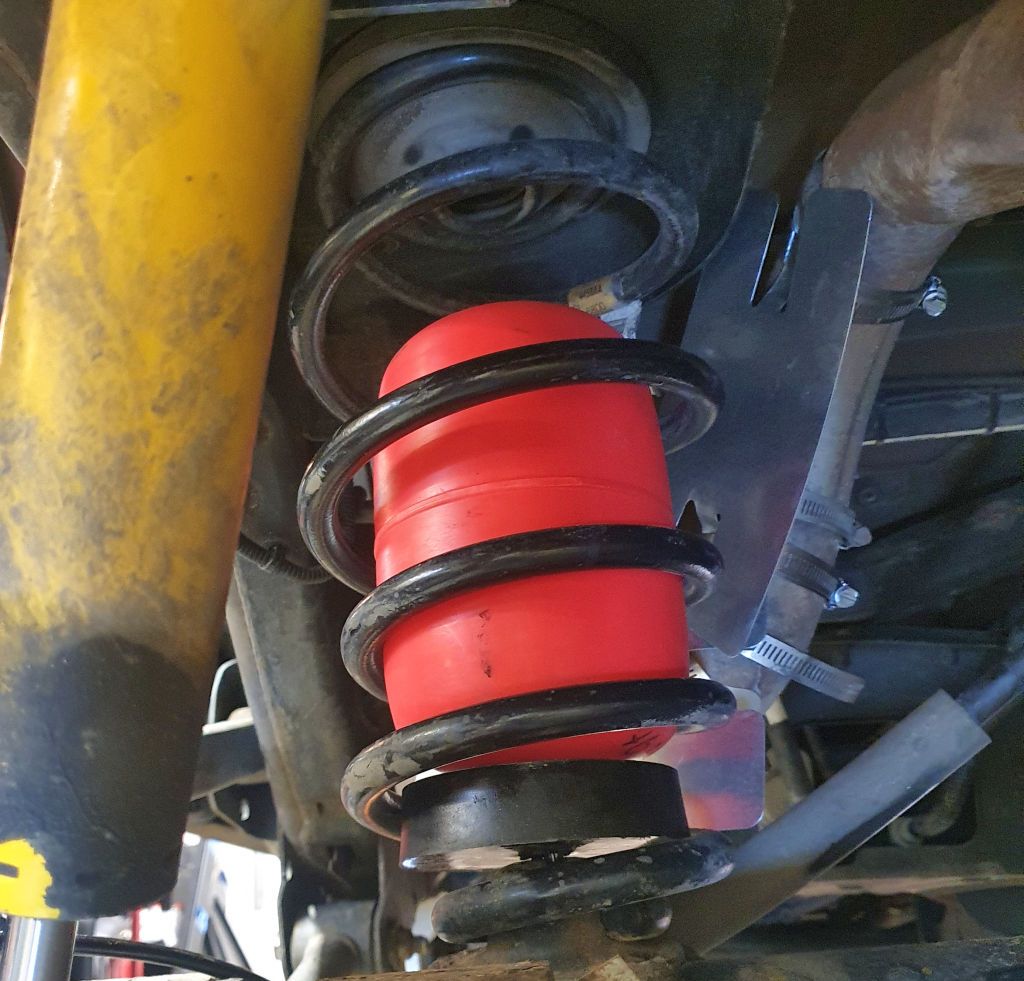
The bags are easily squished and removed/installed through the side of the springs when the springs are fully extended, so replacing the bad bag was a quick job. I also replaced the heat shields. These heat shields come with the kit and are fairly thin zinc-plated steel, so I may need to deal with them again in 4 years or so. If I have to replace them again I may make something more substantial.

NewBagInstalled.jpg


Working fine now.

In spite of the air connection on the bag being somewhat prone to failure and the cheap heat shields, I highly recommend these. A kit for the rear axle is about $110, and Airlift warranty support for a failed bag is excellent. I did get about 12 years out of the set in the pickup before one bag failed, maybe 7 years in the LJ before a bag failure and about 4 years in the JKU. and since replacement is pretty quick and easy, given the initial price, ease of installation and the warranty support a bag failure isn't really a big deal.

A couple of things I'd recommend if you're thinking of installing these in your Jeep:

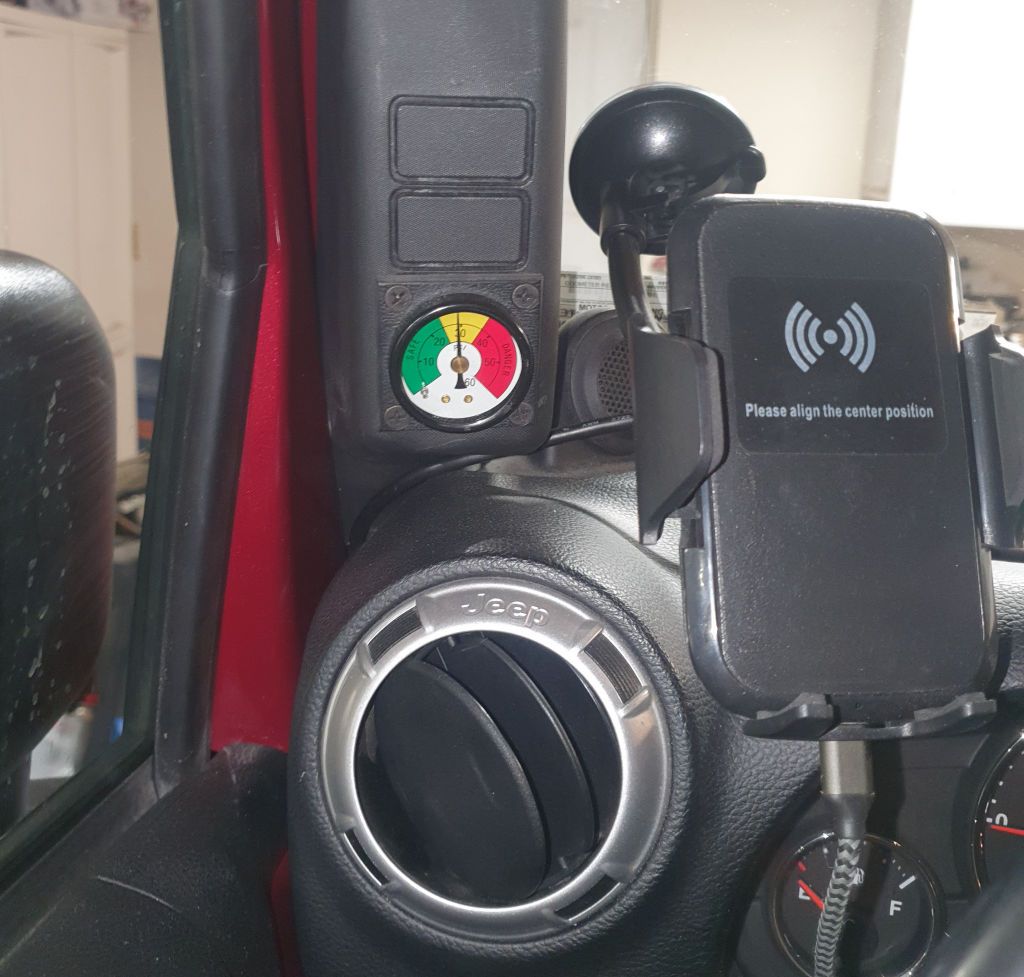
1. Install a gauge to monitor the bags. I've got one on my a-pillar. It's helpful to see how loaded the bags are and if airing them up might be useful for the current load, and it's also useful to monitor for leaks.

AirGauge.jpg


2. In all three of my Jeeps I've plumbed both bags together and based on several hundred thousand miles across all 3 Jeeps I see no reason to plumb them separately. There are no ill effects from plumbing them together and I've never had a situation where I felt that I needed more air on one side than the other.

3. I've never felt the need for an on-board compressor to air these up. I only change the pressure when I have a heavy load, and in that case I can air them up at home before I leave. I also carry a small bicycle pump (the type that mounts on a bike frame) and since the bags are fairly small if I need to add air on the road it doesn't take too many strokes of the bike pump to add even 15 pounds of pressure to them.
 

Lt Dan

Observer
Back in 2008 when I was building my Wrangler pickup I installed an Airlift 1000 air bag helper kit in the rear springs to assist with heavy loads in the pickup bed. They worked so well I installed them in both my LJ and my JKU to help with overlanding loads - roof top tent, kitchen with fridge and all the other gear one carries on such adventures.

I've had a slow leak in the JKU system for the past few weeks so this morning I got underneath to investigate and repair the leak.

The driver's side bag is a bit stretched, although mostly that's due to it conforming to the spring, which is wider at the top than at the bottom.

BagDeformed1.jpg


The passenger bag is stretched as well, but not to the same degree. I think the driver's side bag may be more stretched because of what's not in this photo with the bag removed:

BagRemoved.jpg


Notice the hose clamps on the exhaust pipe - those are part of the air bag kit and hold heat shields in place to shield the bag from the heat of the exhaust. The shields are gone. The tabs that were part of the shields are still held in place by the hose clamps, but the shields have broken free of the tabs and fallen off. Could be that the excess heat from the unshielded exhaust pipe made the bag deform a bit more than the other side.

But that's not the reason for the leak. These next photos show the air connection at the bag. On the right I'm pushing it sideways with my thumb and air can be heard leaking out when I do that. This is the weak point in the bags - I've had this problem once in the LJ and also once in the pickup. Airlift is great about warranty replacements - the first time it happened in the pickup was year or two ago and the bags were installed in 2008. They sent me a replacement bag no charge.

BagLeak.jpg


The bags are easily squished and removed/installed through the side of the springs when the springs are fully extended, so replacing the bad bag was a quick job. I also replaced the heat shields. These heat shields come with the kit and are fairly thin zinc-plated steel, so I may need to deal with them again in 4 years or so. If I have to replace them again I may make something more substantial.

NewBagInstalled.jpg


Working fine now.

In spite of the air connection on the bag being somewhat prone to failure and the cheap heat shields, I highly recommend these. A kit for the rear axle is about $110, and Airlift warranty support for a failed bag is excellent. I did get about 12 years out of the set in the pickup before one bag failed, maybe 7 years in the LJ before a bag failure and about 4 years in the JKU. and since replacement is pretty quick and easy, given the initial price, ease of installation and the warranty support a bag failure isn't really a big deal.

A couple of things I'd recommend if you're thinking of installing these in your Jeep:

1. Install a gauge to monitor the bags. I've got one on my a-pillar. It's helpful to see how loaded the bags are and if airing them up might be useful for the current load, and it's also useful to monitor for leaks.

AirGauge.jpg


2. In all three of my Jeeps I've plumbed both bags together and based on several hundred thousand miles across all 3 Jeeps I see no reason to plumb them separately. There are no ill effects from plumbing them together and I've never had a situation where I felt that I needed more air on one side than the other.

3. I've never felt the need for an on-board compressor to air these up. I only change the pressure when I have a heavy load, and in that case I can air them up at home before I leave. I also carry a small bicycle pump (the type that mounts on a bike frame) and since the bags are fairly small if I need to add air on the road it doesn't take too many strokes of the bike pump to add even 15 pounds of pressure to them.

Thanks Jeff
I have been using the same airbags with great success and highly recommend them.

I do not have a gauge but would like to. Seems to be a valuable addition to the air bag system.

If it's not to much trouble could you provide info on the gauge it's self and how it was installed. More interested in how you tied into the air system then actual location of the gauge..

Thank You!

Dan
 

jscherb

Expedition Leader
Thanks Jeff
I have been using the same airbags with great success and highly recommend them.

I do not have a gauge but would like to. Seems to be a valuable addition to the air bag system.

If it's not to much trouble could you provide info on the gauge it's self and how it was installed. More interested in how you tied into the air system then actual location of the gauge..

Thank You!

Dan
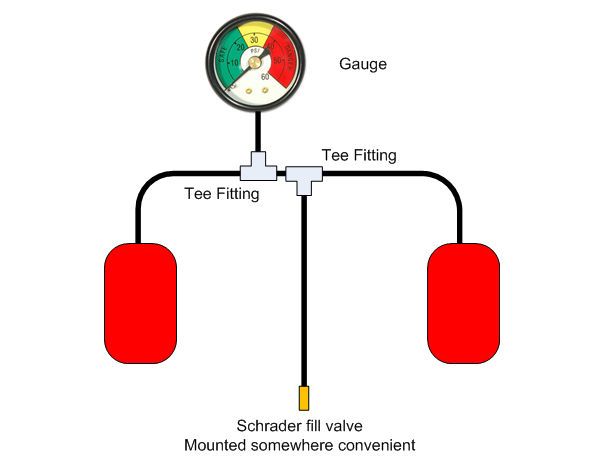
I highly recommend adding a gauge to the system. The plumbing is very simple - a couple of tee fittings:

AirLiftPlumbing.jpg


Depending on your installation there may not be enough hose in the kit to reach from the back to where you install the gauge so you can add an AirLift hose kit:

.

The hose kit will also give you an extra tee fitting, only one comes with the basic air bag kit. Tee fittings are also available at most auto parts stores, they're sold as vacuum line fittings and Dorman is one of the brands.

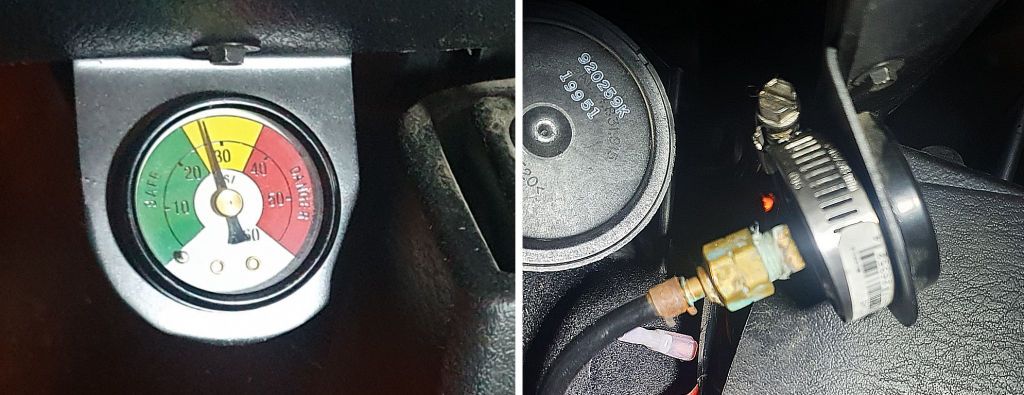
I found my gauges on eBay, they're 0-60 PSI with a yellow region that maps perfectly to the Airlift pressure recommendations.

eBayAirGauge.jpg


I bought 4, one for each Jeep and a spare because I figured they wouldn't be available forever. They are still available on eBay, but they're a little more expensive now: https://www.ebay.com/itm/372048175711

AirLift sells gauges, but they're 0-200 PSI and apparently for their high-end high pressure kits, they're not useful for the Airlift 1000 kits.

To mount the gauge in the JK, because the JK dash doesn't offer any good places to add a gauge I chose an a-pillar mount (mine was given to me by Auxbeam to review, I posted about it somewhere in this thread https://auxbeam.com/products/85619099?_pos=11&_sid=c7603d1e4&_ss=r). They're available from lots of places on eBay: https://www.ebay.com/sch/i.html?_fr....l1313&_nkw=wrangler+a-pillar+switch&_sacat=0

For the LJ's, I made a sheet metal gauge mount for under the dash. Pardon the lousy cell phone photos below...

GaugeMountAndAdapter.jpg


Depending on the type of gauge you get, you may have to adapt the 1/8" air hose to a 1/8" NPT (pipe) thread on the gauge. I did that as shown in the right photo above - I used a 1/8" NPT brass pipe cap from Home Depot (https://www.homedepot.com/p/Everbilt-1-8-in-FIP-Brass-Cap-Fitting-802069/300096118), drilled a hole in it, cut off the hose nipple portion of the second Shrader valve provided with the AirLift kit and soldered the nipple into the hole in the cap. If you can find a gauge with a 1/8" I.D. hose fitting input you won't have to make an adapter as I did.
 

jscherb

Expedition Leader
Another maintenance/repair on the JKU...

Sometimes it takes Jeep a long time to get things right. For example, there are a number of revisions to the JK tailgate hinges and the tailgate stay rod. The high-end HVAC controls (the ones with automatic temperature control) have been a real problem - they're now on their 9th revision of the control unit. The lead mechanic at the local dealership tells me he's replaced lots of them over the years. The one in my son's 2013 JK had a problem - it would blink for about 30 seconds after startup before it started working. The one in my 2013 JKU has been acting up - no matter what setting the controls are left in when the Jeep is shut off, it'll start back up in the dash vents setting. My better half likes the heat to come in at her feet, so this morning I swapped the control unit for a new one with the part number suffix AI. Jeep parts start with suffix AA and each revision bumps the suffix, so the "I" on the end indicates the 9th version.

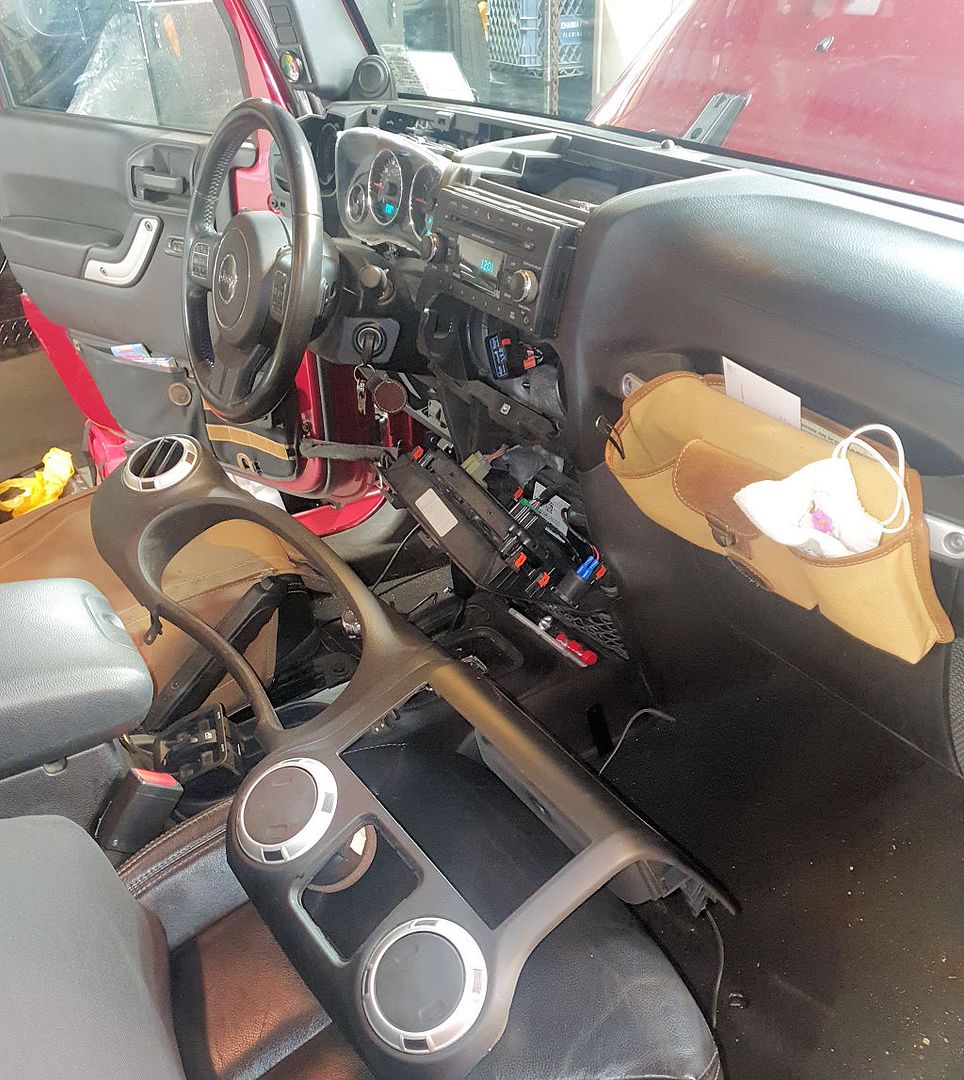
It's a pretty quick job. First thing is to get access, which involves removing the dash panel. On the TJ this was really easy because the center bezel removes with just two screws. In the JK, the driver's side panel and the center panel are one piece, so the entire thing needs to be removed. It's actually pretty easy though, four screws and some clips and the main dash panel comes off.

HVACControl1.jpg


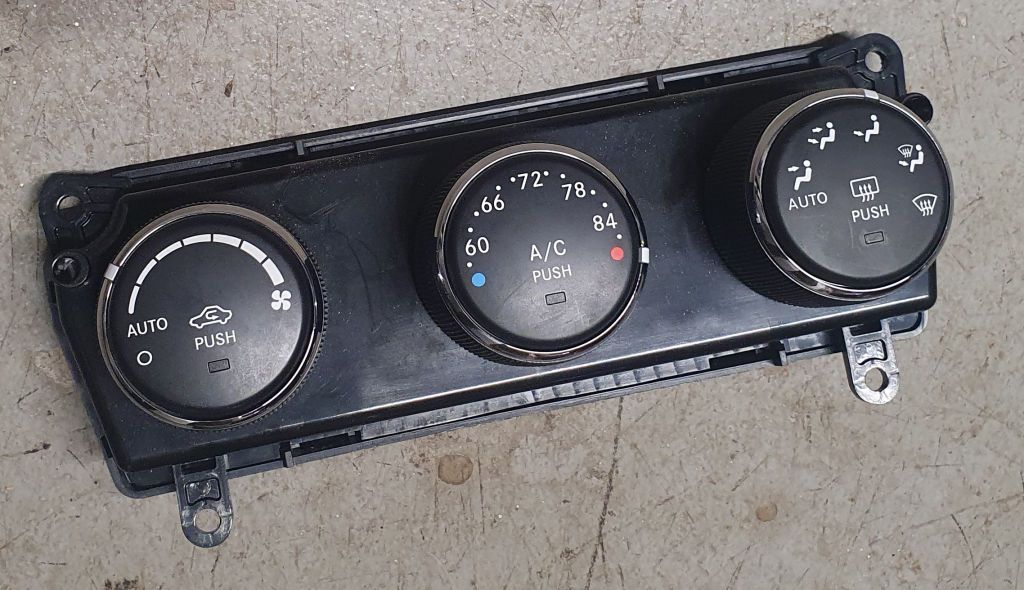
The control unit is held in place with a few screws and has one plug on the back so it's a quick swap. The entire job took about 20 minutes.

HVACControl2.jpg


The unit I removed is the "AG" variant, and based on the date on the back it's original to the vehicle, so Jeep had already gone through 7 updates from 2011 through when my 2013 was manufactured.

The HVAC is working fine now, it does what the controls are set for.
 

jscherb

Expedition Leader
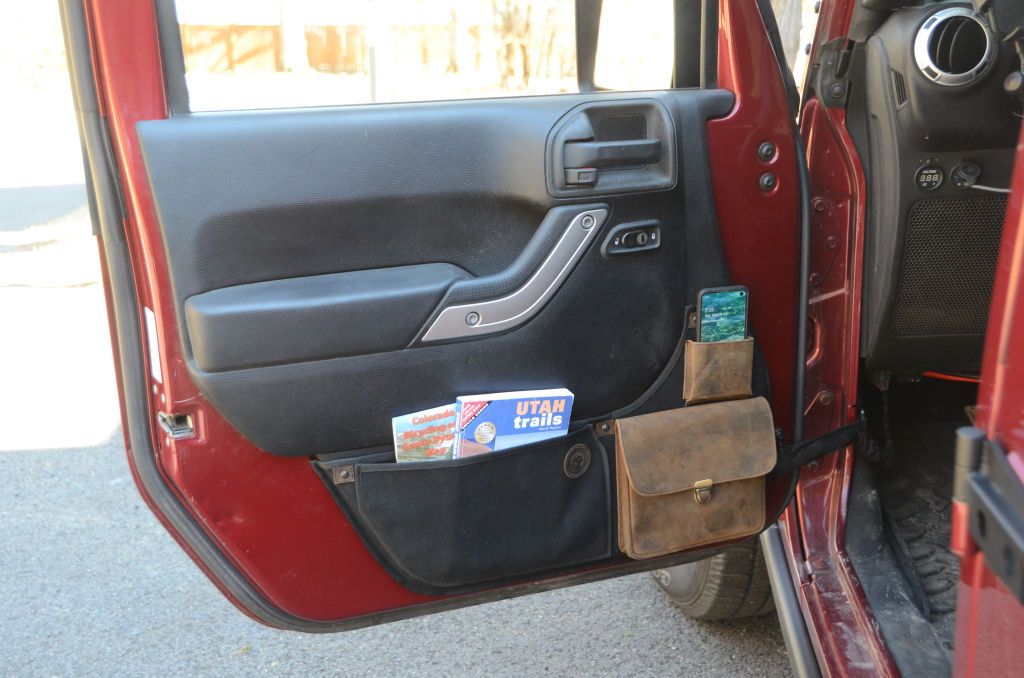
Back in 2019 I made door pockets to replace the saggy factory next on the JK doors:

PocketPanelDriver1.jpg


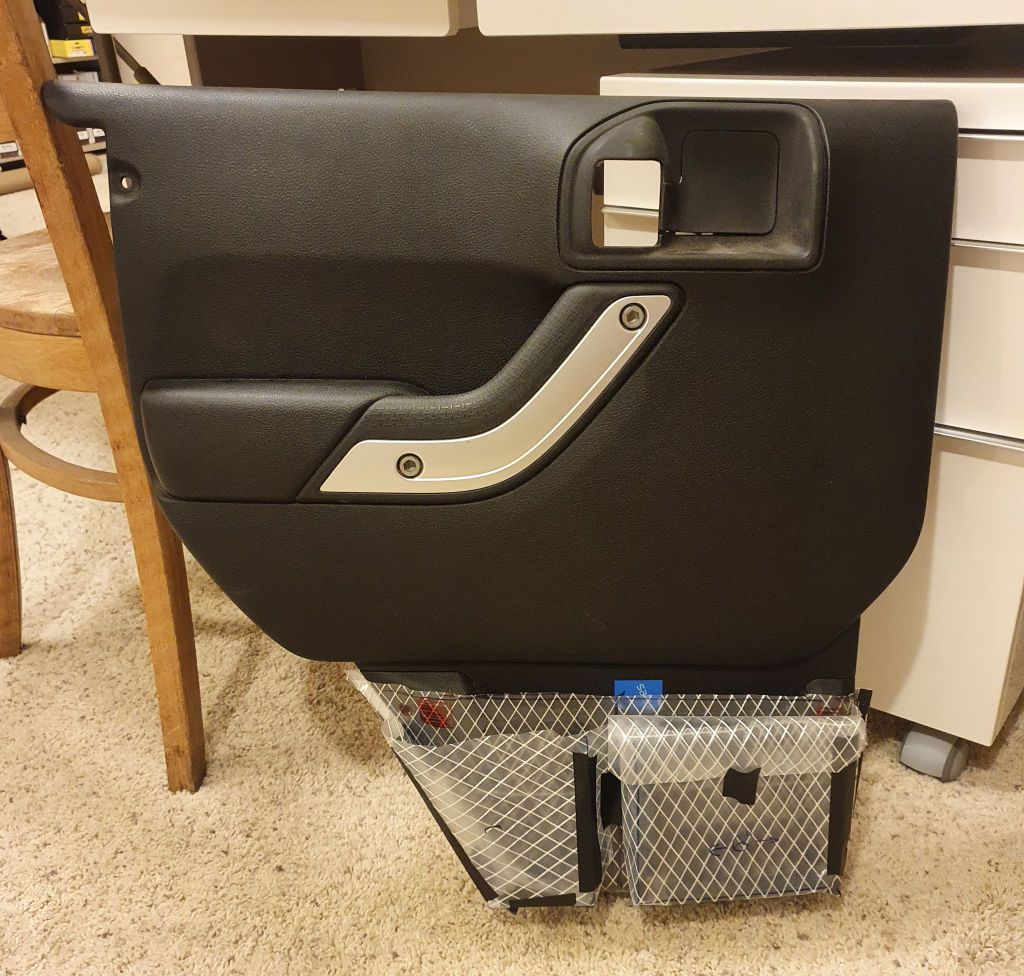
They've been so handy that I decided it was time to make some for the rear doors. This next photo is a DuraSkrim pattern mockup of the design; it will have a leather pocket with a flap closure in the front and an open pocket in the back.

DuraSkrimMockup.jpg
 

Lt Dan

Observer
I highly recommend adding a gauge to the system. The plumbing is very simple - a couple of tee fittings:

AirLiftPlumbing.jpg


Depending on your installation there may not be enough hose in the kit to reach from the back to where you install the gauge so you can add an AirLift hose kit:

.

The hose kit will also give you an extra tee fitting, only one comes with the basic air bag kit. Tee fittings are also available at most auto parts stores, they're sold as vacuum line fittings and Dorman is one of the brands.

I found my gauges on eBay, they're 0-60 PSI with a yellow region that maps perfectly to the Airlift pressure recommendations.

eBayAirGauge.jpg


I bought 4, one for each Jeep and a spare because I figured they wouldn't be available forever. They are still available on eBay, but they're a little more expensive now: https://www.ebay.com/itm/372048175711

AirLift sells gauges, but they're 0-200 PSI and apparently for their high-end high pressure kits, they're not useful for the Airlift 1000 kits.

To mount the gauge in the JK, because the JK dash doesn't offer any good places to add a gauge I chose an a-pillar mount (mine was given to me by Auxbeam to review, I posted about it somewhere in this thread https://auxbeam.com/products/85619099?_pos=11&_sid=c7603d1e4&_ss=r). They're available from lots of places on eBay: https://www.ebay.com/sch/i.html?_fr....l1313&_nkw=wrangler+a-pillar+switch&_sacat=0

For the LJ's, I made a sheet metal gauge mount for under the dash. Pardon the lousy cell phone photos below...

GaugeMountAndAdapter.jpg


Depending on the type of gauge you get, you may have to adapt the 1/8" air hose to a 1/8" NPT (pipe) thread on the gauge. I did that as shown in the right photo above - I used a 1/8" NPT brass pipe cap from Home Depot (https://www.homedepot.com/p/Everbilt-1-8-in-FIP-Brass-Cap-Fitting-802069/300096118), drilled a hole in it, cut off the hose nipple portion of the second Shrader valve provided with the AirLift kit and soldered the nipple into the hole in the cap. If you can find a gauge with a 1/8" I.D. hose fitting input you won't have to make an adapter as I did.

WOW!
Thank You Sir,
Especially for the links.
Ordered!
Dan
 

jscherb

Expedition Leader
Update on a few items...

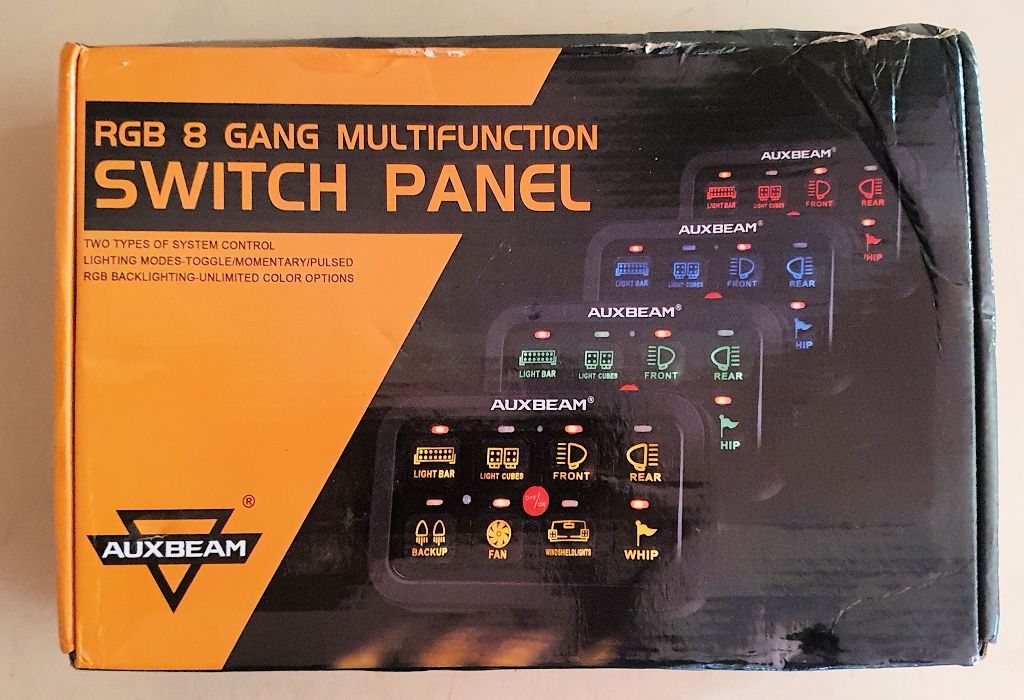
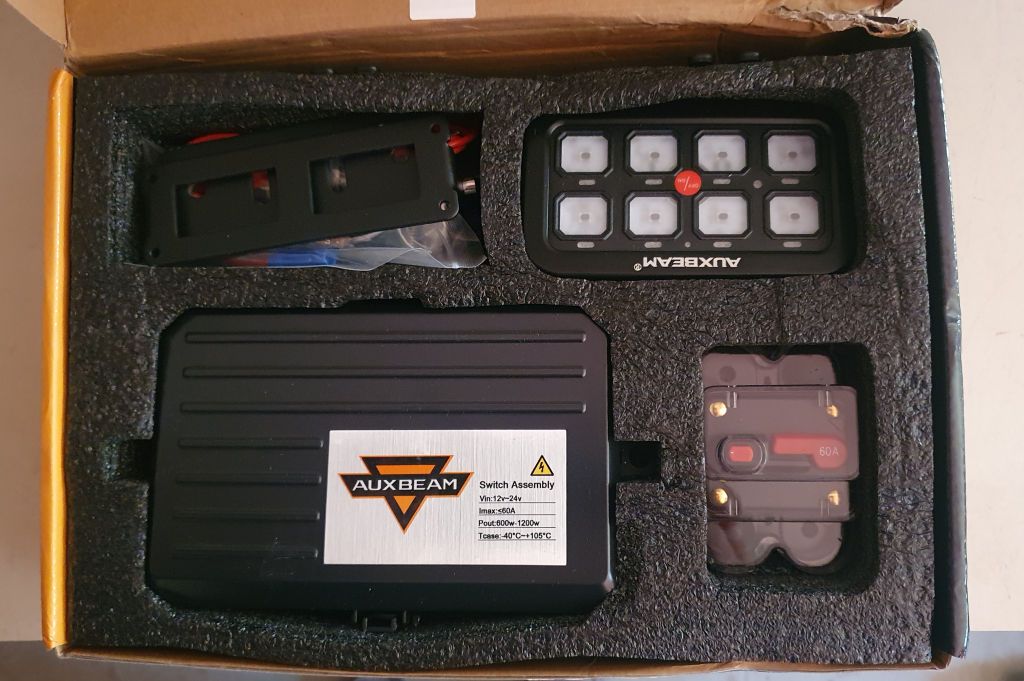
A week or so ago I posted that Auxbeam had just released a new Bluetooth-enabled switch panel. They sent me one to test and review, it arrived today:

BluetoothPanelBox.jpg


BluetoothPanelBoxOpen.jpg


Looks pretty nice. I'll get to it early next week and post a detailed review.

And the other day I posted about designing door pockets to replace the saggy nets on the rear doors of the JKU; I posted a photo of a DuraSkrim mockup. I showed the photos the Overland Outfitters and they liked the idea. Since they've sewn hundreds of their front door pockets for both the JK and JL, they know everything they need to know to sew these, so they said I could send them the mockup and some dimensions and instructions and they'd sew the prototypes. They'll send me prototypes as soon as they sew them. I like this, I didn't even have to go to the effort of sewing prototypes myself for once :).

Happy Holidays to everyone.
 

Forum statistics

Threads
188,032
Messages
2,901,437
Members
229,352
Latest member
Baartmanusa
Top