Bolt-together fiberglass Jeep-tub trailer kit

jscherb

Expedition Leader
Brute on a Budget...?

I'm on my way to Las Vegas now, I'll be attending the SEMA show starting tomorrow.

But in the meantime...

It's no secret that I like building Jeep pickup trucks - I've built two so far:

GauchoR1.jpg


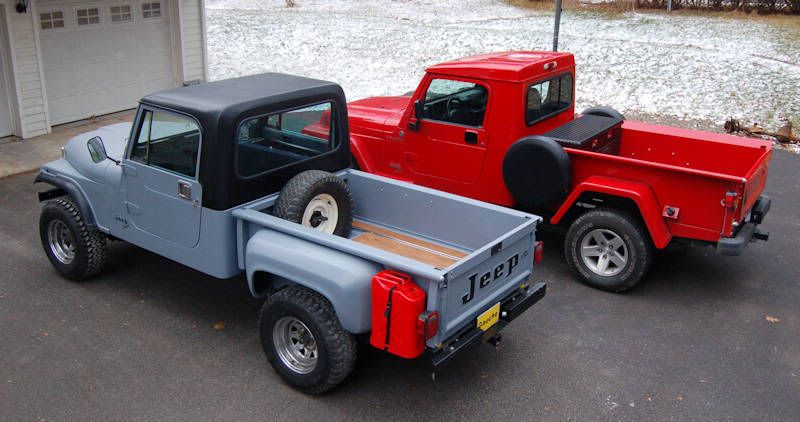
One of the reasons I've been doing this fiberglass trailer tub kit project is to serve as a proof-of-concept test for a fiberglass pickup bed, for a possible future pickup project I'm considering.

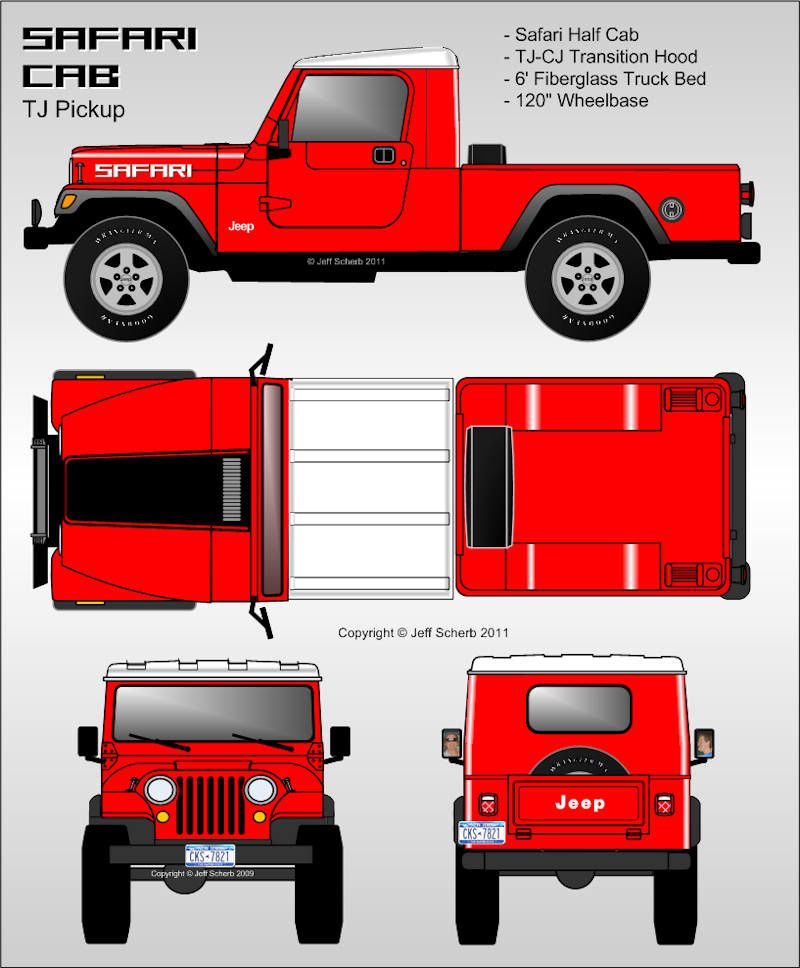
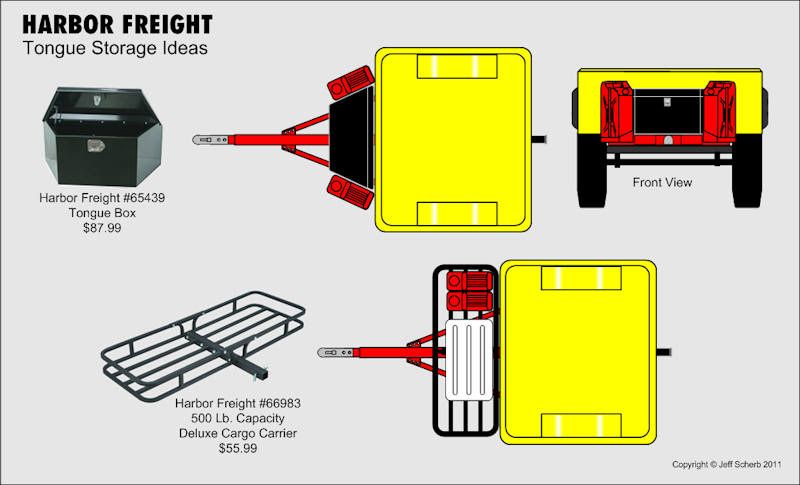
Here's a concept drawing showing the tub kit parts being used both to make the back wall of the body tub and the pickup bed tub, and of course a Safari Cab half cab...

PickupTubConcept1.jpg


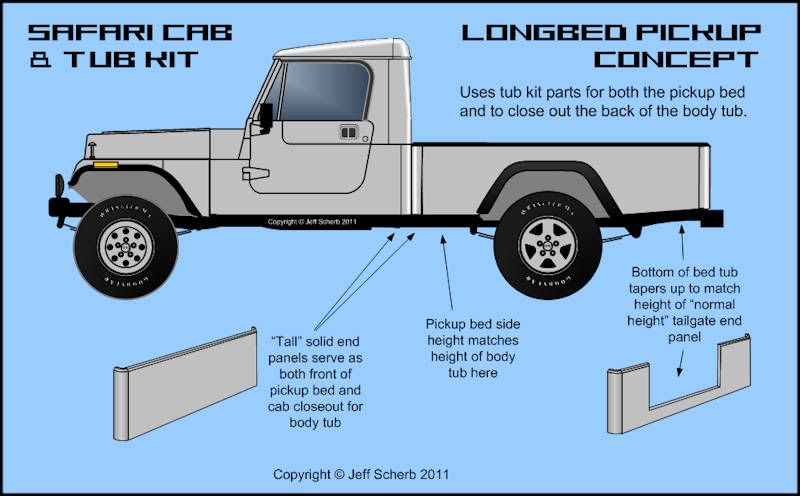
Taller solid end panels serve as both the rear of the body tub and the front of the pickup bed; I haven't made the mold for these taller solid end panels yet, but it's a simple modification to the current solid end panel master. This fiberglass panel can easily be bolted/bonded to the back of the cut off tub to complete the pickup cab tub, it would be a much easier tub conversion than trying to shorten a tub by cutting something out of the middle and trying to weld the original back panel in place behind the front seats.

The side panels for the pickup bed would be molded with an angled dam in the rear to slope the bottom of the bed side up to meet the standard height end panel with the tailgate opening in it, the same way the bottom of the Jeep tub slopes up behind the wheel wells.

With these parts you could build a "Brute on a Budget". The Brute cab closeout sheet metal from AEV is about $2300, but this fiberglass end panel closeout could be sold for a small fraction of that (a few hundred bucks probably). The Brute pickup bed from AEV is $5500; this fiberglass one could also be a small fraction of that. Add a Safari half cab hardtop or a Gr8Tops half cab hardtop, and some lengths of frame rail from the junkyard to length the frame and you're pretty close to everything you need to assemble a pretty cool Wrangler or CJ based pickup...

The drawing above is a "longbed" concept, but of course the pickup bed tub could be made to any length.
 

jscherb

Expedition Leader
Here's another pickup concept using the tub kit parts. This one's a TJ, it uses the TJ/CJ fiberglass hood and fenders I'm planning on building for my next project, a Safari Cab half cab hardtop, and a 6' fiberglass bed (the bed of the silver pickup in the last post is 7' 5", the same length as my yellow trailer tub).

PickupTubConcept2.jpg


This one has a recessed well in the front of the bed for the spare tire, and mounts for two jerry cans inside the bed just behind the inner fenders.
 

jscherb

Expedition Leader
Killing time on the plane back from SEMA/Las Vegas, I did some doodling with different tire sizes for the trailer. This drawing shows the original 5.30x12 Harbor Freight tires, 28" base Jeep tires (225/75-15), and 32" tires on 16" rims. I've extended the tongue to 48", which is possible by rearranging the HF parts, so that I can fit Jerry cans and a 16" deep tongue box on the tongue; the tailgate on the Jeep is open to show that this combo should just fit.

TireSizes3.jpg


With the larger of the two tire sizes, you'd just share the Jeep's spare. If the original HF tires were used with smaller wheel openings as shown, a separate smaller spare would be required for the trailer, so I've mounted one on the trailer tailgate.
 

jscherb

Expedition Leader
Tomorrow I'll begin prepping the molds for making parts, and Monday I'll mold the first actual parts - I start with the tub tailgate end panel and one of the inner fenders on Monday

Today I was mostly catching up from being away all week, but I did spend a little time mocking up some of the modifications I plan to make to the Harbor Freight trailer frame - having seen all of the tongue storage ideas at SEMA, I decided to take a look and see how the HF frame could be improved so the tongue would be more usable.

As it comes from HF, the tongue and coupler assemble like this:

TongueStock.jpg


The coupler ball location is about 42" in front of the front wall of the tub, which is fine, except that doesn't leave too much room for tongue storage and swinging open the Jeep's tailgate all the way. Also the tongue is somewhat weak with only the two a-frame members.

Next photo is a mockup using one of the main side rails that will be leftover from shortening the trailer from 8' to 4' as a center tongue member. I've also mocked up a Harbor Freight #97093 18" receiver tube on the front:

TongueReceiver.jpg


The receiver tube ($12.79 on sale plus 20% off coupon) can be used as-is to accept couplers attached to a 2" square tube; this would allow easy swapping between a ball-style coupler and a pintle ring for either on-road or off-road use. The hitch connection moves up to about 63" away from the front of the trailer tub if this is done, allowing a good amount of storage space on the tongue, say for a tongue box:

TongueReceiver2.jpg


The only minor complication with the photo above is that the trailer comes with a coupler that fits on a 2 1/2" wide tongue bar, and the coupler shaft is 2", so you'd have to adapt the HF coupler to the 2" shaft. An easy way to do that is to pick up a Reese reducer sleeve, it adapts from 2 1/2" to 2", and it's a proper length to support the coupler. $11.99 at Tractor Supply. Then all you need is a foot of 2" square tube to make the coupler shaft.

One other option is to bolt the HF-supplied coupler directly to the receiver tube:

TongueCoupler.jpg


In the photo above the coupler is angled because of the ring around the end of the receiver tube, that ring would have to be removed in order for the coupler to mount properly. Removing the ring wouldn't be too hard using a cutting wheel in an angle grinder, and the receiver tube would still have adequate strength in the event you wanted to unbolt the coupler in the future and use the tube as a receiver for an alternate coupler.

I think I'll do what's mocked up in the last photo for this frame - I'll lengthen the tongue as shown and put a receiver tube on the front. I'll remove the ring on the tube so the HF-supplied coupler can be directly bolted to the tube, but this will still allow the future option of using the tube as a receiver.

There are a few details to making this work that aren't shown in the mockups, but I'll show them when I do the actual trailer assembly.
 

jeepdreamer

Expedition Leader
Good to see your jumping right back into it. Are you going to start your own SEMA thread or just add to others? I'd like to see what you found interesting, everyone seems to have their own perspective.
 

jscherb

Expedition Leader
Good to see your jumping right back into it. Are you going to start your own SEMA thread or just add to others? I'd like to see what you found interesting, everyone seems to have their own perspective.
No plans to post any more SEMA stuff. I was somewhat focused on trailer stuff there because of this project, although I did explore the entire show. And I did have meetings at SEMA with two different companies who have expressed some interest in producing these trailer tub kits.
 

jscherb

Expedition Leader
Now that I've come up with an easy way to lengthen/strengthen the tongue on the Harbor Freight trailer frame, here are some tongue storage ideas. I've dipped into the Harbor Freight catalog again for two options - a tongue box, and a tongue cargo platform:

StorageIdeas1.jpg


The HF cargo carrier comes with a receiver tube, it's intended for use with a hitch receiver. But in this application, it gets assembled without the center tube, and bolted directly to the trailer frame.
 
Last edited:

jscherb

Expedition Leader
Won't be long now until I'm assembling a complete tub kit... the first parts for the kit are now coming out of the molds...

These are just out of the mold, all I've done so far is wash the green PVA mold release off them:

Tailgate end panel:

TGEndPopped1.jpg


TGEndPopped2.jpg


Inner fender:

InnerFender1Popped.jpg


This morning I'll trim up the edges and post some more photos.

Later today I'll prep the solid end panel mold and the inner fender mold (to make the second one).
 
Last edited:

jscherb

Expedition Leader
I do lots of mockups to inspire me, something about seeing how things are going to go together is really cool... so here's a mockup - a TJ tailgate with Exogate hinges, and tail lights:

TJTailgate.jpg


I don't plan to use a TJ tailgate on the trailer, but this one was handy in the garage so I threw it in for the mockup.
 

gorogergo

New member
I'm really enjoying following this process, not just the physical output, but the developmental process. This thread, and your other build threads, are step by step instructions for taking one's inspirations from dream to reality.
 

jscherb

Expedition Leader
I'm really enjoying following this process, not just the physical output, but the developmental process. This thread, and your other build threads, are step by step instructions for taking one's inspirations from dream to reality.
Thanks, glad you're finding it useful. But I have a confession to make about the step-by-step - I'm only posting a summary here on Expo, I'm posting every detailed step on another forum. Yesterday, for example, I showed pretty much every step in the fiberglass layup process for these parts.
 

jscherb

Expedition Leader
I've rough trimmed the parts... this next photo shows how the end panel assembles to the floor and to the side panels. I've pasted some bolts in place to show where they would go, but the assembly could be bonded also, with no bolts. At this point I've left the flanges a little wide, they'll be final trimmed when I assemble the tub.

The pink bolt locations are where the end panel attaches to the side panels. The yellow bolts attach the end panel to the floor, the floor panel goes under the bolt flange/tailgate opening flange. There will be similar flanges on the side panels to secure the side panels to the floor.

In this photo you can also see the 1/4" plywood reinforcements I've sandwiched into the fiberglass to support bolting things like hinges to the rear panel. This panel can support either swing-down CJ tailgates or side-swing Wrangler tailgates.

TGEndFlangeBolts.jpg


And a shot of the trimmed inner fender:

InnerFender1Trimmed.jpg


The inner fender will be bolted to the floor using the bottom flange. It could be bolted to the side panel as well, but I'll bond that joint with fiberglass instead, it will make for a stronger side panel having the fender bonded.

Also notice the tiny "step" in the back of the floor flange on the inner fender - that part sits on top of the side panel floor flange, so it needed to be raised a little so the rest of the inner fender flange sits flat on the floor.
 

Forum statistics

Threads
187,200
Messages
2,892,143
Members
227,883
Latest member
nepaltourism
Top