You are using an out of date browser. It may not display this or other websites correctly.
You should upgrade or use an alternative browser.
You should upgrade or use an alternative browser.
Buying & Building a Medium Ambulance into an RV – The FAM-BULANCE
- Thread starter rlrenz
- Start date
Ozrockrat
Expedition Leader
Where is the thermostat for the rear AC on yours. I have looked all through the box and cannot find one. The spare wires I thought were for the thermostat are for another fan (according to the label on the wire)?
I just went out and checked the wiring diagrams. There is not a thermostat in the mix anywhere????? Is this because the just either turned it on or off for Miami weather? I am confused but hopefully in the morning I will start chasing wires and power and find out where the electrons are blocked or escaping. Its much easier if they send up smoke signals.
I just went out and checked the wiring diagrams. There is not a thermostat in the mix anywhere????? Is this because the just either turned it on or off for Miami weather? I am confused but hopefully in the morning I will start chasing wires and power and find out where the electrons are blocked or escaping. Its much easier if they send up smoke signals.
Last edited:
rlrenz
Explorer
Sound the bells and ring the trumpets!
I've been searching for a suitable heavy duty grill that I can use for fresh air for the generator, and for exhaust cooling air. I've dug through electronic piles of data, and I keep not finding what I was looking for. I checked with McMaster - nope. I checked with steel door makers - nope. I chased all over the place.
You get the idea -
Then, I was searching for something else, and I found the name Shoemaker popping up all over the place for vents and registers. I finally realized that I don't need a set of weatherproof louvers - all ambulance builders use is some sort of a grill - look at what Frazer uses to exhaust cooling air from their ambulance generator - just some punched holes through the compartment skin..
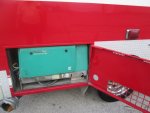
It turns out that Shoemaker supplies their grills in steel, aluminum, and stainless steel. I found both 1/8" aluminum, and also 14 gauge stainless available at not too bad prices - roughly about $100/each in 1/8" aluminum. I'll use an intake grill that's about 12x12", and a cooling air exhaust grill that's about 16x6". I want something heavy duty, so if some wise acre decides to kick the panel, it will have a chance of surviving (which is why I like 1/8 aluminum or 14 gauge stainless)
Shoemaker (http://www.shoemakermfg.com/) has a good on-line listing that will give you the model number. Their products are sold by Registers Direct (http://www.registers-direct.com/).
I've been searching for a suitable heavy duty grill that I can use for fresh air for the generator, and for exhaust cooling air. I've dug through electronic piles of data, and I keep not finding what I was looking for. I checked with McMaster - nope. I checked with steel door makers - nope. I chased all over the place.
You get the idea -
Then, I was searching for something else, and I found the name Shoemaker popping up all over the place for vents and registers. I finally realized that I don't need a set of weatherproof louvers - all ambulance builders use is some sort of a grill - look at what Frazer uses to exhaust cooling air from their ambulance generator - just some punched holes through the compartment skin..

It turns out that Shoemaker supplies their grills in steel, aluminum, and stainless steel. I found both 1/8" aluminum, and also 14 gauge stainless available at not too bad prices - roughly about $100/each in 1/8" aluminum. I'll use an intake grill that's about 12x12", and a cooling air exhaust grill that's about 16x6". I want something heavy duty, so if some wise acre decides to kick the panel, it will have a chance of surviving (which is why I like 1/8 aluminum or 14 gauge stainless)
Shoemaker (http://www.shoemakermfg.com/) has a good on-line listing that will give you the model number. Their products are sold by Registers Direct (http://www.registers-direct.com/).
Last edited:
rlrenz
Explorer
Tire Stuff-
I'm sticking with my standard stock 245/70/R19.5 tires, primarily because I'm not planning to go off-roading, plus I'm old enough that I can't physically handle the weight of a larger tire any more.
Since many fire departments / volunteer ambulance organizations can rely on backup for a flat tire, their equipment often doesn't carry a spare - since I don't have a municipal garage to call for a flat tire, I decided to carry a spare with me.
The question was WHERE?
Between the frame rails sounded nice until I measured...
I ruled out building a swinging spare tire rack for the new (now being planned) rear bumper, since I wanted to open the rear doors without dealing with a swinging tire (and Murphy's Law will always decree that I would be parked on a slope and the tire would fight me...).
I decided to build a spare tire rack to fit in my ambulance's end compartment on the driver's side.
A little measuring showed me that I'll have a total of 1" of clearance to the cabinet shelf supports, and I can easily raise one shelf to give me sufficient clearance. I have to fiddle with the cabinet back a bit so the interior cabinet access doesn't look at a tire, but that's straightforward metalwork and some carpentry.
More as this proceeds -
rossvtaylor
Adventurer
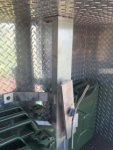
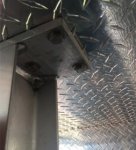
Well, Bob... you may be in luck. Let me photograph and measure my spare tire mount. It is still built into the left rear compartment, but our new tires and wheels won't fit in there any longer and we'll be taking it out. The mount is aluminum and damned sturdy. If it fits, you can have it for the postage.
EDIT to add pics and measurements:
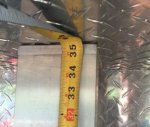
It looks like the mount's vertical support is about 35 1/4 or 35 3/8 inches tall. If it's a bit shorter than you need, you could put a couple of washers between the mounting bolts and the top or bottom box surface. If it's a bit too long, that's a bit of a tougher issue... it's nicely welded, so would be hard to shorten. Here are some pics. Let me know if this will help you out.


Last edited:
rlrenz
Explorer
Thanks for the offer, but you're about 3 weeks late -- I bought the material a while ago, then welded it up last week. It was Scotch-brited and acid cleaned today to prep it for paint tomorrow - epoxy primer then a coat of Freightliner white.
The cabinet I'm using is about 6 ft high, so I have to do all my mounting through the floor. It's a 3/8 x 12" bottom plate, with a 1/2 x 6" upright and a couple of side braces. It will bolt through the floor deck plate and through the 2x2" body support side stringers with 3/8 flathead bolts. All stainless steel hardware and Ny-lock nuts. Added material was been cut and drilled for backup under the floor and under the 2x2" tubing.
I welded a 7/8" diameter bolt through the upright to hold the tire to the upright - probably overkill..... Instead of using a nut with a handle to secure the tire, I used a junk yard machine tool handwheel - Chrome plated! I drilled it out and ran a 7/8-9 tap through it.
rossvtaylor
Adventurer
Sorry! But it sounds like you've got a better, even more bomber, mount. I was picturing a cabinet similar to ours, but they are all indeed unique. Nicely done - we look forward to the pics. Nice use of the handwheel, by the way!
rlrenz
Explorer
Freightliner struck again! After learning that a bad Throttle Position Sensor will stop you totally, I picked up a spare from Freightliner. When we tried to install it, we found that somewhere in the 15 years that my truck had been out there, a change was made, and they now used a totally different throttle pedal assembly. The spare TPS I had purchased was for the new style pedal assembly. The new version (that doesn't fit) runs about $ 140 at Freightliner, bu thankfully they cheerfully (really!) refunded my money. I could have purchased a new pedal assembly with sensor for about $350, but I decided to pass.
Any of you folks running a 1999 and newer Freightliner will find that you probably use a Williams 131040 sensor module. I have seen discussions on the web that that same sensor is also used by International, Navistar, and Volvo - but under a different part number. I'm going to check with Fleetpride on Monday to see what their books say.
In the meantime, we cleaned the old sensor, and gave it a shot of Kroil followed by an air hose (since I couldn't find any tuner cleaner on my shelves).
It works fine now.
Last edited:
rlrenz
Explorer
A 5 Star Tool!
Several months ago, I saw a mention by Ross Taylor where he mentioned a torque multiplier lug wrench (Amazon - who else?). I decided to buy one (https://www.amazon.com/gp/product/B00H99Y556/ref=oh_aui_search_detailpage?ie=UTF8&psc=1) since I wanted something that could live on board and that could be operated by just about anyone. I bought the larger kit that offered additional sockets so it can be used on various vehicles.
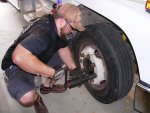
My thanks to MNtal for showing me some tricks on truck brakes (he's in the photo)!
It did the job perfectly! It has earned a place in my on-board tool collection.

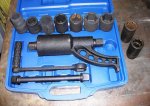
The two sockets standing next to the torque multiplier are a 33mm x 1/2" drive impact socket to tighten the lug nuts, and a 1" 8-point x 1/2" drive in case I want to take advantage of the 58:1 torque ratio to tighten the lugs with a torque wrench.
Several months ago, I saw a mention by Ross Taylor where he mentioned a torque multiplier lug wrench (Amazon - who else?). I decided to buy one (https://www.amazon.com/gp/product/B00H99Y556/ref=oh_aui_search_detailpage?ie=UTF8&psc=1) since I wanted something that could live on board and that could be operated by just about anyone. I bought the larger kit that offered additional sockets so it can be used on various vehicles.
My thanks to MNtal for showing me some tricks on truck brakes (he's in the photo)!
It did the job perfectly! It has earned a place in my on-board tool collection.


The two sockets standing next to the torque multiplier are a 33mm x 1/2" drive impact socket to tighten the lug nuts, and a 1" 8-point x 1/2" drive in case I want to take advantage of the 58:1 torque ratio to tighten the lugs with a torque wrench.
Last edited:
rlrenz
Explorer
Good to know that worked out OK. Now I guess I need to get me one ordered!
In the Amazon reviews, one guy grumbled that the tool didn't retain the sockets -- I could care less! I'm perfectly willing to drop a socket from time to time - especially compared to fighting with a 6 ft hunk of pipe on a wrench handle. I don't need "fancy", I just need to remove a lug nut.
rlrenz
Explorer
I have been advised that the Throttle Position Sensor is definitely a critical part -- if it fails, I'm dead in the water. Since I have a Freightliner with a Cummins 5.9, I bought a replacement from Freightliner. When we tried to install it, we found that it didn't fit my throttle pedal - the only option was to buy a new complete throttle pedal/sensor package for about $350.
I declined, and decided to track down a new sensor. It turns out that the old sensor (Williams Control # 131040) is long obsolete. No one had one, even ebay.
I called Williams Control, and found that the 131040 sensor has gone through several upgrades over the years, with new part numbers assigned to help keep the stock sorted. The new number for this sensor is Williams Control 131973.
rossvtaylor
Adventurer
Hi Bob, glad I could be the guinea pig! I actually got the idea from Ozrockrat and from the (slightly different form factor) versions I use at work, on the wind turbines. I don't think this is the same model Oz ordered, but the reviews were good and I've been very pleased. I got the same kit you did, with the sockets. True, it doesn't retain the socket... but I think that's by design, actually. When you use a torque multiplier, it braces against something. In this case, that something is the neighboring nut. When you back off the tension a touch, you need to pull the bits off and reposition on the next nut. I find that it's easiest to put the loose socket on the next nut, orienting the socket opening roughly where I want it (this will make sense when you use it, as you can rotate the socket to get different wrench orientations). Then, I can insert the wrench into the socket. I find it easier than keeping the socket on, then blindly cranking 100 times in either direction to get it to slide on.
Hey, I like tricks! Please share.
My thanks to MNtal for showing me some tricks on truck brakes (he's in the photo)!
Hey, I like tricks! Please share.
rlrenz
Explorer
That makes sense, Ross.
OK - here's the skinny on what we did:
I'd installed new front brake shoes last year, and barely drove it afterwards. This summer, we took her out and got stuck in a 25 mile long conga line of traffic - the kind where you can see the light turn green 4 times before you get to the intersection, and your speed fluctuates from about -0- to maybe 10 mph, and your foot gets tired of pressing on the brake.
When we got back, the brakes were definitely hot. I mentioned it to MNtal, and he volunteered to take a look at them. He's built a lot of off-road rock crawler equipment, and has run into large discs a lot more than I have.
The new torque multiplier popped the lugs off in a jiffy, and he showed me how to remove the brake shoes (an Allen wrench to remove the lock-screw, and a punch to drive out a lock bar and spring). The shoes were definitely new, but he showed me how to use an angle grinder with a flap disc to lightly scuff them to remove any glazing (about a 10 second project). A Scotchbrite disc and an air angle grinder was then used to clean up anything that was on the rotors, followed by a squirt of spray brake cleaner.
Then, a wood stop block was set in front of the pistons. It was selected to allow them to travel farther than they needed to be based on the pad thickness, but not so far as to allow the pistons to travel too far. A press on the brake pedal caused the booster electric pump to engage and extend the pistons. Then, a piece of bar stock and a large C clamp were used to push the pistons back into the caliper. The pedal was pressed again so the pistons would again come out to the wood block. After 2-3 cycles of this, the C clamp effort dropped off, and we decided that the pistons were freed up.
The two pads were re-installed, the lock bar/spring and the lock screw went back in, and the tire was reinstalled. We used a normal 1/2" impact to tighten them - we've found that if they are installed with a 1/2 impact, the final torque is very close to the recommended 450-500 Ft Lbs for a 22mm stud.
We then sorted out lug nuts to match up the correct nuts to the stainless wheel simulators that were on the ambulance - two of the nuts are a little shorter so the studs stick through far enough for the simulator nuts to grab on, so these have to be positioned 180 degrees apart. After a few tries, we even got the valve stem to line up as well.
A test drive showed that the end result was perfect.
rlrenz
Explorer
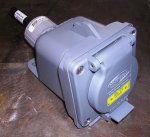
I ran into a Hubbell inlet on ebay the other day. It was originally set up for use on Thermo-King truck refrigeration units, and it has the same 30 amp, 125 volt rating as the marine power inlets we usually wind up with. The price is also decent - when you figure in shipping, $46.00. The ebay location is:
The seller is warehouse salvage - I bought it on Sunday, they shipped it on Monday morning, and it came today. My kind of sellers!
http://www.ebay.com/itm/22187038924...49.l2649&ssPageName=STRK:MEBIDX:IT&rmvSB=true
I bought one, and it is every bit as nice as everything Hubbell makes. I'm planning to use it to connect my 4 kW Onan generator to the buggy.


Last edited:
Similar threads
- Replies
- 1
- Views
- 649
- Replies
- 0
- Views
- 337
- Replies
- 3
- Views
- 1K
- Replies
- 1
- Views
- 751
