You are using an out of date browser. It may not display this or other websites correctly.
You should upgrade or use an alternative browser.
You should upgrade or use an alternative browser.
Casper & Outono - 2x 1998 Discovery 1 Builds
- Thread starter Outono
- Start date
Outono
Well-known member
No fuel spill that I can see, but the scent is strong near the gas tank. I have no pressurization at the gas gap so perhaps that is a sign as well (i.e. no whooshing when you open it up for a fill). I've tried reseating the cap multiple times but im not so sure that is the problem.Do you have fuel spill when filling the tank to full at the gas station? There's a vent hose that likes to fail which was giving me a ton of fumes, especially at low-speed
Cool head unit. Happy with it?
Love it! What a huge difference it makes. Perhaps a little too big for the dash, but you get used to it very quickly. Now to just soundproof the doors...
Outono
Well-known member
Spent a couple hours today attempting to install a new master cylinder and some fresh front suspension bushings on Casper. And of course, nothing is ever as easy as it seems.
The master cylinder is really easy to pull out and install, but despite having a minty second-hand unit, the damn thing leaked right off the bat. As soon as pressure built on the pedal, the cylinder seeped fluid. So we decided to move on and buy a new one for next week. No point in spending more time on it.
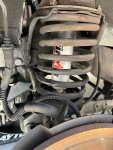
The really irritating part came when we jumped onto the suspension bushings. Ever since I picked up the vehicle, I knew the front suspension was shot. The bushings looked as if they had melted so I was under the impression they had never been touched for the lifetime of the vehicle. Turns out, somebody years ago cut a huge corner and replaced the old bushings with what we think is putty. Really, it's not solid at all, it's basically sticky tack.

This really pissed us off. Not only was it a monumental pain cleaning it all up, but it got everywhere. Flecks of putty litter the street.
I didn't plan for this and I definitely didn't have enough bushings for both the top and bottom end. And when we pulled the shocks, it was clear those too were beyond saving.
As luck would have it, I still had the Terrafirma front shocks in the back of Casper from when we did the suspension swap on D1V2 (my daily). So we opted to place those suckers into Casper and wouldn't ya know, they went in without a problem. No more bouncy front end and definitely no more putty BS.
Next weekend we'll finish the brakes and Casper will be off to Smog and Brake/Light check.
The master cylinder is really easy to pull out and install, but despite having a minty second-hand unit, the damn thing leaked right off the bat. As soon as pressure built on the pedal, the cylinder seeped fluid. So we decided to move on and buy a new one for next week. No point in spending more time on it.
The really irritating part came when we jumped onto the suspension bushings. Ever since I picked up the vehicle, I knew the front suspension was shot. The bushings looked as if they had melted so I was under the impression they had never been touched for the lifetime of the vehicle. Turns out, somebody years ago cut a huge corner and replaced the old bushings with what we think is putty. Really, it's not solid at all, it's basically sticky tack.

This really pissed us off. Not only was it a monumental pain cleaning it all up, but it got everywhere. Flecks of putty litter the street.
I didn't plan for this and I definitely didn't have enough bushings for both the top and bottom end. And when we pulled the shocks, it was clear those too were beyond saving.
As luck would have it, I still had the Terrafirma front shocks in the back of Casper from when we did the suspension swap on D1V2 (my daily). So we opted to place those suckers into Casper and wouldn't ya know, they went in without a problem. No more bouncy front end and definitely no more putty BS.

Next weekend we'll finish the brakes and Casper will be off to Smog and Brake/Light check.
Outono
Well-known member
You would think, but this was a one-owner vehicle its whole life and serviced almost entirely at Land Rover Newport Beach. My guess is the owner did it himself or toward the very of his time with the vehicle, he took it to a less than reputable shop and had them "fix" his bouncy front end.I wonder if the putty was something from a previous car dealer. That’s the sort of thing they’d do
To date, we've done quite a bit of work:
- Terrafirma front suspension
- New Bosch steering pump
- New (mostly) genuine steering lines
- Rebuilt steering gear (rebuilt in California!)
- New ball joint on the track rod
- New rear caliper
- New fan clutch
- New steering reservoir
- New battery
- New brake light bulb harnesses (the plastic ones)
- New Tom Woods front drive shaft with X-spline
- Fluids flush
- Rebuilt cargo door lock and latch
Last edited:
Outono
Well-known member
It's finally done. Well, almost.
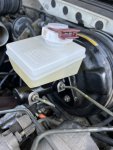
The master cylinder turned out to be a really easy repair and made a big difference in brake feel. If I were keeping the vehicle, i'd swap the rotors and pads out too, but i'll let the next owner deal with that.
Aside from an alignment, some new bulbs for the rear lights, and a set of new tires, this truck is good to go. Smog and brake + light check this week (I know i've said this before, but for real this time!) and then off to the car wash.
Outono
Well-known member
And just like that, the truck is complete. It took 7 months and an endless amount of surprises, cursing, and bloody hands, but today Casper is officially titled and registered.
During the brake and lamp inspection, the truck failed on the thickness of its front end rotors and pads, which meant more $$$. Once that was fixed, Casper sailed through the rest of the inspection. No problem with smog either.
I've got to say, this thing drives so much smoother than my daily D1. It handles better, it's quieter, and provides a more enjoyable driving experience. Of course, my daily is outfitted for off-roading so I don't expect it to deliver the experience Casper does.


I've got a potential buyer lined up, but if he falls through i'll be listing this guy for sale next week.
During the brake and lamp inspection, the truck failed on the thickness of its front end rotors and pads, which meant more $$$. Once that was fixed, Casper sailed through the rest of the inspection. No problem with smog either.
I've got to say, this thing drives so much smoother than my daily D1. It handles better, it's quieter, and provides a more enjoyable driving experience. Of course, my daily is outfitted for off-roading so I don't expect it to deliver the experience Casper does.


I've got a potential buyer lined up, but if he falls through i'll be listing this guy for sale next week.
Outono
Well-known member
Lot's going on this week.
My daily got a number of upgrades on top of Casper wrapping up.
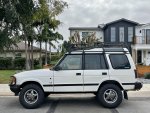
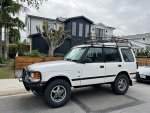
First up, Tactical Rovers sliders. I've always loved the low profile design of these, though I am a bit bummed they don't fit as seamlessly as I was hoping. You can see a gap near the area between the front and back door. It droops quite a bit more on the back than on the front, despite being mounted as high up as possible. There's also about an inch of no coverage at the front fender point. All in all though, it's a really nice set of sliders.

Underneath, we threw on some Gwyn Lewis stainless trackrods with greasable ball joints, installed an OME steering damper and relocated it, and swapped the front radius arms with a pair of Terrafirma's that had the correct caster correction. Of course, OEM rubber bushings were put on.
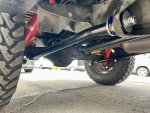
In the rear, we've got some new rear cranked trailing arms from Gwyn Lewis + a mix of OEM and SuperPro bushings. Topped it all off with an alignment.
For a heavily modified vehicle, this thing drives really well. There's only a few outstanding things left before the big trip in November:
My daily got a number of upgrades on top of Casper wrapping up.

First up, Tactical Rovers sliders. I've always loved the low profile design of these, though I am a bit bummed they don't fit as seamlessly as I was hoping. You can see a gap near the area between the front and back door. It droops quite a bit more on the back than on the front, despite being mounted as high up as possible. There's also about an inch of no coverage at the front fender point. All in all though, it's a really nice set of sliders.

Underneath, we threw on some Gwyn Lewis stainless trackrods with greasable ball joints, installed an OME steering damper and relocated it, and swapped the front radius arms with a pair of Terrafirma's that had the correct caster correction. Of course, OEM rubber bushings were put on.

In the rear, we've got some new rear cranked trailing arms from Gwyn Lewis + a mix of OEM and SuperPro bushings. Topped it all off with an alignment.

For a heavily modified vehicle, this thing drives really well. There's only a few outstanding things left before the big trip in November:
- Full cooling system replacement
- Allisport stainless tank
- Nissens radiator
- Flowcooler Water Pump (should I replace the bolts or is re-using OK?)
- Stant Superstat 180 degree thermostat
- Trailhead 4x4 stainless oil cooler lines
- Hayden condenser fans
- Determine cause of transmission / transfer case leak. It's a light one, but it drips enough to piss me off. I haven't taken a close enough look at where it's actually coming from, but it needs to be addressed. I know, I know, these things leak no matter what (so they say), but im really particular about these things. There is also a light weep near the oil filter, which is new...Hopefully, it's a non issue.
- Re-seat the head unit. The damn thing literally came out while I was driving. I don't think the kit that was used is holding it in the dash correctly.
- Find a fuel pump cover. For whatever reason, it's missing. Does anyone know what screw sizes are used?
- Fix the rear window solder joint so I can use them again.
- Get a fifth Toyo tire.
Last edited:
Outono
Well-known member
Well, its two vehicles! The original thread was for Casper, a D1 I bought at auction. I got impatient and bought a second D1 (known as D1V2) and that has become my daily. D1V2 gets all the great upgrades, Casper got lots of required updates, but thats the one im selling.Why the heck would you sell this? Great job!
Last edited:
Well, its two vehicles! The original thread was for Casper, a D1 I bought at auction. I got impatient and bought a second D1 (known as D1V2) and that has become my daily. D1V2 gets all the great upgrades, Casper got lots of required updates, but thats the one im selling.
Ah. So D1V2 has all the amazing components and you are NOT selling it, right?
My only recommendation and it is just personal taste is ditch the brush guard. Will look so much more clean, but if you want perfection, you might need a new airdam as they typically cut it to fit the brushguard.
Well done. Now get back to work, it doesn't look like you have HD axles, CVs, 4.11s and lockers yet!
RE: Drivability. IMO this gets sacrificed when you lift more than 3" and/or remove sway bars and go larger than 235/85R16. At that point you MUST redrill swivels. All the stuff that you have done thus far would only improve drivability (IMO).
I run 235/85R16 on mine and love 4.11s. That and lockers were the toughest mechanical thing I have managed myself. M y arms and rods are all rockware, which is presently unobtanium.
Outono
Well-known member
That's right!Ah. So D1V2 has all the amazing components and you are NOT selling it, right?
My only recommendation and it is just personal taste is ditch the brush guard. Will look so much more clean, but if you want perfection, you might need a new airdam as they typically cut it to fit the brushguard.
Well done. Now get back to work, it doesn't look like you have HD axles, CVs, 4.11s and lockers yet!
RE: Drivability. IMO this gets sacrificed when you lift more than 3" and/or remove sway bars and go larger than 235/85R16. At that point you MUST redrill swivels. All the stuff that you have done thus far would only improve drivability (IMO).
I run 235/85R16 on mine and love 4.11s. That and lockers were the toughest mechanical thing I have managed myself. M y arms and rods are all rockware, which is presently unobtanium.
The plan is to get rid of the brush guard toward the end of the build. I'd love an old Safari Gard bullbar but they're not easy to find.
I've thought about HD axles, but im not sure they're required for the way I plan on using the truck. I would like to re-gear, though i'll probably do that the same time I add Ashcroft ATBs front and rear. Since I already have a fully locked HDJ81, im keen to make this truck a unique build with ATBs only.
As for the lift, im happy where im at so that should help simplify any additional upgrades to fix the drivability of the vehicle. Truth be told, it does drive great for a 4x4 - really great - but it's obviously not the same experience as a stock Rover.
Outono
Well-known member
Well, we got cracking on the cooling system this weekend. Taking our time as neither my buddy nor I have done this before.
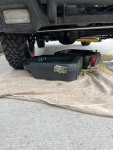
Started off well enough. Caught most of the coolant and hit the spilled bit with some sawdust before it got too far into the street. We pulled the lower radiator hose to drain, but only got about 2 gallons out. Probably should have pulled the lower bolt on the water pump like Atlantic British suggest, but we'll do that on the next flush.

We topped the radiator off with distilled water and then fired up the truck. As the vehicle got warmer, the reservoir began to get foamy. Uh oh. That's usually a sign of exhaust gas in the system, which means head gasket failure. We let the truck get up to close to operating temp and magically, the reservoir cleared out.
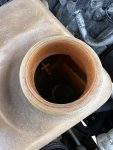
This is about the time I had to call it a day due to other errands, but we're going to run another flush this morning and then get cracking on all of the new items (water pump, thermostat, stainless reservoir, condenser fans, radiator, and oil cooler lines).
A few things i've found interesting so far:

Started off well enough. Caught most of the coolant and hit the spilled bit with some sawdust before it got too far into the street. We pulled the lower radiator hose to drain, but only got about 2 gallons out. Probably should have pulled the lower bolt on the water pump like Atlantic British suggest, but we'll do that on the next flush.

We topped the radiator off with distilled water and then fired up the truck. As the vehicle got warmer, the reservoir began to get foamy. Uh oh. That's usually a sign of exhaust gas in the system, which means head gasket failure. We let the truck get up to close to operating temp and magically, the reservoir cleared out.

This is about the time I had to call it a day due to other errands, but we're going to run another flush this morning and then get cracking on all of the new items (water pump, thermostat, stainless reservoir, condenser fans, radiator, and oil cooler lines).
A few things i've found interesting so far:
- It's news to me that distilled water is arguably the best heat transfer medium you can put in your vehicle. No matter how long we drove the truck, we could not get it above 191F with distilled water (well, lets be honest, it was probably 70/30 water to coolant). I suppose this is a sign that my cooling system doesn't actually need any updating, but we'll see.
- Despite some worrying foaming and air bubbles, we saw almost nothing after a good 15 minutes. This led me to believe it was air from both re-filling the radiator with distilled water and perhaps air stuck in the heater core. The whole reason we're doing this is to solve this trucks inability to cool down when running for a while. On hot days, it'll want to go above 210F unless you hit the heater. Forget about the AC - even with working fans, it only makes matters worse. Could it have just been air in the system this whole time?
- My coolant was quite low in the reservoir when we started. Now, I never actually documented what it looked like when I bought the truck this summer so that's on me - it could have always been this low or, worse yet, the truck is consuming it. As I said above, there are no telltale signs of HG failure so im crossing my fingers we're in the clear.
Last edited:
Outono
Well-known member
Today was a long one.
We finally dug into the cooling system and had a number of surprises along the way. The first task was to fill the engine back up with distilled water to continue with the flush. The day before, we'd seen quite a bit of foaming so we figured it needed a bit more fluid through it.
The funnel we used yesterday was put to use cleaning up some oil and left over fluids from previous work so we had to get creative with our oversized funnel and the small radiator fill plug.

We call the contraption "funnel-glove", and it worked swimmingly. It was slow going, but it was worth avoiding another trip to the store for an extra funnel.
We flushed, we drained, we got tired of doing this over and over, so we decided to backwash the block with a garden hose to force the remaining coolant out of the system. First task: pull the thermostat so we can get a garden hose in there.

The thing is, when we pulled the thermostat housing, we were met with an empty cavity. That's right, my engine has no thermostat and it's probably been that way for 3 years or so because the previous owner had no idea either. The big question was what sort of effect this has had on the engine.
For a while now, i've noticed my engine smelling a bit rich, but I couldn't figure it out. Fuel pump, lines, injectors, everything is all in great shape. Usually, it took a long time for my engine to get up to operating temperature, but I just chalked it up to this Rover doing it's thing. It looks like the thermostat may have been the problem all along. Can't run efficiently if im always running cold.
Alright, so, how do you create enough pressure to push water back through the block and out of the radiator? With another one of our fancy contraptions: "foam hose".

We cut up an old camping mat, wrapped the end of the hose with a rubber glove, and popped it right through. Once the contraption sat on top of the thermo elbow, we lit that sucker up with a blast of water. Without the foam, we wouldn't have been able generate enough pressure to move water backwards through the system.
Within 30 seconds, we'd cleared the remaining coolant and began prepping thermostat installation.
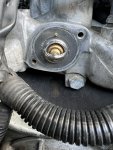
SuperStant 180 thermo ready to go.
We also spent some time pulling the reservoir and installing a very slick Allisport stainless one. This one comes with a level sensor that will need to be wired in at a later time,

Then onto the fan clutch. This was a rather annoying installation since the existing fan clutch nut was not 36mm like all other Disco 1s. In fact, it wasn't even metric. Then I remembered that this is a Range Rover GEMS engine and that's likely why some of the parts are a little different than what Casper had.
This clutch is from MAHLE (Germany).
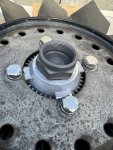
Love me some stainless bolts.
Toward the end of the day, we tackled the water pump, which turned out to be a real pain. The previous gasket was fused to the block and required a couple hours worth of scraping. We did our best, but our work wasn't perfect. Nothing a little Peramtex won't fix...
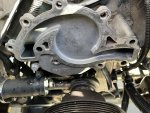
We eventually got most of this crap off (photo taken before then) and smoothed it out with a nylon wheel.

I never claimed we knew what we were doing, but it seemed to work.

Nice and shiny.
That FlowCooler is a sweet bit of kit. We used Permatex 22071 along with the gasket and Loctite 1158514 for the water jacket bolts (the long ones).
I really hope this thing is sealed. I don't want to rip it all out again.
We finally dug into the cooling system and had a number of surprises along the way. The first task was to fill the engine back up with distilled water to continue with the flush. The day before, we'd seen quite a bit of foaming so we figured it needed a bit more fluid through it.
The funnel we used yesterday was put to use cleaning up some oil and left over fluids from previous work so we had to get creative with our oversized funnel and the small radiator fill plug.

We call the contraption "funnel-glove", and it worked swimmingly. It was slow going, but it was worth avoiding another trip to the store for an extra funnel.
We flushed, we drained, we got tired of doing this over and over, so we decided to backwash the block with a garden hose to force the remaining coolant out of the system. First task: pull the thermostat so we can get a garden hose in there.

The thing is, when we pulled the thermostat housing, we were met with an empty cavity. That's right, my engine has no thermostat and it's probably been that way for 3 years or so because the previous owner had no idea either. The big question was what sort of effect this has had on the engine.
For a while now, i've noticed my engine smelling a bit rich, but I couldn't figure it out. Fuel pump, lines, injectors, everything is all in great shape. Usually, it took a long time for my engine to get up to operating temperature, but I just chalked it up to this Rover doing it's thing. It looks like the thermostat may have been the problem all along. Can't run efficiently if im always running cold.
Alright, so, how do you create enough pressure to push water back through the block and out of the radiator? With another one of our fancy contraptions: "foam hose".

We cut up an old camping mat, wrapped the end of the hose with a rubber glove, and popped it right through. Once the contraption sat on top of the thermo elbow, we lit that sucker up with a blast of water. Without the foam, we wouldn't have been able generate enough pressure to move water backwards through the system.
Within 30 seconds, we'd cleared the remaining coolant and began prepping thermostat installation.

SuperStant 180 thermo ready to go.
We also spent some time pulling the reservoir and installing a very slick Allisport stainless one. This one comes with a level sensor that will need to be wired in at a later time,

Then onto the fan clutch. This was a rather annoying installation since the existing fan clutch nut was not 36mm like all other Disco 1s. In fact, it wasn't even metric. Then I remembered that this is a Range Rover GEMS engine and that's likely why some of the parts are a little different than what Casper had.
This clutch is from MAHLE (Germany).

Love me some stainless bolts.
Toward the end of the day, we tackled the water pump, which turned out to be a real pain. The previous gasket was fused to the block and required a couple hours worth of scraping. We did our best, but our work wasn't perfect. Nothing a little Peramtex won't fix...

We eventually got most of this crap off (photo taken before then) and smoothed it out with a nylon wheel.

I never claimed we knew what we were doing, but it seemed to work.

Nice and shiny.
That FlowCooler is a sweet bit of kit. We used Permatex 22071 along with the gasket and Loctite 1158514 for the water jacket bolts (the long ones).
I really hope this thing is sealed. I don't want to rip it all out again.
Last edited:
Outono
Well-known member
For the grand finale, we pulled the radiator and finally discovered why the engine couldn't clear the heat once it got above operating temperature.
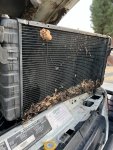
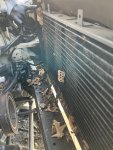
That would be 4 wasp nests on both the radiator and condenser. There was also a considerable amount of corrosion on the upper left part of the radiator, which surprised me (again) since this thing was supposedly rodded just a year ago by the previous owner. Lies! All lies!
By the time we pulled the rad, the sun had gone down and it was time to call it. We'll be back at it next weekend to wrap up the work and test it out. Im still a bit concerned about Saturday's foaming coolant, but all signs point to issues that don't include head gasket failure. It just doesn't seem likely.
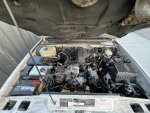
This thing is going to be an absolute beast when it's done.
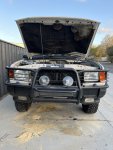
More to come next weekend.


That would be 4 wasp nests on both the radiator and condenser. There was also a considerable amount of corrosion on the upper left part of the radiator, which surprised me (again) since this thing was supposedly rodded just a year ago by the previous owner. Lies! All lies!
By the time we pulled the rad, the sun had gone down and it was time to call it. We'll be back at it next weekend to wrap up the work and test it out. Im still a bit concerned about Saturday's foaming coolant, but all signs point to issues that don't include head gasket failure. It just doesn't seem likely.

This thing is going to be an absolute beast when it's done.

More to come next weekend.
Last edited:
Similar threads
- Replies
- 0
- Views
- 436
- Replies
- 11
- Views
- 3K
- Replies
- 6
- Views
- 808
- Replies
- 0
- Views
- 261
