E350 Cutaway 4x4 w/ DIY Pop-Top Composite Camper Box (Build Thread)

Here is a link to the ujoint video of them flexing it out. On Justin’s van doing this same thing resulted in 6in from top of tire to top of wheel well. And his bump stop on that side had A LOT of space (probably 6in+) away from the axle.

Maybe Chris @ujoint could weigh in on what is limiting the travel in the rear/why the tire is barely stuffed into the factory wheel wells/far from the bump stops?
 
Last edited:

rruff

Explorer
My 2 cents is that it has a 6" lift. Also they don't seem to be teetering on 2 wheels. The front is also less stiff than the rear, but if they put a swaybar on that would change.
 

ujoint

Supporting Sponsor
Vertical travel in the wheel well isn't as important with these E series because the wheel wells are small and the tire will always kiss the back of the fender (or flare) 1st. This is because the lift spring flattens out during compression which moves the axle rearward. The video above was done on fresh springs, they need some cycles to soften up a bit for full travel.
 

ujoint

Supporting Sponsor
From the looks of your wheel wells in the last mock up pic I'd say you have pretty of room and can certainly shrink them up a bit F/R. Once Do you plan to have the tires somewhat flush with the outside of the box?
 
From the looks of your wheel wells in the last mock up pic I'd say you have pretty of room and can certainly shrink them up a bit F/R. Once Do you plan to have the tires somewhat flush with the outside of the box?

The box is 79.5in wide, so I assume I’ll have some tire poke with the Dana 70 in the rear. I built the wheel wells with the assumption that a 39.5in tire (37 + chains) would fully stuff and touch the top of a tall wheel well, so I have 40in of width at frame height!

Now that I know the tire doesn’t fully stuff into the factory wheel well, I can definitely shrink it up a bit. If I use the assumption that the wheel only gets 6in from the top of factory body, I could make them really small.

But it still makes me uneasy that friction/bind is the limiting factor and not the bump stop which are more absolute. Theoretically a big bump could send it higher than a static articulation demo? I guess I could always extend them but it seems silly given I’d be extending it like half a foot.
 
Been busy working on the camper and MIA on the build thread for a while. Going to post updates over the next week or so on everything we've gotten done since!
 
Completing the Subframe

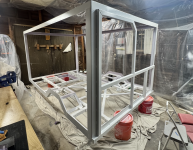
There were a lot of unforeseen details that went into finishing the subframe, the first of which was framing out the wheel wells. Unfortunately, I originally sized the wheels wells based on Ford’s guidance, which proved to be pretty incorrect (way too big) considering the change in suspension that will happen with the 4x4 conversion. I was able to shrink the wheels wells front/rear substantially, but this took a long time to frame out and consisted of sooooo many measurements, angles, and welds.

After the wheel wells, I built out the lowered entryway. This is crucial to allow for as tall of an entry door as possible and to make getting in/out of the camper easier.

I also welded up the side flanges that will hold the edge of the wall panels. This was just made out of thin strips of .100 5052, the same as the rest of the exo. I made these only 4in tall and welded it to the bottom and top of the tube, leaving only 2in of exposed flange (3in at the wheel wells/entryway). The lack of exposed flange has been a huge source of problems now that we’re doing the panel joints and we ended up adding more aluminum angle trim along the edges to allow for more glue surface. If I were to do this again, I would definitely leave more flange for the wall.

The last step of the subframe was finishing up all of the mounting provisions. This includes the Aux Gas Tank, Grey Water Tank, Rear Bumper/Lights, Jack, and Air Compressor. All of this ended up being extremely time consuming and there was dozens of other things I wanted to have wrapped up while the access was so easy.

Here is a photo of it during paint prep:
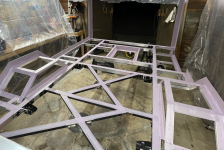
subframe photo during painting.png
 
Exo Skeleton/Rear Carrier Finished!

exo-skeleton.png
Finishing up the exo was pretty simple, it just involved welding all of the corners together. This created a good amount of distortion and isn’t the prettiest, so I designed and ordered some corner caps to add some extra strength and give a finished look. The entire thing including the subframe weighs ~280lb.

On the rear, we wanted to build a carrier system that could hold a heavy spare tire securely along with loads of other gear. This was built into the subframe design by extending the subframe rear cross bar beyond the wall framing, so it creates a 2in ledge behind where the rear wall will be. You can see this in the bottom of the photo.

The idea of this was to build a grid of welded aluminum bars we can then attach whatever storage cases/carrier to. These bars sit on the subframe rear member ledge which should add a lot of strength. This will also have a ton of glue surface area to the rear wall of the camper. The other thing that is a little overkill here is that we have only 2in of rear overhang from the last body mount to the very back edge of the camper. Honestly, I’m still not really sure why I didn’t just make it a bit longer – I got a little obsessed with the overall length and departure angle and just went for the cut early on. But the subframe is supported the entire length by the frame and we won’t have nearly any overhung weight.

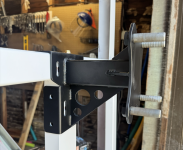
I also built this tire carrier out of steel that bolts to the aluminum framing. My best welds yet!

Tire Carrier.png
 
Painting!

I’m not going to go too in-depth into the painting because we are far from experts on this, and honestly, I hated the entire painting process. We used SPI Epoxy on the entirety of the frame and as a primer for a single stage white topcoat on anything that would see UV exposure. You can see pics of it painted above ^

It was just endless sanding, cleaning, and painting. In the end, the finish is okay but I’m very OCD and we ended up with faint drips in some spots. I’m sure at some point I will sand these out and repaint, but for now, it’s functional, and I have to keep reminding myself we’re not building this to be a show car.

Along those lines, there’s also many locations along the welded aluminum that have distortion from where it was welded. With some patience and body filler we could get these all smooth (and I will probably eventually do that), but again, function over form here – there’s much more important things to get done!
 

fjefman

Member
Just saw this thread...super cool...please keep us updated of the progress. I'm really close to starting a similar build on an E-450 DRW 158wb chassis. I just need to find it.

How did you get your chassis? Order from a local dealer?
 

Ebiketoter

New member
Great project.. kudos.. I'm interested in the composite panels you are using.. I've been mentally planning a hard sided pop up for my 02 econoline 7.3..
Keep up the great work!!!
 
Great project.. kudos.. I'm interested in the composite panels you are using.. I've been mentally planning a hard sided pop up for my 02 econoline 7.3..
Keep up the great work!!!
Thanks! I've gotten a lot of questions about the panels I'm using so just made a dedicated post to outline my experience with Lemker and help others with finding a source.
 
Just saw this thread...super cool...please keep us updated of the progress. I'm really close to starting a similar build on an E-450 DRW 158wb chassis. I just need to find it.

How did you get your chassis? Order from a local dealer?
I had no luck with any dealers, none of them had any or could order one anytime soon. It was also very difficult to search for them and specific one without a box, not to mention most of them were larger and duallys. I think you may have better luck trying to find the 158 Dually you're looking for.

I ended up lucking out because @UjointoffroadCO let me know of one that was sitting on a dealership in Florida and grabbed it right away!
 

Forum statistics

Threads
188,178
Messages
2,903,430
Members
229,665
Latest member
SANelson

Members online

Top