great trip pics; glad to hear the jeep is working good. Hey another question for ya some what on topic; with the surfboard on the roof; do you had it locked? The jeep is much higher then my lx470 but I constantly worry when traveling that someone will just cut my straps and grab my board and go when either gas up or a lunch break. As a surfer have you ever come across any good locking setups for boards??
You are using an out of date browser. It may not display this or other websites correctly.
You should upgrade or use an alternative browser.
You should upgrade or use an alternative browser.
EarthRoamer XV-JP "Northwest Edition"
- Thread starter WhereTheHellIsJames?
- Start date
mhiscox
Exp. Leader Emeritus
Any luck with the diet, Mike?
I took the truck across the mountains to visit my good friend John Rhetts before he leaves on expedition in his most excellent Fuso FM camper. I learned lots about how things about how the truck turned out in this 400+ mile day, including how much the rig weighs, courtesy of the Oregon Department of Transportation.
Short answer: 7000 pounds with 200 pounds of fuel and 200 pounds of me and another 100 pounds of miscellaneous. Now this may seem to the uninitiated like one heck of a porker (and it is) but I was quite pleased in that after all of the changes, we're actually a little less than with the previous design. Not enough less to brag about, but we haven't lost ground, and that's quite satisfying.
I was also pleased with the distributions . . . 3100 front, 3900 rear and the side-to-side balance was within 100 pounds, maybe less (limited scale precision), which given that we pretty much had to live with things where they managed to fit, is a happy result.
Ford Prefect
Expedition Leader
Wow, sounds like a great trip! I have liked John Rhetts' truck a lot since the first time I laid eyes on the photos! What a great concept, and would be perfect for my family!
Glad you had an enjoyable drive. Does it ride as comfortable and nice as you would like Mike?
Cheers
Glad you had an enjoyable drive. Does it ride as comfortable and nice as you would like Mike?
Cheers
mhiscox
Exp. Leader Emeritus
The ride is extremely good for a Wrangler and probably better than most sedans. And the handling on the curves is much better than I have a right to expect given the vehicle's weight and form factor. I've said it several times, but it's worth repeating that the change from the TeraFlex suspension the vehicle arrived with to the nth Degree/AEV suspension Scott Brady recommended I use completely transformed the ride and handling of the vehicle. Rather than being borderline scary on high speed turns, the current setup demands no special attention.Does it ride as comfortable and nice as you would like Mike?
JRhetts
Adventurer
I took the truck across the mountains to visit my good friend John Rhetts before he leaves on expedition...
.... which means that LUCKY John Rhetts got to go over the re-build in detail and drive it around for a bit. To my personal knowledge, Mike has been scheming and fabricating on this rig for over two years, and it has paid off. John B, James L, and Paul J have all made terrific contributions under Mike's discerning eye, and now it it is not only very functional and drives nicely, but it has more eye-candy value than you can really believe until you see it yourself.
Mike, thanks for coming over and giving me first hand at it!
John
HMR
Rendezvous Conspiracy
+1but it has more eye-candy value than you can really believe until you see it yourself.
The pictures look great but don't do it justice. Seeing this thing in person was a mind blower.
mhiscox
Exp. Leader Emeritus
Hot water system change
Right before Paul Jensen left for the trip around the Olympic Peninsula detailed above, he had to deal with a flooded passenger side floorpan caused by leakage from the connections on the Isotemp 15-liter hot water heater used in the XV-JP. With considerable effort, including having to cut an access panel in the bottom of the propane locker, he got in to tighten the fittings and stop the leak.
Temporarily. A few weeks ago, I noticed that I, too, had a small pond under the passenger's seat. After checking with Paul to see how he had fixed things, I reopened the access hatch he'd cut and took a look at the numerous nylon push-to-fit connectors that EarthRoamer was forced to use in order to fit the 15-liter unit in the space available. Which is to say, basically no space at all; the distance between the driveshaft hump and the passenger side B-pillar interior trim was pretty much identical to the length of the Isotemp tank.
The view through Paul's hatch looked like this:
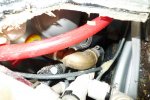
The Isotemp heat exchange units are well-regarded and widely available in the U.S., and you can't fault EarthRoamer for trying to maximize the amount of hot water available. But I came to the conclusion that the connections, constantly under stress as they were, were never going to be anything I could count on and that a major redo was required. This involved disassembling the passenger side of the cabin, which was a pain as the heater got in the way of important things like the rear seat bolts, but once everything was out you could see the situation better.
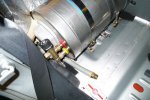
There was, for example, no more than a quarter-inch of clearance here:
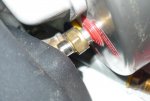
And flat-out ZERO clearance here; it was scrapping the Jeep’s B-pillar trim piece:
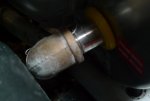
The tank is gone now, though, after a lot of really annoying work, never to return. The floor under where it was is a mess, with part of the surface gone where ER stuck the tank supports down with some unknown mastic.
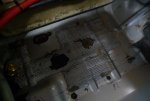
I also got rid of the plastic waste tank valve next to the passenger seat and put in metal fittings with an adapter that allows you to disconnect the hose. (The whole assembly had originally been glued all together.) The valve is under the truck now (tucked in very well), with a garden hose quick connect on the end. Muy better.
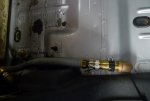
The floods have made the floor areaa complete mess. I’ll go back and stabilize the rust when I put the new, smaller heater tank in.
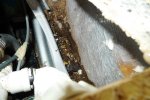
At the far left, you can see one of the two coolant hoses that run from the heat exchanger. I’ve plugged, but not cut, them, and I also left the PEX hoses from the pump and to the sink the original length, connecting them together with Sharkbite press-to-connect fittings that I can easily undo. The hope is that installing the new tank will be a piece of cake using the previous plumbing.
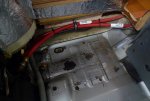
The new tank, an Elgena Nautic Junior, is 10 liters rather than the original 15, making it usefully smaller. Also, it has an added benefit of having a 200 W 12V DC immersion heater which I can use to keep the water warmed longer between runs of the engine.
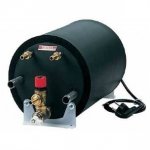
Sadly, it’s coming from Europe through the efforts of Steve at Eurocampers, so it’ll be a while in transit (as I turned down the chance to double its cost by paying for air shipment.) In summary, all should be great when it gets here.
More will get posted when the new unit arrives.
Right before Paul Jensen left for the trip around the Olympic Peninsula detailed above, he had to deal with a flooded passenger side floorpan caused by leakage from the connections on the Isotemp 15-liter hot water heater used in the XV-JP. With considerable effort, including having to cut an access panel in the bottom of the propane locker, he got in to tighten the fittings and stop the leak.
Temporarily. A few weeks ago, I noticed that I, too, had a small pond under the passenger's seat. After checking with Paul to see how he had fixed things, I reopened the access hatch he'd cut and took a look at the numerous nylon push-to-fit connectors that EarthRoamer was forced to use in order to fit the 15-liter unit in the space available. Which is to say, basically no space at all; the distance between the driveshaft hump and the passenger side B-pillar interior trim was pretty much identical to the length of the Isotemp tank.
The view through Paul's hatch looked like this:

The Isotemp heat exchange units are well-regarded and widely available in the U.S., and you can't fault EarthRoamer for trying to maximize the amount of hot water available. But I came to the conclusion that the connections, constantly under stress as they were, were never going to be anything I could count on and that a major redo was required. This involved disassembling the passenger side of the cabin, which was a pain as the heater got in the way of important things like the rear seat bolts, but once everything was out you could see the situation better.

There was, for example, no more than a quarter-inch of clearance here:

And flat-out ZERO clearance here; it was scrapping the Jeep’s B-pillar trim piece:

The tank is gone now, though, after a lot of really annoying work, never to return. The floor under where it was is a mess, with part of the surface gone where ER stuck the tank supports down with some unknown mastic.

I also got rid of the plastic waste tank valve next to the passenger seat and put in metal fittings with an adapter that allows you to disconnect the hose. (The whole assembly had originally been glued all together.) The valve is under the truck now (tucked in very well), with a garden hose quick connect on the end. Muy better.

The floods have made the floor areaa complete mess. I’ll go back and stabilize the rust when I put the new, smaller heater tank in.

At the far left, you can see one of the two coolant hoses that run from the heat exchanger. I’ve plugged, but not cut, them, and I also left the PEX hoses from the pump and to the sink the original length, connecting them together with Sharkbite press-to-connect fittings that I can easily undo. The hope is that installing the new tank will be a piece of cake using the previous plumbing.

The new tank, an Elgena Nautic Junior, is 10 liters rather than the original 15, making it usefully smaller. Also, it has an added benefit of having a 200 W 12V DC immersion heater which I can use to keep the water warmed longer between runs of the engine.

Sadly, it’s coming from Europe through the efforts of Steve at Eurocampers, so it’ll be a while in transit (as I turned down the chance to double its cost by paying for air shipment.) In summary, all should be great when it gets here.
More will get posted when the new unit arrives.
Northern Explorer
Explorer
Can you tell me what the ruff dimensions of that heater...length width?
Last edited:
PaulJensen
Custom Builder
Mike...
Well done in an area with virtually zero accessibly...
I feel your pain...
Well done in an area with virtually zero accessibly...
I feel your pain...
mhiscox
Exp. Leader Emeritus
The outgoing Isotemp heater was about 21 1/4 inches long and 11 1/2 in diameter.Can you tell me what the ruff dimensions of that heater...length width?
The incoming Nautic unit is about 19 1/4 long by 8 3/4 in diameter.
Ford Prefect
Expedition Leader
Sadly, it's coming from Europe through the efforts of Steve at Eurocampers, so it'll be a while in transit (as I turned down the chance to double its cost by paying for air shipment.) .
Wow, how could you pass on an opportunity like that! haha, right. Well it is nice you are getting it sorted.
...Bummer about the rust, what will you use on that?
mhiscox
Exp. Leader Emeritus
Bummer about the rust, what will you use on that?
There are a lot of products available, and you get a choice of whether to "convert" it or "encapsulate" it. It shouldn't be too critical, though, as none of the rust spots is close to penetrating the floor pan.
mhiscox
Exp. Leader Emeritus
XV-JP . . . Meet the Moto
Messing around with the XV-JP continues, and it's all going very well. With the basic rig ready to use, it seemed a good time to see what the chances were of carrying my XR600R on the back.
I've had my Joe Hauler carrier for many years and it always seems to do the job, so I bolted it into the rear receiver. At which point I recognized that the carrier platform was twice as high off the ground as the usual setup and the ramp was going to be at a seriously big angle. Oops.
Gravity--It's the Law--being what it is, it'd take someone way bigger/stronger to get the bike which, at under 300 pounds is very lightweight for this sort of thing, up the ramp unassisted. Which led, obviously, to Plan B, which was to start the engine and power it up the ramp. This is certainly a reasonable and widespread practice, though I was hoping to avoid it to reduce the chances of screwing up and shooting the bike off the end of the carrier (I've seen it done; not pretty).

There was unexpected good news in that the Honda didn't foul the Pelican case and didn't cause problems with an empty Trasharoo. I'd been thinking that I might have to take something off the door when I wanted to carry the bike. Of course, I usually load the Trasharoo to the brim with all kinds of stuff, including the camp chairs--pretty much anything except trash. --and that's not going to work while the carrier is on.
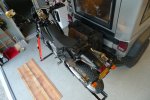

However, since you can't get through the rear door with the bike mounted, the Honda will usually come off immediately on arrival, and then the Trasharoo can go back to storing things. Turns out that the rear door will clear the empty carrier, so you could leave it in place. Maybe it's about to become my new back porch.
You can, of course, always leave the bike in place and crawl into the cabin from between the seats, and if you did, the rear window still opens with the bike in place.
So mounting the XR was a qualified success. Am I convinced that it'll ride well, not ruin the handling and not put too much stress on the bumper? Nope, 'cuz it's early days and it'll take a while to know for sure. But the Joe Hauler has a wedge mechanism that locks it solid into the receiver, and the bumper is tied into the frame, so if you move the strapped-down bike you move the whole truck. But even with the light weight of the moto, it's still a lot of weight levered a long ways off the receiver. I'll be keeping an eye on all the mountings and will be doing some easy trips with the setup before bouncing the heck out of it off-road. I also have some very sturdy points around the truck to which I could angle some ratchet straps to help support the weight if need be.
I'll keep you posted on how this all works out. Sure will be a nice setup if it holds together.

Messing around with the XV-JP continues, and it's all going very well. With the basic rig ready to use, it seemed a good time to see what the chances were of carrying my XR600R on the back.
I've had my Joe Hauler carrier for many years and it always seems to do the job, so I bolted it into the rear receiver. At which point I recognized that the carrier platform was twice as high off the ground as the usual setup and the ramp was going to be at a seriously big angle. Oops.
Gravity--It's the Law--being what it is, it'd take someone way bigger/stronger to get the bike which, at under 300 pounds is very lightweight for this sort of thing, up the ramp unassisted. Which led, obviously, to Plan B, which was to start the engine and power it up the ramp. This is certainly a reasonable and widespread practice, though I was hoping to avoid it to reduce the chances of screwing up and shooting the bike off the end of the carrier (I've seen it done; not pretty).

There was unexpected good news in that the Honda didn't foul the Pelican case and didn't cause problems with an empty Trasharoo. I'd been thinking that I might have to take something off the door when I wanted to carry the bike. Of course, I usually load the Trasharoo to the brim with all kinds of stuff, including the camp chairs--pretty much anything except trash.


However, since you can't get through the rear door with the bike mounted, the Honda will usually come off immediately on arrival, and then the Trasharoo can go back to storing things. Turns out that the rear door will clear the empty carrier, so you could leave it in place. Maybe it's about to become my new back porch.
You can, of course, always leave the bike in place and crawl into the cabin from between the seats, and if you did, the rear window still opens with the bike in place.
So mounting the XR was a qualified success. Am I convinced that it'll ride well, not ruin the handling and not put too much stress on the bumper? Nope, 'cuz it's early days and it'll take a while to know for sure. But the Joe Hauler has a wedge mechanism that locks it solid into the receiver, and the bumper is tied into the frame, so if you move the strapped-down bike you move the whole truck. But even with the light weight of the moto, it's still a lot of weight levered a long ways off the receiver. I'll be keeping an eye on all the mountings and will be doing some easy trips with the setup before bouncing the heck out of it off-road. I also have some very sturdy points around the truck to which I could angle some ratchet straps to help support the weight if need be.
I'll keep you posted on how this all works out. Sure will be a nice setup if it holds together.

Overland Hadley
on a journey
Thanks for the update on your amazing little camper.
Every Miles A Memory
Expedition Leader
That right there would be the perfect solo package!!
Similar threads
- Replies
- 21
- Views
- 3K
- Replies
- 2
- Views
- 2K
- Replies
- 4
- Views
- 2K
- Replies
- 22
- Views
- 4K
Forum statistics
Members online
- cbbr
- mk216v
- out.wandering.McL
- Windaroo
- 94LandCruiserDude
- Siargao2025
- pinevalley
- arveetek
- nargun
- ITTOG
- simple
- Hegear
- Dogpilot
- Cummins_expo
- Spencer for Hire
- ChrisD850
- friartuck
- Curly42
- okiedavid
- jasper.mullins
- mark5280
- DLelandC
- eMULe
- kjcummins
- DEFENDERBEAM
- ajb526
- peculierboy
- iggi
- 85_Ranger4x4
- RobH7
- Pacific Northwest yetti
- vintageracer
- shotty
- avlfj40
Total: 1,701 (members: 39, guests: 1,662)
