Fourwheel Camper Personalization

billiebob

Well-known member
Love this thread and the work you have done!

I've done a few changes to my camper that have helped make things easier. It's great to know others are making changes as well.
Love the thread for sure.
Even like the fact you are writing it up and sharing.

Kudos to you and yer wife.
 

White Dog

Member
Thanks for the kind comments billlebob!

I hope that the bit of effort I put into these threads will give others the confidence to try create their own personalization stories. I admit my passion for 'old-school' and part of that is doing things for myself, my way. I want to encourage others to do the same. Only a generation ago, we in North America took great pride in self sufficiency and creativity. Now we seem to only want to buy it. I see way to many folks bragging about the brand they bought and not nearly enough telling stories about what and why they built there own. The idea of making something seems to be either 'way beyond our capability' or even worse 'taking too much time'. I teach woodworking and I have a few mantras: 1) you (my students) have way more talent than you thing you do, 2) any project requires only a bit of knowledge and a healthy dose of enthusiasm confidence, 3) no project is ever perfect but perfection is still worth striving for, and finally 4) we all have access to this wonderful thing called the internet, all the world's knowledge instantly available at our fingertips (unless, of course, the title says "The Best . . . " or "The Ultimate . . ." because it most likely isn't).

There is my 2 cents worth of philosophy for the day. You get what you pay for. ?
 

outdoornate65

Adventurer
#5) fear/respect the tablesaw.

Enjoying your build/improvements....thanks for taking the time.

Picking-up our new Granby in July. Can't wait to start making it "ours".
 

White Dog

Member
#5) fear/respect the tablesaw.

If you fear a tool, don't turn it on. 'Respect' - Absolutely!

In my opinion, fear comes from a lack of understanding and experience. If you are uncomfortable with a tool (or anything else I guess) find a mentor. I believe any true craftsman will be glad to pass on his wisdom.

I'm excited for you. I'll bet you will love the Grandby. It won't take long to become an old friend.
 
Last edited:

White Dog

Member
Once every six years, I have to apply a coat of finish to our house. This was the year. A tedious job and one that I don't look forward to but it needs to be done. Four weeks of works. Gad!

And now I have six years to goof off.

Back to the fun projects.

I've been busy getting all the parts in hand for the three main projects I need to get done in the next six weeks: 1) get the Engel fridge installed, 2) add the lift struts to the FWC, and 3) finish the storage space behind the front seats in the Tundra.

The Engel fridge has been delivered. The Suspa gas springs are here so I can add lift assist to the roof of the Grandby. I've also discovered the very nice folks at Steeves Agencies here in Winnipeg. They are a distributor for Southco (compression latches for the storage platform in the Tundra), Accuride (slides for the Engel fridge) and a bunch of other useful stuff. They are kind of like a specialty shop for Overland builds - and really nice helpful folks as well. It's nice to find a business that cares about helping their customers, even small ones. With all this stuff in the shop and the house painting done, its time to get to work.

Finishing off the storage area in the Tundra is first up. The build will end up having three parts. The foundation, the platform and the back panel. These will be installed separately to make up the unit. It's just easier that way. When we last left off, I had developed the shape for the front-to-back frames. Over the last couple of days, I've built the steel mounting brackets and the rest of the wooden components.
IMG_20190805_152215.jpg

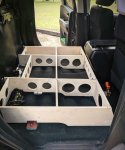
So there's kind of a lot going one here. In fact, this part is by far the most complicated of the build: I wanted to avoid drilling any new holes and use the existing mounting points for the seats and seatbelts, I needed to have room for the front seats to have full range of travel both back-and-forth as well as recline, I had to be able to remove the whole base as a single unit, it had to be strong and of course the frame had to be flat and level both left-to-right and front-to-back so the deck would be level. There is going to be a fair amount of weight in here and it needs to stay put even if I got into an accident. The material is 5/8" Baltic birch plywood and the mounting brackets are 1/8" steel.

Why all the holes?

I wanted lots of ventilation in case water or wet gear gets into the 'cellar' (that's what I've decided to call the space underneath the deck). As is typical with pickups, the heating/AC vents for the back are under the front seats. The openings let air move around the cellar. The issue always arises: How big can the holes be without significantly compromising strength? I have a full proof solution. I ask my son. He has a degree in aerospace engineering - always use the resources available.

Why no holes on the ends?

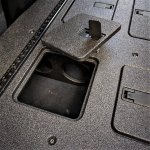
I didn't want stuff accidentally falling out when I open the door. I also think some specific tools (axe, saw, walking poles) are going to end up getting attached on these surfaces. Access to the cellar will be through six removable panels, one for each compartment, cut into the deck that will fit on the top. Each of these access panel will be held in place by a compression latch similar to the way Goose Gear mounts their panels.

How did I decide how deep to make the cellar?

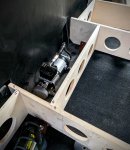
The depth is controlled by the compressor for the Firestone lift bags on the rear suspension.
IMG_20190805_152225.jpg

I suspect someone may be concerned about having the compressor enclosed. This compressor is only for the air bags and never runs for more than 10 to 15 seconds. The large holes immediately in front of it should allow for enough cooling. I have an ARB in the engine compartment for the tire work.

The hardest part of this build so far is getting the mounting points where I think they needed to be for strength. The front points were the trickiest.

IMG_20190805_152235_sm.jpg

It's kind of hard to see what's going on but I made an L-bracket for the front of each of the longitudinal cellar frames. These get sandwiched between the seat bracket and the floor of the truck. These brackets will always be left in place. The frame will get bolted to the bracket with a couple of 1/4" bolts each time the cellar is installed.

The next step is to glue the whole frame together in place so none of the brackets go out of alignment. I will use epoxy and after it is set, I'll remove the whole framework and make epoxy fillets in the corners of each of the joints for added strength.

If you are wondering how I'm going to finish this whole mess, I will have it Line-Xed. Our local franchise has been very supportive and helpful. It will cost a few bucks but Line-X is tough.

That's it for today. Stay tuned as this build moves forward.
 

White Dog

Member
Summer certainly is busy. The build projects get fitted in with all the family stuff and that's the way it should be.

My apologies but I'm going to be jumping around a bit on the three build projects I've got on the go. I'm waiting for supplies on some and 'time management' means that things get done when time allows.

The last couple of days have been getting the mounting plates ready for installation of the gas struts on the Grandby. I think FWC mounts them through the aluminum frame at the factory. The one or two campers I've seen where they have been added after look like self-tapping screws were used. I'm not a huge fan of self-tapping screws and even less of mixing steel screws and aluminum structural members. Galvanic corrosion between dissimilar metals is always a problem so why take the chance if it can be avoided.

I made up a set of plates from 1/4" aluminum that just fit the available space where they have to go. I would have liked them bigger but space, particularly on the roof is tight. The 1/4" thickness also gives the gas shocks the correct offset so they don't rub on camper at least with the strut mounting balls I'm using. I decided to use 5052 aluminum rather than 6061. 6061 is stronger but 5052 is more corrosion resistant and the load on the plates is pretty low (40 lbs). The plates will be attached to the camper with all aluminum 3/16" structural blind rivets from Huck. I'm just waiting for my supplier to get stock in. These rivets are closed and have expanding shanks to increase strength and prevent any water from seeping in. This could be an issue on the front when driving into rain. I will also bond the plates to the camper with Bostik Simson ISR 70-03 adhesive. This product is designed for bonding metallic pieces together like in bus and trailer skins to structural members. Some of you may think this is a bit of overkill. Perhaps but I prefer to err on the side of 'overbuilt' rather than 'underbuilt'. It would be interesting raising the roof on the Grandby with 3 struts instead of 4.

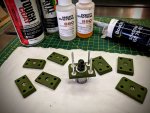
Anyway, here is what the plates look like after being primed and ready for installation.

IMG_20190813_124042sm.jpg

I just set 4 regular Pop rivets in the holes so you can see how its going to work. The steel ball-stud for the strut is powder coated so it should be pretty much isolated from aluminum plate. I will lock the ball on with Loctite during final assembly. I am debating about the stainless washer under the ball. It would help distribute the load over the surface of the plate a bit better but aluminum and stainless don't necessarily play nice together galvanically. I'll decide later.

I went to a local aircraft supply store to get some information on prepping the aluminum for paint. Airplane folks are even more paranoid about aluminum corrosion than I am. They listed a couple of products to etch and coat the aluminum prior to painting. These improve adhesion of the primer. Turns out West System, the folks that make marine epoxy, used to sell these same products for prepping aluminum for epoxy - and I had some on hand. Who would have thought! I don't think West sells this any more. Anyway, It worked out for me. I'll do the final bright-white coat once the plates are installed so the rivets get coated as well and I'm willing to bet at least one of the plates gets scratched during installation.

This may seem like a lot of bother just to mount the gas struts on the Grandby but to be honest, I kind of enjoy the challenge of learning new stuff and figuring how to do it right - at least 'my right'.

Stay tuned. The saga will continue.
 

White Dog

Member
I HAVE NOT BEEN LAZY NOR PROCRASTINATING . . .

Well, maybe a little.

Anyway, after the last entry above, I decided to wait until each of the three build projects was complete before doing the writeup. The storage system for the back of the Tundra is nearly done. It's off at my LineX dealer now for spraying. I pick it up tomorrow. The fridge build is well under way but it will be a couple of weeks until its finished. However, the lift strut build for the Grandby is done.

Background: Back in 2012 when our Grandby was built, the external gas strut lift-assist wasn't available as an option - hadn't been thought of yet. When it did come out, I checked with my dealer and it was available as an after-purchase option but only as a dealer-installed option! My dealer is 2000 km away. Besides, as you have probably figured out, I would have done it myself anyway - just because.

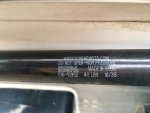
How to do it: Finding out which strut to use was pretty easy: find newer Grandby during my travels, introduce myself and whip out the cell phone camera.

FullSizeRender.jpg

Easy start to the project. Suspa sells these online at a pretty reasonable price.

The factory installs the ball mounts through the frame structure at the time of building. The couple of after-build installs I had seen were done by attaching plates with the ball mounts using self-tapping screws.

IMG_6343 (2).JPG

Hmmm . . .

Maybe a little sketchy.

The struts are always under compression so the balls are constantly loaded. Any movement between the roof and body of the camper is going to put loading/unloading strain on the ball mounts. I wanted mine to be strong (over-strong? Nah, can't happen). A broken strut mount in the middle of nowhere could be annoying. I knew from pictures online and talking to various folks that there was frame structure where the mounts needed to go, not just thin skin aluminum. I also knew that along the top of the body on the back wall was wiring. I certainly didn't want pointy sheet metal screws in that space. I ended up deciding on blind rivets and structural adhesive. I have to point out here that I'm not talking about your average Big Box 'Pop' rivets. I'm talking about true structural rivets that are designed to take a load. Fortunately I have a couple of excellent distributors close to where I live. The kind of guys that love their jobs and love the challenge of helping out a builder with a unique problem even if they are the smallest customer they will see all year (thanks Calvin at Applifast and Barry at Wearing Williams). The rivets came from Huck. Not only do they compress along the axis of the rivet but the shaft expands to lock against the side of the hole. They are also 'closed' so water can't enter along the mandrel shaft. All material in the rivet are aluminum - no galvanic corrosion. The adhesive is Bostik ISR 70-03 which is a 'structural' adhesive designed to bond metal skins to metal frames. Think trailer, bus and train construction. ISR 70-03 is also rated as a sealant which will keep water from getting pass the mount.

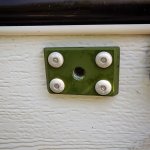
The Build: The mounting plates as shown in the photo on the previous posting are 5052 aluminum - very high corrosion resistance and easy to work with. The plates for the roof had limited space, just enough for four 3/16" rivets and the 5/16 NC threaded hole for the ball stud. The plates were etched and coated with West Stystem #860 aluminum prep before priming. The rivet heads were treated with the same product after installation then primed. The install was straight forward. The back of the mounting plates were covered with adhesive then riveted in place.

IMG_20190829_164128_637.jpg

Note: it is very important to clean up any adhesive squeeze-out as soon as possible with paint thinner. The threaded ball stud hole needs to be cleaned very well too. Once this adhesive sets 'it ain't coming off'.

Again, there are wires behind the body walls, so I was very careful drilling the pilot holes making sure the drill didn't burst through into the cavity - just kinda snuck in. Let me see: spinning sharp drill and electrical wires in a confined space - probably bad!

After letting the adhesive set overnight, I etched and primed the rivet heads then finished the plates to match the cabin using an aircraft paint. Turns out 'Bright White' in the aircraft world is pretty much 'Bright White' in the RV world. Who would have thought?

IMG_20190829_164128_644.jpg


Once the paint had dried, I screwed in the ball studs using Loctite to make sure they won't vibrate loose. In the end, I did decide to put a stainless washer under the ball stud to minimize deformation of the aluminum plate. I'll watch it for the first while to see if there is any galvanic corrosion starting.

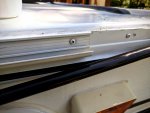
The only modification the Grandby needed was to shorten the drip rail on the roof above the door. I took about 3" off each end to allow clearance between the rail and the strut.

IMG_20190828_131138.jpg

After all the fiddling around, the struts really do help lifting the roof. I'm neither too old nor too feeble to lift the roof without the struts (yet!) but now I am much more likely to flip the roof up for lunches and such.

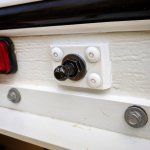
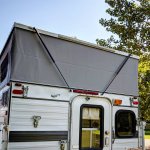
In the end, my little project makes the Grandby look pretty much OEM with its current breathern.

IMG_20190829_164128_646.jpg

IMG_20190829_164128_655.jpg


. . . and I learned a whole bunch about blind rivets and structural adhesives.

Bonus!

Stay tuned! The Tundra storage platform reveal should be out in a couple of days.
 

White Dog

Member
It's late winter here on the Canadian prairies. The warming sun and the latest issue of Overland Journal half read got me to thinking about travelling again. Thinking about travelling resulted in a bulb lighting up in what I call my brain - "I never finished writing up the last of the Tundra storage build". Time to get off my duff and get it done.

The last installment showed the initial fitting of the frame structure to the floor. The Tundra has a reasonably flat floor pan with minimal lumps, bumps and fittings to get in the way. I was determined to use the existing mounting points (seats, seat belts, etc.) so I didn't have to drill any new holes. That went pretty well. Eventually the framework was done and the subfloor was level in both planes.

IMG_20190805_152305_1 (2).jpg

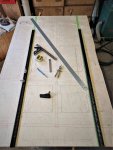
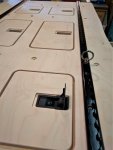
Next came the deck. The material is 5/8" Baltic Birch which comes in 5'X5' sheets. Fortunately, the width needed was 5'. Some careful layout:

IMG_20190816_131614 (2).jpg

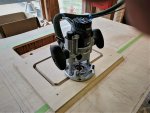
And a router jig to cut the access panels:

IMG_20190817_131730 (2).jpg

Meant that I ended up with 6 access panels to the 'basement' below the deck.

IMG_20190824_135445_1 (2).jpg

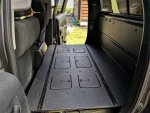
The compression latches on the access panels are from Southco and the L-Track from US Cargo. There are two sizes of access panels - 4 smaller on the outside and 2 larger on the inside. the jig meant they were identical so any of the panels of the same size will fit any of the holes; I don't have to keep track of which one goes where. Note that I recessed the compression latches so they are protected from cargo on the platform.

With the base done, the back was next.

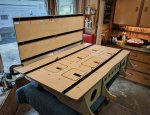
IMG_20190824_135411 (2).jpg

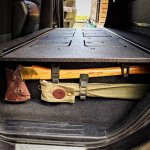
The back attaches to the base by the aluminum angle along the bottom edge. The angle is screwed and bonded with epoxy permanently to the back and attaches to the base with recessed 1/4" button head bolts that thread into T-nuts on the bottom of the base. Three rows of L-Track give me lots of options for tying down gear.

At this point, the unit was ready for a final test fitting with the gear I expected to be carrying.

IMG_20190816_095825 (2).jpg

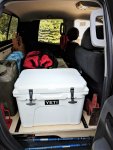
After a bit of sanding the pieces were ready to head off for Line-X. My local dealer was super helpful. I couldn't have asked better service from both him and his staff. When it came back, all that was left to do was install the completed system, load up some gear and head down the road.

IMG_20190901_151256 (3).jpg

IMG_20190901_164243_919 (2).jpg

IMG_20190901_164243_923 (2).jpg

IMG_20190901_164243_931 (2).jpg

After a 3 week trial trip last fall, I'm very pleased with the way this is working out. I have way more room than I need (rare in the Overland world) and everything is accessible and secure. As always, I have a tweaks to do but not many.

This was a pretty quick skim trough a complicated build. If you have any questions, post a reply or shoot me a note. I'm more than willing to pass on what I learned and figured out. I hope this gives other folks lots of ideas to work on their own builds and to pass those on to all of us.

The next on the list is the fridge build and install on the FWC. That will be along in a day or two.
 

White Dog

Member
Did you plunge all the way through with the router for the doors? It look like you didn't as there is a lip, but how did you separate the door from the lip?

A bit of background first.

I would love to have had the genius to come up with this totally on my own but to be honest, most of the ideas were blatant pirated from the folks at Goose Gear. I haven't seen an actual Goose Gear platform but from the pictures, it looks like their access panels are stepped. This is easy with a CNC router and I would be hugely surprised if this isn't how they make their platforms. If I was in business, it's how I would do it. I don't have (nor will I ever have!) a CNC router so I had to come up with my own way. That's the fun of it.

I thought about duplicating the stepped access ports as Goose Gear does but getting the template in exact register on both sides of the platform would have been challenging. Therefore, I chose to create square rings and glue them to the bottom of the platform to support the access panels. This was easy because all I had to do was switch the size of the template guides on the router base and use the same template. The rings are only 1/4" thick. The Southco compression latches I chose for the access panels were a bit happier having the extra 1/4" of thickness as well.

Before I built the access panels, I talked with my friendly LineX dealer. He thought leaving a 1/4" gap between the platform and the panel tp allow for the thickness of the LineX material would be about right. That was a bit generous. If I was doing it again, I would leave 3/16".

Hope this helps.
 

Oilbrnr

Active member
Ok, think I follow. Now the Southco latches only hold on one side of the hatch, what is on the other side of the hatch to hook onto that 1/4" lip?
 

White Dog

Member
Ok, think I follow. Now the Southco latches only hold on one side of the hatch, what is on the other side of the hatch to hook onto that 1/4" lip?

I used Lee Valley table top mounting clips (#13K0101) but only because I had some and they happened to be exactly the right thickness (pure dumb luck - not planned). If they hadn't worked, I probably would have just made a Z-shaped clip that screwed to the bottom of the access panel and caught the edge of the lip.
 

BajaSurfRig

Well-known member
@White Dog What structural rivets did you use on your strut install. I'd like to add rivets to my existing ones as all I have holding the plates in place is 3 self tapping #10 screws. Figure redundancy can't hurt.
 

Forum statistics

Threads
188,020
Messages
2,901,228
Members
229,411
Latest member
IvaBru
Top