From Freightliner ambulance to RV - we hope!

rossvtaylor

Adventurer
Hey, all of you... you know who you are, those crazy medium duty ambulance people...

We just wanted to thank you for the inspiration you've given us, with your build threads (to get us thinking) and your input after we started. I just read a great (and very long) thread about a custom build of an expo camper rig. It's an amazing build, but must have cost waaaay more than we could have done. As I was reading, about how the box was custom welded from aluminum and all of the other great structural and interior details, I kept thinking "hey, that's how ours are built." I'm not comparing. That was a classy rig. But, for the money, we feel like we've gotten a great value. You can certainly spend as much as most homes, but you don't need to in order to get out exploring comfortably.
 

scooter421

Adventurer
LOL, I figured if I talked about it.....maybe it would magically appear? On the dash, steering column, shifter.....anywhere. If it is there, I have yet to find it. Then again I gave up looking a while ago. It actually might be there somewhere!

I have to agree with you Ross, the Ambo option is a good value. I rebuilt a 71 Shasta (compact) trailer from the ground up. I had a guy at work ask me why I was spending so much money on such a small trailer. The following weekend, he went and looked at trailers and the prices! He understood completely after that. Looking at RV's and they way they are built, there is just no comparison in what we're building. Besides, all the busted knuckles, money and hours makes it all worth it in the end. Good times!

Safe trip, catch you later. Looking forward to seeing the progress once you're home.

Scooter
 

bobrenz

Observer
All right! You did have cruise control after all! Excellent!

As far as silicone, I agree that a urethane would do a better job. A bit more fiddling around, but they will be there forever.
 

patoz

Expedition Leader
The thing is, if he bolts the mounting bracket of the LED Floodlight through the side of the pan, and runs the wiring through a grommet of some sort, he will not be able to get to any of that later on for upgrades or repair if the pan is glued in permanently.

I would want to retain accessibility to that area for sure.
 

rossvtaylor

Adventurer
Okey dokey... I'm back in the States and catching up on family time. But, that doesn't mean I can't sneak in a bit of progress on KETO 1.

Before leaving the States, for my 3-week trip, I had listed that beastly Westerbeke generator on CraigsList. We need that space more than we need the genny, and we'll use the money we got from the sale to put in solar and some interior items (like a bed). I had a few people who were interested and willing await my return. One guy, a super nice race car driver from Phoenix, came up and took it off my hands today. It took three adults, plus my daughter, to get the thing out... 6 bolts, lots of wiring connections (both AC and to the remote start panel), a surprise battery connection (for the 200 amp alternator, which I hadn't even noticed before), and lots of screws.

Here's that Power Line 200A alternator, which was run off of a pulley on the end of the flywheel/fan. It had a custom-made belt shroud, painted the same red as the genny, and it was so well incorporated that I hadn't noticed it until I started unbolting the Westerbeke from the floor. To be honest, if I'd seen it earlier, I would have pulled it off before listing it on CL. You never know when you might need a spare 200A alternator... But, since I'd already sent pics to the buyer, I didn't feel like I could do that.
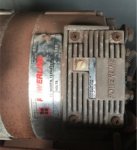
Screen Shot 2016-07-02 at 10.02.56 PM.jpg

We pulled it out onto a jack platform and then raised it up to his truck bed level. Here's the first attempt... it was too low to reach the truck.
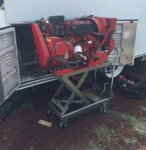
Screen Shot 2016-07-02 at 10.15.17 PM.jpg

So, we lowered it again and then used a 6-foot spud bar, and a couple of blocks, to lever each end up. Archimedes would have been proud, again. We raised the stand base onto some blocks and tried again. Worked really well and that's out of the way, now.
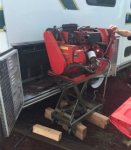
Screen Shot 2016-07-02 at 10.07.46 PM.jpg

That entire cabinet is now available and it will become our exterior kitchen. There are AC (electric) lines there, running to a breaker panel above (inside an interior cabinet), and big *** 12V cables running to the batteries... I'll check the size on those, but they're easily as big as my thumb. Right now, our "stock" inverter is in another interior cabinet and it only feeds two receptacles. They're orange, for identification, and they're in the worst possible spot to be functional. They're behind the legs of whoever is sitting in the CPR seat, about 10 inches off the floor. I think I'll move this inverter into the newly vacated cabinet, fed by those big 12V cables and tie it into the main panel. We'll need to watch loads, so we don't run the microwave and the coffee maker at the same time. But, in this new spot it will feed all of the receptacles and they are spread around where they're functional. We may add another inverter, dedicated for an induction cooktop, but that will be located elsewhere.

And, after getting all dirty anyway, I was anxious to get the tires mounted. We've had the wheels and tires for a month now, but they've been sitting near each other in storage, just longing to be united. I hauled them, two sets at a time, to the Boss truck service center at the Pilot truck stop, about 15 minutes from our house. We couldn't get more than two wheels and tires into the Tundra.
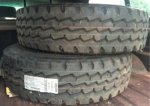
Screen Shot 2016-07-02 at 9.53.26 PM.jpg

I'd talked to them before and they had offered, basically, half price to mount the tires since I didn't need them dismounted first. They worked hard and commented that the sidewalls were quite stiff. They are rugged tires, indeed. I'll let you know how they work out, in use.
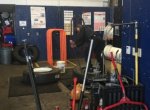
Screen Shot 2016-07-02 at 10.20.58 PM.jpg

This guy earned himself some extra beer money! So, now the fun begins - tomorrow... Or, maybe Monday.
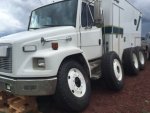
Screen Shot 2016-07-02 at 10.23.34 PM.jpg
 
Last edited:

rlrenz

Explorer
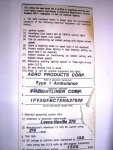
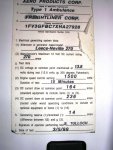
If the alternator was a 200 amp unit, then it would have been too small to replace the truck engine driven alternator - that's a 270 amp unit. When an ambulance is built, a full load test is conducted to verify that the truck alternator can do the job. You should have a label inside the cabinet that has the air conditioner evaporator with the results of that test.

Here's what mine looks like:

I finally figured out that the difference in the amp readings was due to the ambulance having a pair of 500 watt, 120 volt quartz floodlights that were powered by the inverter.

DSCN4297.jpg MM-1.jpg
 

Ozrockrat

Expedition Leader
Have you got something to torque the lug nuts with. 450 ft lbs. also if you happen to have someone coming through Phoenix you can have a loan on my little torque multiplier device. I have a heavy duty one here if (touch wood) I need it.
 

rossvtaylor

Adventurer
Thanks, Bob - I also found that sticker in ours and we've got a 270A alternator as well. I didn't expect a 200A to be a direct replacement, but with the removal of emergency lighting and a change to LED inside, I figured it might be a useful spare. But, as it turns out, I didn't spot it in time and now it's with a new owner. You definitely did some digging and you've uncovered some great info. I very much appreciate how much detail the manufacturers provide with these things - from the testing data to the wire markings, it's pretty impressive.

And, Oz, I learned from you. After trying it the hard way...

My first attempt at removing the previously-installed 19.5-inch wheels was with this torque multiplier:

Screen Shot 2016-07-03 at 10.17.50 AM.jpg

It's got a 1/2-inch input (so I can use my torque wrench) and a 3/4-inch drive output. It's rated for 1100 foot pounds, after which point you risk shearing the sacrificial pin. I used a torque wrench set for 250 foot pounds, on the input, and didn't even budge the wheel nuts. With the 4-1 ratio, that was 1000 foot pounds on the output shaft and I didn't want to shear the pin. That's when I resorted to the 3/4-inch drive breaker bar and a 5-6 foot pipe. And even with that, it was all I could do to break some of the nuts free. Crazy tight...

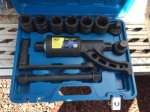
For work, where we regularly have to tighten tower nuts to 1100 foot pounds, we have a 24-1 ratio multiplier. But, that's not at my house. So, after doing it the hard way and reading your thread, we bought a 56-1 ratio torque multiplier that's configured to work better for semi truck wheel nuts. It looks like the same style you got (see, I can learn!).

Screen Shot 2016-07-03 at 10.18.05 AM.jpg

This new one will live in the tool compartment on the rig, so we have a fighting chance of doing this in the field. The whole experience, so far, has been good though. It's nice to know we can change a tire ourselves, and what that involves when they weigh 250 pounds.

Scooter, thanks as well - we look forward to seeing how these look. There's lifting and cutting in our near future, but that's all fun stuff.
 

patoz

Expedition Leader
So, after doing it the hard way and reading your thread, we bought a 56-1 ratio torque multiplier that's configured to work better for semi truck wheel nuts. It looks like the same style you got (see, I can learn!).

View attachment 353214

This new one will live in the tool compartment on the rig, so we have a fighting chance of doing this in the field. The whole experience, so far, has been good though. It's nice to know we can change a tire ourselves, and what that involves when they weigh 250 pounds.


Ross, I'm in the market to purchase one of these also and have been looking on Amazon, but am not sure what brand to buy. Have you used this one yet, and do you have a link to it or any other info on it you can post?

My lugs and wheels are not a large as yours, but they are still very difficult to get off. I replaced the F350 rear axle on mine, which is now a trailer, with a Rockwell 10,000 trailer axle that has 8 5/8" studs.

HPIM1188.jpg
 

rlrenz

Explorer
I've been looking at the Nut Buddy at Amazon - https://www.amazon.com/dp/B00F07VT8...=UTF8&colid=L5GS3BT8G2ZB&coliid=IKROB9Q840SSL

nut buddy.JPG

Over the years, I've fought with Budd truck lugs, and I've never found them cooperative. My worst-case record was a straight lug wrench with a 3 ft bar, and with a 6 ft chunk of pipe on the bar. After I bounced for a while, the nuts finally came off. I learned to install them with a 1/2" impact so I could get them off with a 1" rattle gun.

A torque multiplier is on my list (just as soon as my 401 surfaces...)
 

rlrenz

Explorer
If your truck's alternator ever has problems, look at a rebuild instead of a replacement. When MNtal's 270 amp locked up, he took it to a local rebuilder, and got out for about $40.
 

rossvtaylor

Adventurer
Pat, here's the one we bought:

https://www.amazon.com/gp/product/B00MI0DOW6/ref=oh_aui_detailpage_o05_s00?ie=UTF8&psc=1

It was well-reviewed, but there are others which look similar (like the one Bob found). I haven't had a chance to use it on the wheel nuts yet, but it looks like a nice tool for the price. I'll try it out when I install the wheels, but I'll do the final torquing with my smaller multiplier (since I can use a torque wrench on that one). I guess I could use a torque wrench with this one, too, if I find a socket which will fit on the drive. That should not be tough to find, and I'll let you know what I come up with.

Here's the smaller one I have:

https://www.amazon.com/gp/product/B0017K5ARU/ref=oh_aui_detailpage_o09_s00?ie=UTF8&psc=1

And thanks for the alternator info, Bob. I was a bit scared by the prices I'd seen reported, so that's good info to have. Hopefully it won't be necessary.
 

patoz

Expedition Leader
Thanks Ross,

I saved all of these in my 'Wish List' and will decide later, after I hear a little more about them. There are a bunch on there that all look like they came out of the same molds, just different color paint, boxes, and decals, so that makes it a little confusing.
 

Forum statistics

Threads
188,007
Messages
2,901,030
Members
229,320
Latest member
SMBRoamer
Top