German 98 Blazer build

Started with my laptop mount today...

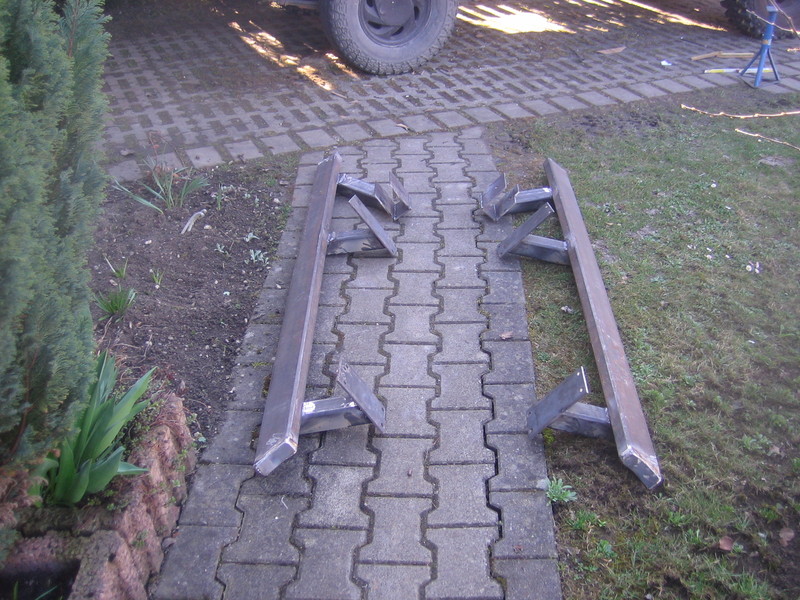
Driver and passenger legs. Driver side was a bit tricky...

img_8100q7fz.jpg


Tacked together:

img_8104u7gl.jpg


In the car:

img_8105972m.jpg


Added a bar to the dashboard:

img_810717nx.jpg


Start of the laptop mount:

img_8110c7vo.jpg


Connected:

img_811297wd.jpg


Almost finished:

img_8115s7g8.jpg


Added some edge protection:

img_8119d7sk.jpg


Finished:

img_812387ji.jpg


My command center. Another gps unit is still missing...

img_8125u74j.jpg


img_8127975r.jpg


img_812977pz.jpg


img_8133e7n4.jpg


img_8137r72l.jpg


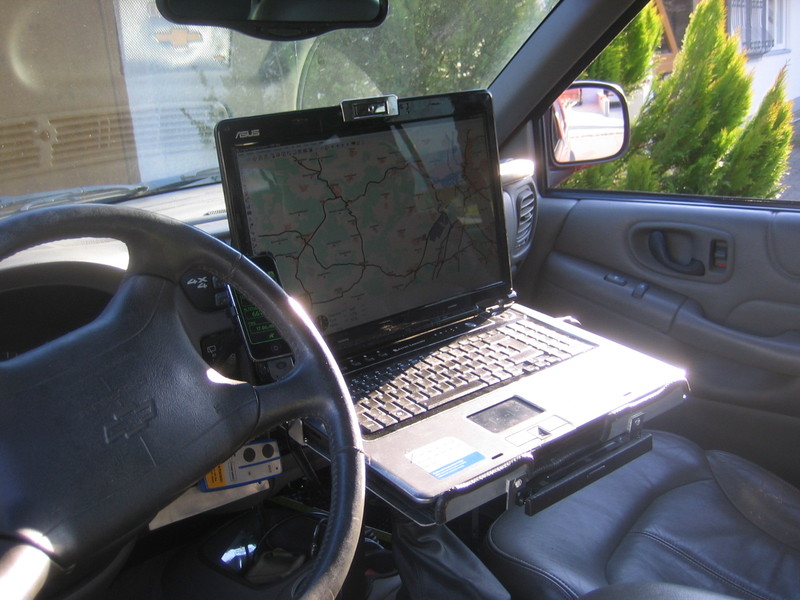
Here you can see how close everything is on the driver side mount:

img_8136k7it.jpg


I`m really happy how it turned out. The mount doesn`t block the sight or hinder with anything in the cab...
 

chilliwak

Expedition Leader
Good work Stein, but are you sure you can access your auto transmision shifter quickly when you are in an emergency?:rally_guys:
 
Good work Stein, but are you sure you can access your auto transmision shifter quickly when you are in an emergency?:rally_guys:

There`s no difference in handling the shifter with or without the laptop mount. The only thing that it bocks a bit is the key...

Mounted some LED fogs for campsite lightning today:

img_8138cq9z.jpg


Switch:

img_8139xosq.jpg


On:

img_81419q6y.jpg


After that pic i flipped the mounts to make it look better:

img_81477oxb.jpg


These lights are pretty bright and only draw about 60mA each...

Also made a mount for the showerhead:

img_8143asxi.jpg


Plenty of hose left:

img_8145rp3q.jpg
 

chilliwak

Expedition Leader
Stein, you are just Mr fabrication.:Wow1: It looks like you are ready to roll for your next trip.:truck: Since you have done such excellent work I think you need a :beer: cold one. After all it is the weekend and time for some :friday: good times!:wavey:
 
Well, we had enought :friday: this weekend... :wings:


Took some measurements for the sliders today. Didn`t think that i need that much steel... :Wow1:
I applied for a job today, and should get a call if they take me on wednesday. If so, I`ll buy the steel on the way back...

Btw, should get my water tank tomorrow, so stay tuned for updates...
 
Shopped at our 1€ store today. Got all those things for about 15$:

img_8149fzvd.jpg


img_8151ulb6.jpg


Here`s the proof that i can reach the shifter just normal:

img_8152d9n8.jpg


Added some anti slip mat to the laptop mount:

img_81539bii.jpg


Then i took the radio out to add a aux input. Unfortunately my radio isn`t convertable, so i put it back together...

img_8154eyzc.jpg


Also got that thing for cheap, but i`m not sure where to mount it:

img_8160vxng.jpg


Then my water tank arrived:

img_8161czcw.jpg


Perfect fit:

img_8162fz2b.jpg


Made a mount for it:

img_8164xlp8.jpg


Mounted:

img_816549ey.jpg


My soldering iron died and i had to use my 75W one. Slightly oversized... :icon_shrug:

img_8166d963.jpg


The pump mounted:

img_8167qyll.jpg


This pump has some serious pressure. I think i`ll put a adjustable resistor in to reduce it a bit:

img_8168nxxy.jpg


Finished install:

img_8169cyf4.jpg


img_8170lz0h.jpg


I think i`ll have to find a better way to store the hose. Suggestions?

There`s another problem i found. The pump doesn`t stop the water when it`s not pumping. So if the showerhead is lower than the tank, it will drain out. Any suggestions on solving this problem?
I could mount the showerhead higher, but that`s not the elegant way...
 
D

Deleted member 9101

Guest
I think i`ll have to find a better way to store the hose. Suggestions?

There`s another problem i found. The pump doesn`t stop the water when it`s not pumping. So if the showerhead is lower than the tank, it will drain out. Any suggestions on solving this problem?
Put valve after the pump.
 
First mockup:

img_8176ho4s.jpg


img_8177ap4i.jpg


Didn`t get much done, just a start with the mounting brackets.I can tell you, this is really tricky to find a place for the mounts...

img_8178vt8l.jpg
 

chilliwak

Expedition Leader
Looks like things are coming along nicely Stein. Everytime I see metal around your truck I know I will see some cool fabrication soon. I cant wait to see those sliders mounted...:Wow1:
 
Thanks. Just got a new job today, so i won`t have that much time anymore, but a lot more money. So i should be able to start with my onboard air system soon...

Went shopping again today:

img_8179goud.jpg


All brackets cut:

img_81812t7y.jpg


This is how they`ll be mounted to the car:

img_8184wp0c.jpg


Rear bracket:

img_8185npkq.jpg


Middle bracket:

img_81874pe3.jpg


Front bracket:

img_8189dob3.jpg


I talked to the owner of the shop where i bought the steel, he said he can bend some tube for me. Maybe i hire him to bend some outriggers for the sliders. Will have a look when they`re finished...
 
Drivers side mock up finished:

img_819577sj.jpg


img_819667ei.jpg


Both sides mocked up:

img_820097qn.jpg


Spent the better part of the day grinding and welding. First one finished:

img_8205q7lc.jpg


Welds started looking acceptable:

img_8211g7yo.jpg


Both sides finished:

img_8215k738.jpg


A few cutting wheels lost their lives:

img_8212t7oo.jpg


Will give them a shot bedliner on monday, along with the rear bumper, snorkel and swingout...

Also got some wingnuts for the hilift mount:

img_8198q79e.jpg


And a new sticker:

img_8217r7se.jpg
 

Forum statistics

Threads
190,314
Messages
2,926,248
Members
233,711
Latest member
DanoWall
Top