Herbie's Chevy Astrolander/ZMB Build Thread

Herbie

Rendezvous Conspirator
There have been a lot of little projects lately. I have not got my act together to document all of them just yet, but this one was quick and easy.

My roof basket is a (craigstlist find, naturally) Surco S4550, more or less as pictured below. You can see the two cross bars (which actually run transversely to sit on my van's rails), and the three longitudinal spars that sit on top of the cross bars. That is the sum total of the "floor" of that basket. With careful packing of big stuff like the camp table covering most of the bottom, I've got by, but it was time to put in a floor.
aIZIk13tC8wyVlmEwC_dwoFjxfR7aX1W1rO5SXX8X7IyKBwKQl1ufsmcE8T1SmT-kYJO4rgo51gUIYFDj0ih6PjDThmRidaYWqAY3DNobRk6e_5ztNnnvGXSYrTHN_Wsp5ajs78pA7KoE0YxjITYasuy6FQXgEKg_3IGxh08JJkPEld68Dizrn9N8ZpETFDhiSLeH085sGG0teqwm23auJtRsVIqYD56KGIcrtUl4s4Z5qTmpfjmAf-hR_8aNAP6gAvvIaN4D5Fp2SnDSoqYeT8kJhKkvwhtjygqN8LjhlQLgoQedxoQ1LzU1HS9LQBR57rLM1fa6Y4BhVFwpmW2CcmsvfO_80fUOT8Ekov1TIhBRIJdMDUfwS2NFwcYf5CL0DTfwvXQnMOL8VLnZA39oh_vqd4q_GL6ssWv-GhrX-hikIEw8hChg76MnM9PS11AXElTwb_IpX-y0F-3ihVH8wE2wI7gO-RkCslxD4ml0h17qLPfIrCXtbvI2r0PzdmH7EIU3Vy2HFvgyT1BxtcPgbsgE-CD90yAeV6ZEJ8sbEmtLLOYJ-ILCfnLx0NMl5_ew47HhjEP4ZpQXX-Vy8lWm5Crpk4Px6F3VMherfo7jqPn8ROXnpxzHQ3y4LMtcEXEI8YSJTe7QypFY5vS4dWhJ2dlSPtd0AT2ew=w495


I know lots of people like the chicken coop flooring, but I found a cheaper/lighter option that I thought might work, so I took the plunge: Ikea Runnen outdoor floor tiles. These are polypropylene, UV stable, and durable as hell.

I laid out two boxes worth of tiles and measured for my basket's width. I ripped four tiles to width on my table saw, then used a jigsaw to round the corners to the radius of the rack.
w_z0xl4ZTBSQi2ZhO2dUOXQG3gvK_HUZL9DMSKk5paaFI4h8E-z_QM4ey1NEHoL14vCRMkQEwguwGb7PIT1Eq_sC812XwZetuL-PdHJnkdkyIrHxUZoKwcI-LCJqG8IXtDBZHDJLl7q3ETiRHvy_BzfRZF6hTEPp5uNQsIHMAOQvuAQXJda2ZWa8yLmnENxwtG2p2KteIHHurEVlCSSV0CnEYiGZzlcUsKFEDYhPwKP1_fITutiBjPRh4JNwKXVQL5Eip0Iy4TkweEu8dOLN3BgzAPTI45NSoZqO2FoS67ZwT_KrdQiaGKfu9YcaWmDBzWdsl_QoaLyz9ZA9hkteDtZcXBaG9OwzcIF_ubFMtrIB3VqfwHYcJ17WEIz0a9kPRMUFPtcGOXfJqi_6ogk1lGAPyyig5lzA7Hr2wT6CUWYQUVXnkufl9dSTPotuNZFvjcZCK54DatxGB_G7fHR0vzVx3_yAgDBz8sSmewGDmAuOJBYQpm3KUeTKY-jrObITCgOvStlgEJGLQGVgaJUIccKr7cNbSIwszIe_Un8TW3qAbxx_Iw1Xq9NhaajLjBZPv03uljq5YCYW6o5jtcBfIVcRFmRcmlvCLBT7RJA1n06IgoHC2fEcIpVOd1YpcAFXRmc0ZhOdjKhOsn4ImNIn4VlN2-TjH11svA=w500


Next I snapped everything together on the ground. The links are pretty stable, but for added security I added a few zip-ties at the joins.
bIFO2zRLjCIY5I6842DpEyIWH1XFq3oPPKgFZQ1xI3zaxiRmEvgQQRsGc_TWl_2fuoFM5TstSJhvhb-YKjfa84vmTQ0gf6DSpwHHZv958XeFdQEm_vifrpKcByaxwROT-42BkdApzkkq-xqDhgY_2hbem7sXg8-TDhYFQTN-X4Upgyl2NYTDd4_e6LmuWSW6228BQ99lqZQ73G18Kzn39vK8ZVksjXsAulLrZGDZK6P3xirjIbDktVepbQ8DWRix-fCNX_7z_hrj4DETtdcSf_KE6OgsVn5qK4BEYi0Mw5tdqJHguGFPQzyoo21RepfpcfIxfmWukopjWMRaMY3rxjoYWHWfAf-1a2u-N0fTiQuZjnFk7AxFg_5nG5-RYGdDlQm4stbY0z-fwIWdHNlkb8KB9wGe3pjrePcZ_Czxlvo1fxh674XxFn7iPB4FWJkfa3qOhtAPMe1LpBGv78fmmRxId0ry6J9DHNqiZkcuAO9kdni6c6G3Zji1htzs6mKCLAjV5hAWK22Ck7z8q1zEv61lazKk0O2yeqjkmek8a2m_7lFOp9uoUeicAmZUUQdFXyv7FKOMqKFggriDUdheGjXUXJj5HuxF2VDnBYWiQ1a1TJFjSy8IwDIYZ5yKt8aAE0iVyhCiQRgZhbKdsF9W5xK9aiCukDK6QQ=w350


Finally, I dropped the assembled floor into the rack - an easy task since it only weighs about ~10.5lbs (versus ~17lbs for the still very light chicken-coop floors).
muoRx7q-lRhKKm9pRvBQxiKbgCqwPjmRvEPr1AnMHw4HjZM2h0zIHwSaM3PkYab-GiBNpRPDFKyimyP0ZaYl0WrqF9O4Eq6OeqhLoalkbRB_Xtqm-sOp4mpt1pzOLW5WA2XtRcbON20r9Xq8IxmAbe6oiYnEOLKAbsKxvsGzdeWyDgsHdsA-myKQKC_OVtwBaoVsdtSkQywWllYlaEFMq_pDm6mh-sHD5JzkIW4CmUcceP4jzvkVxuzzBiVkOFiVHYx3T4H-oapb6uT_z3hLMoyhf0CSrYqPOPKkzOEbdqWy33LLFrZnqM0lBa_IJyhD3cR6Rr7VfDTWniiUL0-azRkrxOu-FAAsIwzIrZnv30j-ma_n5KYL1ycp4y-k9OjXZANQxDL37vBIkNkdV4DorxNpG3Hf7c5fGXFg60Rx9ZIGwX9Iw-ro2qXV4u3aE6WSwqs-_2vg1EBAo_kxjgQeCV0eMyot32MxsMniXSroJKxlxHvCgvH32Ib5sd5lmOsfL4Jb5iy9VDxz9ODaR2CF4Q6H9rlfYLAFEaCZIWTXey_sOlA6v4hMm0XxgvkG8OZY9SNq1Rcb8DXdQL5fcBjI8wUUMKRe36SrDBAW4VEpbU0A5s0VQXbFM9x6LkOIy4ZH-qPuLM197jp3mRTon3-dA7aEKWMIVc8u5A=w500


I fastened the tiles around the perimeter using heavy duty zip-ties through the snap-lock tabs, with more zip-ties looping around the longitudinal struts, with the ties carefully recessed into the grooves so that all my gear will slide in and out easily.

All told, I'm in for $40 plus about an hour's work, plus I have a couple of tiles left over that I may toss in the van for someplace to stand when washing off dirty feet, etc.
 

danfromsyr

Adventurer
I'm curious if the middle will 'flutter' like a sheet in the wind?

I'd thought about using plastic lattice to help items sit flat in the roof rack
 

Herbie

Rendezvous Conspirator
I'm curious if the middle will 'flutter' like a sheet in the wind?

I'd thought about using plastic lattice to help items sit flat in the roof rack

I will have to report on that after testing, but I did fasten around the three longitudinal spars a few inches from the ends at the front and rear. (I'd have to take the rack off the van to be able to attach in the direct middle - not enough clearance under the rack to reach under to guide the zip-tie around.)
 

Herbie

Rendezvous Conspirator
A quick update, now that I've finished the build on my utility rack that spans the rear quarter window between the C and D pillars.

IXN82tcnwe3Mf-yRhQd_LWdD6JClVoIJfdZn00uaEi0_-H_oLpfhfh29enSBuq30sI7DkYyHbnsPhYfvFm1pRIrqyu9ofpJ8-qeYwYRr9JM6JxXhDmsfH_jmok_dgZwQR81D7GApQY8pCo98WLUWTQKmUc79p15w4Zt44ODymqUCsAxXDQrltUiiuzLWEwm-uzrxdw4rMjAkkpNBkwgQvtZhiwtsjXX5tvvidTSdb5R6H_mxg9UNXV-JOGfaGRhhjpviJNbCTsQdgvwS27Af8GWnfLlmWu63oaO8aReMd_poux7uiOuO7HhIf63hmQomEFs1OW8nPGqpAC9y1gnEhnm3WqVScWoTn7X-JnBiD9D8L8khg8kBTDWiZdFe3tErEja1YE9TdVsCUlaGlv8Y_iycsmwj44h8QnuCYzfvio-nobvQRrHexdqu5JGlyebRGPmTv2pqNm1w5YIxzECY2ENQB04TjWdOXfxhL77paDKrleNKj1XgIE4YeKl7a-7rBs3ztXQ77D_qz0X851k549cshsYZHk6kg1vbJsszwk5uW6tWj8kUFEUw-PieU1aEBAfYMorEf3ERP_ZnnyhLWT-qcoxHRXBV-zrS7inqK-u3BD4M_I8GWC-HxBs4dmwUKfA87F12RUKBbUVzbeXPjan81alEWd425g=w600


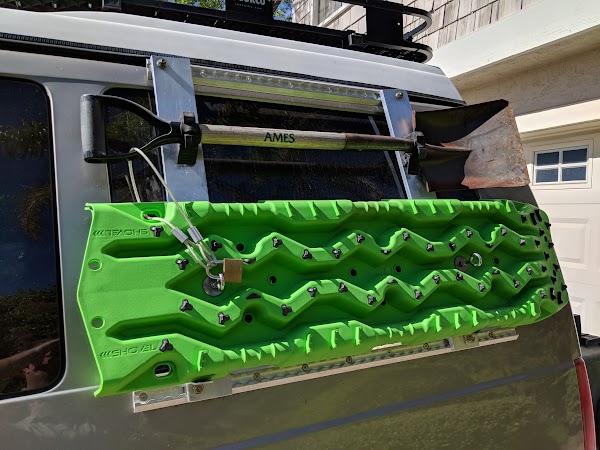
The primary motivator for this was to relocate some of the weight from the forward end of the pop-top. In years past, I've overloaded the front end a little bit by putting the slide-out solar panel and recovery mats on the forward rack. The goal was to make these things easy to each by standing in the open forward door area, but the side effect was that raising the pop-top was significantly harder, due to the extra weight way out on the long lever arm of the hinges/top. As a nice bonus, the TRED recovery mats are now even easier to access, without the precarious tip-toes reaching from the passenger door. (Yes, I'm short.)

XSo50PXPH0aH3nh_5fnLMXDJf-dEijbV07Yc92oFg2grdTLDvXzWTCtdqkKkrtlQXhjh9mEYWhx1nCdDiPy22pYCcXPmijo0mXj3w7pJGnDEHyg-hFhxRmWZUFa_eflf_V266YjCpc09VJ4NKMo801wm-pFDMxP-kgRtMaXfqVT_6NwWhqaIEHwZNnyz30N-VPbfCDyB6bRAMhY9Dmz9w4lCkP6CuoC-OAyI-OAt_F3qWl1ZSKrzk0yLMG8z5fwjIv8HzwNwZjtPlkgkZ4EzLVkxBqHXtHnGlenzaCa2V82kOENvkaW9gx54XFELdpt9REKT7CyaCrLExVCePPZ1SOzS9WCa2qDLb4aBtTTl_Tk977yQ8h0DolREOdjoZnZ0fS82xMJxAlswfXexml1Ps-nKQJuuU8VC-UJII1E5bpTW2BT7OBjepm54gYpSaGL6xSMgiIMatKOIr4MASF1uFx0ItkmCg_QBKC1O4r2jZWz_Z90q3QA33oK1dwNniPlMBrKNMI6vLUTOEQZGyqQE5F21OgJEDPifVqLmRWGK4Kx_bvJHDW549LvOr7Yp0TZYpW6SqpjcUL1Zuh8KTm_6tXdcBt9uBnDiZTcnw-EBUVniN_xl-17MFGOE0dTCAcr9mCiL5yzl9kB3OGiC2b19l5CrgLJCDAbYaw=w600


The bottom rail is aluminum L-track that's fastened via a host of RivNuts through the body skin. Skipping to the end, you can also see I've added a pair of right angle "tabs" that let me sit the recovery mats up on the rack so I don't have to hold their weight while I thread in the eye-bolts that hold them down.

rJu93WP3IlDpF842FnY_2UtKy1RQwy5EvBcZNghmjJC7JLuYmCd-xZ6-uQcJoMe5rrWZ_k4sHzMUvbz_TBN6m_gsA_lDTQJDek8KHnct-CySXVUJcH3yfe-2eyNJu0R97Zl8SkXch0WqE2xi-TfyFcDab8-mWN2pIdgQ8T5kB5xoQDSoB7XIoXF9h3e6lUb8t3--ms3bdg8vM6ljA6EjorclIVxtqd8GRtAmDTlotTPQxT8EhpbBYX-uycUuI9_mu94fIyQ6WWi27r3QyXfOnASjCQb55feJLOgYXBSeSkp2K6iESTNIfZVOHJSgf2TszZJXgL21Zk3IUlpOlc_C3mTntbv6oihY1FVfFPNrO_AyL2kqJ5bgMEEw0y_7fyoCO3pdVzd-3SNJTWzdWxrHZliyNY-ZK_xOpeEJGlq2J6cz-usGdf983iH4f6SJ3FlqKWaSYyZv3xkUGLlVjm-PltLvMmgdIAAemMuuxPPaANhAIYgrWO1pUFTDsLNyjt--I1IRTZsXxQJgCMEAu1iiKVbbDe2QNYESQQeMyypqCYD0yTFvHsq68qo3qHosVrU9vtx_cyjtDKH_MJC-DKe1G8k9afXw_plAyuoO9esncWI-0PSBpI-mqzcJiefM3yE-NBsNes9YKscl6wvrQ75qZlFpGmSSwm9E6Q=w600


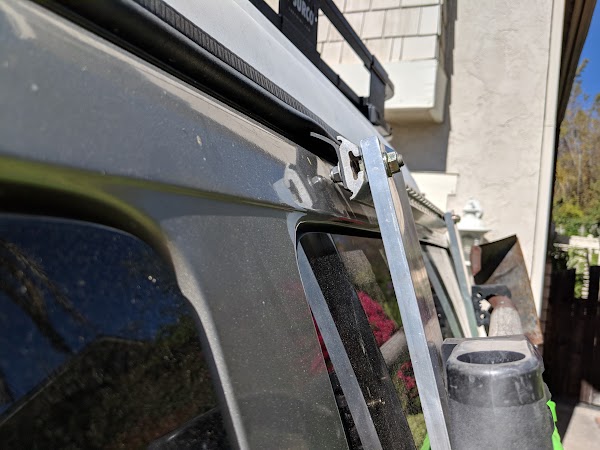
The top part of the rack is more complicated. Like most of my projects, I started by mocking up in paper. This helped me figure out how to get all the bends I'd need to match the curve of the top and get these two "arms" out from underneath the pop-top.

v8Z_HsFNu8Ip94NB4ZJbcm9cXiun3jqHHXNClkjHUbrnT-3vAxMtklkyxvIoJGjVYyg4kIh9XEJFecQF07hEzKaok5SNNWhvUPVTiHHTwqU_M52Q-UlRYtOmQKQkLxG4vn-_GR-_jNt04McEOOhZlKRqjyfLGMML7qKFnj8cZiZes52pxpe5MgrHyEvlEXKKlDGBc30i8tttSb_pzh2TKx7WNZlvZwAaotwvX69l0dG95jyzKXlWZdMs4h3hR4LBxUsYlhDeuCXGBK9DZwIFxnmaX2kP2A_b443TaSMmlmBDbKdI5eps_sRRcyiGlwnt_eNIc2_0pQY4hVOnbDZ1m95F9p9yVxKJLxfBD3d2rlWPq-i0Ms3y_sv8hZHuajZNCmOCnk1PZYTKbyGp0fEkn_78w3ns_v-01MMPlX93sM4-7iyXiJ5qjgvQUuUkiO9itXaUGSWR8f0rwWoBRRozsNqFfaWutljfk8P9l-FNySEnZ5OAsrFDcnVetURBPZRPM272JmieSWmpfSqXnDbanX5ZRuxQQ1Gss4hjXbX-8jOwLi9hoMTeanMumAZhfopUF1LwVPLyzUyax6khEAHUZtq4jzzy85Hm3Ny4DEg4k1xjv6gZCGuRcdXk4hBTmB5TpPtYUGxpj_7KSeqQU-IypgjWLTZip2Cv7g=w600


Then I moved onto steel. This bracket connects to two of the holes that go through the roof for the pop-top hinge on the drivers side. These are secured into a thick backing plate with tapped holes that is bonded to the roof on the inside.

2VxwPJRh4VboflLg8cJFciOyBVvub8-8Ax94MFSkywP8-m2UDFYWYx_75GE0it4dt4CHnGodV3hdj48gL3EX2tTzih0ah5ZBZ2ns8FYLt0125OR0FPsJiBisqRqXQDdU5RUBnBNSCro-IiWecBzWLKzp3SDvHl4Fk1P3SMICxrbzGFcwRr6YuumO12cRLmGlSo_zMSb2pH7vxguLzGqCeZvAaMIx9ubEdXWF7HRF9mXabCTCyvo2mE6Akm5WEP10uCYbJnEVJ_ZDFtepPb00A2PMEfzm7jH4EVY37mePzl8k0W1nZsp0OhqWwQv7_p-0QEs3eR70uPEbGZxp90-uMTr84E4HC4Qb5H8r8eZLDWCpiU5oBooCr7s19Eb5RNcJA5GcvnoxJK1Kan2TrTYxC3T8h3Nn7iqBPmzpUh3kGC48J5wx8gVaOUTPlF_G2C6bYCFsTmB8Qflftt9MGl7KO6Uu-7enzDcSsLXjLLIYyVssgfb265VDdDzoUN_g73y7YGa7esI4mthwb3BZ7O0AHR0tVhZKo1z9TCTiXBMcf1y1QWHH22dCAP9KgTWvPtE_Yf2kaYoEjs8abm4K2DEjoiqIJb1NSv4NMvVWLYIM9cXhfUkVTnUfEr_aiUGHzEKPPTMFyNkNqXYOrdcRqhNBtkNOZtHbDYAPpQ=w600


The arms protrude out from the body, and are connected by another piece of L-track. I couldn't use RivNuts here because there's a second piece of sheet metal at an angle behind the outer skin here (from where the "wall" and "roof" panels were joined at the factory) - so it would have been hard to get a clean seat on the nuts. (I'm glad I suspected this would be the case and eventually double-checked by drilling holes on a junkyard van body.)

fWx-Xz6Z86HdDY-NOQ5q5PRplMBcGcj9ex8w2XgZ0wUBJOonoZMAxi7zJsa3CP4N7rCZyTGllowniyNecK7sQGm3kFs31jBTyBoPONc6X5yb1I60FY7j7i88CfmIohb-EbyaNNGodMb5IXpG3gwOi5JXoFVchlAZc52RMkwff4ZH8vAA-pQWC1ORsTPDs5J_FwEqR-PMjTBlScFevGN2RzIIbjx6Ibq5NQ8cUudJLmquYBF82bRn-d8kpcJveh6oChu8ppJ_1N2rWsZCR_Ixrgnh_4QVdvNx39Slf8cKGYAtr6m-gzjthz0JwlvmrmOiqkZMFzORgejEIrgfAx0YSwvG1k6faiBsj3tSL92bYYybpC4vFtFArRSoYP-9jjz-8ThbSZ8EcCLsvuagB1VgUrGGqec4U6DjrcqXitfHFy7wMnsYYOAdiPt0liUG8BvuToXWr2ttERKwZTxXUKohy4hr_-T_85T0la5kWVCx02F2Gtc0_WehP_biIj7tYE2fYZIxtjPckOVzF-zgJOKWchHqMGZL-UeMTcnirZEWKn2R9EoSy99hP5gOwUO_dPOOCI0UmiN72ZzphCT6HXLNtL2N9KRlCeLuUAIYt0nGbBtzQqdoGKzuHYpIxYedik2trgoDEYO8aEcqsRcp0HTu1lJcrXmT78pIiw=w600


You can see that the hold-downs are 5/16" stainless eye bolts. I used a pair of nuts to jam a fender washer at just the right depth along the bolt threads so that they tightly hold the mat to the rack without protruding too far through the back. I could have used the supplied TRED mounting plate that gives you a pair of protruding "studs" to mount the rack on, but then these would be sticking out all the time, and I wanted this to sit fairly close to the van when I don't have the mats mounted.

g2bU3ysxgjdMMiuA-xckjNK4_7KIx-m9KV8yAQ2-xFXoYw41JiK-dgRjkOo5GrwrBCa4CAIucjGlziiSQevVIYVJB7s2ytpUrltatpeKFuogXNWRH7O-UtG24F_e1FETvwecEAbbbTj0hy56oazRHgzkomT78b07E5Pw8I5YM4R_heSTTRGsL-gNgVfdsB-Nh_CblswJpHv0xg66GPIqO4d_u0q289p432gAHN-0AP7qcfSyrSnIXBLP4BBKwwuto2aVpfirrt_moAQ83fQtkRa9mHaFOEbkppFX8CgldEm_sC1bHpKxXuxOincsMZQiTW6cKAhIpKMRS68miKJi6DJ92tSAxvkKg3IN742CnzgKjQJ_5wxrK4ofLeyWH7UAekALCN3HhbgjnOlWR6cc9-Fwu8_Ay5FTW05SHChMa00Gfq0Gu_IfeAq6GfT67TMu7xuB82Jro-T4uNNASC46zkxqq6E8cGQQaXVY0hsOz0UJrSjrQwoj6CroaCrzC8NtVa7L_7qVwZ8nNbNPVpLbgHZMt82_roAGaex2v6-Z19M1_1--2Oa4HYQZyfqdRKf2_63MicvePDbJry6isBUobR9eEyxSS8PL8YMo25g1J7SSzcsgwpD0tzZZQmqSBI7Wc0vwz0YM_HaaoQivuJZ7U3wovl8CVpGr7Q=w600


Obviously I have plenty of real estate for mounting other tools. It's nice to not have to try to stand on the rear tire to get my shovel down anymore.
 

Herbie

Rendezvous Conspirator
I'm curious if the middle will 'flutter' like a sheet in the wind?

I'd thought about using plastic lattice to help items sit flat in the roof rack

I can report after a couple of hours of freeway-speed driving with an empty rack that I do not detect any flutter. That's not to guarantee there isn't any, just that it isn't noticeable from the cabin. I'd need a spotter with a tall vehicle to tell me otherwise.
 

Mat Mobile

Adventurer
I can report after a couple of hours of freeway-speed driving with an empty rack that I do not detect any flutter. That's not to guarantee there isn't any, just that it isn't noticeable from the cabin. I'd need a spotter with a tall vehicle to tell me otherwise.
Isn't that what go-pros are for? :LOL:
 

nobodyhome

Adventurer
Wow Herbie, that thing is looking BUILT these days! Love the new additions, although I may never get to my rear hatch jerry can holders ala Herbie.
 

FRAM

New member
What a great thread to read this afternoon. Lots of ideas for my potential build. Thanks for documenting your progress along the way. Did you end up with a locker for the rear?

Does anyone find the need to upgrade the rear axle? My jeep fabricator friend thinks it's a fuse waiting to go off in my Astro just looking at the size of it. I recall the D35 rear ends were supposed to be ticking time bombs too in my jeeps but they held up to overlanding quite nicely I thought ;)
 

nobodyhome

Adventurer
Your friend must be a rock bouncer or just one of those million dollar rig types that picked up an article once and read that. 8 Jeeps, 7 D35s... no issues.
As for the GM 8.8... if you try to bounce your Astro up rocks, the rear end will be the last in a series of catastrophic failures.
 

Herbie

Rendezvous Conspirator
I did end up with a Powertrax Lock-Rite lunchbox locker, at the same time I re-geared to 4.10. (Still need to write that up here.) There simply aren't very many choices for the GM 7.6" diff. It's... okay, but not great. It works fantastically well when on-trail, particularly when crossed up or in the silty desert sand I see a lot of. On the road, though, it's a bit twitchy. I've come to appreciate the phrase "Locker Lane Change" - occasionally under load on a mostly flat, mostly straight road, it will occasionally lurch with a clunk. Very unsettling, and every time it happens, I find myself really wishing there were a selectable locker for the 7.6".

As far as upgrading the rear axle, I do occasionally think about trying, but it wouldn't be cheap. Not for the strength of the gears, per se (since I don't rock crawl), but for the weight capacity on the axle. When fully loaded with camping gear, water, and the family, I'm probably 200 pounds over the Astro's rear GAWR. A heavier-duty axle would make me sleep better at night.

The problem, if not covered in my thread, but definitely covered elsewhere, is that it's a tough fit. The Astro is wider than all the normal truck axles, and the 4" passenger side offset makes it even harder still. I think a wide-body full-size Jeep Dana would fit (with a lot of custom work to the perches, etc.), but I've not found much else. The 6-lug Durango axle would probably fit, but the Chrysler 9.25 isn't really any more stout and there's still no locker available there.

I *think* a GM 8.6" 10-bolt from a van might be the right width, but I don't think they have the pumpkin offset, and that'd make it a hard fit past the fuel tank on an Astro.
 

Forum statistics

Threads
188,395
Messages
2,904,142
Members
230,274
Latest member
mbauerus1
Top