Hey Vortec Guys! / Sierra pickup / Suburban / Yukon etc - Finally has Index!

Martinjmpr

Wiffleball Batter
great job, man every time I see one of these motors opened with the type of mileage we have, I am just amazed at how well built they are, even with the oil leaks and all:)

I keep telling myself when it gets to 300k, I'm just going to replace it with a junkyard 50k, but now I'm really wondering how far they can go!
.
Good luck on the Toyota!
.
I'm pretty sure there are Vortec motors with a half million miles or more. Over on the Tahoe/Yukon forum there's a guy with a 1500 Tahoe and I think he's somewhere around 650k and still on the factory transmission. :Wow1:
.
I think the only things that keeps these trucks from racking up more miles are (a) rust in the rust-belt states where they are popular, (b) the fact that they are relatively inexpensive which means that when you get to the point of needing a new transmission or fuel pump, repair cost exceeds residual value and (c) the fact that since they are inexpensive, they are often owned by people who can't afford to/have no interest in keeping up with routine maintenance.
.
(C) is something I noticed 20 years ago with motorcycles. Harley Davidson fans would argue that HD's were better made than the Japanese bikes and would cite, as evidence, the fact that there are so many older HDs out there in good running condition, whereas older Japanese bikes tend to be in much rougher condition and end up going to the junkyard pretty early on.
.
Of course, the reason for that is simple: Since HD's cost so much more to buy initially, they are purchased by people who have the means to garage the bikes, do routine maintenance, and generally take good care of them - which makes them last longer, naturally. OTOH, since Japanese bikes are much less expensive to buy, they are often bought by people who DON'T have the ability to garage them, keep up with maintenance, etc, so they sit outside for years, get rained and snowed on, get generally neglected and when they end up in the junkyard, the HD fanboys say "Jap Junk."
.
What's funny to me is that the dynamic on 4wd trucks seems to be reversed: It's the US built trucks that are sold for lower prices and generally neglected that are considered "junk" by the Toyota fanboys, who pay more for their vehicles and who, having paid more, take better care of them. It's basically a self-fulfilling prophecy.
 

rayra

Expedition Leader
Day and a half and the Tundra is still kicking my ***. Don't think it has ever been apart. 14yrs, 140k mi, lots of frozen bolts with mild steel heads. And some clearance issues. Power steering pump is supposed to slide forward and off, so the alternator can come forward and free, but the pressure side hose back to the rack and pinion is too short. Pulled it jussst enough to wiggle the alternator past and free. Not sure I can wriggle that back on without breaching the power steering loop.

Then a bunch of bolt head / tool clearance issues on the drive side low. Fan mount bracket trapped by AC bracket bolts, blocked by AC compressor blocked by oil cooler mount. Heads too soft and restricted to get at with my worn 12-pt sockets. or use my fresher deep sockets. Couple store trips to buy a 14mm box end wrench with a 6-pt box, after chewing the bolt up a bit with my 12-pt. Bolts so frozen I'm very worried about my Bullwinkle strength snapping them. Plus temps are in the 40s.

Then after getting most of it apart, I go to blow the crank pulley bolt off and my 1/2" impact won't get it done, even runnign the air well over the rated limit. The tool just doesn't have the foot-lbs to get it done. Tried several alternates to no avail. There's no holes or secondary bolt locations to bind / brace the pulley so that I can put my 1/2" breaker bar and a big cheater bar on it. My plastic / rubber strap wrenches are useless for holding it. Manuals and online guides speak of chain-wrenches and unicorns. None of the chains auto stores around me have one to lend or sell. Nor Sears.
Tried rapping the bolt head a couple times like a nail with my 3-lb maul, hoping to break any 'weld', but beating on the end of the crank with a hammer is a doubleplusungood idea.

So I spent another $50 on a 'heavy duty' impact (rated 585 ft-lbs vice the 'normal' 300), hopefully it will do it tomorrow.

Only other trick I have left is to put a torch on the bolt head. Heat it and the threaded hole in the crank. Then let the exterior parts cool (it'll be 45-50F in the morning when I try this) and hope that the differential temps allow me to torque the bolt out of there. Maybe shoot some brakleen on the bolt head to encourage more of a temp difference. Get the thread hole warm and the bolt cool. Try it with the 'normal' impact, before using the heavier model and working my way up thru its settings.

If that won't work I'll have to find a way to bind that pulley long enough for a cheater bar to do the trick. But that's borrowing worry. Have to wait and see what the morning will bring. even toyed with putting it all back together, just to get the assist from the s-belt. meh.

Tundrageddon03.jpg


Also picked up some 6-pt metric impact sockets so I can get that AC / oil cooler stack off. I'll probably break all those free while I wait for the torch heat to cool off some.

Once it's all apart, it won't take 20mins to set the new belt and water pump. And I'm reasonably sure I can put Humpty Dumpty back together again in under 2hrs. I've been very careful about taking pics and ziploc-bagging and labeling fastener hardware sets and setting everything down in the order it was removed.


The spark plugs were also severely eroded at the center electrode, really sloped like Gumby's head, dammit. Got a nice new set of NGKs waiting to go back in. And a new fuel filter too, but I'll leave that until it is back together and running properly.
 
Last edited:

rayra

Expedition Leader
What a pain in my *** and knuckles. This Tundra is fighting me every inch of the way. Last thing last night I bought a 'heavy duty' impact as a failsafe. Today I tried several ways / times to get the crank bolt off. My neighbors higher flow airline, compressor, his Ingersol-Rand impact, tried the newly purchased impact, No joy. Torch heat. No joy and while waiting for that to cool somewhat I managed to strip the nut in a very tight place on the bracket atop the oil filter manifold, which supports the AC. And has to come off in order to pull the AC. Cursed that and switched back to the crank bolt.
Old tricks are the best tricks. At this point there were only two remaining options. 1) Pull the trans bellhousing inspection plate and put a pry bar thru the flexplate and a big cheater bar on the crank pulley bolt. Or 2) put the breaker bar on the crank bolt, extended with a cheater and position them up against the bottom of the passenger side frame rail, hook the battery back up and bump the starter.
I did the latter and heard / felt the 'tung' as the bolt broke loose. Too easy. Came right out after that. The threads looked muddy / dirty, not rusted and not like something that was threaded in.

My lame 'cheater pipe', yes, that's Sched40 PVC pipe. Terrible idea. Put some extra duct tape on it. Improvise, adapt, overcome. I aint got time for yet another trip to a store on this job.

Tundrageddon04.jpg


... and I put a scrap plywood shield in front of the AC condenser, in case that plastic pipe grenaded.

Tundrageddon05.jpg


The threads looked odd, like they were instead exposed to atmosphere all these years.

Tundrageddon06.jpg


Then it was back to the oil cooler bracket nut. Got out my air chisel for that fun. Shooting between and atop the aluminum housings of the oil cooler block and the oil filter itself. Couldn't get a clean angle or cuts to cut the nut in half. No room for a traditional nut splitter, either. So I just kept switching bits as appropriate and chewed things down into a lump of **** until it finally broke apart.
Under the plate the bolt has another nut / shoulder, holding the oil housing in place. IF I can take that out without stripping it too, I could replace the bolt. It the Toyota dealer has it. And it doesn't cost a fortune. In the meantime, it holds together and the bracket is 'insurance' on top of 4 other hold-down bolts on the AC. I'll do somethign further about it LAST. In the meantime I'm focusing back on completing the disassembly and getting the damned timing belt changed. The truck can be made driveable without that bracket for a short time. The whole thing can otherwise be put together sans that bracket / bolt.

The Horror.

Tundrageddon07.jpg


The debris. Hammered dog**** that was a 12mm nut.

Tundrageddon08.jpg


The aftermath. Going to have to take a dremel wand / grinder bit to clean that mushroomed stud up enough to get the bracket off.

Tundrageddon09.jpg


Biggest lesson / takeaway so far - DONT USE WORN 12-pt TOOLS ON OLD / FROZEN / SOFT HARDWARE. If I'd used fresh 6-pt tools from the start I wouldn't have chewed up this nut.

Lunch over, back at it. Trying to get it running before sundown.
 
Last edited:

rayra

Expedition Leader
Here's the bracket and bolt, out. I wound up driving to my local Toyota dealer. Replacement bolt was only $3.50, but it's on the other side of the Mississippi. Going to take a few days. But that's ok, the whole thing can go together and be driveable without that bracket. And I reinstalled that bolt to hold the oil cooler / filter mount in place.

Tundrageddon10.jpg


Everything finally apart, timing belt out, tensioners / rollers out, water pump out.

Tundrageddon11.jpg


After I got the new water pump installed I discovered that it had been dropped on the corner of the mating lip. Went looking and found the corresponding divot inside the kit box. So some warehouse / shipping ape banged it around. The corners of the box were ok and unscuffed, so it wasn't drop-kicked or anything. Just got toss-stacked somewhere, probably.

Tundrageddon12.jpg


So I taped up the port and went after it with a flat bastard file, tuned it up so it was flush and flat. This face has no gasket, black RTV is specified. So things really need to be flat / flush.

Tundrageddon13.jpg


And here's all the new stuff installed, water pump, idler pulleys, new hydraulic tensioner, new belt, all the marks lining up properly.
Bogged down a bit when I called my neighbor over to view his shiny new parts in place before I closed it up. I've got the cam covers and some electrical and cooling plumbing, S-belt tensioner, fan, radiator etc and new plugs to do in the morning.

Tundrageddon14.jpg


I'll have to take some pics tomorrow of the old belt. It looked new. I'm 90%+ sure that it's the original and it appears unworn. Not even scuffed or galled. The ridges / cross-hatched texture on the inner face looks new too.

140k mi.
maybe 30mph avg. 5,000 hours of runtime.
x60min/hr, 300,000 minutes of runtime.
maybe 2000 rpm avg.
600 million revolutions?

Damned thing looked new.

Got to go back out and tidy up my work table and tools for tomorrow, before I stiffen up.
 
Last edited:

rayra

Expedition Leader
Alive.jpg


Worked late on it again after I posted, putting the cover plates jigsaw puzzle back together. Tried and tried to get the serpentine belt back on could not, working by shop light. Couldn't seem to get enough slack in it even with the tensioner jammed out of the way.

Put the serpentine in the house overnight, and in a sink full of very hot water, while I put the plugs etc back on. Then got the serpentine back on, seemingly without doing anything different than I did last night. Not sure, was pretty beat last night.

Got the cooling system back together, everything bolted up with no parts missing or extra, got my nerve up to turn the key, nothing. Forgot to re-hook the battery. Got in again and rr-rrrr, battery too pooped to pop. SO on the charger. Eventualyl I got it fired right up, to operating temp, no leaks, running smooth and quiet. Shut it down and changed the fuel filter cannister. Got it off the jackstands and the skidplate etc back on, everything else buttoned up and took it for a spin. Very torquey on the bottom end. Had also cleaned the throttle body, the new plugs etc.

Delivered it to my neighbor and even got paid on the spot. In a few days when the bolt arrives I'll do five minutes of wrenching and check the coolant levels and call it finished.
 

tbisaacs

Adventurer
intakeswab13_zpszovgaa4y.jpg


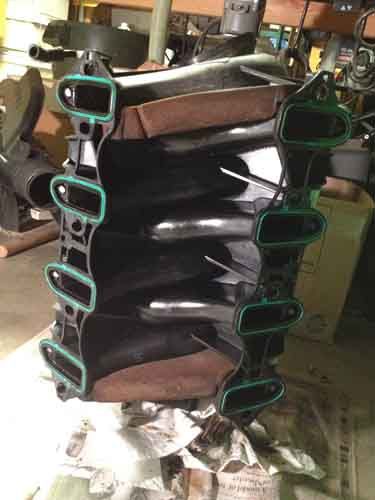
The brownish blocks at both ends of the manifold are a later model factory revision, directly related to the corrosion failures of the knock sensors. The foam blocks seal both ends of the galley / void under the intake. Mostly. More about that in a bit.

So I pulled everything apart. It's a pretty straight forward and relatively easy job. The finicky injector solenoid connectors are the toughest part. Second toughest, more on that in a bit, too.

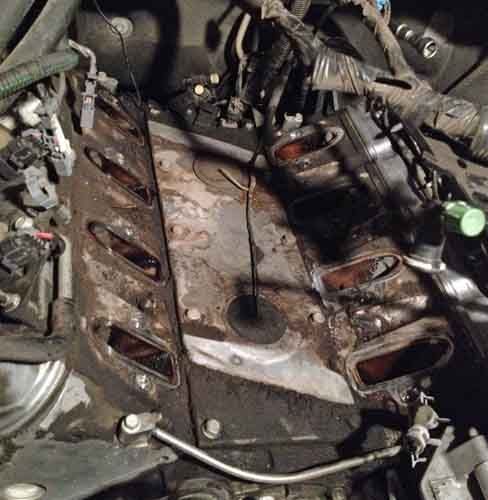
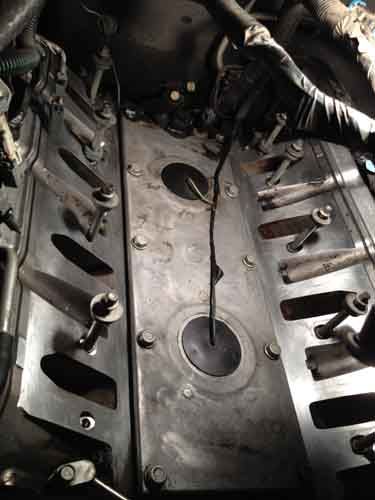
These dirty ports are the INTAKES. A before and after I cleaned things up a bit.

intakeswab14_zpsgetuyxcv.jpg
intakeswab15_zps0rjsfyr7.jpg


And that's a clear shot of the two knock sensors in an '05 5.3L vortec. Under those rubber disks. And their wire leads.

Anyway I cleaned it all up and got it back together, nice new intake gasket plates. Did a series of longer and longer test drives and called it good.

Once again, super helpful thread. I woke up this morning to a CEL. Too lean on both banks. Groan. Job seems straightforward, but I'd be lying if I said I wasn't intimidated by it.
 

rayra

Expedition Leader
I'd be looking at the MAF, or more specifically for an air leak / crack in the intake ducting. Computer is reading one set of values and setting the fuel flow, but more air is getting in than is calculated for. Or something that is limiting fuel flow at the source(s). Fuel filter. How cold is it wher eyou are, chance of frozen water in the bottom of the tank / fuel pump pickup?

If you got a null on the cable connecting both knock sensors I think the comp would just go in limp mode and your fuel economy would go to crap, not throw a 'lean' code.

Now the knock sensors working properly in response to knocking generated by a lean condition would be the system working properly, not faulty knock sensors. Need moar codes!
 
Yeah since the ECM can adjust individual cylinder timing they split left and right banks for knock sensors or it maybe front to back. So if one knock sensor fails then those cylinders default to limp timing and if both fail all cylinders go to default limp timing. It is basically pulling timing out. I don't think it effects fuel tables.

Lean condition is normally an air leak somewhere between Mass Air Flow Sensor and the intake. Rayra is correct it could be in the air ducting or a leak on either side of throttle body.
 

tbisaacs

Adventurer
It threw P0171/174. In thinking intake manifold gasket, not knock sensors. Although I'll probably change them if I have the intake manilfod off.

Only 40s here so nice. MAF is brand new. But I hand not though if checking intake for leaks.
 

Stryder106

Explorer
Well - my 02 Avalanche just threw the SES light - had the codes checked - Knock Sensor 2. I have absolutely no time for this right now so I'm paying to have them changed - and RTV'd - and the intake gaskets changed while it's apart. Ugh.................................
 

tbisaacs

Adventurer
Well - my 02 Avalanche just threw the SES light - had the codes checked - Knock Sensor 2. I have absolutely no time for this right now so I'm paying to have them changed - and RTV'd - and the intake gaskets changed while it's apart. Ugh.................................

May I ask what you are paying?
 

RedF

Adventurer
I've got two broken exhaust manifold bolts in my 05 Silverado.

I'm wondering if anybody has tried to drill them out with a left hand drill bit, with the manifold left in place. I really don't want to pull the exhaust manifold.
 

rayra

Expedition Leader
It really isn't hard to remove / disassemble and trying to drill like that means you can't see what you are drilling. Too, are the studs broken down in the head, or will removing the manifold show you enough of a stub to get some tools on it?
And all that's even if you could get a drill and bit down in there, clearance-wise. OR see what you are doing. Do it the right way, pull it apart. It really isn't hard on these motors, they've done some fine design work to isolate the subsystems so you can swiftly work on just a portion.
 

Stryder106

Explorer
May I ask what you are paying?

$300 for the two sensors, new wires, and new intake gaskets
$270 for labor

I would do this myself - but I just seriously have no time right now.

Rayra - knock sensor 2 - does it automatically put one bank in limp mode? My Av seems to be going through a ton of fuel since that light came on
 

Forum statistics

Threads
188,334
Messages
2,905,568
Members
229,959
Latest member
bdpkauai
Top