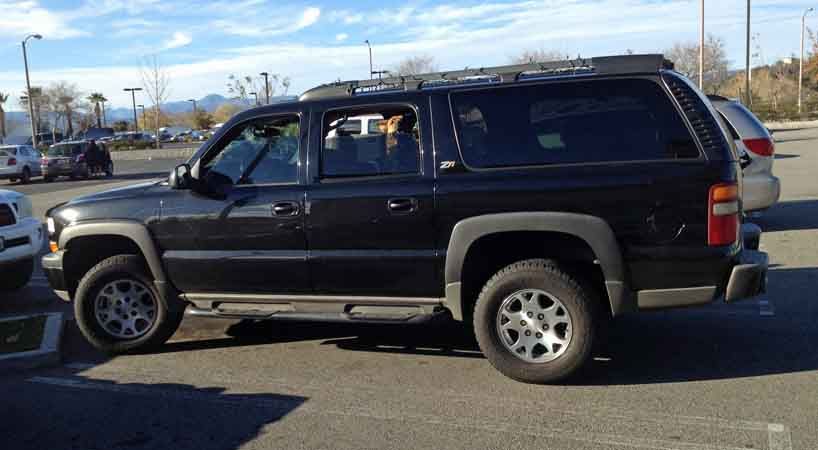
Hey Vortec Guys! / Sierra pickup / Suburban / Yukon etc - Finally has Index!

tbisaacs

Adventurer
For what it's worth, you are overpaying for parts. Felpro gaskets, 2 knock sensors, and wires should be ~$175

IMG_8764.jpg

I'm in the same boat as you. Don't have time, trying to figure out if it's worth it to just pay someone.

$300 for the two sensors, new wires, and new intake gaskets
$270 for labor

I would do this myself - but I just seriously have no time right now.

Rayra - knock sensor 2 - does it automatically put one bank in limp mode? My Av seems to be going through a ton of fuel since that light came on
 

rayra

Expedition Leader
It's not even a day's work. 4-6hrs if you're handy and thorough. I've already detailed it all here. It's easy to do.


Got the new bolt on the Tundra today, and topped off the cooling system. Done with it now.
Tomorrow I get to haul my tools across L.A. County to work on my father's 10yr-old Malibu. He busted some EGR piping mucking about.
I am not a vehicle mechanic by trade or desire. Just seem to be doing a lot of wrenching lately, helping out other people.
 

kojackJKU

Autism Family Travellers!
Well my z71 Burb was towed to my mechanic shop today. Prognosis, rotted brake line and two rusted out transmission lines doh. Oh well new transmission fluid
 

kojackJKU

Autism Family Travellers!
Just got back from the mechanic shop. I was under the burb. Its fairly brown and red there, but still 100 percent SOLID! thank god! Now, on to getting it all fixed up so I can drive it!
 

kojackJKU

Autism Family Travellers!
Rayra, Do you have a list posted regarding these maintenance items that should be done? Not a how to but just a list of what to get to, to keep the 5.3 running? I need to get at some things in mine. I have to read the codes and see whats up. I get a studder at idle/low RPM when wet or snowy....I am thinking a plug wire but I want to read the codes to see. My z71 just had every brake line replaced due to corrosion, as well as the main transmission lines to the cooler. 1300 bucks later she's good to go again!
 

ajmaudio

Adventurer
I've got two broken exhaust manifold bolts in my 05 Silverado.

I'm wondering if anybody has tried to drill them out with a left hand drill bit, with the manifold left in place. I really don't want to pull the exhaust manifold.

I had this issue, pulled remaining bolt with one of those hammer/impact drivers, which broke no more of them and made quite easy... then I welded a nut on top of the stud, which was broken just below flush with the hole... took 20 minutes tops, 2 tries welding. No damage to the head at all... worked better than I expected.
 

rayra

Expedition Leader
Rayra, Do you have a list posted regarding these maintenance items that should be done? Not a how to but just a list of what to get to, to keep the 5.3 running? I need to get at some things in mine. I have to read the codes and see whats up. I get a studder at idle/low RPM when wet or snowy....I am thinking a plug wire but I want to read the codes to see. My z71 just had every brake line replaced due to corrosion, as well as the main transmission lines to the cooler. 1300 bucks later she's good to go again!

I don't have a readymade list, othe rthan the several issues related in this very topic. And I'd prepare / pre-shop for a fuel pump swap. Your stutter, I'd look at the coolant bypass lines that warm the throttle plate. And also the idle (air) solenoid / circuit. It's a cylindrical solenoid about like a 'C' cell battery, on the driver side of the throttle plate. Get some sensor-safe spray cleaner. The solenoid is a plunger like affair and it cruds up and sticks / doesn't move right. Typically expressed as a higher idle, but it does also give a stutter on initial acceleration. It's fed via a channel in teh throttle plate at about 1 or 2 o-clock as you look into the throttle body. It's only a couple bolts to take the solenoid off. And 4 bolts and throttle cable(s) to remove the throttle plate itself, so you can give it a thorough cleaning from both sides. Don't use a wire brush or scraper / scrunge to go after harder deposits where the throttle plate / butterfly seals the opening, any gouges there may affect throttle response. Just spray-soak it and left time and a nylon toothbrush do the work.
Use the opportunity of removing the throttle body to get inside the intake manifold and wipe out the oil film (or even puddle).

The other thing is lifters, these motors seem to develop sticking lifters. Steer clear of synthetic oils if you haven't already been using them. I tried switching my vehicle to them after I got it and got a bunch of leaks for my trouble. I've had success with both ours by doing the quart of engine flush regimen right before dropping the oil pans to replace their gasket and the oil pickup tube o-ring. Both vehicles were exhibiting a sticking lifter tick on cold startup, from the number 1-3 area. Both were well resolved with the flush and oil changes.

Other than that just keep the electrical and air connections clean and in good shape.

I'm using a ~$14 bluetooth-equipped ODBII reader/ dongle thing and a free app (TorqueLite in my case but there are others) on my android tablet (will work on android phones). There's Apple versions, cost more. That combo of gear lets me read and clear codes just as well as my $50 basic code reader from Harbor Freight. Both solutions have already paid for themselves many times over in delivering codes and in allowing me to clear knock sensor fault codes and keep my vehicle out of 'limp mode' well enough to commute home
 

kojackJKU

Autism Family Travellers!
I have the torque app and dongle. It does work awesome. I will do some cleaning of the throttle body and those other places you mentioned. I hope to get this rig to where I can drive it daily and not worry about breaking down all the time. I have to replace the A/C pump this spring. mine seized last fall and burnt the belt so I just left it until I can get it replaced. 1300 bucks worth of brake lines/transmission lines later and she's back on four wheels.
 

kojackJKU

Autism Family Travellers!
Got er back....Some good to. Driving great at the moment.....plowed most of my driveway and got most of the snow cleared. My son wants to go for a ride in the burb and watch movies on the RES! ha ha.
 

rayra

Expedition Leader
Since this is still the closest thing to a 'build thread' here for me -

Finally getting around to installing some of the parts I've been accruing the last few months. Today it was installing the replacement taller rear coil spring spacers to raise the rear end of the vehicle. And making a corresponding adjustment to the already-installed aftermarket torsion bar keys, to raise the front to match.

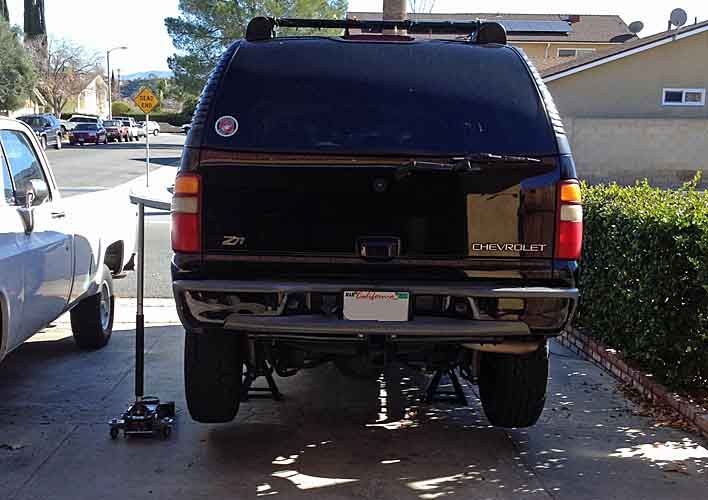
Got to use my recently purchased 3 Ton floorjack, made light work of the big Suburban. I used a chunk of 4x6 as an added spacer, on top of the jack's 18"+ of rise, to really get the *** of the Sub in the air. Heavy duty jackstands were set just forward of the rear trailing arm pivots / mounts. The trailing arms will NOT take the weight of the vehicle. They'll fold right up. A replacement is $35 from RockAuto.

rearsuspredo01.jpg


Just as an aside, at full droop, everything still attached, the rear sway bar just clear the rear axle cover by about 1/4". If you go for a thicker / armored / cooling fin rear cover, you will probably have clearance issues at max extension.

rearsuspredo02.jpg


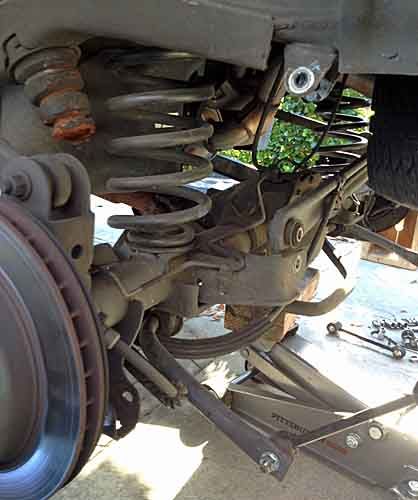
Wheels off, all the linkages disconnected - stab bar end links, shocks, panhard bar. Started lowering things fully on the floorjack and noticed in time that things were starting to hang from the brake lines. Ungood.

rearsuspredo03.jpg


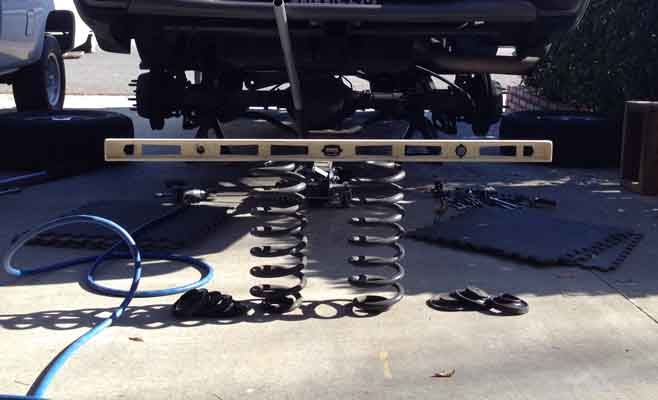
Last time I did this procedure, I noted the stock coils were a bit different in height, the driver side being a bit more 'crushed', with the driver and fuel tank on that side all the time. But I neglected to swap them side to side. This time I am. Here they are removed and switched, before re-install. The level across the top accentuates the height difference. It was about 3/16" with the springs side by side.

rearsuspredo04.jpg


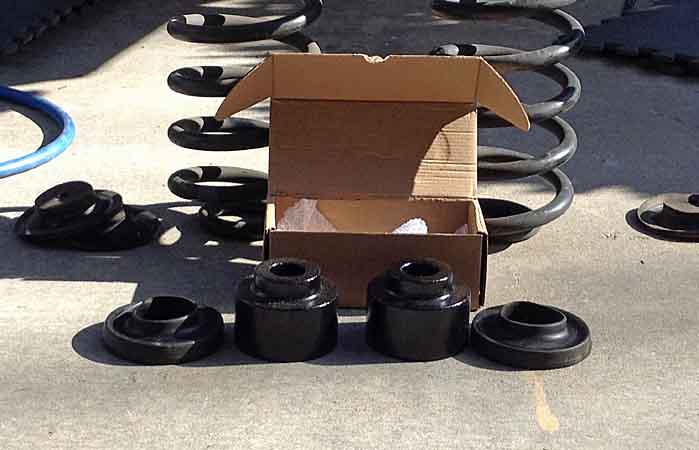
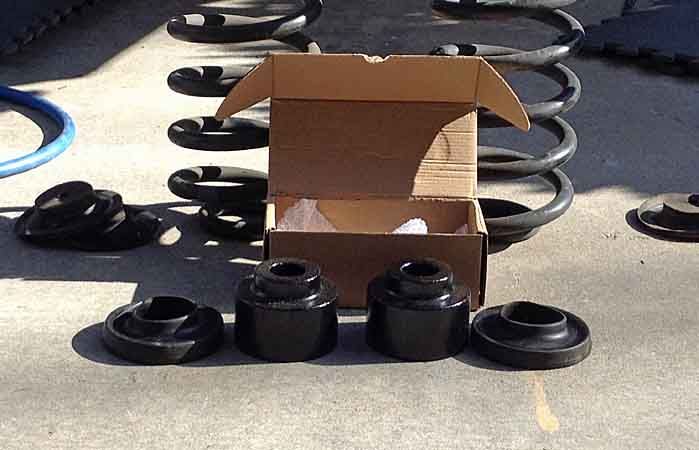
Here's the new 2" iron spacers, next to the 3/4" pieces that were first installed.

rearsuspredo05.jpg


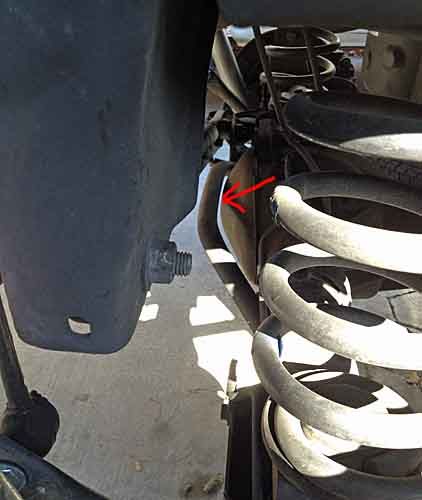
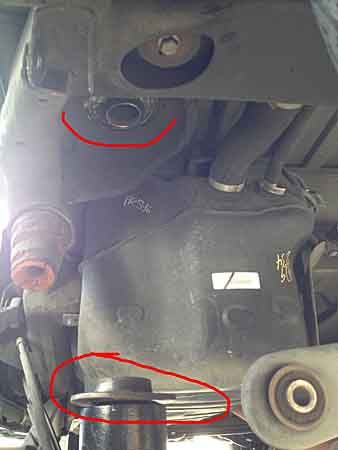
Here's the spring mounting location, that's the end of the fuel tank in the background. The springs appear symmetrical, top and bottom, like they can go either way, so do the footings for the springs. I initially wanted to put the spacer to the top, as I did wtih the 3/4" but trying to juggle it all and force the stack in with the axle hanging at its limit was beyond my patience. So the spacers are on the bottom, where I can keep tabs on them easier, anyway.

rearsuspredo06.jpg


I ended up with only an 1/8" difference between the rear sides, after swapping the springs. Much better than last time.

rearsuspredo07.jpg


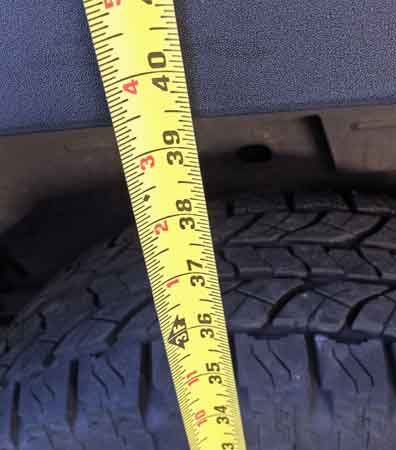
Took it (and the dogs) out on an errand to exercise the suspension, settle things in, before making the torsion adjustments back at home. I put 5 full turns on the torsion key adjustment bolts, raising the nose to about a 1/2" of rake, measured at the top of th e wheel well openings centered over the wheel hubs.

This pic was before that adjustment and the angle really makes the Sub *** look fat.

rearsuspredo08.jpg


I also installed the rear shock boots while they were dismounted.


Next week, after the rain, I'm tearing up the front end for tie rod end armor, front shock boots, probably front brake pads, possibly ball joints (probably due by now and no better time, since I'll be taking it in for alignment afterward).

I also need to change my brake pads again, been a little over 2 years since I got the vehicle, not quite 13k mi. I inspected the brakes when I first got it, rotors were in ok shape, pads were about done, so I elected just to install new low-grade pads and clean up / grease the rest. And get rid of the factory torx-drive caliper bolts. Those pads are worn now. Wear indicators started dragging a few days ago. Inspection of the rears today showed their indicators almost in contact. Noise is coming from front right. Rough look thru the rim with a flashlight, they look thin too.
I am giving serious consideration to an upgrade to GMT-900 front brakes. So it's likely just another set of cheap pads for now. I really ought to have the discs cut this time, but my local shysters will either refuse or cut them so they MUST be replaced next time.
Maybe I'll put new discs on the rear, and leave the front discs as they are while I decide about the upgrade.
 
Last edited:

RedF

Adventurer
Nice 'burb.

What angle are your A arms and CVs now at? I'm curious what's acceptable, or not. I cranked up the bars on my 2500 Silverado and fit 35s, but I'm not sure what is too much.

What do you have planned for the tie rods? I should do something, but there's quite a few options so I don't know what to do (and I'm cheap!).
 

rayra

Expedition Leader
I'm cheap too. I've gone with a $30 set of tie rod sleeves / 'armor' from Rough Country.The sleeves fit snug over the outer tie rods and replace the jam nut on the tie rod ends. They basically beef up those spindly 1/2" diameter outer tie rod shafts.

eta
tierodarmor.jpg


http://www.roughcountry.com/gm-tie-rod-sleeves-1144.html

Next step up is stuff like FabTech tie rod end kits, that's about $275. Next step is big fat forged pieces, costing ridiculous money.


As far as angle, I couldn't say. Not set on anything. My days of bashing along at high speed are over, so I'm not much concerned where they are at, in terms of stress or ride. Details are earlier in this topic, about the torsion keys I installed. If someone wants higher speed performance they're better off going with a proper suspension lift kit that replaces arms and lowers the cross brace / lower arm mounts and lowers the front axle to preserve the CV angles. But that's 10x the money I've spent.
when I get things settled out and finish working on the front end I'll report the angles. WE'll see how jouncy it is. Maybe my original torsion bars will offset the ride angle, with their mushiness.
 
Last edited:

kojackJKU

Autism Family Travellers!
Since this is still the closest thing to a 'build thread' here for me -

Finally getting around to installing some of the parts I've been accruing the last few months. Today it was installing the replacement taller rear coil spring spacers to raise the rear end of the vehicle. And making a corresponding adjustment to the already-installed aftermarket torsion bar keys, to raise the front to match.

Got to use my recently purchased 3 Ton floorjack, made light work of the big Suburban. I used a chunk of 4x6 as an added spacer, on top of the jack's 18"+ of rise, to really get the *** of the Sub in the air. Heavy duty jackstands were set just forward of the rear trailing arm pivots / mounts. The trailing arms will NOT take the weight of the vehicle. They'll fold right up. A replacement is $35 from RockAuto.

rearsuspredo01_zpsfwoymmob.jpg


Just as an aside, at full droop, everything still attached, the rear sway bar just clear the rear axle cover by about 1/4". If you go for a thicker / armored / cooling fin rear cover, you will probably have clearance issues at max extension.

rearsuspredo02_zpsl3p4w0qw.jpg


Wheels off, all the linkages disconnected - stab bar end links, shocks, panhard bar. Started lowering things fully on the floorjack and noticed in time that things were starting to hang from the brake lines. Ungood.

rearsuspredo03_zpsoc8z7ymx.jpg


Last time I did this procedure, I noted the stock coils were a bit different in height, the driver side being a bit more 'crushed', with the driver and fuel tank on that side all the time. But I neglected to swap them side to side. This time I am. Here they are removed and switched, before re-install. The level across the top accentuates the height difference. It was about 3/16" with the springs side by side.

rearsuspredo04_zpswjs9vidq.jpg


Here's the new 2" iron spacers, next to the 3/4" pieces that were first installed.

rearsuspredo05_zpsqkcm7mjp.jpg


Here's the spring mounting location, that's the end of the fuel tank in the background. The springs appear symmetrical, top and bottom, like they can go either way, so do the footings for the springs. I initially wanted to put the spacer to the top, as I did wtih the 3/4" but trying to juggle it all and force the stack in with the axle hanging at its limit was beyond my patience. So the spacers are on the bottom, where I can keep tabs on them easier, anyway.

rearsuspredo06_zps2wncfvpu.jpg


I ended up with only an 1/8" difference between the rear sides, after swapping the springs. Much better than last time.

rearsuspredo07_zps7cfu8yzf.jpg


Took it (and the dogs) out on an errand to exercise the suspension, settle things in, before making the torsion adjustments back at home. I put 5 full turns on the torsion key adjustment bolts, raising the nose to about a 1/2" of rake, measured at the top of th e wheel well openings centered over the wheel hubs.

This pic was before that adjustment and the angle really makes the Sub *** look fat.

rearsuspredo08_zpstjgmuckj.jpg


I also installed the rear shock boots while they were dismounted.


Next week, after the rain, I'm tearing up the front end for tie rod end armor, front shock boots, probably front brake pads, possibly ball joints (probably due by now and no better time, since I'll be taking it in for alignment afterward).

I also need to change my brake pads again, been a little over 2 years since I got the vehicle, not quite 13k mi. I inspected the brakes when I first got it, rotors were in ok shape, pads were about done, so I elected just to install new low-grade pads and clean up / grease the rest. And get rid of the factory torx-drive caliper bolts. Those pads are worn now. Wear indicators started dragging a few days ago. Inspection of the rears today showed their indicators almost in contact. Noise is coming from front right. Rough look thru the rim with a flashlight, they look thin too.
I am giving serious consideration to an upgrade to GMT-900 front brakes. So it's likely just another set of cheap pads for now. I really ought to have the discs cut this time, but my local shysters will either refuse or cut them so they MUST be replaced next time.
Maybe I'll put new discs on the rear, and leave the front discs as they are while I decide about the upgrade.


265 tires in that shot bud?
 

rayra

Expedition Leader
Yep and will be for another couple years. And maybe next set, too. Just don't gain much for the price difference of going a one size bigger.
I'll do another animated GIF in a week or two showing the height changes, after I get the torsion height dialed in. I'm waiting on brake pads before diving into my front end re-work (tie rod armor, bump stops, shock boots and maybe ball joints), before getting a fresh alignment.

Then after that I'm finally getting around to running power cables back to my rear power module. I'm putting the othe rpieces together this week.
 

kojackJKU

Autism Family Travellers!
Rayra, quick question....do you think its a coil going out in my rig or do you figure that a set of wires and plugs plus a clean up of all the plugs "should" Its giving me the misfire code for 7. so that could be any of those things. Actually if can, you can pm me your email and I can email you the exact codes from my torque app. I took a picture of it. Thanks. I need to get that fixed up.
 

Forum statistics

Threads
188,334
Messages
2,905,568
Members
229,959
Latest member
bdpkauai

Members online

Top