Hey Vortec Guys! / Sierra pickup / Suburban / Yukon etc - Finally has Index!

Jelorian

Adventurer
Bummed that all these issues are popping up now. Did you check out the Moog Problem Solver parts as an alternative to AC Delco? Suppposedly much better made compared to OEM, but not sure compared to AC Delco. Was thinking of getting sleeves for now as well and then maybe upgrade everything later. Cognito control arms would be nice but man they are pricey.
 

Burb One

Adventurer
Busted out the front end work on the Sub today.

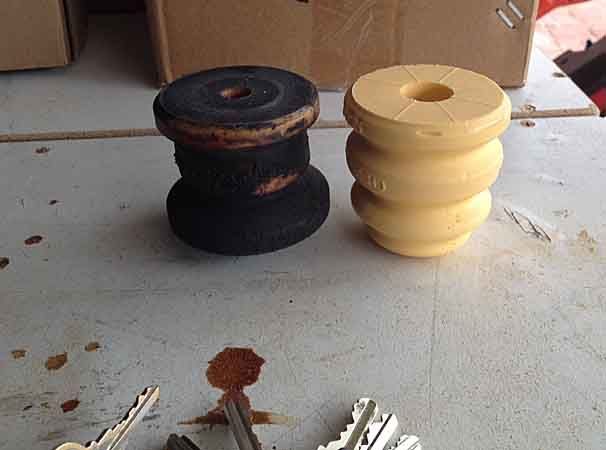
Swapped in the new / replacement bump stops in the front suspension. Unfortunately the parts I ordered were the 'stock' beehive design and not 'Z-71' type. They were really inexpensive at RockAuto, not sure I'll tolerate the sticker shock on the 'correct' parts from the dealer enough to bother switching them again. The install was fairly easy, the fronts are just pressed into a metal cup with four flanges that grip the piece. Easy enough to pry out the old one and work the new one in.

frontsuspensiontweaks02_zpsvg7lyun7.jpg


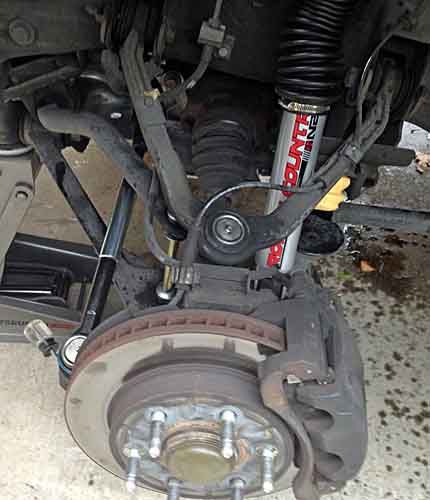
Then I pulled out my budget shocks to install the shock boots I'd neglected to order in the first place. A little fighting the gas shocks was all that took.

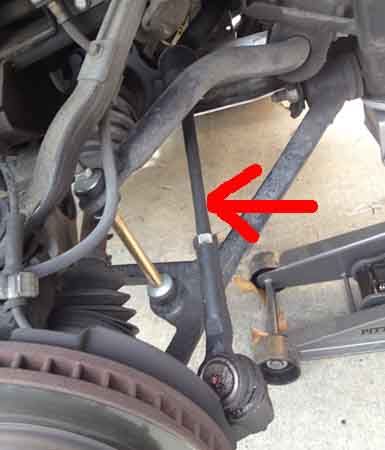
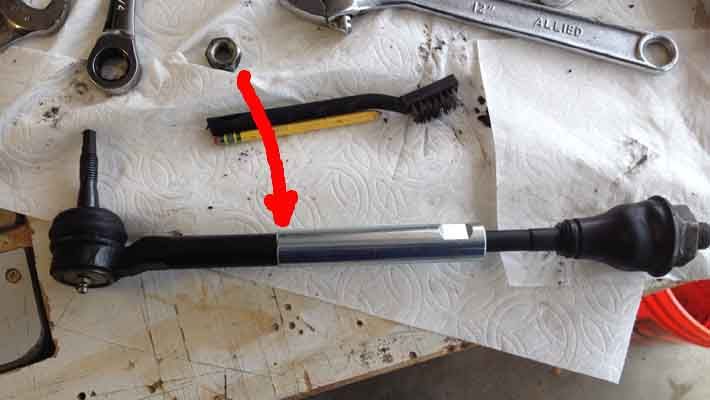
Then it was on to the inner tie rod 'armor'. Again a budget choice. The stock inner tie rods are ridiculously spindly and somewhat exposed frontally. They're ~1/2" in diameter.

frontsuspensiontweaks01_zpsqocz1zhw.jpg


There are a few much more robust offerings, but they 5-10x as much as these sleeves. And given the sort of slow driving I do off-road anymore, I think they're a decent improvement and value.
These sleeves basically replace the jam nut that locks the outer tie rod in place. A clever solution.

frontsuspensiontweaks03_zpsqdyrjft8.jpg


The instructional video advises some care in removing the tie rod assembly, then measuring the overall length and replicating that after you disassemble things and add the sleeves. You won't get accurate enough to not require a new alignment, but you will get close enough to drive a bit without chewing up your tires. With other work and torsion adjustments, I fully plan(ned) on getting a fresh alignment before the week is out.

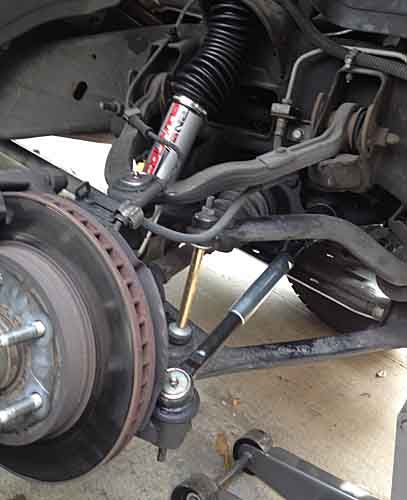
I did however run into one particular issue, which might be related to my torsion key mod and adjustments. The tie rod assembly passes under the sway bar. At full droop and even when jacking up on the suspension at the steerign knuckle, I didn't have straight-in clearance to the steering connector for the tie rod assemble. The sleeves interfered with the sway bar.
Couldn't spin it in and thrashing around trying to make a quarter turn, then bend the inner rod and turn it again, while getting threads started, just wasn't enjoyable. So I marked the end of the 'armor' sleeve with a metallic sharpie on the inner rod shaft, broke it back down, then readily remounted the inner shaft, then re-attached the outer end and re-adjusted the sleeve / nut back to my marked line.

frontsuspensiontweaks04_zpsjjvkxeas.jpg
frontsuspensiontweaks05_zpsdf3xcp4b.jpg


when it was all done, it seemed to track fine, but my steering wheel is now off center a tad. That's a problem for the alignment guy to fix.

I found no discernible play in my boll joints, nor any great wear in my front brake pads after 2yrs / 12k mi. My rotors needed turning 2yrs ago, they still do. Nor any real wear in my upper or lower control arms. All the suspension bushings got a liberal soaking in silicone lubricant and fresh grease on all the fittings.

I also took a full turn off my torsion bolts, after putting 5 turns on them last week after the rear lift changes. The front was pretty jouncy and seemed to feel like things were 'teetery'. But since I turned them down a bit AND lubed the **** out of everything, hard to tell what made the most difference. Thing rides pretty nice again. A bit more driving and maybe another torsion tweak and then I'll call it done and get the alignment.

Make sure you check the play yourself if you can. I tried TWO of my not usual shops recently after redoing my front end (basically all that you mention and more) out of location convenience to my work and my usual guy being on vacation. They both told me I had play in my inner tie rods. I didn't believe them (since it was all new) and waited until my usual guy came back from vacation. We put it on the lift and the brand new Hunter and there was no play...

Those "convenient" shops are both well respected and I had taken other cars to before, so I figure they A) either don't know these trucks and modifications (both had to ask me about the sleeves -since the sleeves covered the wrench mounts on the delco tie rods- and maybe there's more play than the sports cars they usually deal with... or B) they wanted to make a quick buck. I'm also thinking that the sleeves confuse the alignment guys into thinking the tie rod spins free because there's no where to hold onto the tie rod and which would indicate inner joint wear and they stop and say there's play without thinking about it...

However with your mile and original- it is possible there is play, just thought I'd chime in.
 
Last edited:

rayra

Expedition Leader
About my fastest brake pad swap ever. A bit under an hour, creaking around my driveway. Real easy to service these rear brakes. It's literally just (2) 12mm bolts to take the caliper apart. And a fat screwdriver / pry bar to free it and get to the pads. A bit of cleaning on the metal trays / guides that hold the ends of the pads, re-greasing them. And fiddling around using a single-piston spreader tool on a dual-piston caliper, to compress the pistons fully so it will fit over the new full pads.

subbrakes20.jpg


The pads on it were ~25% remaining. Now I'm not sure at all that I changed the rears. I thought and noted that I did, but no way these pads wore so much in just 2yrs / 13k mi.

now I need to return the wrong brake pads and the fronts I didn't need, as credit towards a couple rear rotors. And get those steering and suspension parts. I was hoping I was done with this stuff so I could get to work on finishing the electrical power mods.
 
Last edited:

rayra

Expedition Leader
while I was sitting around waiting for the non-alignment, I was struck by the improved ground clearance and tried to take a picture, but by the tim I dug my phone out someone had parked on the other side of me and obscured all the bright concrete I could see under the vehicle.

subbrakes19.jpg
 
Last edited:

rayra

Expedition Leader
for reference, apparently the GMT 800 trucks and SUVs all use the same rear suspension bump stop, GM part # 15712438. RockAuto has them for $21ea. GM Direct is about the same.
 

Jelorian

Adventurer
About my fastest brake pad swap ever. A bit under an hour, creaking around my driveway. Real easy to service these rear brakes. It's literally just (2) 12mm bolts to take the caliper apart. And a fat screwdriver / pry bar to free it and get to the pads. A bit of cleaning on the metal trays / guides that hold the ends of the pads, re-greasing them. And fiddling around using a single-piston spreader tool on a dual-piston caliper, to compress the pistons fully so it will fit over the new full pads.

Rayra, one trick I learned from a mechanic buddy of mine was to use the old brake pad to spread the load when re-compressing the caliper pistons. This is especially useful when using a c-clamp as opposed to the real compression tool. Obviously won't work on the pistons that are keyed and need to turn to compress. Luckily the rears on ours aren't.

Glad you are slowly getting things knocked out.

I, for one need to get my new winch hooked up and my sliders installed.

The rig looks she's sitting at a nice stance now. I have a very similar mild lift with 2" rear coil spacers and aftermarket keys along with Bilstein 5100's.
 

rayra

Expedition Leader
yep, that's the trick I use. Used to use a C-clamp and a 1/2" drive deep socket on my C-10 single piston, until I splurged ($8) on a spreader tool. Then of course I promptly wound up with two 2-piston vehicles.

/

Some days can't seem to get ahead. Midday I was heading to a Fedex dropoff with my wrong brake parts, planning to use the break in our rain to do some other maintenance and nearly got crashed into by a boor who decided he would cut into the line of cars making a right turn. His back bumper was about even with my driver door when he started crowding into my lane. I gave him some horn. Then laid on it as he figured if I was honking I must see him and would back off. F that. After the turn, we had a frank exchange of opinions, showing each other we thought the other was #1. I mashed my window down so hard and fast for this exchange that the tired motor finally gave out. Another classic gotcha with these vehicles apparently, the mechanism failing in a down position.
So after the Fedex dropoff the rest of my day was spent getting up to speed on the issue and finding parts sources. Had to tear the whole thing apart just to get the glass free and slid up into position and taped in place. Pulled the window motor and regulator assembly out (after verifying the problem was the motor, not the power or switch - thanks 1AAuto.com for your swell repair videos), broke it down and took off to pick up a replacement motor for $38. Had to finish in twilight with a headlamp on my noggin, but I got it all done and back together and it even works properly.

irregularregulator01.jpg
irregularregulator02.jpg
irregularregulator03.jpg


Some days it seems crap breaks faster than I can fix it.

btw, both front and rear doors on each side use the same motor. I mean the left side doors use the same, the right hand doors use the same. The motors are 'handed', if you take my meaning.
My fallback plan if I couldn't get the motor today was to pull both left doors apart and swap motors, so I'd have a workable driver door / window.

I might have some amusing dashcam video of the fracas, pulled the memory card from my dashcam, trying to find it. The date / time is messed up, as is the recordign format, I have to convert a bunch of files and hunt it down.
 
Last edited:

rayra

Expedition Leader
Found the vid. Pain in the butt to find, convert, cut down the clip and get it uploaded. Pretty anticlimatic on video. And I had the dashcam audio set to 'off'. Just as well, I was cussing a blue streak at the top of my lungs as could be expected of a former Marine Arty Battalion Operations Platoon Sergeant. You can see him pause after my first short horn blast, then he tries to wedge in anyway. At that point I lay on the horn the whole way thru.
It's a heavily trafficked intersection, particularly that right turn lane, it backs up quite a way along that shopping center. This guy and many like him will shadow the line looking for a spot to swoop in late right before the turn. There's a river bed beyond that intersection, miss the turn and it's a long way around.
He cut off the car behind me, instead, and there was much loud cursing as he passed me wide on my left after the turn. He was giving me the Brit V-finger while behind me and both he and his female companion were quite salty (too). The move after was me moving to make sure I got their plate number if their stupidity continued. After that I moved to the right and told them they were #1 again when their lane backed up.

vid clip
http://vidmg.photobucket.com/albums...170106-1145ish_Segment_0_x264_zpsw2aiwmqj.mp4


The camera is an inexpensive BlackBox G1W-B, widely available in several versions, several chinese makers. This is the capacitor / non-battery version. It has a lot of nice features especially for its sub-$100 price. The HD video is pretty crisp. There are a few baseline ISO settings you can fiddle with but the menu system is cumbersome and the manual is in Engrish. Just not convenient to mess with. And without a permanent power source to have it always on, your date resets and it sort of scrambles the dated order of your data files, making retrieval later problematic. On the plus side whem you manually trigger a 'marking' (locking) of a film segment, or the camera detects a sharp G-shock, the locked segments get put in a separate folder on teh memory card. So there's a lot less to sort through when you really need it. If you can remember how to manually mark the segment when you eventually need to.
The capacitor in the camera will also allow it to record for a minute or so after loss of the power source.
 
Last edited:

Stryder106

Explorer
Sounds like you had a day similar to mine the other day. We picked up my daughter's Jeep from a shop (new ECU) and were coming home - my girlfriend and her daughter were 4 cars ahead of me in the far right of a double turn lane to the right. I watched a small gold car with damage on all four corners (firs clue)and limo blacked out all windows except the front (second clue) pass on my left going very fast (third clue) and proceed to pass all of the cars turning right and then dive to the right just in front of my family in the Jeep just as they were starting to make the turn. Completely cutting them off - as I watched our Jeep swerve to the right (she should have not swerved as I'm pretty sure the winch bumper with the I beam winch plate and 9.5K winch would have peeled that car open like a can of tuna) to avoid the collision. I got pissed. Floored my Av out of the lane and went around on the outside turn lane (yes - it was clear) - and proceeded to run the car down. Heading up the main street - it's 45 - I saw two cars side by side that we were approaching rapidly. I pulled clear of the car by about 20 feet then dove into it's lane and nailed my brakes. That car then pulled up next to me on the right and rolled odwn it's window - and I rolled mine down. It was a black girl who emotionally said, "Why would you do that? I have my daughter in the car?" My non-emotional reply was, "Because you just did the same thing to my daughter. And if you care about your daughter you should be more patient in your driving". She then pulled in front of me and tried to brake check me. I stopped - turned on all 360K lumens of lights bars - and started accelerating. She then sped off. Moral of the story - I noticed my window was slow while rolling back up - think I need a new motor.
 

rayra

Expedition Leader
Heh. Well I tell you buy it now in advance of need and change it at a time of your own choosing. With our 'atmospheric river' rain-ageddon!!1! happening you don't want to have a window stuck down.

With the worsening drivers in SoCal, the licensing of nearly a million illegal aliens and now the legalization of recreational marijuana use, I'm sure this dash cam is going to be needed. I'm shopping more expensive models that record both forward and rearward, too.

I've also got a license plate frame -mounted backup camera that ties into the DVD-player stereo I fitted earlier this year. No recording function on that, but it's a good way to spot a license plate on a tailgater. I'm fairly sure I can switch the stereo to that input and get a picture without being in Reverse, too. Or will wire it that way if necessary. With the second battery installed I don't much mind adding more parasitic power draws.
 

rayra

Expedition Leader
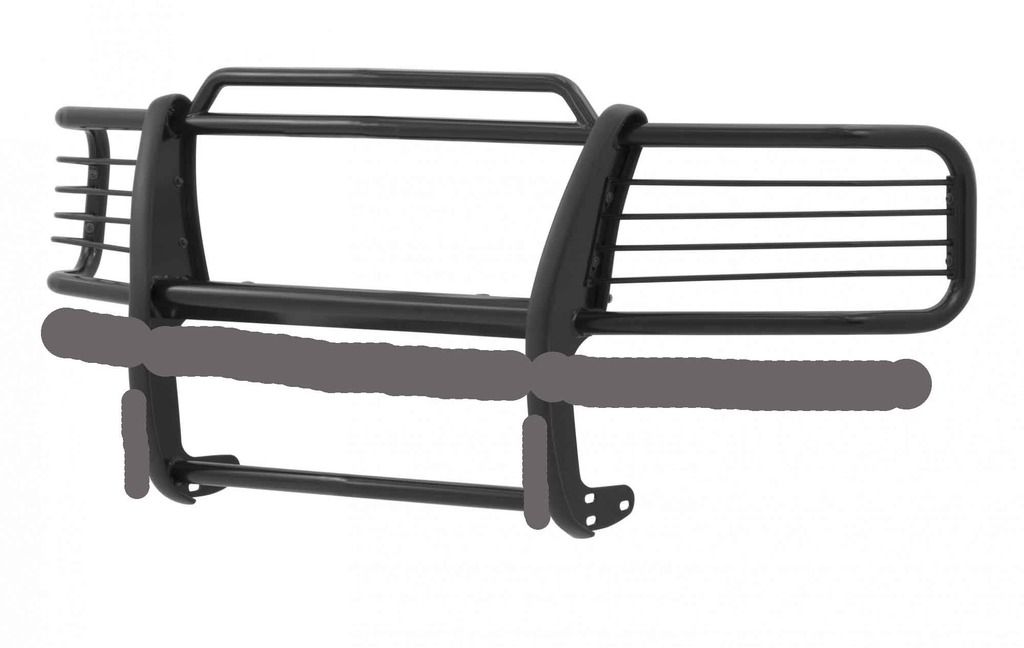
And on a related tangent, got an email this week from RockAuto that they got another item back in stock. I've been looking for a long time trying to find a bumper / grill guard that doesn't look like a huge cattle grate or add a huge amount of front end weight OR take a lot of weight out of my wallet. Even thought about building my own. Eventually found the Aries brand grill guard and considering modifying it to suit me. The Aries grill guard is only $260. I'd probably spend double that again in making all the modifications to it.

The heavy gray line would be a mandrel-bent heavy wall 3" dia pipe / air tank, with air fittingss inset in the ends. Its top would be level with the top of the factory bumper

The vertical gray lines would be highway patrol style push bars. Probably on clevis pins so they can be swapped with recovery hooks or rig other things.

I dub thee 'Linebacker Mod'

linebackerstyle.jpg


I'm also intending to put in a front receiver hitch a la 02TahoeMD(?). And it would also serve as another protective cross-bar.

And possibly add some sort of bolt-on vertical-diagonal bracing bars from the grill guard uprights back down to the top of the frame ends, thru the top back edge of the bumper. I had something similar on my first off-road beater truck 35yrs ago. I'll see if I can find a picture of it.


eta only have a couple images of it and no great angle on the grill guard. IIRC this one was for a Toyota, I had to build up my frame ends with some square tubing. I added solid steel rods across the headlight loops much like those on the Aries, and I added some tabs and solid rod loops to relocate the stock front turn signals and deleted the stock chrome bumper altogether. And I also welded diagonal braces to it. So here I am so many years later basically trying to re-create the same thing.

evanstruckgrillguard.jpg
 
Last edited:

rayra

Expedition Leader
Took some quick and dirty measurements today, while messing with some other stuff.

Near as I can figure, the angle on the lower arm / CV axle is ~16deg. Just tried to measure it this afternoon. That's with aftermarket keys and enough turns to bring the vehicle level with the 2" metal spacer on the rear coils.

Departure angle now is 25% at the bottom edge of the bumper. And a woeful 13deg at the bottom edge of the receiver hitch. But I took a 4-1/2" grinder to all the sharp edges on the bottom of that thing several weeks ago, hoping it will drag more easily when the time comes. I went ahead and put it back on after a near-miss rear-ending adn just too many idiot drivers in my area, I want the hitch tube back there as armor.

Measured at the top of the wheel well openings, centered over the hubs, I'm sitting at 39" now, -1/4" on the driver rear. Just no avoiding that with the fuel tank where it is.
I'm sitting at 14-1/2" clearance at the frame rails / nerf-steps and IIRC 78-1/2" at the highest spot on the roof rack.

I'll have another animated gif of height changes in a bit, just got home from taking this picture for it. Screwed up the framing. That's the previous animation next to it, haven't made the fresh one yet

subprofile2in.jpg
Z71%20stance%20comp%20160816.gif


Essentially I've just added the 2" rear spacer and aftermarket keys so I could level it. Still sitting on 265 70 17s with no plans to change that. But could readily fit some 285s. All this farting around and minor expense to arrive at the stance of a 2500-series. ;)
 
Last edited:

Martinjmpr

Wiffleball Batter
And on a related tangent, got an email this week from RockAuto that they got another item back in stock. I've been looking for a long time trying to find a bumper / grill guard that doesn't look like a huge cattle grate or add a huge amount of front end weight OR take a lot of weight out of my wallet. Even thought about building my own. Eventually found the Aries brand grill guard and considering modifying it to suit me. The Aries grill guard is only $260. I'd probably spend double that again in making all the modifications to it.

The heavy gray line would be a mandrel-bent heavy wall 3" dia pipe / air tank, with air fittingss inset in the ends. Its top would be level with the top of the factory bumper

The vertical gray lines would be highway patrol style push bars. Probably on clevis pins so they can be swapped with recovery hooks or rig other things.

I dub thee 'Linebacker Mod'

linebackerstyle_zps5davnyfr.jpg


I'm also intending to put in a front receiver hitch a la 02TahoeMD(?). And it would also serve as another protective cross-bar.

And possibly add some sort of bolt-on vertical-diagonal bracing bars from the grill guard uprights back down to the top of the frame ends, thru the top back edge of the bumper. I had something similar on my first off-road beater truck 35yrs ago. I'll see if I can find a picture of it.


eta only have a couple images of it and no great angle on the grill guard. IIRC this one was for a Toyota, I had to build up my frame ends with some square tubing. I added solid steel rods across the headlight loops much like those on the Aries, and I added some tabs and solid rod loops to relocate the stock front turn signals and deleted the stock chrome bumper altogether. And I also welded diagonal braces to it. So here I am so many years later basically trying to re-create the same thing.
.
Would you really benefit from such a setup though? Over on the Toyota message boards we called brush guards like that "damage multipliers". :D Just my opinion but if you need front end protection you need protection. As in an ARB or Ranch Hand or similar bumper, not just something that bolts onto your existing bumper.
.
I like the UZJ-100 ARB bumper modified to fit the GMT-800 trucks - it's as clean and good looking as such a bumper can be. For probably a bit more than the $500+ you'd have to spend on that Rock Auto brush guard and modification you could probably have something fabricated that would look good and be more functional.
 

Martinjmpr

Wiffleball Batter
Essentially I've just added the 2" rear spacer and aftermarket keys so I could level it. Still sitting on 265 70 17s with no plans to change that. But could readily fit some 285s. All this farting around and minor expense to arrive at the stance of a 2500-series. ;)
.
:coffeedrink: I know, right? If only they made the 1500's with the same stance as the 2500s right from the get-go it would save us all a lot of $$.
.
Looks good though. You know you've got a good lift when your current tires start looking too small. 285s would fit nicely, hell you could even go up to 34's if you wanted to.
 

boll_rig

Adventurer
Stance looks great Ray. I second that on all this work just to have the stance of the 2500s ha. Oh well.

Also thats the same brush guard I bought, and for just that reason, smallish and extremely cheap and very easy to install. Will help me if i hit a deer or get into a minor accident. Especially in comparison to not having it. Wasn't ready to drop into an ARB just yet. Figure I could sell it for 200 when the time is right and only take a minor hit..
 

Forum statistics

Threads
188,334
Messages
2,905,570
Members
229,959
Latest member
bdpkauai
Top