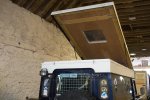
Making a ifting roof on a 110

wuntenn

Adventurer
Thanks MDM - did try the duct-tape-dab but the tape was so far gone it simply stuck more glue on! Basically it would stick anywhere except to itself! Will take some new stuff with me today and try that.

And yes Frank I'll keep reporting on progress! The interior is likely to 'evolve' in the same way the exterior has: slowly and with several changes of tack!
 

java

Expedition Leader
If you can find goo gone over there it works pretty well and wont eat paint. Its orange based. Still takes a fair bit of elbow grease.
 

backstop

New member
"Sticky Stuff Remover" available from Lakeland Plastics.....great thread, BTW. Only just discovered it. Will keep a lookout for you locally - watch out for a yellow 110CSW with a sea kayak on the roof.
Good luck with the rest of the build.
 

wuntenn

Adventurer
Thanks lads - good advice. Might have orange-based chain cleaner in my bike stuff pile which may do the trick. (maybe Swarfega even, its citrus too I think).

Yellow 110CSW with sea kayak? Think I've seen that on the A96 near Nairn one day. Small world!
 
Last edited:

wuntenn

Adventurer
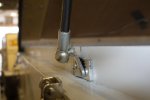
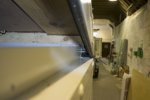
Anyway - here's a close up of the front detail where the hinge is, and where the fabric side will terminate at the sharp end of the wedge. I've made these first two pix larger files than usual - 2400px or so, so if you click through them you can magnify and see the detail a bit better.
hinge-1.jpg

As you can see I've fabricated the lower section so there is an upstand that goes completely around the lower frame to prevent water ingress, it's 30mm high on the back and both sides and slightly higher at the front. At the front the hinge is screwed through the 3mm alloy into a treated timber subframe. You can see the various seals in this shot - from the bottom there is the black rubber gasket between the metal frame and the lower hinge leaf, then the hinge leaf (silver), the closed-cell foam gasket that fits between the hinge leaves, then the top hinge leaf (slightly open) and then the black rubber gasket between the top leaf and the metal frame of the lifting lid.

The side fabric will be bolted along this 30mm upstand at bottom and terminate in under the edge you can see here, screwed to the timber batten that is located above the top hinge with the knots in it. (What looks like white mastic running down the upstand is actually weld.) The exposed wood you can see will be partly covered in fabric eventually.

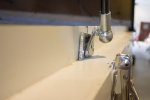
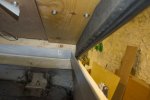
This second shot is taken slightly higher so you can see the upstand from the inside and the lid's lip P/tadpole section seals, and a 6mm foam lining above the seal to prevent condensation. The wavy metal end will also be covered but I can fit some closed cell foam in behind it so when the lid is closed it is pinched between the metal upstand and the wood on the lid. Existing LR roof is in lower part of pic with bolt through to secure the lower frame. At the top the fabric will be screwed to the wooden plate above and sealed on a bed of mastic. Its located almost 3 inches up above the lid's lip seal so I figure that's far enough up to prevent water blowing in.
hinge-1-2.jpg

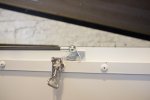
This is the lower fixing for the gas strut. I've put a temporary 3mm shim under it to stand in for the fabric side which will eventually be fitted behind it. The edges of the fabric will be rolled and sewn to form a pocket along its length and a 1.5mm alloy flat bar slipped into it and bolted through onto the metal side.
hinge-1-3.jpg

Hope this helps you visualize the construction and sealing of fabric sides.
 
Last edited:

wuntenn

Adventurer
I'd be surprised if any wind or rain will get in :ylsmoke:

I hope not!


hinge-1-4.jpg

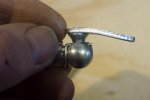
Managed to get another leap forwards today. Fitted the gas struts but could not get the lid to move - the struts seemed quite stiff and resistant to pressure but I leaned on the lid and it gently whuffled down. I guess the pistons were simply sticky because they are new. The lid came back up just as nicely, several up/downs later it all seemed hunky dory. I did a wee bit of pottering around preparing to put some timber inside when I noticed that the lower strut bracket was bending out, and doing it on both sides. (The piece of alloy behind is a shim to substitute for the fabric pocket and ally flat bar that will be fitted when the sides go on behind the bracket.)

hinge-3.jpg

hinge-2.jpg

A hasty lashing and propping up followed, and then I had a look at the brackets and pulled one off. Definitely bent. Now I've followed the fitting instructions to the letter, and double checked my measurements, and it's all spot on. The strut/bracket info on the web shows the bracket in the orientation I've fitted them, however it does seem from a basic physics POV that having the bracket the other way round would be stronger as the force would be applied to the bottom, forcing the bracket tightly against the vertical alloy face its bolted to, rather than away from it as it is at present. I've emailed the tech fellow at the strut supplier for a definitive answer.

hinge-4.jpg

Still, it works!
 

buff

Observer
The ones I used had a small Allen key on the side to let out excess gas. Will depend if yours are adjustable.
 

wuntenn

Adventurer
Didn't get the adjustable ones, but got them preset to my desired weight. TBH the bending is a consequence simply of the lid's weight as I watched it fold even when I wasn't putting weight on it, but standing on the deck watching! (with a pair of straps hooked around the roof joists and fastened to the lid as a safety net!)
 

krl81

Adventurer
Hi!
As you mentioned, if you put the bracket the other way around it probably will be better, by looking at the pic it looks like the "pin" holding the strut is removable. Would it be possible to let the screw that holds it go through the wall and hold the "pin" from the inside?
Just an idea. :)
 

wuntenn

Adventurer
Hi!
As you mentioned, if you put the bracket the other way around it probably will be better, by looking at the pic it looks like the "pin" holding the strut is removable. Would it be possible to let the screw that holds it go through the wall and hold the "pin" from the inside?
Just an idea. :)


Might work. I've had a look at the suppliers catalogue and there's a multitude of different bottom bracket types, all with varying dimensions. However my requirement was for a surface fitting so it goes over the fabric side (ie on the outside of the fabric). But if it needed to be located inside and with a hole through and a grommet in the fabric at bottom it might be ok. Will see what the supplier suggests - trying to keep within warranty for the time being!
 

Arjan

Fossil Overlander
Hmm... bracket is obviously not up to it.

The gasstrut is a "ball loint" and the leverage on these brackets is quite a lot. I'd suggest you either go for a stiffer / thicker mount or a "U" shaped bracket with the stut inside the "U" to stop the leverage.

Looking good though !!
 

buff

Observer
Its a bit trial and error, one of my strut rod's is slightly curved . Due to pulling down to hard when i had them recharged, before i had let a small amount of air out. Didnt go for the ball end on my struts, just the 8mm eye's. Nothing that end has bent, so far.
 

wuntenn

Adventurer
I've little experience of gas struts so let the supplier's engineer recommend what he thought would work, but I guess it's pretty variable depending on individual locations. I'll see what the replacements manage before I start to worry!
 

buff

Observer
I only went for adjustable ones as i didnt know what the finished weight of the roof would be. And they're only adjustable in that you let some air out, until its enough to keep the roof up. But not hard to pull down.
 

Forum statistics

Threads
186,674
Messages
2,888,753
Members
226,864
Latest member
Nowhereman
Top