Ah well I did the deed today - and whacked a chunk out of the roof, so no turning back now.
I decided to use a piece of red pine on either side and across the back end - apart from being relatively strong and light, it is significantly more moisture resistant than the majority of plywood (without getting into a bank loan for some marine grade ply). Plus its nice to work with. So fitted that first to give me a line to work to all round and then off with the jigsaw. The T piece that we used to support the lifting lid on the bonnet when it was getting fitted was the perfect size to fit in the back and hold the cut piece of roof up so it didn't collapse inwards under its own weight. Worked a treat.


I retained the strengthening rib just above the drivers seats where the roof slopes down to the windscreen, and about 18 inches behind that. Basically I've cut across at about 40 inches from the front, and this front section will be well braced and structural and form the front half of the bed platform, with the second half of it stored on top and slid backwards when needed.


There's not a huge amount of space between the lifting lid and the bed platform - only a few inches - enough for a 1" thick thermarest mat and an open sleeping bag. If I wanted more space I'd have had to A) lose some internal headroom below the platform which I decided I did not want to do as I'm 6' and don't want a crick in my neck or my knees under my chin when sitting in the back, and its good to have the same usable space below even when the bed is set up so we can move about underneath, or B) use deeper profiles for the lifting section and go higher externally, which again I wasn't keen on doing - more weight, more wind resistance, more awkward to build and fit. As it is it's 'tight' - but this is a reasonable compromise.
The added bonus of this is that it also leaves sufficient headroom in the front to allow me to fabricate a sleeping platform for my wee boy William (aged 5). With the seats tipped forwards there will be enough space from the seat back to the back of the seating area (just at the bulkhead) to provide a 30" wide by 50" long platform I can suspend from the channel above the doors on 4 pieces of stainless wire. With curtains all round over the windscreen, doors and across the bulkhead he'll be snug and have his own reading light (the existing vanity light) for comfort. The board can be stored under the seat cushions or on the floor when not in use, or maybe folded down the back of the seating area. The advantage of this is that it leaves the whole back area free for we two adults and he's well out of the way later in the evening and won't have to be disturbed.

The pine gives a nice lip all round to catch and store the fabric from the sides when the lid is closed, and handy for putting a mug of tea or some pot plants on. Although William is determined to have a model railway on it (which may actually happen - he has some lovely wooden track I can use.......we'll see!).

To finish it off.....well I have no idea. I dashed off to collect William from school just after cutting the roof so had little time to consider options - but I think there will be some substantial bracing across the front cut to strengthen that bit, which is also where the loading from the gas struts comes down, so that will be useful to have - I may use some metal for this. And then some timber along both sides and the rear to strengthen the cut edges, which might be a sold batten with a rebate to fit over the edge. At the sides there will be some verticals coming up from the wheelarch boxes (mines a hard top so has full-length arches internally) which will be located at the crucial points where the internal fittings start/end (sink, fridge, cooker etc), and these might form a floor to pine-lip cupboard so give storage and provide support too. The bracing for the end of the bed nearest the back door will be attached to the bed platform and slot into a rebate on either side so will be strong enough to support two adults and particularly the loading when climbing onto it.


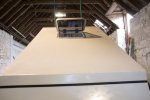
The black stuff you can see between roof alloy and the carpet is an inch of closed cell foam - have that all round the vehicle and its pretty good for keeping noise and condensation at bay, heat in and cold out.
The hollow at the front of the bed where the roof dips is sufficient to install some speakers, or various electronic bits that need space but be kept out of the way. I'm going to cut a pair of vents in the front right above the windscreen so that warm air can circulate up and under the bed area in the dip, and then cut some holes in the sleeping platform so the top is well aired, and this will help stop condensation.
")