My "New" Willy's II Trailer Build

slimtwo

Adventurer
Yesterday, I got the sides all glued up, and I cut out the access hatch for the plumbing stuff; pump, pre-filter, valves and the like. I need to so the one for the other side, the propane bottle and fittings for that.

Today, I worked on the “positive air flow ventilation system”. I had an idea that I think will work very well. I have a 12 V server fan that puts out 640 cfm, at 1,500 rpm. It is fairly quiet, and should move a fair amount of air. I made the penetration in the front bulkhead, in the fridge compartment, so it will draw in fresh air, and push the heated air out.

05062206.jpg

05062205.jpg

And for the filter, I am using an air filter used for a riding lawnmower engine, 6” OD, and 4.5” ID (same as the fan). At this point, I just need to make a cover, to hold the filter in place.

05062203.jpg 05062202.jpg 05062201.jpg

My hope, is that the pressure will equalize through the whole box, and bleed off through the many gaps in the door seals. However, If I did to good a job with the weather stripping, I will install a tiny vent, so the air is aloud to move. The list of parts is pretty low cost. The fan cost about $18.00 bucks, and the filter and pre-filter was about $14.00 for two filter sets. I'm really anxious to see how it works. Another step closer to finishing.

Happy Trails!
 

slimtwo

Adventurer
Today, I cut the last compartment door in the side panel of the box, and cut the plywood for the fridge slide out shelf. I also drilled the holes in the shelf, and slide frame for the bolts.

05072201.jpg

05072204.jpg

05072205.jpg

The next thing I need to do, is take the router and clean up the edges for the last two compartments, then cut the doors out, and mount the hinges for them. I didn’t do any more today, because I didn’t want to screw up the adjustment, I got at the chiropractor yesterday. Back on Monday.

Happy Trails!
 

slimtwo

Adventurer
Today, I trimmed the sides on the two small compartments with the router, so they are now ready for the door stops that the weather-stripping seal will adhere too. Then I glued down the top of the box.

05092203.jpg

05092201.jpg

Once that was done, I put a radius bit in the router, and radiused all the outside edges.

05092202.jpg

Eventually, I will do the same on all the compartment openings, and the doors, to clean them up some. Couple more checks off the “to-do” list.

Happy Trails!
 

slimtwo

Adventurer
The past few days have been spent cutting and fitting the door stops for all the compartment doors, which is where the weather-stripping will be attached.

05142201.jpg

05142202 - Copy.jpg

I also wanted to make sure that there would be enough space for the doors to close and be flush. So I made sure to give all the stops a 3/32" spacing, so that would happen, and to make sure there was enough "squish" to seal well.

05142203.jpg

Now that that is done, I will go over the outside with the sander, wipe it down, and start filling the gaps and screw holes with bondo. By the end of next week, I intend to start coating the outside with resin.

Happy Trails!
 

slimtwo

Adventurer
I started the process of filling the holes and cracks with bondo last week. Wow, that did not go as I had envisioned it, at all! Mixed up my first batch of bondo, and normally, the hardener is a different color than the bondo so you can clearly tell when you have it mixed completely. well, the bondo is white, and so was the hardener. So I took and extra minute or two to make sure it was thoroughly mixed. Well, by the time I got to spreading it on, it was kicking off. I actually followed the instructions on the can too. So I tried mixing a smaller amount, same thing. So, this time, I used half the hardener, and I was able to get more of it on before it kicked, but not much. Needless to say, I was very frustrated to say the least. I got half of one panel filled with the first coat and then I pulled something in my back again. So, for the past week, I have mostly been flat on my back. I have gone to the chiropractor once, with another visit scheduled for this coming week.
Today I am feeling some improvement. So, I put together a deflater/inflator set up I saw on YouTube.

20220522_111824.jpg 20220522_111309.jpg 20220522_111314.jpg

20220522_111301.jpg

The only thing I have been doing (when I'm not laying down) is watching off road videos, and I saw this one video on how to make a deflater/ inflator set up. I liked it, so I bought the stuff to make it. I am excited to finally get out in the dirt and try it out. Hopefully, I will be back on the trailer this coming week, and I can get this thing done. It's time to move on to the next project (the list is not getting any shorter).

Happy Trails!
 

Snydmax

Member
I started the process of filling the holes and cracks with bondo last week. Wow, that did not go as I had envisioned it, at all! Mixed up my first batch of bondo, and normally, the hardener is a different color than the bondo so you can clearly tell when you have it mixed completely. well, the bondo is white, and so was the hardener. So I took and extra minute or two to make sure it was thoroughly mixed. Well, by the time I got to spreading it on, it was kicking off. I actually followed the instructions on the can too. So I tried mixing a smaller amount, same thing. So, this time, I used half the hardener, and I was able to get more of it on before it kicked, but not much. Needless to say, I was very frustrated to say the least. I got half of one panel filled with the first coat and then I pulled something in my back again. So, for the past week, I have mostly been flat on my back. I have gone to the chiropractor once, with another visit scheduled for this coming week.
Today I am feeling some improvement. So, I put together a deflater/inflator set up I saw on YouTube.

View attachment 723314 View attachment 723315 View attachment 723316

View attachment 723317

The only thing I have been doing (when I'm not laying down) is watching off road videos, and I saw this one video on how to make a deflater/ inflator set up. I liked it, so I bought the stuff to make it. I am excited to finally get out in the dirt and try it out. Hopefully, I will be back on the trailer this coming week, and I can get this thing done. It's time to move on to the next project (the list is not getting any shorter).

Happy Trails!

Let us know how the diy in/de-flate setup worked and post up a link to that video


Sent from my iPhone using Tapatalk
 

GJK5

New member
I started the process of filling the holes and cracks with bondo last week. Wow, that did not go as I had envisioned it, at all! Mixed up my first batch of bondo, and normally, the hardener is a different color than the bondo so you can clearly tell when you have it mixed completely. well, the bondo is white, and so was the hardener. So I took and extra minute or two to make sure it was thoroughly mixed. Well, by the time I got to spreading it on, it was kicking off. I actually followed the instructions on the can too. So I tried mixing a smaller amount, same thing. So, this time, I used half the hardener, and I was able to get more of it on before it kicked, but not much. Needless to say, I was very frustrated to say the least. I got half of one panel filled with the first coat and then I pulled something in my back again. So, for the past week, I have mostly been flat on my back. I have gone to the chiropractor once, with another visit scheduled for this coming week.
Today I am feeling some improvement. So, I put together a deflater/inflator set up I saw on YouTube.

View attachment 723314 View attachment 723315 View attachment 723316

View attachment 723317

The only thing I have been doing (when I'm not laying down) is watching off road videos, and I saw this one video on how to make a deflater/ inflator set up. I liked it, so I bought the stuff to make it. I am excited to finally get out in the dirt and try it out. Hopefully, I will be back on the trailer this coming week, and I can get this thing done. It's time to move on to the next project (the list is not getting any shorter).

Happy Trails!

I just made the same setup but with 1/4" flexzilla, not sure it is going to move enough volume, we will see. Looks great!
 

slimtwo

Adventurer
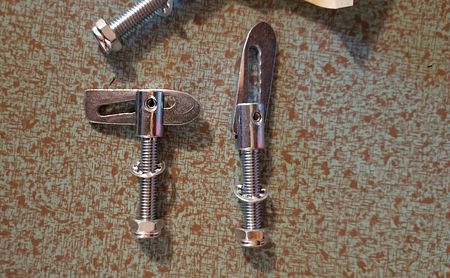
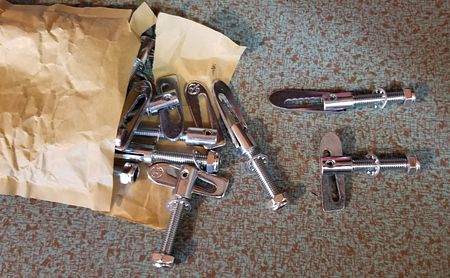
So, I finally received the "Anti luce latches" that I ordered from the UK. When I tried to order these last month, they would not ship to California. Not sure why? However, I took a look at the website again first of last week, and the alert was not there. So I ordered them, and they arrived yesterday.

05252202.jpg
05252201.jpg


These are great latches. I found these years ago, when I was looking for tail gate latches for the old trailer. The ones I just received, are smaller in size, and they will work great for the latches on all my compartment doors. Still nursing the back. I have another Chiropractor appt. tomorrow. We will see how I'm doing after that.

Happy Trails!
 

slimtwo

Adventurer
Here is the link for the inflate/deflate video.

I tried it in the driveway at home. It took about 4 minutes to deflate to 14psi. however, the air pressure in the tires was at about 25psi. When I filled the tires back up. I filled to 32psi, and it took about 6 and a half minutes. I think it is gonna be well worth it.
 

slimtwo

Adventurer
So, I spent some time at the shop today. First time in a week. My back is not there yet (so frustrating), but there is improvement. Today I filled more holes, and sanded what I had done last time.

05302201.jpg 05302203.jpg

05302202.jpg

Hopefully, I will be up to spending another hour or so in the shop tomorrow. All for now.

Happy Trails!
 

slimtwo

Adventurer
Ok, I have been working on the trailer for at least and hour or two each day, to at least be able to say that I have made some progress. Not as much as I would like, something is better than nothing. So, I have just about finished filling and sanding the seams, cracks, and screw holes in the exterior of the box.

06022206.jpg

06022207.jpg

I have maybe one or two more things to do yet before resin, but I am applying resin starting next week! The other things that must be done before resin, are the bottom hull penetrations, for battery leads and trailer wiring, and plumbing, and in the front bulkhead, the penetration for the solar panel wires.

I radiused the hole, inside and out with the router to protect the wires.

06022203.jpg 06022202.jpg

06022201.jpg 06022204.jpg

That's it for now, more later.

Happy Trails!
 

slimtwo

Adventurer
Well, I was going to wait until Monday to start applying the resin moisture barrier. But after I got to shop today, I didn’t have that much left to do as far as prep, so I went ahead and set up for resin.

06042201.jpg

06042205.jpg

I started off with small batches, because I am using a fast hardener, and I wanted to make sure I had enough working time. As it turns out, I have about an hour, as long as I am working out of a paint tray, and the resin is spread out, not in a cup. In a cup, I only have about 7 or 8 minutes. So, to be able to apply a 2nd coat of resin with out sanding in between coats, I have to wait until it tacks up (1 hour minimum, up to 6 hours). So, after the first coat, I went to lunch.

06042204.jpg

When I got back, it was tacky like painters’ tape, without coming off on your fingers. I managed to get two coats on today. I don’t think I would have the patience to wait around for another hour, so I will stop at two in a day.

06042203.jpg

06042202.jpg

Monday, I will come in and give it a lite sand, then apply two more coats. After looking at the box with two coats on it, it seemed like it was still soaking in to the wood. So, a total of 4 coats should be good.

So, next week, after I get the fourth coat on the box, and it cures, I will flip the box over so I can get to the bottom. I will prep it, and apply two heavy coats of resin, let it cure, scuff it up some, then apply the raptor liner on the bottom (That will most likely take the hole week). Once that is done, I will flip it back over, and get it ready for the top coat.

More later.

Happy Trails!
 

slimtwo

Adventurer
Back in the shop today. I did some final sanding on the box, then wiped it down with acetone. Then I mixed up the first of many batches of resin, and started applying the 3rd coat. It took about an hour, but I got it all on. I made sure that it was a fairly thick coat. When I was finished, I decided that it was not necessary to do 4 coats.

06082201.jpg

Now comes the hard part, flipping the box over on its top, so I can prep, and coat the bottom. My plan, is to lift the box off the table using the car hoist again, and setting the box on two furniture dollies, that way it is close to the ground. Then, with someone’s help, I’ll flip the box up on its end, and lay it down on the top, and then back on the dollies. That way I can still move it around. Then it is prep, two coats of resin, and the raptor liner (I'll have to let the resin cure for several days of course, before the liner). While it is upside down, I will permanently mount the fenders, and undercoat the inside of them as well. Once that all dries, I’ll do everything in reverse, and get it back up on the table, then I can start applying the final top coat. It sounds easy enough in my head anyway.

Stay tuned!

Happy Trails!
 

slimtwo

Adventurer
So, today, my son and I managed to flip the box over so I could work on the bottom.

06102202.jpg

06102201.jpg

I’m sorry, but I didn’t have enough hands to film and work at the same time, so I didn't get any picks of the box hanging under the car hoist. But, if you have been following, you saw the same exact thing when I had to repair the table when it collapsed, and I had to put the box back on. Just know, it went even better than I had hoped it would. I will try to take pictures of the process when I put the box back upright, and on the table. I set the fenders in place, and got all the holes drilled, then I sanded the box good. On Monday, I plan on applying two coats of resin, which is all I am doing on the bottom. And when that cures for 24 hours, I will sand it, and apply the raptor liner. I was originally going to spray one coat of the liner on, then set the fenders in place and mount them, then spray the second coat on, including the inside of the fenders. But I think instead, I will mount the fenders in sealant, and when that sets, then I will spray on the liner over the bottom, including the fenders. That way, I can two coat everything. That should seal up any seams and gaps. Let me know what you think. More later.

Happy Trails!
 

slimtwo

Adventurer
So, for the past couple of days, I have been prepping the bottom of the box for the Raptor liner. Today, I applied the liner. I am very happy to report, that it went on as easy as the adds said it would, and I was able to apply a fairly heavy coat, so I only had to do this once. It’s gonna be on the bottom, and there won’t be anything being drug over it anyway, so it should hold up just fine. Now that the liner is done, I am gonna start painting the inside of the box. I figure that if I get started while it is upside down, I can get the upper part of the inside all painted, while it’s on the floor (that way, I don’t have to contort myself to paint it when it is up right). And after I get the box back on it’s bottom, I’ll be half way done. I believe I have to wait a few days for the liner to fully harden before I can flip it anyway, so time well spent.

I bought the gallon kit, which includes 4 bottles. This is what one bottle covered. And I did lay it down thick. right to left, then crossed. And I did put extra on the seam.

06152202.jpg

06152203.jpg

06152206.jpg

06152204.jpg

The last two bottles are for the bottom of my friends new trailer box.

Stay tuned!

Happy Trails!
 

Attachments

  • 06152206.jpg
    06152206.jpg
    3 MB · Views: 15
Last edited:

Forum statistics

Threads
188,225
Messages
2,904,103
Members
229,805
Latest member
Chonker LMTV
Top