New Build Begins- 2021 CV 515

2 bikes 2 brown dogs

Active member
Oh, I forgot..... after you cut the large ground wire inside disconnect the little ground wire from the relay.....then go outside.
Once outside wiggle the circ pump plug through first. Follow it by the smaller 4 pin data plug, then the red/white wire with female terminal then raw black 12ga.
Plug the two terminals back into the relay, reconnect the ground wire and humpty dumpty is back together again.
 

2 bikes 2 brown dogs

Active member
The 2 glycol lines obiviously need to exit the habitat.
I completely installed no less than four versions of makeshift bulkhead connectors. I started with brewery based o-ring style. Between asking too much from O-rings designed for homebrew tanks and trying to marry stainless threads to metric barbs to brass thread STD NPT...well...a lot of no bueno.
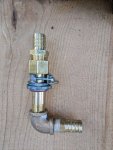
I ended up with two different fitting combos. one was pieced together from some parts I got from a hydraulic and air fitting shop. Love it. But they only had enough parts from their junk bin to make one and after two weeks of deep dives into industrial fittings I classified it as a unicorn and frankenstiened something else for the second bulkhead. That other one is shown here because I think it is more re--creatable. The use of a electrical strain relief fitting to grab the floor deck may be 'unique' so we'll see how that shakes out.bulkhead.jpg
 

2 bikes 2 brown dogs

Active member
Part description in the photo, working from top (inside habitat) to under chassis should be as follows. Should = im almost sure:
Part 1) male barb for 3/4" ID hose to 3/4"npt male.
Part 2) is reduction coupling 3/4" female npt to 1/2" female npt. The smooth pipe just below the 32mm hex is still part of fitting number 2. That is the outside of the female 1/2" threads inside.
Part 3) is the 1" electrical strain relief. It's threads pass through the floor deck and control the hole diametter.Most of the smooth part of fitting number 2 passes inside of that and is captured by the clamp. The nut portion of the strain relief threads on from outside. I did find a large rubber washer that goes over the male threads of the strain clamp before the nut goes on. It's not shown here.
Part 4) 1/2" npt male/male nipple 1.5" long.
Part 5) this is wierd but it turns out some of the o-rings i didnt like in other version actually fit great between nipple and the inside of the strain relief so i pushed two up there before the caulk gun comes out.
Part 6) 1/2" npt female/female 90.
Part 7) 1/2" male npt to barb for 3/4" ID hose.

Parts 1-5 were assembled first and pushed through floor. 6 & 7 then connected underneath. I'm not saying this is a great way to go........it's just what is in my driveway and hasnt started leaking yet..or been driven on the road... ;)
 

2 bikes 2 brown dogs

Active member
Well, it's been one heck of a last month as we've pushed a bunch of long weeks together and finally started the first real shakedown. The plan was...is... to be out for at least two months. Tucking tail and heading home early is a possibility but we're going to try our best to have fun while we work out the kinks. The chin is up at the moment but repairs and head scratching is already underway.
My intent was to take the collection of photos from the last month of work and spend a little time updating the build post BUT im a little in over my head on an alternator charging issue and am going to reserve my screen time for asking questions.
The chassis has a second factory alternator but I discovered the hard way that I'm only getting extremely sporadic charging from the chassis to the habitat battery bank. I havent had enough time to replicate any scenario that creates a charge to the lithium. When it happens, like it did in the driveway :| , I'm getting about 2,200 watts. But it's pretty short lived. I'm heavily suspecting the chassis' using a 'smart alternator' protocol that is out smarting me.
I lobbed some very specific questions to a service center back home and they couldnt tell me anything about the voltage limitations......so....if anybody has any ideas or familiarity with International/GM's ECM that may help me start heading in the right direction I'd be all ears!
I've recently read about other dedicated, secondary alternator systems that avoid this but I'm clearly behind the eight ball on this one.
At the suggestion of the retailer I purchased the Victron components through I've reached out to Nations Starter and Alternator so I'll cross my fingers there.
Otherwise Im burning diesel in the hydronic furnace to keep the tanks warm while driving down the road and that's a real kick in the pants.
 

2 bikes 2 brown dogs

Active member
We got some good weather and I figured out enough of fix, short term at least.
The battery combiner (Cyrix-Li- Ct). Was getting 14.1A but only letting 5A pass through at times.
I pulled it out of the system and I'm getting. FULL Juice.
I'll have to work I'm a battery protection piece in the future, other that the manual disconnect I have now, but that's good enough to roll west!
 

shortbus4x4

Expedition Leader
The old school way of combining two batteries with engine running and then isolating them with engine off.

Have the solenoid hooked to a fused ignition on power source that is off with the key off. No chips to fail.
 

2 bikes 2 brown dogs

Active member
Week four of the shakedown has begun. It's been a little more challenging than fun but we are managing to work on a few planned projects along with some fixes.
Being that we are basically living in a metal box we knew that thermal transfer was going to give us condensation challenges but rainy 35° days made "challenges" an understatement.
The Arctic tern windows can latch in a vented position. Between that and the right fan speed we solved most of it.
 

2 bikes 2 brown dogs

Active member
We left some steel posts exposed or unencapsulated by the closed cell untill we figured out what we were going to do for our interior wall panels. Those exposed members were the culprits
We bought a DIY closed cell kit called a Froth Pak 200. It's a 2 part canister system that works real well. If you were thinking about spray foaming a smaller compartment it's a pretty good solution.
 

2 bikes 2 brown dogs

Active member
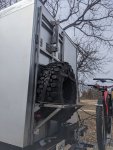
The tire is strapped into the basket with a tire bonnet. Want the easiest to find something for a 43" but this fits:)
 

2 bikes 2 brown dogs

Active member
The bars at the top of the rack open up to form a hoist. Once I get the winch and a few other items back there finished (like buying a cordless impact wrench to replace my broken cheater bar) I should be able to show some pictures of the hoist in action.PXL_20230307_185319272.jpg
 

2 bikes 2 brown dogs

Active member
One of our projects so far was to swap out the furnace on our Elwell hydronic system. We had some glycol leaking out of the furnace body. I sent some pictures and a new one was shipped the next day. I can't say enough good things about their customer service.
The leak came to light as the furnace was shutting itself off intermittently. After staring at the service pages on the touch panel long enough I noticed that error code 48 (heater communication) would flash just as the furnace was finishing a heating cycle. Most of the time the system would continue operating normally but sometimes the system would turn itself off.
You could turn it right back on but that got me under the chassis and saw the leak.
Unfortunately I'm still getting the error code to flash every couple of days and the system has shut itself down one of those times. If/when I shake that gremlin out I'll give an update.
 

2 bikes 2 brown dogs

Active member
As far as the heater goes I'm going to eventually build an insulated box around the exterior heater unit. In spending so much time looking at the service screen it became apparent that even when the air temperature in the habitat was satisfied the system would still fire up the burner if the exterior unit dropped below about 156°F or if the reserve tank gets below 170°F.
It doesn't take much for the outdoor furnace to drop below 156° so we are essentially burning a lot of fuel for the system to just be 'standing by' waiting for the cabin to drop below the thermostat setting. We are so well insulated just the heat coming off the interior equipment while in 'stand-by' keeps the habit 30° above exterior.
 

Forum statistics

Threads
188,340
Messages
2,905,759
Members
229,959
Latest member
bdpkauai
Top