I don't know you're system, so with a grain of salt:
I have the 3 100ah AGM batteries. I've been troubleshooting a DC switch panel issue (bad ground inside one of my DC panel switches by the door- there's a lot of good stuff in our campers, but those DC on off switches lights, plugs, water pump... are kinda crappy inside)
but until i suckled in the bad ground contact inside the switch, I thought I had a bad battery cell. So spent much time and almost bought one of the new Renogy 200ah Pro batteries with the BT and newer BMS. Until I found my real problem was the switch ground wire.
But in getting to this point- I learned a lot about LiFePo4 batteries.
BIG difference in wiring needs between LiFePO4 and AGM/Lead acid batteries. Best i've come up with - What shipped with our campers is 16mm wire which equals 6 AWG. Ok for a 100ah AGM battery. But a LiFePo4 will feed its rated amps 100ah could supply 100amps, 200ah 200amps. you need a battery to bus bar wire that can handle that. Me, id use a 1AWG for a 100ah Lifepo4 and 2/0 (not 2AWG) for a 200. And you'll have room to grow. Get Ancor marine grade or TEMCo marine grade wire, and you'll be good.
ALSO,
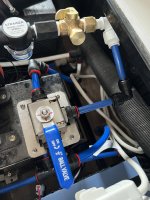
at least on mine, there is no fuse between my AGM batteries and the positive bus bar. Theoretically, each battery should have one to protect the wire (not the battery). Mine are in parallel with separate runs to the +\- bus bars. I guess if yours is in ' daisy chain' style you could use one fuse going to the buses. But i'll need 3. If you go Lifepo, lots of folks recommend using Class T fuses (they don't ARC when they blow as they are encased in silica) and LiFePO4 can feed a lot of current! $50 each for Blue Sea brand (don't buy cheap). I suppose some could say the BMS in a LiFePo4 has a disconnect built in........ meh. i'll do in the T fuse rated for the battery amps and sleep well.
all this leads to another concern. The provided Pos and Negative Bus blocks.... not sure they will take a 1 AWG or better yet a 2/0 wire size?? And if you want to add 3 Class T fuses, One for each battery, with its personal fuse block... now you're adding a bus bar before the one the inverter is going to now. I'm pondering what I want to do here as I would have to add a plate or something for all this to sit on. I don't want that down at floor level with our slide out kitchen and the sink drain hose that if you forget will be dumping water inside that area :/ (ask me how I know that)
So, a bit of a data dump.
all to say, meh, you could just drop in new batteries and fit as big a wire as you can into the existing fuse block and let the BMS in the battery do its thing. cost of some 3' wires pre made and you'll be ok (i'm not an electrician don't call if you burn it down)(and disconnect the solar panels FIRST! Or you'll cook your solar controller- or do it in the middle of the night when it's dark, but for sure, lick the wires first just to be sure there isn't any residual charge up there (see part about i'm not an electrician, these are all jokes
")
But i'd just beef up the whole battery side of the house to NEMA code while you're in there.
Add some 2 pole DC solar disconnect circuit breakers to the front end of your panels while your in there. Then you can easily disconnect them for your battery swap. There's room in there. ours are wired direct into the Solar charge controller. Guess what you have to replace when you disconnect the battery before the panels in the daytime - solar charge controller.
what else - Renogy has a new dual MPPT-/ DC-DC solar & vehicle alternator simultaneous charge controller, just came out this month. I'm going to wire that in and use the truck alternator to charge the camper while driving. 1/0 wire from vehicle to back bumper mount an Andersen plug, plug Andersen from camper into that. find the other end back there under bunk and redirect to the new controller and it will use both solar and your vehicle alternator to charge as you go. or better yet, repurpose that tiny wire they provided going too the hitch Andersen plug as an external solar panel in-wire (cut and crimp MC4 connectors on it so you know what's what, run that wire to your old Adventure Solar controller. then wire a while new 1/0 wire to the back from the hitch, and run that to the new Alternator charge controller (and you'll have no voltage drop on that line from your alternator and the charge controller won't have to work so hard to boost the alternator 13.8 volts to 14.7 that the LiFePo4s want for a charge voltage.
see- easy peazy!
that's it for now
nothing is ever as simple as drop it in is it:/ haha
") just takes a while
just takes a while