OBI Dweller Review and Discussion

BruderMaximus

New member
Does anyone else's Propane/CO detector keep going off, for a propane leak, even though all the windows are open, the system has been vented, and NO PROPANE has been hooked up for a week? I've already changed out the detector for a new one!! I'm about to hit the welding supply and see how I can get CO2 with the same connector so I can purge the system after use. I'm also going to buy another propane detector and if it doesn't sense anything maybe the installed one is tripping on battery off gassing?
never had that problem and i used it to run my Truma heater. no alarms. You sure you don't have a leak, or some issue?
 

BruderMaximus

New member
First trip, nothing exciting went to a private camp ground.

Good drive up, it’s 80 miles or so, back roads, up canyons, real pretty.

Handles great, rode nice at 70, stretch about 4 miles.

I’m happy!

Ac definitely not perfect but I’ll live with it.
You gotta leave the top down and the back in, let the heat out, seal it up and run that AC on high and go for a walk for an hour, then pop the top and back. Only way in texas i've managed to get it cool by bedtime. but once there... it's cold:) just takes a while
 
Last edited:

BruderMaximus

New member
New here, but thank you to all who contribute, it's been a great resource in finding my way round my D13.

Added some useful items photos attached.

Molle panel on the tool box for rec boards.

Hitch receiver for bike rack

Moved propane tank to fit gas can holder

Added a Starlink, didn’t want to drill roof so used the excess thread on the awning bolts and attached a steel Z bracket. (For stationery use only)

I have an Anderson plug at the back of my truck, I spoke to an auto electrician who told me I can connect the Anderson plug on my D13 direct to my truck to charge my batteries while driving. Want to dbl check this before I do it, has anyone did this ? Any problems ?
Where did you get that jerry can mount!??
 

Josh00333

Member
I don't know you're system, so with a grain of salt:

I have the 3 100ah AGM batteries. I've been troubleshooting a DC switch panel issue (bad ground inside one of my DC panel switches by the door- there's a lot of good stuff in our campers, but those DC on off switches lights, plugs, water pump... are kinda crappy inside)

but until i suckled in the bad ground contact inside the switch, I thought I had a bad battery cell. So spent much time and almost bought one of the new Renogy 200ah Pro batteries with the BT and newer BMS. Until I found my real problem was the switch ground wire.

But in getting to this point- I learned a lot about LiFePo4 batteries.

BIG difference in wiring needs between LiFePO4 and AGM/Lead acid batteries. Best i've come up with - What shipped with our campers is 16mm wire which equals 6 AWG. Ok for a 100ah AGM battery. But a LiFePo4 will feed its rated amps 100ah could supply 100amps, 200ah 200amps. you need a battery to bus bar wire that can handle that. Me, id use a 1AWG for a 100ah Lifepo4 and 2/0 (not 2AWG) for a 200. And you'll have room to grow. Get Ancor marine grade or TEMCo marine grade wire, and you'll be good.

ALSO,

at least on mine, there is no fuse between my AGM batteries and the positive bus bar. Theoretically, each battery should have one to protect the wire (not the battery). Mine are in parallel with separate runs to the +\- bus bars. I guess if yours is in ' daisy chain' style you could use one fuse going to the buses. But i'll need 3. If you go Lifepo, lots of folks recommend using Class T fuses (they don't ARC when they blow as they are encased in silica) and LiFePO4 can feed a lot of current! $50 each for Blue Sea brand (don't buy cheap). I suppose some could say the BMS in a LiFePo4 has a disconnect built in........ meh. i'll do in the T fuse rated for the battery amps and sleep well.

all this leads to another concern. The provided Pos and Negative Bus blocks.... not sure they will take a 1 AWG or better yet a 2/0 wire size?? And if you want to add 3 Class T fuses, One for each battery, with its personal fuse block... now you're adding a bus bar before the one the inverter is going to now. I'm pondering what I want to do here as I would have to add a plate or something for all this to sit on. I don't want that down at floor level with our slide out kitchen and the sink drain hose that if you forget will be dumping water inside that area :/ (ask me how I know that)

So, a bit of a data dump.

all to say, meh, you could just drop in new batteries and fit as big a wire as you can into the existing fuse block and let the BMS in the battery do its thing. cost of some 3' wires pre made and you'll be ok (i'm not an electrician don't call if you burn it down)(and disconnect the solar panels FIRST! Or you'll cook your solar controller- or do it in the middle of the night when it's dark, but for sure, lick the wires first just to be sure there isn't any residual charge up there (see part about i'm not an electrician, these are all jokes;)

But i'd just beef up the whole battery side of the house to NEMA code while you're in there.

Add some 2 pole DC solar disconnect circuit breakers to the front end of your panels while your in there. Then you can easily disconnect them for your battery swap. There's room in there. ours are wired direct into the Solar charge controller. Guess what you have to replace when you disconnect the battery before the panels in the daytime - solar charge controller.

what else - Renogy has a new dual MPPT-/ DC-DC solar & vehicle alternator simultaneous charge controller, just came out this month. I'm going to wire that in and use the truck alternator to charge the camper while driving. 1/0 wire from vehicle to back bumper mount an Andersen plug, plug Andersen from camper into that. find the other end back there under bunk and redirect to the new controller and it will use both solar and your vehicle alternator to charge as you go. or better yet, repurpose that tiny wire they provided going too the hitch Andersen plug as an external solar panel in-wire (cut and crimp MC4 connectors on it so you know what's what, run that wire to your old Adventure Solar controller. then wire a while new 1/0 wire to the back from the hitch, and run that to the new Alternator charge controller (and you'll have no voltage drop on that line from your alternator and the charge controller won't have to work so hard to boost the alternator 13.8 volts to 14.7 that the LiFePo4s want for a charge voltage. ;)

see- easy peazy!

that's it for now

nothing is ever as simple as drop it in is it:/ haha
My system is what every came factory from the Gen 1 D13's.

Sounds like drop in, but upgrade the battery cables, basically?

I won't add a DC charger from the truck.
 

BruderMaximus

New member
From what i've read, make sure the cables size are matched to the max amps your battery of choice can provide. And then the guy who runs this expedition portal has a channel and highly recommends in line fuses between batteries and bus bar. But I suppose modern BMS's will shut the battery down on a short circuit. I think the thing to check is what size wire will fit in the existing bus bar connection where the 16mm wires that came with our batteries goes now. i'm not seeing a lot of room to go bigger in those three holes on the bottom of the bus. But maybe. We might be stuck needing a new bus bar for + and - that can take a 1 AWG or so wire. I haven't gotten that far yet in planning my upgrade so don't know. Food for thought.
 

landy66

New member
If I wanted to do this what do I “have” todo to swap them?

Are they direct drop in, charger settings on the existing system?

I don’t really want to get into a full system change.
Batteries were 'drop-in' .. and then you have to re-program the Renogy Inverter ... which was pretty simple ... ROA had a blog post about the exact settings:


The batteries I used:

 
Last edited:

landy66

New member
I took some fingernail polish and painted a line around it.
also, what not to do, NEVER jack up our campers with the ARK HD lifting stabilizers (i bought and added them myself-a must have IMHO (get the short 25" and use blocks, not the 33" ones)
UNLESS the jack/stabilizer is straight down. i thought i could get away with it a little bit at 45deg setting, survey says XXX. i had to pull it, tear it down, pull the pins, throw them in a vice and straighten them. They really did mean it when they said, don't do that.
what the heck is 'fingernail polish'? What aisle at Home Depot? :)
 

landy66

New member
Another Important thing I learned the hard way ....
My D13 has a front and rear tank for water.
Front meaning closest to the hitch
I had both filled up and shot off to the amazing deserts of Moab
Eventually my Front tank went empty.
Ok I thought .. so just use that lever under the bed to switch to the other tank ...
Water pump ... making all sorts of noise
No water coming out of faucets
:(
Next morning called ROA support - long story short .. don't let your tank run empty .. air will get in the system .. and needs to be bled out ..
But how?
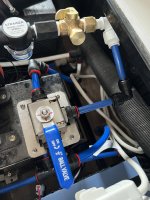
No easy way to do it .. unless you install a 3-way valve btw pump and water sources...
ROA sent me the valve .. and I sourced some PEX pipes/fittings.... inserted it between the pump and tanks ... then got a hand pump from an RV shop.. this connects to the 3-way valve and the other end goes into a bucket of water.
Now I can force water (or even winter antifreeze) through the system ... flushing out any air in the pipes that causes problems with the water pump ...
I think this should have been built-in from the get-go but alas no....
 

Attachments

  • IMG_2139.JPG
    IMG_2139.JPG
    1.8 MB · Views: 26
Last edited:

CowboyKyle

Active member
Another Important thing I learned the hard way ....
My D13 has a front and rear tank for water.
Front meaning closest to the hitch
I had both filled up and shot off to the amazing deserts of Moab
Eventually my Front tank went empty.
Ok I thought .. so just use that lever under the bed to switch to the other tank ...
Water pump ... making all sorts of noise
No water coming out of faucets
:(
Next morning called ROA support - long story short .. don't let your tank run empty .. air will get in the system .. and needs to be bled out ..
But how?
No easy way to do it .. unless you install a 3-way valve btw pump and water sources...
ROA sent me the valve .. and I sourced some PEX pipes/fittings.... inserted it between the pump and tanks ... then got a hand pump from an RV shop.. this connects to the 3-way valve and the other end goes into a bucket of water.
Now I can force water (or even winter antifreeze) through the system ... flushing out any air in the pipes that causes problems with the water pump ...
I think this should have been built-in from the get-go but alas no....
I would suggest two things to you:

1) you were told incorrectly

2) you may have other issues

I have ran both tanks completely dry numerous times and have never had an issue. Nothing needs to be bled. The pump simply starts sucking air. Move lever to other tank, and it starts sucking water. Also bonus tip: if you're gonna be using both tanks, pull from the rear tank first. It helps maintain proper tongue weight.
 

landy66

New member
Hey I'm just reporting my experience as it happened to me -
I would suggest two things to you:

1) you were told incorrectly

2) you may have other issues

I have ran both tanks completely dry numerous times and have never had an issue. Nothing needs to be bled. The pump simply starts sucking air. Move lever to other tank, and it starts sucking water. Also bonus tip: if you're gonna be using both tanks, pull from the rear tank first. It helps maintain proper tongue weight.
Hey I'm just reporting my experience ... maybe you are lucky with the tank switches but I certainly was not . These self priming pumps are only rated for a certain distance between pump and source ... so the distance between front/rear tanks on the Dweller might be an issue. Anyway, what I documented here is FACT. It happened. One tank empty, the other full .. pump not able to pick up. Maybe you have been lucky so far...
In any event, adding this 3way connector, even if you haven't experienced problems like mine, is an easy way to 'winterize' your Dweller with that pink anti-freeze fluid...
 

CowboyKyle

Active member
Hey I'm just reporting my experience as it happened to me -

Hey I'm just reporting my experience ... maybe you are lucky with the tank switches but I certainly was not . These self priming pumps are only rated for a certain distance between pump and source ... so the distance between front/rear tanks on the Dweller might be an issue. Anyway, what I documented here is FACT. It happened. One tank empty, the other full .. pump not able to pick up. Maybe you have been lucky so far...
In any event, adding this 3way connector, even if you haven't experienced problems like mine, is an easy way to 'winterize' your Dweller with that pink anti-freeze fluid...
Are you suggesting it's more likely that I "continue" to "get lucky" than it is there are other issues in your trailer?
 

landy66

New member
Are you suggesting it's more likely that I "continue" to "get lucky" than it is there are other issues in your trailer?
I'm not suggesting anything .. just reporting my experience (and solution) in case anyone else runs into it ... I'm not the only one to experience this either - it's a known thing .. not sure it's a common thing though ...
That there may be other issues in my trailer I have absolutely no doubt :)
At any rate, the modification also serves as a great way to quickly winterize the trailer ....
 

WillySwan

Well-known member
Eventually my Front tank went empty.
Ok I thought .. so just use that lever under the bed to switch to the other tank ...
Water pump ... making all sorts of noise
No water coming out of faucets
I purchased my D13 in 2021. I've winterized and de-winterized for three seasons now. In addition, I have run the tanks dry on several occasions. It took a few times for me to get the hang of priming the water system. My D13 came with a Seaflo 42 series pump. I think that is what they are still using. These are self priming diaphragm pumps.

In my experience, the key to priming the pump is to crack open a faucet when doing the priming. If I don't open a faucet, the pump will run non-stop as you mention and never prime itself. Sometimes I find it works better to alternate between opening and closing the faucet as the pump is priming. Your mileage may vary, but this has always worked for me.
 
Last edited:

Forum statistics

Threads
188,337
Messages
2,905,701
Members
229,959
Latest member
bdpkauai
Top