You are using an out of date browser. It may not display this or other websites correctly.
You should upgrade or use an alternative browser.
You should upgrade or use an alternative browser.
Pre birth of a camper - No laughing!
- Thread starter ianc
- Start date
Anton2k3
Adventurer
600mm I think would be fine. Ours is around 450mm and is a little bit of a squeeze if two people are passing. That said, we wanted a seating area that could seat 4, so the corridor size fixed. Cutting and re-welding in situ would make a right mess of the floor panels no? My vote is to leave it as is!
Looking forward to the pics when you get a chance.
Looking forward to the pics when you get a chance.
Some pictures. Looking at them makes me feel like I've got very little done in the week+ off work.
A big problem I've encountered is the patch I mentioned in post #196. The Sikaflex didn't "wet" to the polypropylene tank and it came away. Lucky I spotted this before locking the tanks in forever. I now need to find an alternative. The tank maker is suggesting gorilla glue from Wurth plus lots of self tap screws. I'll try to source tomorrow.
I got the floor cut out at test positioned to get a sense of where I need to position stuff and drill holes etc.
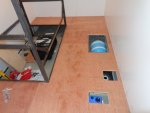
View towards the cab
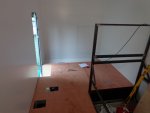
View to the rear. The raised floor only extends to within 750mm of the rear wall. That space at the end will have bunks in it for the short term but will be convertible to take a motorbike.
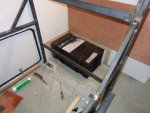
This is the under floor Dometic Aircon/Heat Exchanger being positioned for the floor cut outs.
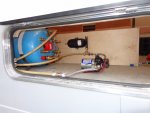
I also fitted another hatch. This one went in a lot easier due to the size. This will give access to the plumbing etc.
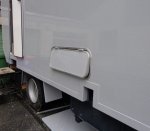
We had torrential rain while I was away and there is definitely a roof leak plus the larger hatch is not sealing completely. I'll need to do some "adjusting" on one of the hinges. The roof leak will need the box guys to come out and sort.
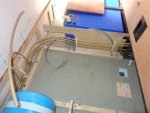
I also got started on the plumbing:
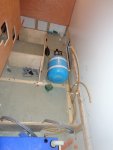
This weekend has been artic cold (for Ireland) which made working with the plastic piping a real PIA. Normally its reasonably flexible, but today it was like a steel spring returning to the coil shape it was shipped in.
A big problem I've encountered is the patch I mentioned in post #196. The Sikaflex didn't "wet" to the polypropylene tank and it came away. Lucky I spotted this before locking the tanks in forever. I now need to find an alternative. The tank maker is suggesting gorilla glue from Wurth plus lots of self tap screws. I'll try to source tomorrow.
I got the floor cut out at test positioned to get a sense of where I need to position stuff and drill holes etc.

View towards the cab

View to the rear. The raised floor only extends to within 750mm of the rear wall. That space at the end will have bunks in it for the short term but will be convertible to take a motorbike.

This is the under floor Dometic Aircon/Heat Exchanger being positioned for the floor cut outs.
I also fitted another hatch. This one went in a lot easier due to the size. This will give access to the plumbing etc.

We had torrential rain while I was away and there is definitely a roof leak plus the larger hatch is not sealing completely. I'll need to do some "adjusting" on one of the hinges. The roof leak will need the box guys to come out and sort.
I also got started on the plumbing:


This weekend has been artic cold (for Ireland) which made working with the plastic piping a real PIA. Normally its reasonably flexible, but today it was like a steel spring returning to the coil shape it was shipped in.
Last edited:
Re the polypropylene tank patch, unfortunatly I do not believe you will find an adhesive that will stick long term. I had a polypropylene black tank that split along the seam and I tried all types of 'glues' that 'would' do the job, but none did. The nearest I found was a two pack adhesive used to repair car bumpers from the USA but this also failed. Eventually I had to strip out the tank and replace it with an aluminium one. The reason nothing sticks to it is because polypropylene is an oil based product. You have two options. 1, get the tank welded or 2, make a bung with a rubber seal that compresses. Sorry to be the bearer of bad news but it took me 4 months and a lot of frustration before I realised I had to take out my failed tank. I did try having it welded but for me this also did not work
I also sorted the steps problem. I bought one of these 5 step scissors units (AS25) http://www.crbrophy.com/stairs.html from East End Campers (http://www.eastendcampers.com/index.php) They're shipping them to NY and I'll pick them up when I'm over on business next week! Thanks to mmartin for suggesting.
nick disjunkt
Adventurer
I had a similar problem getting Sika 221 to bond a shower tray to a plywood base. No ammount of cleaning or surface prep did anything. After several experiments, I worked out that wiping the plastic down with Sika 205 cleaner, and priming it with 210 activator, allowed the 221 to form a reasonable bond. The bond could still be pryed apart using a chisel but it was enough for the application I had.
Glad to see you're making progress despite the new job. Sounds fairly high flying tho, what do you do?
Re the hatches, did you re-use the cut out sections of side wall as the hatch doors or something else, looks neat...
I'm involved in Systems Integration consulting (aka building big IT applications for big clients!)
I haven't used the wall sections for the hatches to date because the wall material is about 60mm thick and the hatch frames are only really set-up for 30-35mm material. I had an additional 35mm panel made up to be used for the hatches. I have one big hatch to do (the panorama window) and I will try to do it using the wall material. Here's the hatch cross sections:

One other thing I'd appreciate advice on.
I have a two coil hot water tank which I'm going to connect like so:
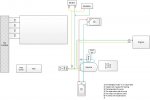
Basically two independent heating circuits 1) Teed off the engine cooling system and heating water only and 2) Driven by the Diesel water heater which heats both water (via second coil) and radiators.
My question is: How do I deal with topping up/expansion & contraction of the second circuit? Would putting a single pipe between the circuits work?
BTW - Snowing this evening, so not conducive to the van building lark
I have a two coil hot water tank which I'm going to connect like so:

Basically two independent heating circuits 1) Teed off the engine cooling system and heating water only and 2) Driven by the Diesel water heater which heats both water (via second coil) and radiators.
My question is: How do I deal with topping up/expansion & contraction of the second circuit? Would putting a single pipe between the circuits work?
BTW - Snowing this evening, so not conducive to the van building lark
Anton2k3
Adventurer
I think you'll need an expansion tank of some sort on the system. having rubber pipes may take up some of the expansion, but not sure if it will be enough. I t'd in an expansion tank from a VW passat (or something like that). It doesn't need to be in series.
Not going to go down the single heating circuit route with change over valves?
Not going to go down the single heating circuit route with change over valves?
andylod
Tea Drinker :-)
One other thing I'd appreciate advice on.
I have a two coil hot water tank which I'm going to connect like so:
View attachment 149125
Basically two independent heating circuits 1) Teed off the engine cooling system and heating water only and 2) Driven by the Diesel water heater which heats both water (via second coil) and radiators.
My question is: How do I deal with topping up/expansion & contraction of the second circuit? Would putting a single pipe between the circuits work?
BTW - Snowing this evening, so not conducive to the van building lark
joining the 2 circuits together could cause all sorts of problems with pump flow direction and bleeding the circuits.
I would suggest a small accumulator/expansion vessel (1 or 2 litre) and a filling loop and gauge. This would enable you to fill and top up the circuit from your cold water feed. This is the same as a sealed circuit in a domestic system. Filling to 1bar should be sufficient so you can vent the air from the highest point (radiator). The diesel heater should have some notes on whether you need an additive in the water (inhibitor or even anti freeze). You will also need a pressure relief valve vented to outside (say 3bar)
All this equipment is readily available from domestic plumbers merchants. This could be mounted anywhere on the system and at any height.
A simple header tank from a car could work as Anton says, but it will need to be mounted higher than the radiator. The header tank cap is also the pressure release valve so it would need to mounted with that in mind.
Hope this helps
Andy
Last edited:
docka
Adventurer
I'm involved in Systems Integration consulting (aka building big IT applications for big clients!)
I haven't used the wall sections for the hatches to date because the wall material is about 60mm thick and the hatch frames are only really set-up for 30-35mm material. I had an additional 35mm panel made up to be used for the hatches. I have one big hatch to do (the panorama window) and I will try to do it using the wall material. Here's the hatch cross sections:
View attachment 149121
Sounds like an interesting job, good luck in NY.
That hatch system looks good, hope you get it sealed ok.
Good old maritime climate lets you test your fittings before you disappear into the outback for real.
Sorry I've nowt more constructive to add. Thanks for the updates.
I went for the two separate water circuits with filling loop and expansion vessel - Thanks Andy for the advice.
I've still to source the small expansion vessel and the electric valve has yet to arrive but everything else around the calorifier is pretty well done.
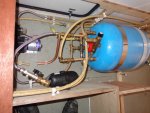
It looks neater in real life. Honest!
I've used PVC piping (Qualplex brand) and compression connectors because I believe this will be the most rugged (no vibration fractures) and easiest to fix if there is a problem. The only thing to be careful of is the size - We still use 1/2" rather than 15mm in the UK an the rest of Europe. So I'll need to bring some spare when travelling.

Here's where I branched into the engine cooling system. I was worried there wouldn't be a strong enough flow to get to the calorifier in the back, but as long as the engine is revving a little( >1500) it works fine.
Again - everything takes longer than you think (I think).
I've still to source the small expansion vessel and the electric valve has yet to arrive but everything else around the calorifier is pretty well done.

It looks neater in real life. Honest!

I've used PVC piping (Qualplex brand) and compression connectors because I believe this will be the most rugged (no vibration fractures) and easiest to fix if there is a problem. The only thing to be careful of is the size - We still use 1/2" rather than 15mm in the UK an the rest of Europe. So I'll need to bring some spare when travelling.

Here's where I branched into the engine cooling system. I was worried there wouldn't be a strong enough flow to get to the calorifier in the back, but as long as the engine is revving a little( >1500) it works fine.
Again - everything takes longer than you think (I think).
Similar threads
- Replies
- 6
- Views
- 2K
- Replies
- 3
- Views
- 1K
- Replies
- 6
- Views
- 1K
- Replies
- 4
- Views
- 1K
