Prepping a defender 130 for around the world..

The Rover Shop

Explorer
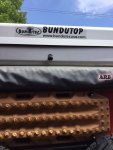
Designed a custom aluminum box for the top of the truck where the rooftop tent WAS.. This will be used to store light stuff, such as extra clothes etc, hammocks,smoke spares etc etc.. Want to try and keep the heavier stuff down low as possible,.the box is also there to provide protection for the expensive aluminum bundu tech tent.. So it's slightly taller and slightly wider.. This way anything like low lying tree branches etc hit the box first.. I also made the front angled to keep in line with the aerodynamics of the defender...lol.. Bush cables or limb risers are on order and will be attached to the front edge of the box, I had the exposed edges reinforced as well as two strengthening bars on the inside so that we can stand on top of it also..
image.jpg

image.jpg

image.jpg

Now I just have to have a hinged lid made to suit..
 

The Rover Shop

Explorer
Wireless Bluetooth Reverse camera is linked into our new garmin GPS system screen.. Comes on automatically when you select reverse but I will have a manual switch to override also..
View attachment 296315

GPS screen is mounted to the overhead console but is on a ram mount setup so it can be folded flat against the console..or angled for co pilot, or removed very easily for entering waypoints etc..
image.jpg

image.jpg
 

Attachments

  • image.jpg
    image.jpg
    408.5 KB · Views: 68
Last edited:

Jakeleverett

Adventurer
God it's beautiful. A little bulky in my opinion, but I also am not traveling in dangerous parts of the world, so I'm sure its perfect! It will be fantastic to see this thing out on the trail!
 

Scrapdaddy

Adventurer
Very nice! Wanted to ask you about your plan for accessing the roof storage bin. I've been thinking of putting storage behind the Bundutop, so I could climb up a ladder in back or the tailgate ( FJ55 ). I like your idea of protection with the storage bin in front.
 

The Rover Shop

Explorer
Yeah, the old girl is going to be a bit on the bulky side.. But you can't make an omelette without breaking some eggs.. So far I have had 2 people run into me in parking lots.. Took a little piece of the reflective tape on the bottom off my truck..
image.jpg

But did a little bit more damage to his..lol..

image.jpg

Of course the owner of the truck didn't say a word to me but some other people saw it happen and pointed it out to me..:)

So hopefully if it can escape the moron drivers in south Florida, the jungles of Africa etc should be good to go..at least trees etc are usually stationary..:)
 
Last edited:

The Rover Shop

Explorer
Trying to keep this truck as externally uncluttered as possible so decided to use the right side of the truck as a tool board,, keeping the heavier stuff such as the hi-lift, pull-pal and tirfor as low as possible and the lighter stuff such as the straps and ropes towards the top.. Here we have the basic recovery necessities easily on hand... Not that I plan on getting stuck much...lol.. Once I have everything situated and mounted where I think it is best the whole lot will come apart and be sealed and painted... May even go over the top and make it a shadow board..give the wifey something to do.:)

image.jpg

But it's also lit by recessed LED lighting strips..

image.jpg
 
Last edited:

The Rover Shop

Explorer
Now according to my wife I have a high power light obsession.. Driving long open expanses of deserted roads I like to be able to see what's coming at me.... So spread lighting as well as long distance lights are important to me. So for the headlights I installed the trucklites.. These are really great lights. On the front bumper I have the terrafirma 9" hid lights..these are really bright and long distance throw, but as with hid lights they are not instantaneous, but do light off pretty quickly.. To satisfy the need for spread high lighting I installed the 52" curved LED light bar above the windscreen... And holy cow that thing throws some good useable light... Perfect for bush driving as well... Now for flood lighting in the front I have been watching the ARB intensity lights and their knockoffs... Just about to buy one (for the centre of the bumper) when the Godzilla of lights was found.. It's the same as the arb intensity but 30% more LEDs.. Giving it a stated wattage of 225 watts, over 20,000 lumens...as opposed to the under 100 of the others.. And I must say...holy **** that thing is bright..and instant. I only mounted one and I can't imagine how TOO bright 2 would be... It comes as a spot light but also comes with a diffuser cover that turns it into a flood light, and it does a pretty good job at doing that..

image.jpg

image.jpg

image.jpg
 

The Rover Shop

Explorer
Now I know that some people are going to say that it blocks too much flow into the radiator for cooling.. IF that is the case the centre one is very easily remove able and is on a quick disconnect plug.. I am also upgrading the cooling and interoolong system also and it should be fine..:).. But thanks for your concern.. I also installed a SDO front protection grille which allows lots more air flow as well..
 

The Rover Shop

Explorer
Also found online a set of LED running light /turn signal light combination lights that install right into the ARB bumper.. Coupled with the stock location LED parking/turn signal light kit I installed it's definitely high viz....
 

The Rover Shop

Explorer
For campsite and four wheeling lighting I installed some rectangular led lights on the sides as well as 2 rear facing rigid lights, the rear facing ones are switched on with reverse as well as being able to be switched on independently from the centre console. I also have a remote control system which switches all upper perimeter lights on at once.. I call it my zombie mode..while in the roof top tent it's nice to be able to remotely illuminate the complete surrounding areas of your truck at the push of a button..

image.jpg

These side ones actually are mounted so that you can pivot them around to almost face directly forward...juuuuust I case I need extra forward facing light..:) or in the event of losing front lights..

image.jpg
 
Last edited:

nathanwind

Observer
Now I know that some people are going to say that it blocks too much flow into the radiator for cooling.. IF that is the case the centre one is very easily remove able and is on a quick disconnect plug.. I am also upgrading the cooling and interoolong system also and it should be fine..:).. But thanks for your concern.. I also installed a SDO front protection grille which allows lots more air flow as well..

I was more going to say you're covered up a work of art in that front grille hiding behind those lights :).
 

The Rover Shop

Explorer
Lol.. I bought that grill not only for its outstanding good looks and it's improved air flow, but also for its high level of inter cooler and radiator protection.. Also it is very easy to add a wading blanket and bug screen to.. It's the ultimate over landing grille..for doers as well as poseurs..:)
For those of you who don't know...the front grille is made by a company called Series and Defender Outfitters (www.seriesdefender.com ) and is of absolutely the highest quality. They have some really great products for these trucks..Both in looks as well as protection/performance... It only takes one stray branch through your radiator to realize just how important it is to have something beefy there, well worth every penny. And since it's flat in its design it's very easy to add clips to secure a wading blanket or bug screen to.. Everything from Florida love bugs to the Australian outback flies and spinifex seeds..or even locust swarms in Africa.. And then of course the installation of the radiator muff for extreme cold weather or deep water wading..
 
Last edited:

The Rover Shop

Explorer
I was so happy with my solar panel setup on our other build that I decided to do it again but with built in redundancy. This time I used 2 solar panels wired together in parallel, this way if one panel gets broken I don't lose solar capabilities all together.. Not wanting to drill through the top of the roof tent I made a framework out of aluminum angle and pop riveted the solar panels to this framework on the roof, this way I can remove/replace the panels by removing the pop rivets and they simply come out of the framework.. I adhered the framework to the roof with 5200 adhesive sealant, I think the whole roof will come off before the panels do.. Unfortunately this design requires me to have to run the wiring through the roof to allow the roof to be able to go up and down and still have the panels connected.. So I will be running the wires through the inside and into the roof power source which then feeds the solar control panel and the batteries.

image.jpg
 

The Rover Shop

Explorer
The vehicle box has a separate rear door where the propane cylinder used to be stored, I robbed some of that space for the rear tool compartment and since I am only running a smaller propane cylinder I sectioned off a smaller compartment, this is sealed off from the truck I terior itself just in case the cylinder etc develops a leak it will vent to the outside of the truck through the door vent instead of into the interior.. The top is removable so if and when I need to remove it the top simply unscrews and the cylinder lifts out of its securing brackets.i finished up with exactly the right space to store our portable barbecue grill, we use that grill a lot when on the road especially in areas where campfires aren't permitted....

image.jpg

image.jpg
 
Last edited:

Forum statistics

Threads
188,496
Messages
2,905,754
Members
230,501
Latest member
Sophia Lopez
Top