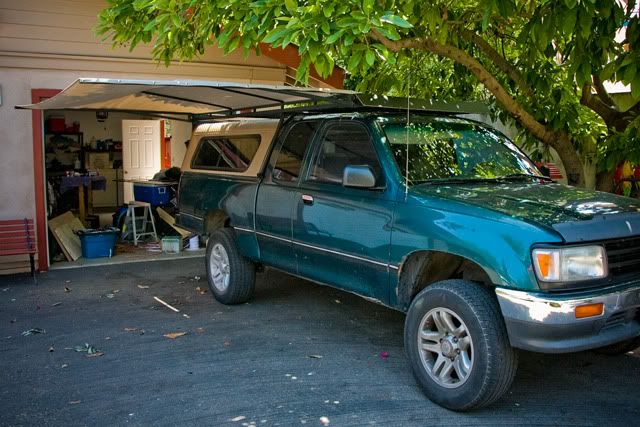
Project T100: "Baja Explorer Ver. 2"

G100

Adventurer
Rack build moving along but slowly

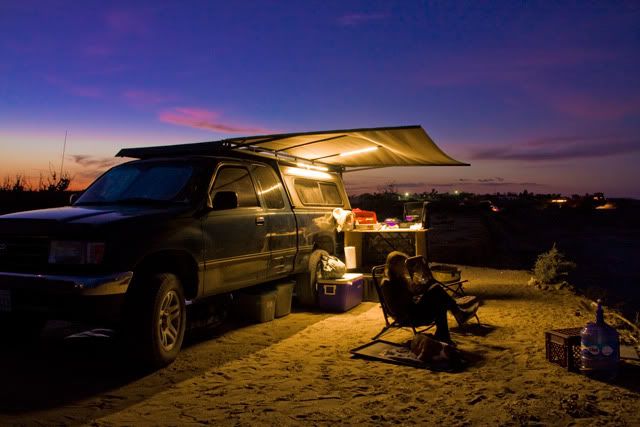
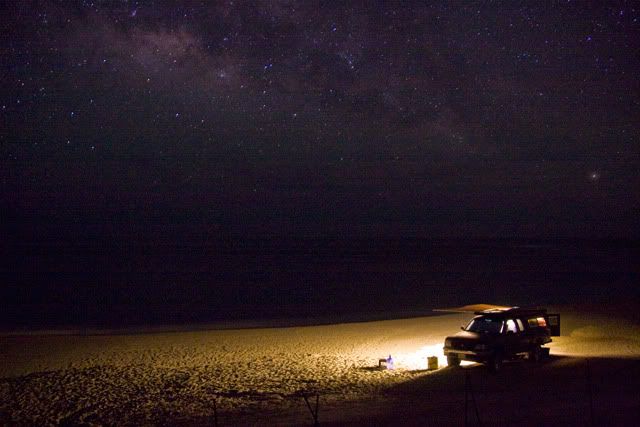
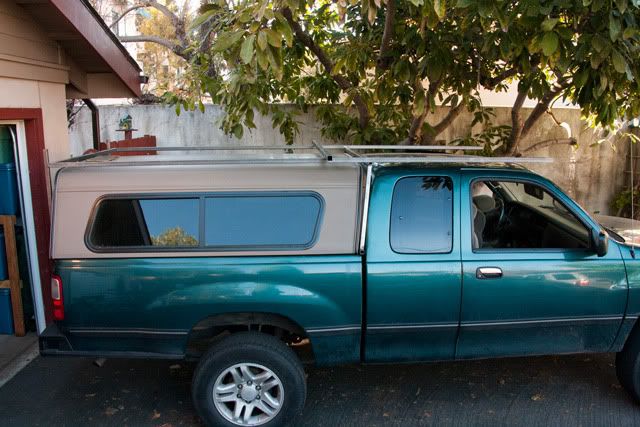
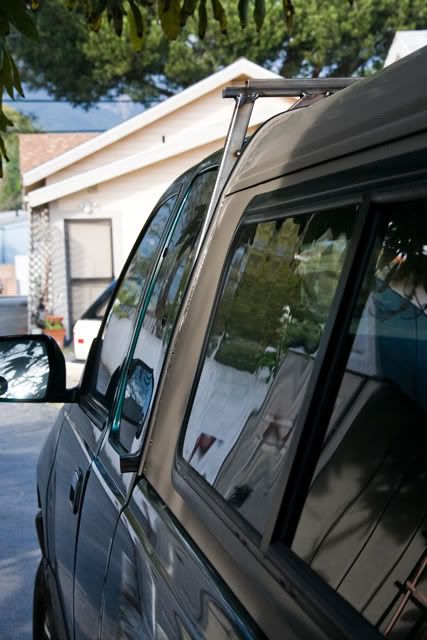
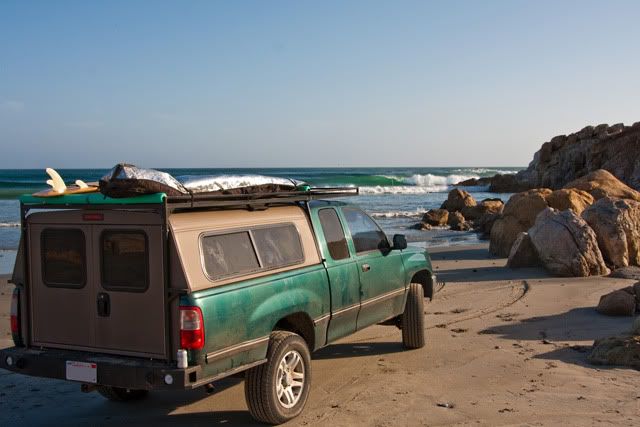
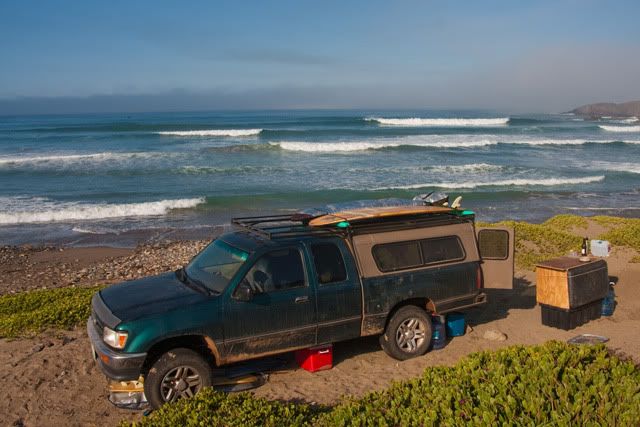
Thanks for all input guys, I have been working on this project a lot slower than I would like, but now I have a deadline so hopefully I will speed things up a little. I plan on going down to baja for a week at the end march and I want the rack to come with me, its going to be tough so we'll see.
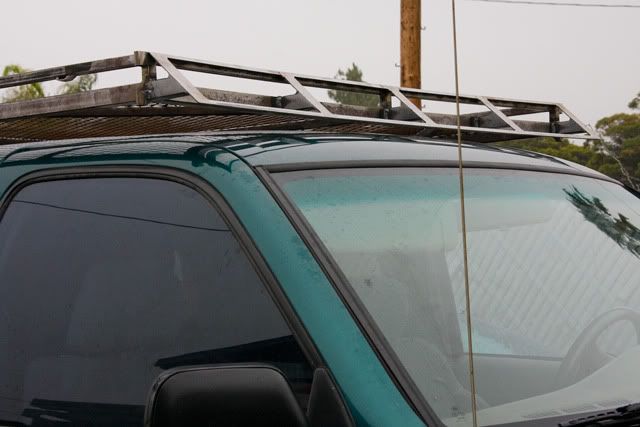
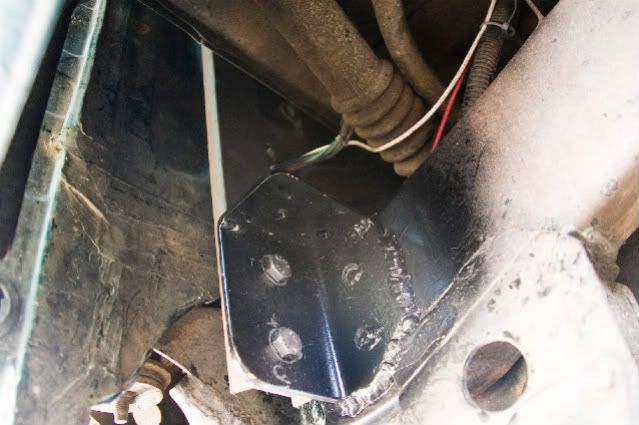
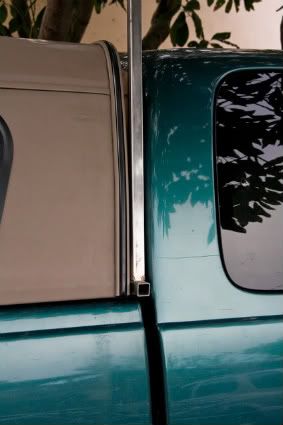
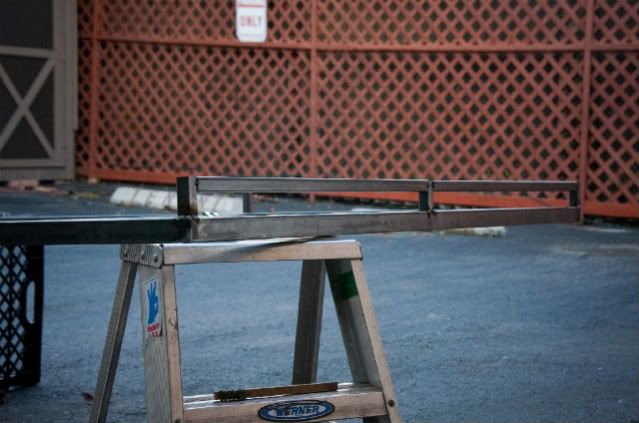
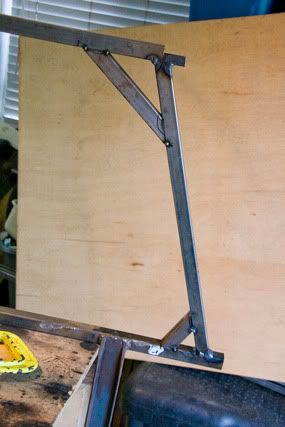
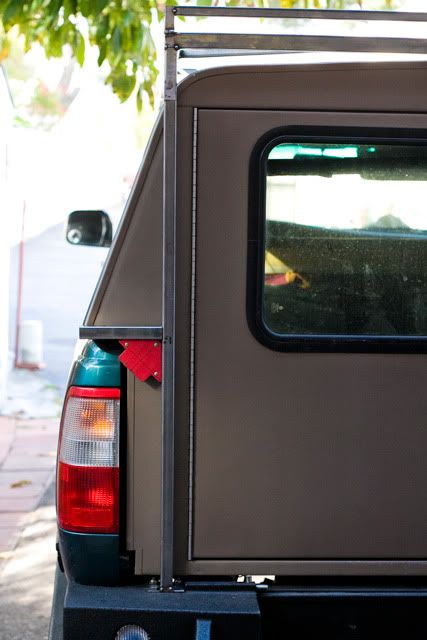
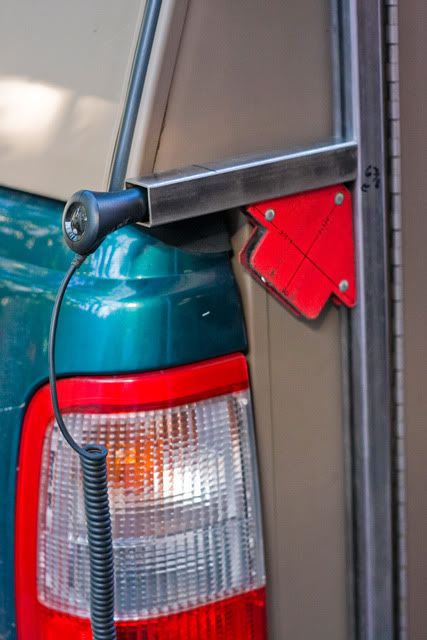
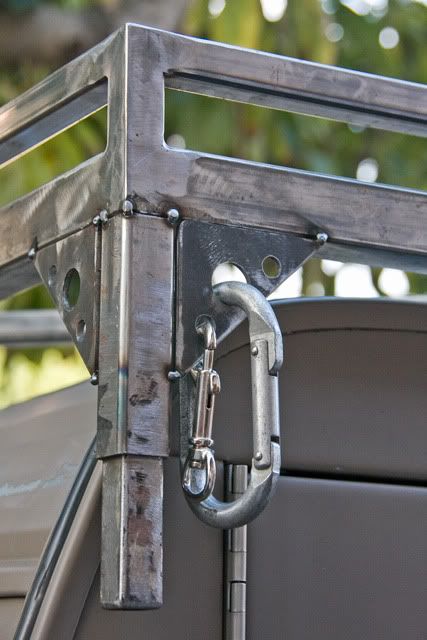
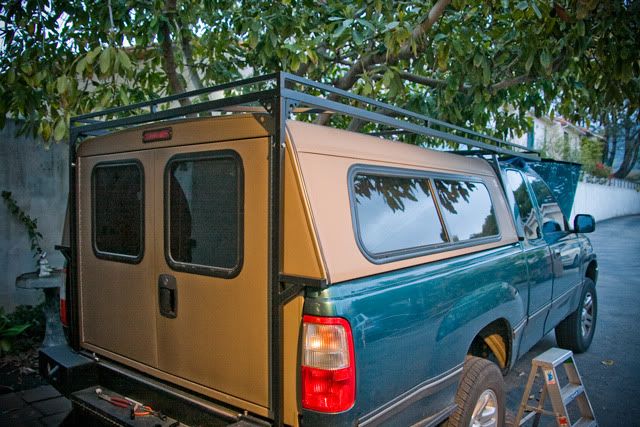
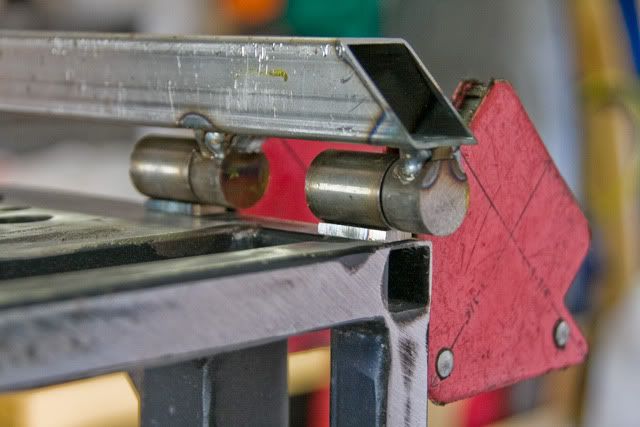
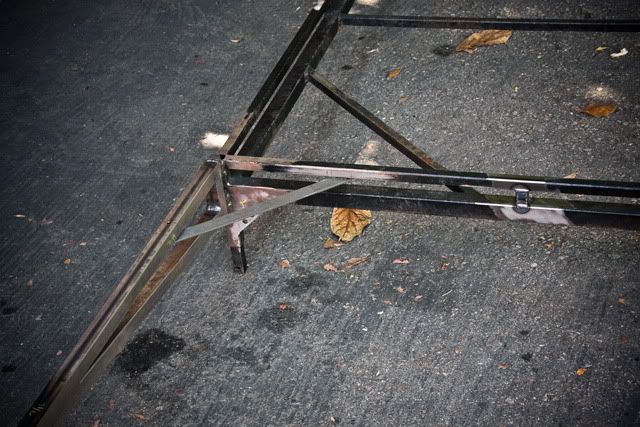
So I did end up welding on the frame bracket, it went pretty smooth, it was a difficult space to get to but I think it will hold up just fine. Here is a shot of the end result.
Rack16-1.jpg


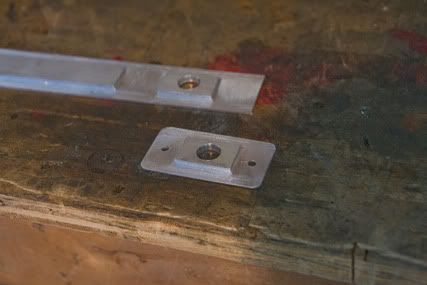
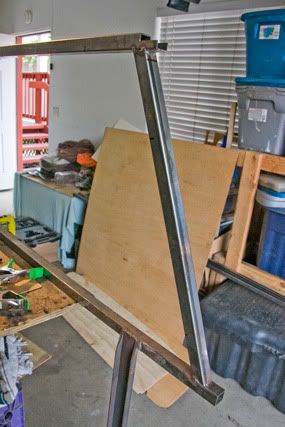
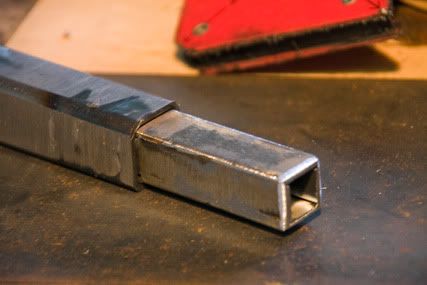
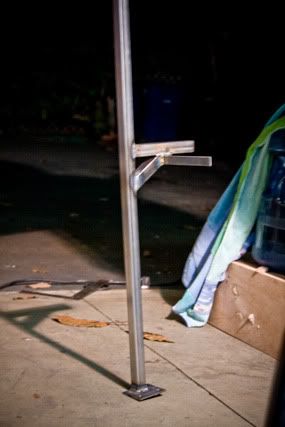
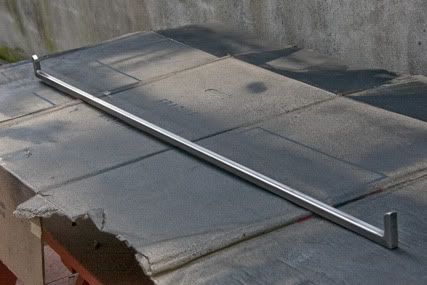
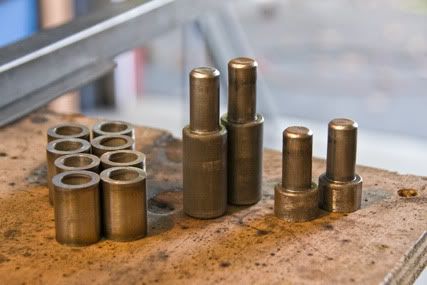
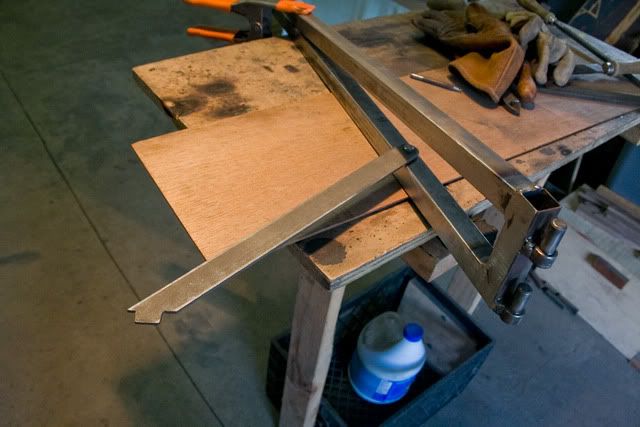
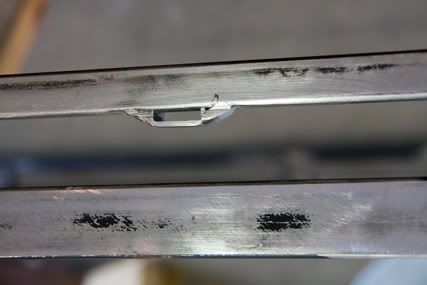
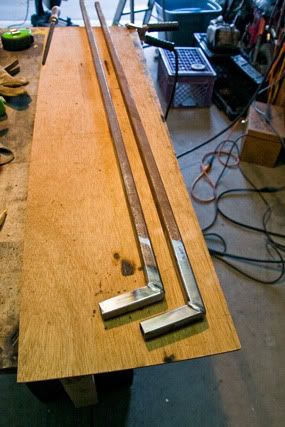
Getting the compound angles cut right on the uprights took some time and a lot of trial and error.
Rack08.jpg
Rack09-1.jpg


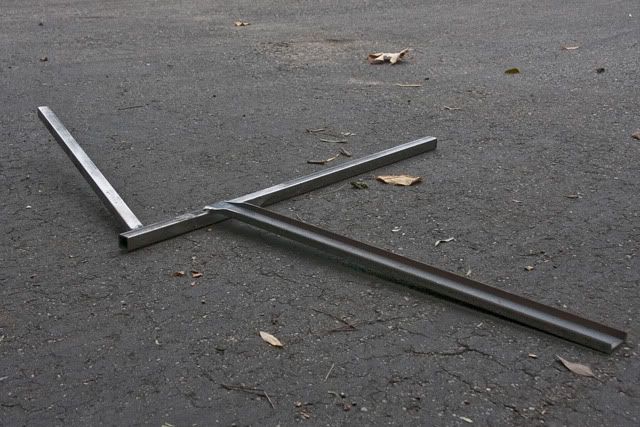
I am hoping that things should move a lot faster now that most of the cuts will be 90s or 45s.
Rack15.jpg


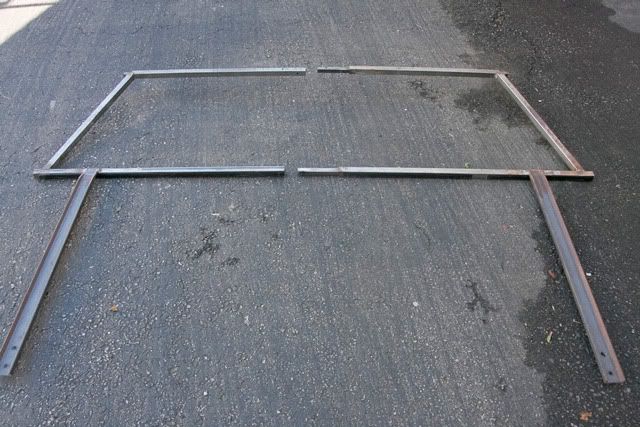
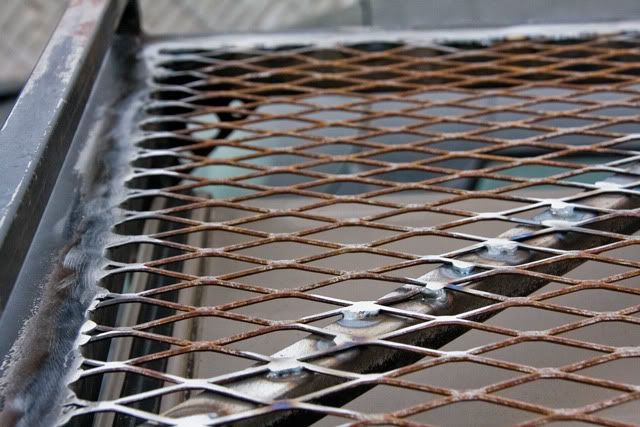
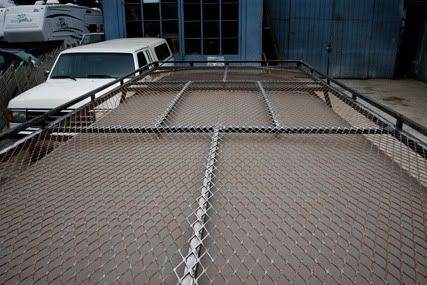
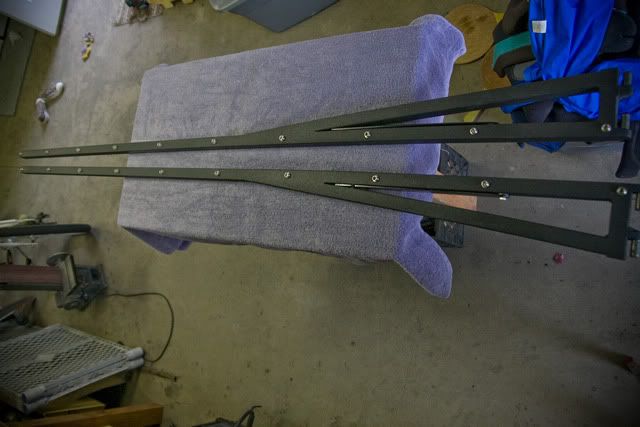
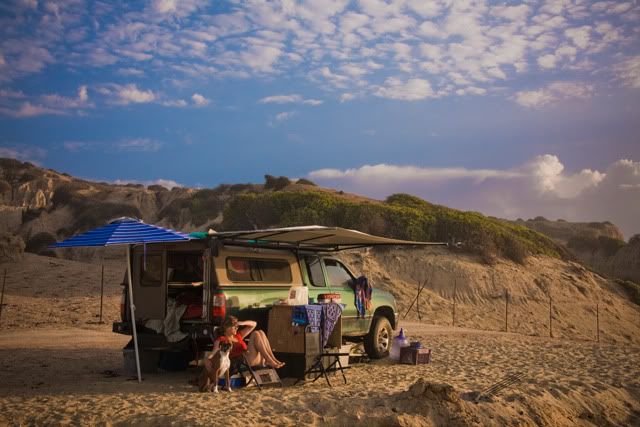
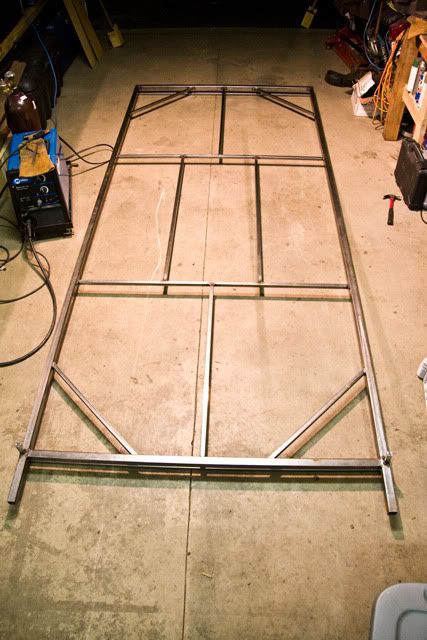
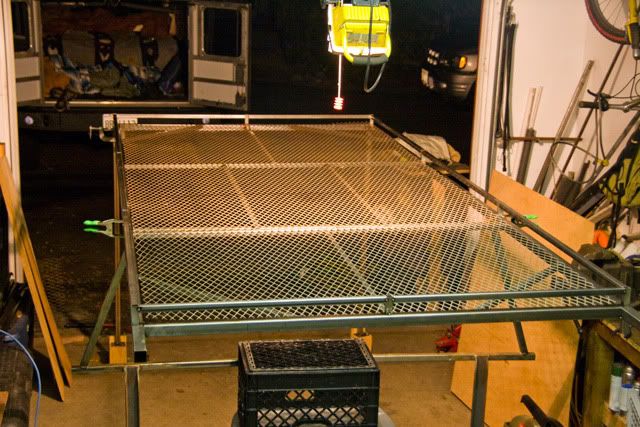
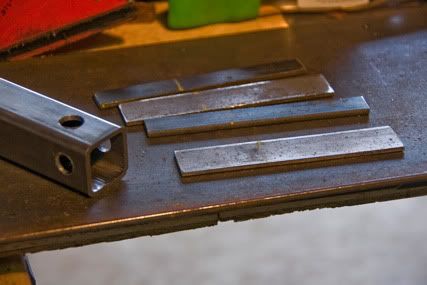
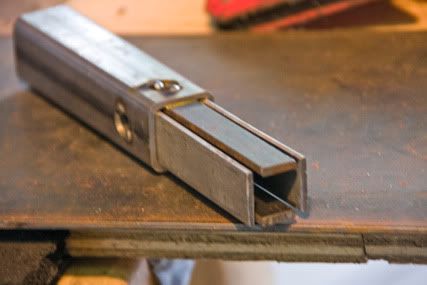
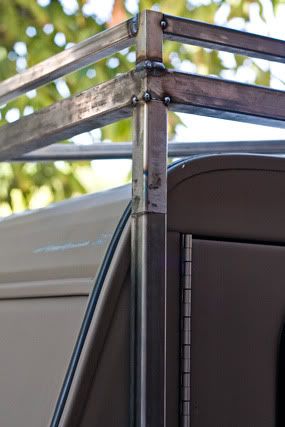
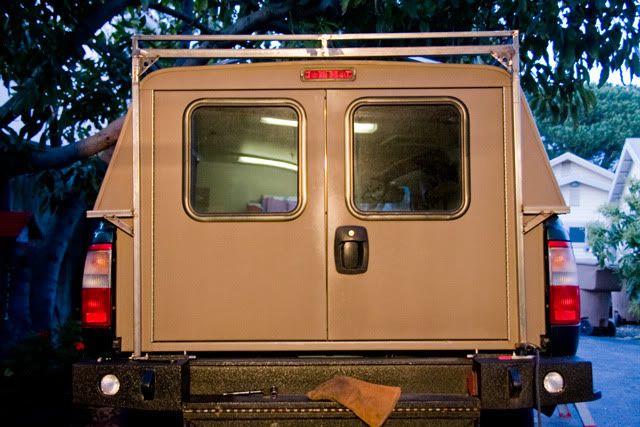
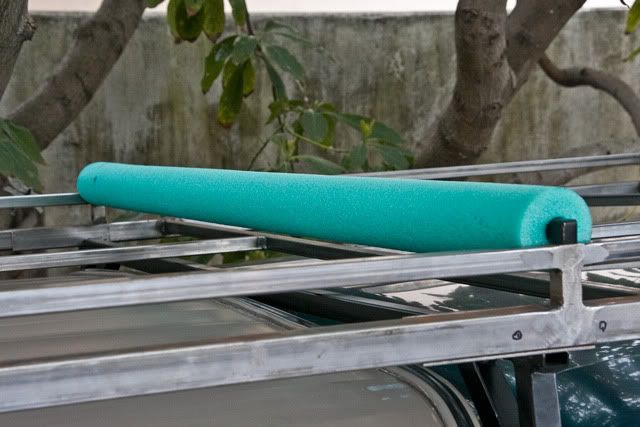
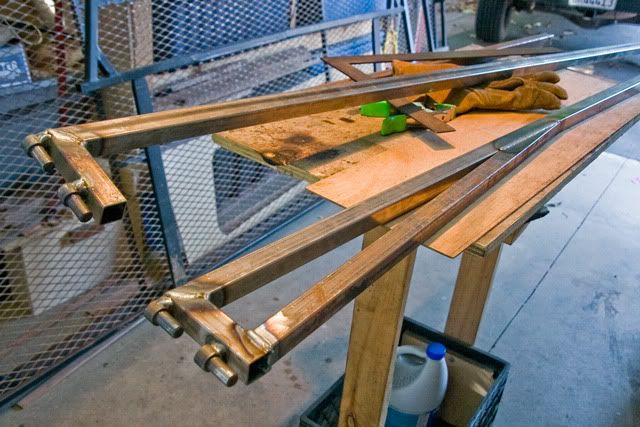
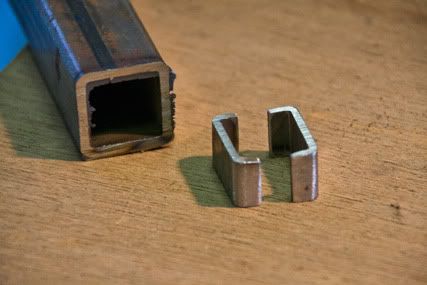
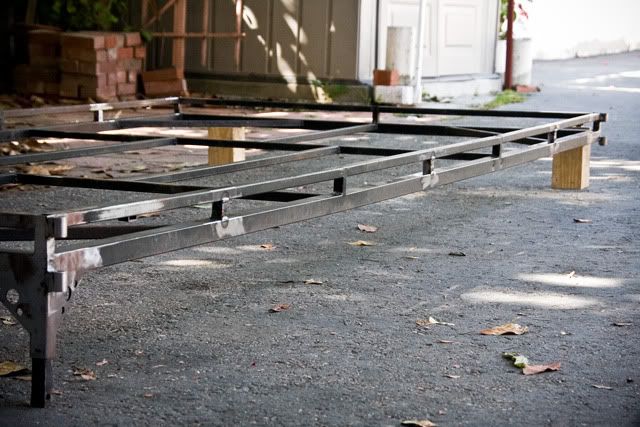
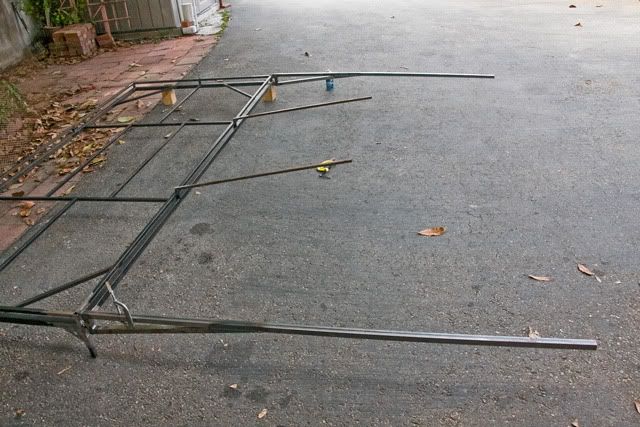
I started putting together the actual rack which felt good. I am using 16 guage 1.25" square tubing for the frame and .75" square tubing for the rails.
Rack14.jpg


The top of the rails are going to be 2" above the 1.25" tubing. The vertical pieces of the rails are stainless steel because I will be leaving the tops open to be able to recieve 5/8" square tubing for accessories like surf racks, kayak racks and maybe even a custom roof top tent in case the family starts getting bigger.
Rack17-1.jpg


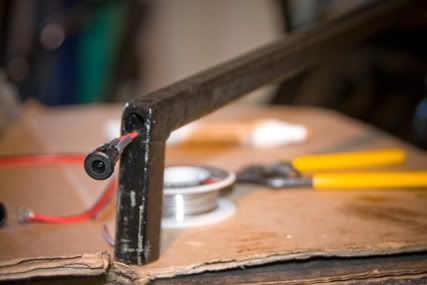
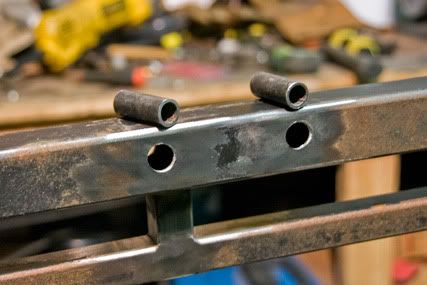
[?????] I am trying to figure out how to make drain holes at the bottom that won't ruin my lineX coating down the line when the 1.25" tubing at the bottom starts rusting. I was thinking maybe put a stainless cap on the vertical pieces then weld it on cap side down, then once the lineX coating is on, drill a small hole. This way no rust is bubbling up the lineX, I am affraid though, it might just happen anyways because water is going to eventually seep under the coating through the seam. If you guys can actually figure out what I am talking about and have a suggestion I would love to hear it. Maybe the best option would be stainless steel, no drain hole, let it evaporate.[/?????]

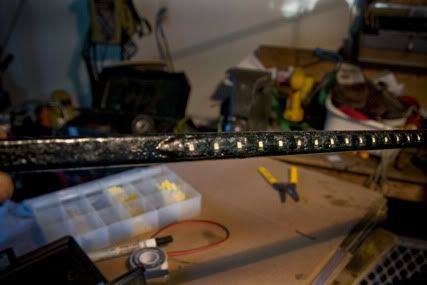
I bought some Vision X LED euro lights off ebay for the front, they should be here this week, hope I made the right choice.
 

G100

Adventurer
Big Project, Small Garage

JCMatthews thanks for bump I know its been some time and I should be finished already, but I haven't been able to work much because of the constant rain that has been coming down here in california. My garage is not big enough to be able to work while its raining, so this has put a big damper on my plans to have it done before my baja trip in a couple days. I am trying to get it done enough so that I can a least use it to hold my longboards so that I don't have to travel with them inside. Here are a few things that I got done on the days I could work.

I decided to go with a thinner sheet of expanded metal mesh for weight issues. On my old truck I had 3/4 9 guage which weighed a lot, so this time I decided to put a little more support underneath the mesh and go with a thinner 3/4 13 guage, which weighs less than half of the 3/4 9, but is a lot more flexible. Here is shot of the pattern I decided for the support of the mesh. I figure when I put heavy things up there like water or gas, I usually put them in the corner so I made sure to strengthen the corners.
Rack18.jpg


here is what the sheet looks like, its just laying on there not welded up yet.
Rack19.jpg


As I originally planned I also put some gussets on the front support thing.
Rack20.jpg
Rack21.jpg


Here is side view of what it looks like installed, I like how it doesn't stick out from the side of the truck at all.
Rack22.jpg


I worked on the back supports also. I changed my original plan for how it is going to attach. I was going to have some angle iron welded on the top of the square tubing and the rack would just set on and bolts would hold it together. Instead I am going to attach them kinda like I did on the front support with a slip joint. This will have a much cleaner look and solves some other issues. I couldn't find tubing to work for the male part of the joint so made it myself.
Rack23.jpg
Rack24.jpg
Rack25.jpg


Heres what it turned out to look like
Rack26.jpg


next I will be putting on a piece on the rear supports that will work as a step and will also have a tab coming off of it, bolting to the bed to make the supports a lot stronger and more rigid.
Rack27.jpg


More on this later, but I will share and idea that I am playing with . . .
Rack28.jpg


just happens to fit perfectly, might be real nice to have especially when having to air up with a portable air compressor. What do you think?
 

G100

Adventurer
Rack made it to Baja

Well just as always, I was running around like a mad man trying to get my current project done before a trip to baja. This time I didn't quite finish it, but got it done enough to hold my longboards which was really nice. All that I really needed to get done was get the rack secured to the truck and make the board rack attachment.

I started by finish up the rear supports, I place gussets in the corners and drilled holes so that I could have a place to clip things. The smaller holes will accept a standard key-ring type clip and the larger hole is big enough for a full size caribeaner. They look larger then needed because once the line-x coating is on the holes will be alot smaller.
Rack29.jpg


Then I finished up the step pieces that have the tab coming off that I am hoping will make the vertical supports real solid. I ended up making the piece that might be the 12V receptical out of stainless steel in case I want to do the power port.
Rack33.jpg
Rack34.jpg


The tab slides through a small gap between the shell and the bed and then bolts into the bed from the inside.
Rack35.jpg


It was unbelievable how these tabs made the vertical supports and the entire rack so much more rigid and over-all stronger, this will be a huge improvement that my other rack did not have. You can push and pull the rack any direction as hard as you want and it will not bang against the shell. All I had to do was put in a couple bolts and the rack was now completely secured to the truck. I gave everything a quick coating of some black spray paint so that it does turn in to a rusty piece of crap by the time I get back.

Rack36.jpg


The surfboard rack "accessory" was pretty quick and easy. Just a piece of 5/8 square tubing with two 2" long pieces welded at the ends. I tapered the ends of the 2" pieces so that they would position themselves in the holes easily. I use a water-noodle for the foam, in my experience the best foam ever hands down, it doesn't take on water, it never loses it cushion, and is extremely resistant to breaking down from being outside.

Rack30.jpg
Rack31.jpg


The piece will fit in any of positions, the front, two middle and rear.

Rack32.jpg


Here are a couple shots from my trip with the boards on.

Rack38a.jpg


Rack39.jpg


Its real nice to have it on, but I still have a lot of work to do: the mesh, the awning, the lights, air-deflector.
 

JCMatthews

Tour Guide
Love it

I just have to say that your truck is inspiring. I love how it looks. I like the fact that it is understated. I really like the parts that you have fabbed, and how useful everything is. One day soon, I will start on a DC Tundra and follow your lead.
 

G100

Adventurer
Here we go again!

Somethings never change, I’ve got another baja trip coming up quickly so that means trying to wrap up unfinished projects and not getting them done until the day after I supposed to leave. First it was the window, then it was the bumper, then the rack, and now it’s the rack again with the awning, mesh, lights, faring, and finally getting it Line Xed.

So first step is getting the awning done, and like most everything I’ve done it is going to be a lot like my other trucks but better. One improvement is the mounting brackets that are attached to the rack are going to be stainless steel, obviously for rusting issues so they will fit together more smoothly. The brackets I am using are lift off hinges or I think they are called bullet hinges also. They come with a male and female piece, instead of using the female pieces, I found a piece of stainless ¾ inch tubing 1/8th inch thick that fits perfectly, i just cut it up into 1 inch sections to use for the females. It isn’t capped on one end which doesn’t matter, it won’t collect water and I will be able to put hinges closer together without the extra length, I even cut down the male pieces for the same reason.
Rack40.jpg


When welding the pieces on I placed a piece of 1/8 flat bar as a spacer so that they will be able to fit once both the pieces get LineXed, which is a layer anywhere from a 1/16 to a 1/8 in thick.
Rack42.jpg


The arms for the awning are made from some 16 guage 1in. square tubing. For maximum size and ease of storage they are about an inch short of the length of my truck bed, about 76 inches. My last setup was just a “L” shape and held up fine, but they were about 15 inches shorter, I decided to put a reinforcement angle piece, that should make things a little stronger.
Rack43.jpg


The arms will be locked into the 90 degree angle with a piece of 1/8 thick 1” flat bar as a gusset against the rack. This piece is fastened to the arm with a bolt and can rotate in for storage.
Rack54.jpg


This gusset piece will insert into a slot. I played around with some ideas for this and ended up making a piece out of cutting up some 1 in. square tubing.
Rack45.jpg


Where this piece gets welded on is pretty crucial to the angle of the arm. I got the arm to a 90 degree angle then moved it out a bit more, this will hopefully do a few things, one, to allow for flex in the arm, two, keep the unsupported edge of the awning tight, three, I can grind down the gusset piece for a perfect fit.
Rack46.jpg


Heres a shot welded on.
Rack53.jpg


Once I got it all together I was pushing on the end of the arm and noticed a bunch of flex, but it wasn't the arm that was flexing it was the piece on the rack where the gusset is held on. So I ended up welding on some new vertical pieces that seems to solve the problem.
Rack47.jpg


I like the new look with five vertical piece rather then three.
Rack48.jpg


You might notice the dimples on the side of the rack where the bolts go, under the fourth vertical, I did and thought I would solve that problem while I was at it. So I am going weld these guys in.
Rack49.jpg


The last thing the awning system needed besides the canvas, is the two center supports. I came up with this on my old setup and it was invaluable, the two supports hold the center up a little higher kind of creating a pitched roof, so when it rains, the rain sheds off to the sides, it also helps keep the awning nice and taught so the wind isn't flapping it around, it is a very nice simple and effective piece to the puzzle. Just two pieces made out of 5/8 in square tubing so that it can fit in the "ports" for the surf rack.
Rack51.jpg


Here you can see where they go.
Rack52.jpg


Now I just need my canvas to finish it up. More to come, soon.
 

DaveInDenver

Middle Income Semi-Redneck
I've been running them for 3 or 4 years now with no issues... I had my Toyota Master Tech pal install them when he replaced my upper & lower ball joints. He did have to do a little grinding to make them fit.
I've been running SDORI BJ spacers (also got them from Roger) at their full 1.5" thickness. I ended up using an extra set of upper arms, cutting and trimming them on the floor, painting them and R&R for my old ones. This was WAY easier than trying to do in situ. That was early 2008 when I put them, no problems here either.

I run my torsion bars with very little pre-load. The key is to use spacers instead of cranking the arms, doing both is beyond the limits of the suspension. I use the stock upper and lower rubber bumps stops. In particular the upper set really should be stock thickness (Frank @ SDORI recommends stacking washers under them) otherwise the down travel stresses the CV joints.
A side FYI - there was a steering linkage recall a few years ago. Any Toyota dealership can run your VIN# and tell you if it was done or not...
If your truck is covered by the TSB, you get a new relay rod and an alignment from Toyota. :)
 

G100

Adventurer
Lots of Work, Lots of Trips

Sorry about the delay in getting back to the build, I just didn't have time, the days before my trips consisted of wake up, go to work, come home, work on the truck until 11 pm, and repeat. So I don't have as many photos either but this is what I got done.

Once I finished the fabrication on the awning I started on the faring in the front, I was originally planning on putting some light inset into the faring but after the advice the Portal gave me on post i put up I decided to forget about lights up top and will probably end up putting them on the bumper.
The faring has a frame and then it will have a peice of aluminum screwed to the face.
Rack63.jpg


I cut some access holes to help with running wiring for the lights and to install switches.
Rack62.jpg


Made some cover plates out of aluminum to cover the access holes and to hold my switches.
Rack66.jpg


I was now ready to put on the sheet of expanded metal. Lots of little welds. Then grinding them flat.
Rack59.jpg


Rack60.jpg


All parts sandblasted and ready for Line X
Rack61.jpg


I did a little painting myself on the awning arms and installed the snaps that hold the awning canvas. I used Dupli Color Bed Liner spray, its alright but nothing like Line X.
Rack58.jpg


I masked off the LEDs that I installed on my awning support bars and sprayed them also.
Rack64.jpg


They get their power from a DC connector I installed on the back edge.
Rack65.jpg


My wife and I sewed up the canvas made out of Sunbrella and it fit great. You can see I fitted a temporary faring made out of 1/8" ply laminated with black formica. Looks pretty good but won't last like aluminum.
Rack57.jpg


You may notice in my messy garage an old interstate battery sitting on the ground. The reason for this is I bit the bullet and got myself a DieHard Platnum aka Odyssey. I bought the biggest one they had, it just bearly fit in all directions, I had to make some modifications to the battery holder but once it was done it fit perfect. I started my car and the damn thing almost flipped over on itself.
Rack56.jpg


Rack55.jpg


From there it was off the Kern river, down to Baja, and then back up to the Serria's to Shaver Lake.
 

G100

Adventurer
Baja Pics

Here is a couple pics from my baja trip with the new additions.

Cabo02.jpg


I couldn't imagine doing the trip with out my new lights and awning.

Cabo01.jpg


My lantern is a thing of the past, no need. So nice to eliminate fragile bulky items from your camping setup.

Cabo03.jpg


Cabo05.jpg


I am slowing down on the build a little, still have a lot to do, but my rig is finally getting close to where I want it.
 

J-man

Adventurer
nice last shot of on the bluff at scorp. When were u there? I was there may 8-15. Good waves, looks like it was decent while u were there too - good times.
 

exploreFL

Observer
Is the awning attached via snap buckles? How do you think this will hold up over time? I definitely like the die and would like to do something like that, I'm just not ready to give up my tundy's rear roll down window!
 

G100

Adventurer
J-man: I was there a little after you, hit it up on the way down (mid june) and the way back (early july). Yes I did get good on the way down, about head high at second point, and for some weird reason very small crowd, good times for sure.

exploreFL: Yep, stainless steel snaps, should last as long as truck, I can very easily change out any individual pieces if they get damaged. This is the same way I did my last truck's setup and it lasted me 7 abusive years. Totally agree with you on the roll down window, it is the most crucial and used modification that I have done to my truck, couldn't imagine traveling without it.
 

Forum statistics

Threads
186,682
Messages
2,888,881
Members
226,872
Latest member
Supreet.dhaliwal
Top