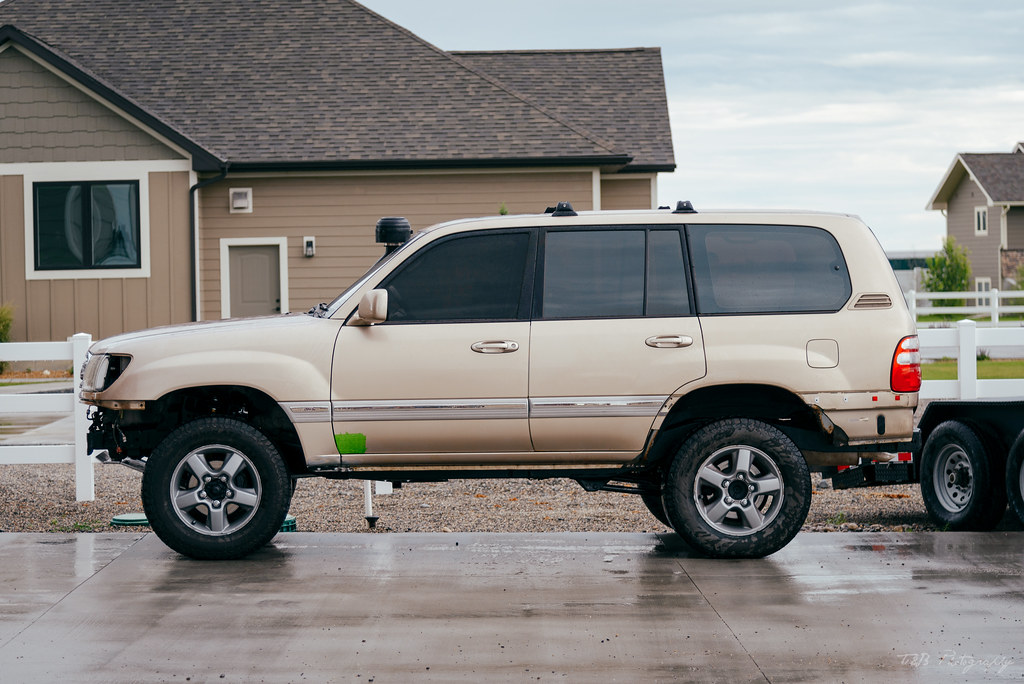
Sandy: 2003 Land Cruiser 100 Series Build & Adventure Thread

wreckdiver1321

Overlander
I was down to the final few steps to putting Sandy back down on her own tires, just a few quick things left.

First up was the rear sway bar. Again, I had to drill out a couple of the mounting holes, but these were tapped to accept a slightly larger bolt rather than use a nut, as all of these fittings are difficult to access. I used a slightly extended SuperPro sway bar end link kit and OE rubber bushings on the diff. Everything got a healthy dab of grease before being reinstalled.
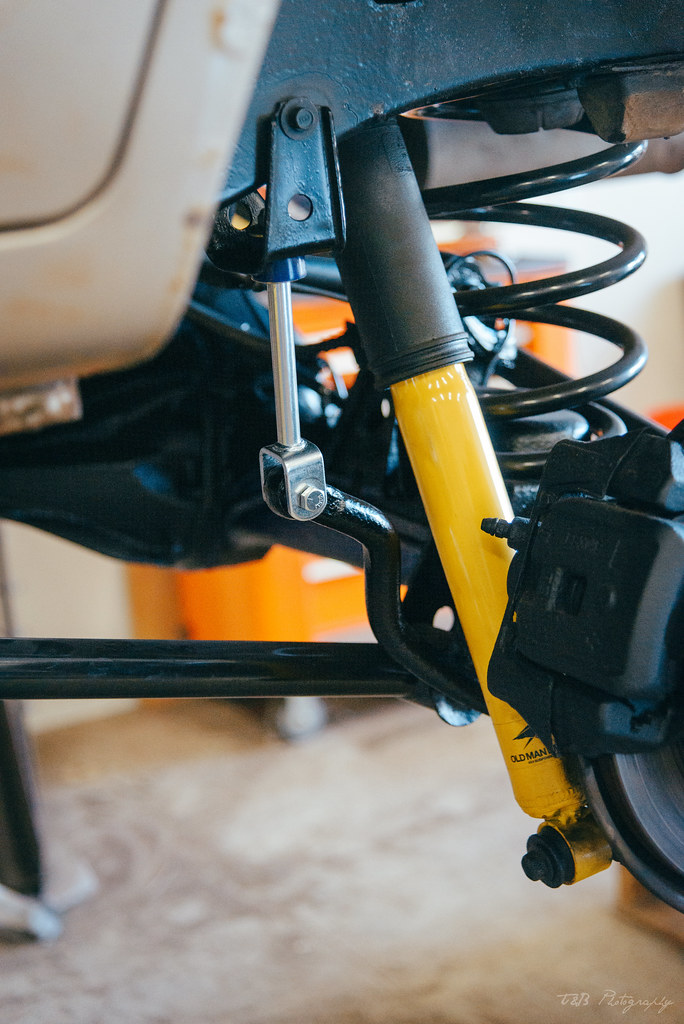


While I was at the rear axle, I also went to work installing my extended diff breather. I got the ARB kit, which I do like, though the plastic tubing is a lot more persnickety than rubber would be. I really like the upper breather though. I picked a spot on the firewall and mounted the manifold before pulling the old breather hose off and securing the new line to the rear diff. Then it was a long process of routing it up to the firewall.


With that small project done, I pulled the skid plate out and burned in the remaining side gussets, as well as finishing up some other welding.

While I was busy doing that, my brother in law fixed the rust holes on my fenders using a few cut sections generously provided by an ih8mud member. Originally we were going to stitch the panel together behind the molding, but it turned out the fender pieces were very different from factory fenders, sticking out a good half inch wider on either side. So instead we just cut off the sections we needed and welded them into place. A little grinding and shaping, and we were in business.


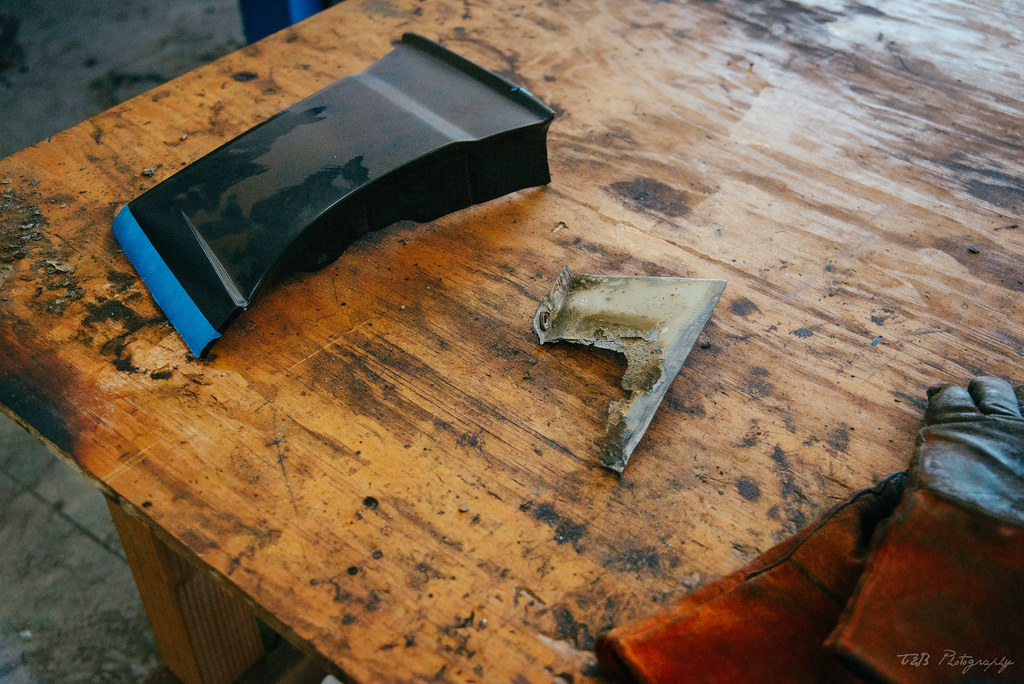


For the first time in a long time, Sandy had front fenders again! With them on the truck, we could get the patch panels properly lined up and tacked before welding.


Then, my brother in law and I switched. I handed over the welder and picked up the grinder and drill. I opened up a hole for the transmission drain plug and began cleaning up the welds while he stitched the new fender pieces on.


By the time he had both fenders all lined up and ready to go, I had finished most of the cleanup on the skid plate. I may have taken it father than necessary, but I think it looks pretty solid for my first metal working project. It should be plenty strong for what I do. Any more experienced metal workers feel free to tear this apart haha!


Then it was time to finish up the body work for the day. We mixed up a layer of filler to finish off the fenders and front of the rockers, then applied. We used Bondo Glass filler, which has been impregnated with fiberglass for better strength. But regardless, we went as minimal as possible. Then it was time to wait for that to set before sanding smooth.

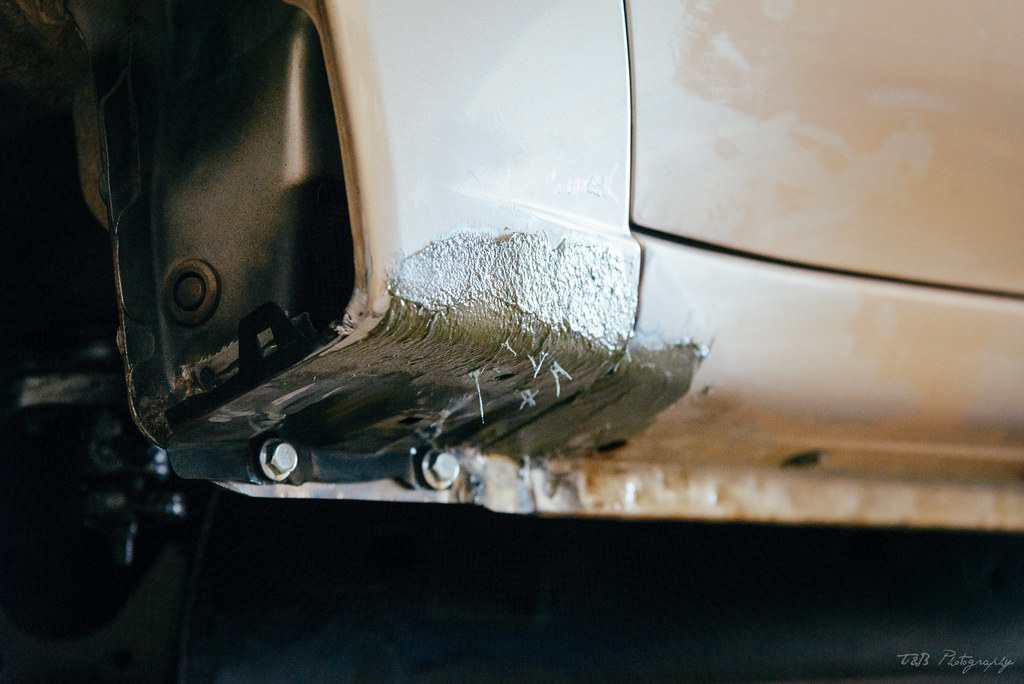


I spent the remaining hour of the evening sanding the filler back to smooth before calling it a night.


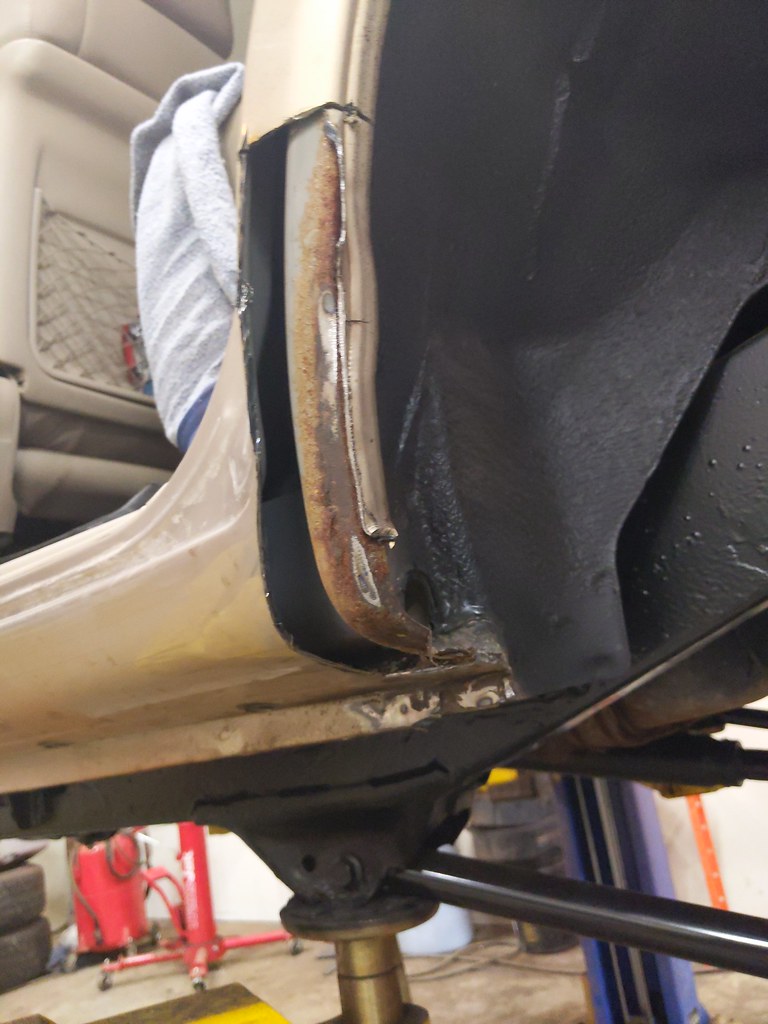
The next day was only a partial day, but it was all that was needed. We did a little bit of work on cutting out the extra rusty sections first.


 

wreckdiver1321

Overlander
After cleaning up the rear quarters a bit, I had to attempt grinding a small rust bubble behind the driver's side rear door. Well, this rust bubble turned into it's own special circle of hell.


Turns out, it had rusted through a couple layers, so I cut wide to get all of the remaining corrosion out of the body. It sucked, and made me very upset to rip open the panel, but so it goes. I'd rather get it fixed than have it give me problems later on.


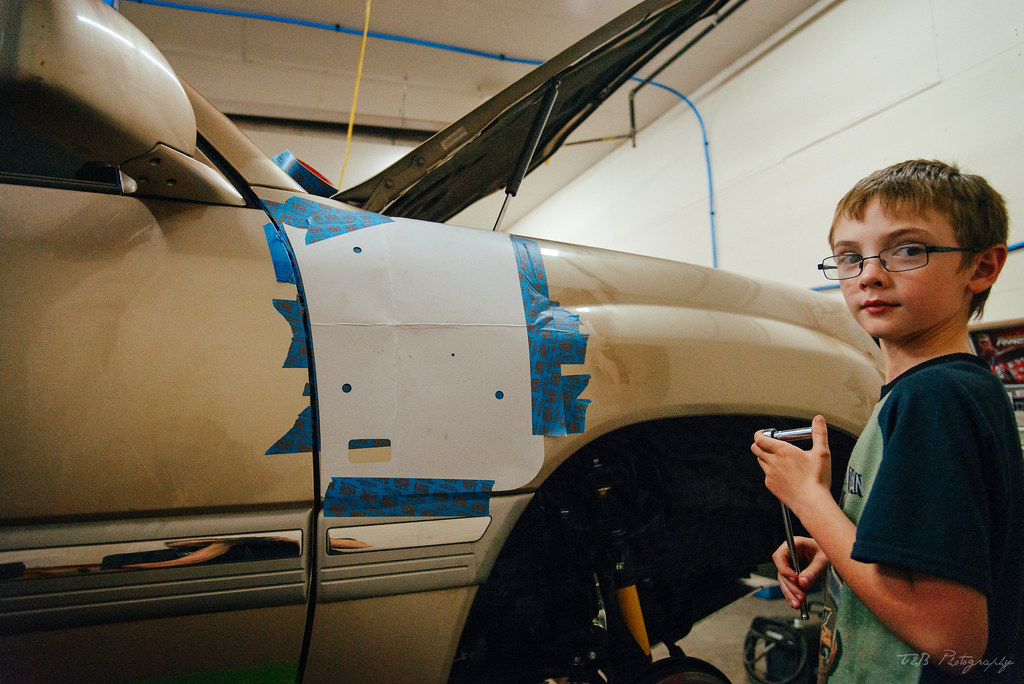
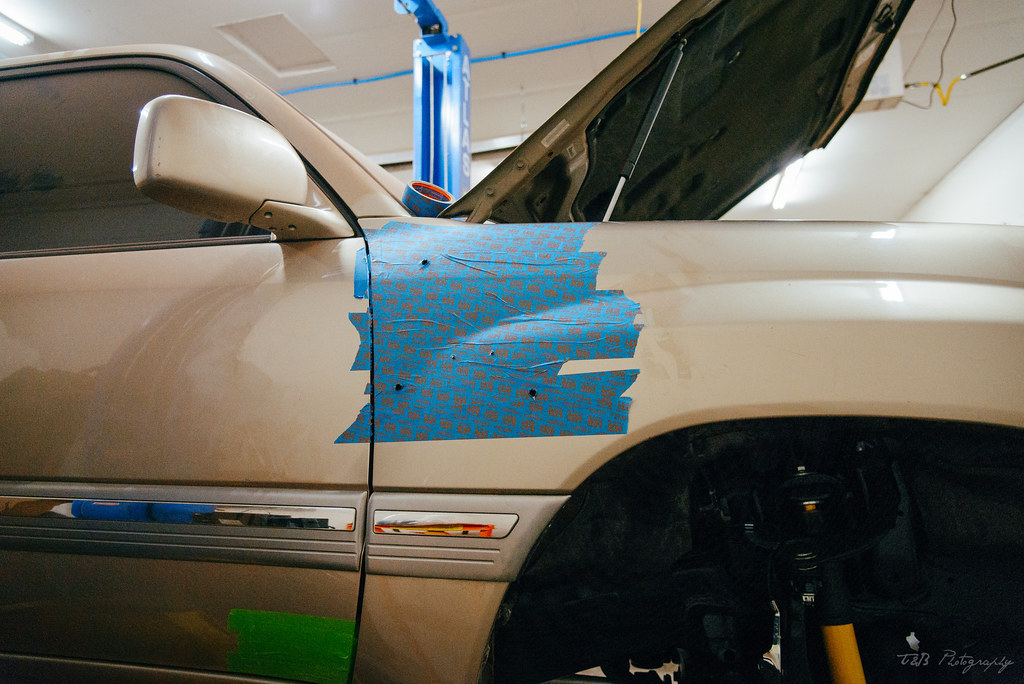
Thanks to another gracious ih8mud member, I already have replacements for these sections. Fed up with the rust repair, I roped my nephew into helping me install my snorkel. I needed a bright spot rather than the continued negative slog of cutting bits off my Land Cruiser. So I taped up the fender, lined the template up and taped it down, threw back an entire beer for courage, and started drilling.


Then I threw back another beer and pulled out the hole saw. That was very exciting.


Meanwhile, my brother in law continued getting the rear quarter ready. He finished cutting and started making a replacement panel.


He had other things to attend to after that, so I left him to it and finished getting the snorkel installed. I sprayed a quick coat of paint on the exposed edges and let that dry while I got the wheels put back on. Then I got the snorkel installed fully and got ready to lower the lift.

I double-checked everything to make sure it was in place, then lowered the weight onto the ground. The front end sat a little low, so I got under the truck with Milwaukee's finest electric impact and went crazy on the torsion bar adjusters until the truck measured level with a factory rake. It's a bit off side to side, with the passenger's side about 1/4" low. I may fix that with a spacer later, but I want to get the body work finished and the bumpers on first.

Following that, I torqued all of the control arm and sway bar hardware to spec before hopping in, and for the first time in a long time, popping it in reverse and driving it out. I only backed out into the driveway, then let the truck idle while I hosed all of the red dust off. Then I hopped in and went for a quick tour of the neighborhood. The result was, in a word, startling.

Everything that concerned me about the truck disappeared. It felt tight as a drum. The brakes were immense, the steering was sharp, there was zero slop or vibration in the drivetrain, and the engine purred like a kitten. It was like a whole new truck. The body work was still frustrating me, but this moment made all of the frustration feel worthwhile. What a moment!


With the truck mobile, my work was done for a short time. But rest assured, there's still plenty to do....
 

wreckdiver1321

Overlander
My ARB has arrived!

Need to go pick it up after this weekend's backpacking trip. Hopefully I'm able to get that installed soon-ish and not have to have it laying around the shop taking up space. Trying to figure out what to do there.
 

wreckdiver1321

Overlander
I had a chance to get over to the shop last week and put my rust buster to the test.

Good news: it worked.

Bad news: it worked briefly.

The drill attachment was hokey at best, so I ended up figuring out a way to slap an electric impact on it and used that for a bit. Unfortunately, I melted the plastic drum, so I had to come up with a better solution.

The metal snake part is essentially a long, tightly coiled spring, so I clipped off an 18" section and figured out a way to attached three links of chain to the end, then I cinched the other end in a drill chuck. Et voila, a new frame cleaning tool! This worked better, but occasionally I would snag something in the frame which would turn the spring into a pretzel, so I remade this tool a few times.

After about two hours, working front to back, I was satisfied with the result. I hit the entire length of each frame rail, as well as each crossmember. I spent extra time working on the rear section of frame, as this is the most corroded. Then, starting from the front, I blew compressed air through the frame until debris stopped flying out the rear of the frame rails. There was a copious amount of junk that flew out, so I'm glad I took the time to do this.

I received the internal frame coating this weekend, so my plan is to get over to the shop at some point soon, tape off a bunch of frame holes, and get the frame coating laid down front to back. There's some areas of the rockers I'll probably be able to hit too.

After rust busting, I took a grinder to the pinch weld and opened up the places were corrosion had eaten through the outer layer. Once I cleaned those up and got to substantial metal, I began fill-welding the holes, then grinding off the excess. I have one of the holes mostly filled in and ground back, I just need to finish it up and move on to the next ones. Shouldn't be too long. I'm hoping I can get this finished up soon and get primer on the pinch welds so that can be crossed off the list.
 

wreckdiver1321

Overlander
In other news:

We close on a house 9/3. Took us a couple months of searching in the hottest real estate market in America, but we found what we needed. 2400 sqft in a nice neighborhood, nicely updated, original wood floors, big yard, and plenty of trees. Importantly, it has two garages. An oversized single-car is attached to the house, which is spacious enough as it is. In the back yard, though, is an oversized 2-car garage, fully insulated, heated, and with 240v power already set up. Just needs some additional lighting and workspace figured out.

Which brings me to a new project: setting up my own personal shop. Because there is an attached garage and a shed, nothing but shop stuff needs to happen in there. It's my own space. So now the question is how to arrange it and get the most out of the space. I have a few ideas brewing, but my ultimate goal is to turn it into an ultimate modern workshop/garage/hang out area. I'd like to build some chairs out of car seats from a junk yard, with seating and a TV mounted to the wall. I have three Whalen industrial shelving racks from Costco that could easily be made into a workbench and storage/shelving. I'm trying to work out how to arrange everything and keep it tidy. It's going to be quite the project!

Meanwhile, the house itself will be updated as well. The whole house will be painted since there are some dark colors that need to be exorcized. The kitchen will receive painted cabinets and a new countertop. We'll probably throw in some light fixtures too, and I'll build a pallet wood surround for the fireplace upstairs.

We're pretty excited about it. :cool:
 

llamalander

Well-known member
Congratulations on a new (old) house and a new (old) truck and a shop to park it in!
I like the name Sandy too, much more graceful than Choppy, Grindy or Weldy ;)
Looks like you're going to run low on things to clean/fix & paint, so maybe we'll get some more of your great trip reports again?
Either way, keep us posted, it's all fun to watch-
 

wreckdiver1321

Overlander
Congratulations on a new (old) house and a new (old) truck and a shop to park it in!
I like the name Sandy too, much more graceful than Choppy, Grindy or Weldy ;)
Looks like you're going to run low on things to clean/fix & paint, so maybe we'll get some more of your great trip reports again?
Either way, keep us posted, it's all fun to watch-

Hahaha! I love that. Should have named her one of those.

Thank you sir! We're excited to finally get into somewhere with the space for us and our kids. Our house we're moving out of is a massive 765 sqft, so we'll have more than triple the space. Plus a bigger yard. Plus a garage and a shop. Plus a better location, with a park nearby. Whole lotta good. As with everything, it needs some work to make it what we want, but it's a small leap to get it there. It's not HGTV levels of remodel going on. Luckily our inspection showed the house to be in exceptional shape, so other than cosmetic/functional upgrades, we've got little to worry about. Just have to move our crap in and figure out how to arrange it. I'm pretty stoked about the possibilities that come with the shop space, and it's just a matter of time before I get it organized and set up to my heart's content. Exactly three weeks from today is closing, so the time is approaching!

I'm headed out to the shop to work on Sandy tonight, so hopefully I'll be able to get the internal frame coating laid down along with some POR15, and maybe finish up the majority of the fill-welding on the pinch welds. I might pull the skid plate too and get it back to my house so I can finish drilling the speed holes. We shall see.

Thanks for watching!
 

wreckdiver1321

Overlander
Please forgive the low-quality pictures, I haven't gotten my camera over to the shop in far too long.

I wanted a quick fun project to take my mind off of the rust prevention before I got back into it, so I got my Rhino Rack Batwing Compact awning mounted. It's a little far forward, so it appears I will need to mount that third crossbar after all, but the coverage is great and it's very easy to use.

1629149849850.png


Next up, I pulled Sandy back into the shop to continue working on some of the necessary rust repairs. I'm starting by giving attention to the pinch welds.

1629149914663.png


1629149930743.png


The passenger side pinch weld showed three bubbling spots, otherwise everything was nice and straight. So I got out the wire wheel and began peeling back the layers until I hit clean, albeit pitted, metal.

1629150015385.png


1629150032052.png


Once I got to this point, I cleaned it up a little bit more, than started filling the damaged area with weld. Now, this probably isn't the best way to solve this, but I think with the work I put in plus some rust encapsulator and primer, it won't give me any trouble going forward. The perfect cure for this would be to peel the outer layer of pinch weld away, add material, and get it welded back together. Being that this area is no longer going to be enclosed by the side steps and that Montana is so dry, I think this approach will work out fine. I do plan to grind away the undercoat and reinforce the backside of this seam, so I'm sure this will be enough for a long-term solution.
 

wreckdiver1321

Overlander
My original welds didn't take very well, so I had to go through a bit more cleaning before everything started to go my way. Once I had this sorted out, I was able to get decent fill. Then I ground back and did more fill-welding until I got a pretty smooth result. This is a "half-way" stage.

1629150428083.png


Next up was attacking this nasty crap.

1629150467883.png


1629150491357.png


This is after my roto-rooting of the frame and blowing the dust and flakes out. @crolison had pointed me towards Eastwood Internal Frame Coating, so I took a stab at it. I masked most of the frame holes (which turned out to be not nearly enough) and used the extension tube to hit the frame from front to back. I used 4 cans and think I should use one or two more for the crossmembers and rocker panels. This stuff is no joke! I'm very impressed with how effective the coverage is, and it seems to do a real number on the rust as well. Hopefully this will be the end of the line for any internal frame corrosion.

1629150697605.png


1629150715801.png
 

wreckdiver1321

Overlander
BIG things have happened!

I did a few things on the shop to get it prepared, but the cold weather moved in, took away the already meager humidity, and caused flooring temps to drop. As such, I won't be getting the floor coating completed until conditions improve. However, I did make some big steps towards getting back into the Land Cruiser.

Primarily, I brought Sandy home. Due to a foot injury and needing a scooter to get around his shop, my brother in law requested I move her, so I picked it up and drove it home.

1639077203042.png


In order to keep it out of the weather (raw metal) I cleaned out the attached garage and got her parked inside.

1639077254835.png


It dawned on me that since my brother in law was once again laid up, I would need to work on the body repair myself. I watched a lot of videos and did plenty of research to figure out what I needed and the kind of work I would need to do. Luckily for the stuff that will be visible, I have patch panels, which makes life a lot easier. But I still needed some things, so a trip to Harbor Freight got me set up.

1639077384639.png


The flange/punch tool will allow me to make lap joints where necessary and plug weld body panels together, which will be a big help. The narrow belt sander will allow me to more easily open up spot welds and clean out rust spots on the hatch and doors. The air hammer will help me separate the layers on the patch panels so I can weld each individually.

I also picked up a hammer and dolly set for planishing work.

1639077442080.png


I picked up a few other things as well, and made an order. For this:

1639077533441.png


Since the shop has a 220v outlet, I could afford to pick up a 220v MIG welder. This is HF's Titanium, which from all reviews seems like an amazing deal. For my relatively limited use case, I think this is a good investment and plenty of welder for me. Reports say up to 1/2" plate is doable, but I'll likely never need that capability. Can't wait to get going with it!

Originally, I was going to get the flooring done, panel one of the walls in old pallet wood, get some benches and cabinets built, and a few other projects to get my shop space up and running. Unfortunately, due to the weather, I opted to wait on the floor coating. I had already completed the wall paint, which was a feat. I used patching plaster and a load of paint to smooth out the OSB walls, so they're nice and smooth now.

1639077852438.png


I then built a wall cabinet to get some tools and consumables moved into the shop. This is the color the cabinets will get painted.

1639077895371.png


With my brother in law laid up, the weather changing, and spring/summer getting closer, I decided there was no sense putting it off. I Picked up a large tarp and welding blanket from HF to protect the raw concrete, then laid it down in the shop and got Sandy moved over in preparation of metal work.

1639078005764.png


Here's my plan:

I want the truck ready for the summer, so I'm giving myself a deadline of April 4th to get the body work as "done" as I can get it. I'll make an appointment with a good body place as close to that date as I can, then get to work. I'll start with the costliest and most complex repairs, namely the rear quarters. As I said, I'm lucky enough to have patch panels for most of the hard parts. Then I'll address the small spots. Whatever state it's in in April, I'll get it over to a body shop and they can take it from there. Hopefully that means I'll have it back with plenty of time for finishing touches before we get traveling.

More to come soon!
 

wreckdiver1321

Overlander
This weekend allowed me to really get some things done for once. I got cracking on Sandy by jacking her up in the air, putting her on jackstands, and pulling the rear tires off for better access. I took a look at the areas of damage, mapped out what needed to happen, and then got cutting. My HF composite die grinder makes pretty easy work of carving through the metal, though I think I need a bigger compressor and better safety glasses. I got hit with some zingers one too many times.

1639416534592.png


1639416555079.png


1639416579300.png


1639416598718.png


I was able to get all the nastiness cut out before taking an abrasive brush to the surface rust. The only spot around the rear tires left to work on is just behind the passenger-side rear door, and that looks pretty minor compared to the other side.

I'm happy to report the damage isn't as bad as I feared, and since this truck will not live in a salty state for as long as I own it, I'm not concerned about the corrosion coming back. I do have a plan to toughen up the coating on the underside to prevent any further problems, but I don't foresee that being a big issue.

Next, I hit all the surface rust areas with an abrasive brush before coating them with this:

1639416616814.png


@LCDan2 had good results with this stuff, so I'm giving it a try as well. I painted a good 1/8" layer on all the areas with surface corrosion, then covered them up with plastic to prevent it drying, per the instructions. I'm going to leave it until next weekend and see where I'm at, but I feel pretty confident that I'll be moving on to the "rebuild" stage a lot faster than I anticipated. The final area to clean up shouldn't take too long, I just need to get the motivation up to make it happen.

1639416639199.png


1639416653344.png


This coming weekend, I'm going to start peeling apart my patch panels to see what I'm working with. One has a rust hole in exactly the same spot as my truck, so a little metal fab will be needed. Luckily, It's in a an area that isn't very visible and fairly flat, so shaping and patching shouldn't be too bad.

I actually think the biggest challenge will be the area behind the driver's side rear tire. The good news is everything below that sharp inward bend is covered by the rear bumper. The bad news is I need to replace a section of that bend and have it look at least close to original. It's going to be completely covered by trim, but I want to do my best to make it look clean.

A mix of apprehension and excitement is churning my brain. I know I can do it, but I've never done body work before. Should be a fun challenge.
 

Forum statistics

Threads
188,259
Messages
2,904,636
Members
229,805
Latest member
Chonker LMTV

Members online

Top