Glad you went with the Claytons and TrXus...that combo has been working great for about 10k miles now on my rig. Really digging the kitchen, too...well done!
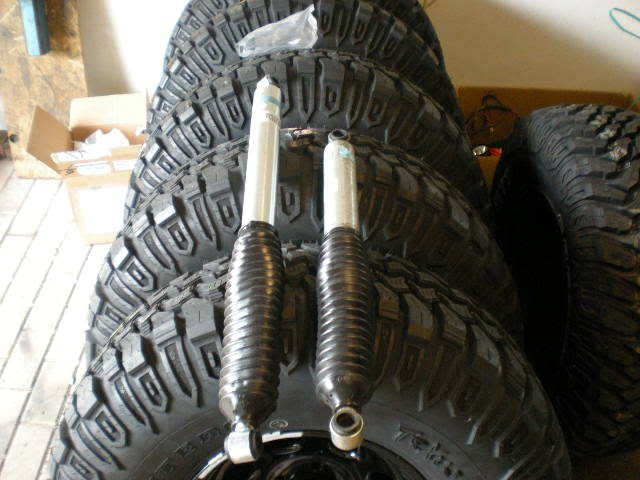
The suspension parts are starting to trickle in. I picked these up from the post office today! Hopefully that means everything else will be here int he next couple of days.
Billstein 5125's (mmm..... Newcastle)
These things are big. The one on the right is off of my tacoma, which is sized for 2-3 inches of lift. The new Bilstein's for the jeep are a full 6 inches longer.
The wife picked this stuff up for me today at the post office. I have about 80% of the suspension stuff in now! I am still waiting on the trackbar from Claytons, and the SYE and CV drive shaft from Tom Woods, then I will be ready to start work.
Nice welds on this stuff, maybe one day mine will look like this. The johnny joints on the lower arms are freekin HUGE. Im talking as big as a persons fist. This stuff is very obviously made to take all the abuse you can throw at it!
James.. i had a brainfart today... i'm working on installing my Roadless Gear interior winch control.
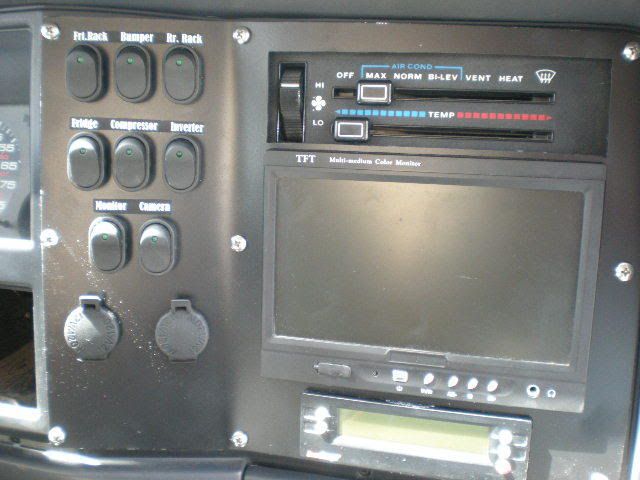
In the pics i copied above, where the B&M trans temp gauge sits, and where you have your rocker switches.. i removed the false info panel and figured i'd position the control here instead of my original idea of the cig lighter location.
I found i had to cut away a section of plastic (a 2"x3" section) behind to make clearance for the plugs/wiring. What i didnt realize is that it's actually a "cavity" used in the ductwork for the AC and Vent functions. Heat and Defrost do not use this cavity. Did you cut into this area and have you noticed a signifigant loss of airflow through the vents?
I figure i have two options, make a plate and recover the section i cut or continue and attempt to seal the cavity as best i can. The brainfart part comes from a quick decision to relocate the control from my original idea.. and didnt think it through entirely.
John, I am a little confused, are you talking about you had to cut behind where I have my rocker switches mounted, or did you have to cut behind where my monitor screen is mounted?
If you are talking about behing my rocker switches, there is nothing behind there on my jeep. Its a big hole and I had plenty of room for my wiring if memory serves me.
If you are talking about behind my screen, yes, I had to cut into the plastic, and then I realized it was part of the duct work. I had to form a replacement panel out of flashing material, and I screwed it to the outer edges of the plastic and used silicone to seal it all up. I had to be careful not to go too deep because of the vacuum actuated door/flap that controls the flow of air. Luckily my screen is only protruding behind the panel about 1/2 of an inch, so I didnt need to cut too much.
It's the area behind your rockers.. the available 1-1.5" wasnt enough for the controller so i decided to cut a relief. Flashing material.. good idea. I have a bundle left from redoing my house roof.. i bet i can get it sealed up well enough to not lose much airflow.
I dont have a problem in that area because my panel comes out flush with the outer dash panel giving me a couple more inches. Yes, you will definitely have to close up the hole somehow. when I cut behind my screen there was zero air flow out of the vents until I did the flashing bit. On a side note, I would use shoe goo or even a hot glue gun for the sealing part of it if you decide to seal it. I used silicone, which worked great, but stunk for a while!
I want to get one of the in cab winch controls also, I got a wireless set-up the other day from Summit when my tires came in, and im not sure if would be too much redundancy on the controls. Probably so, but redundancy is cool. Post up some pictures when you get her finished up.
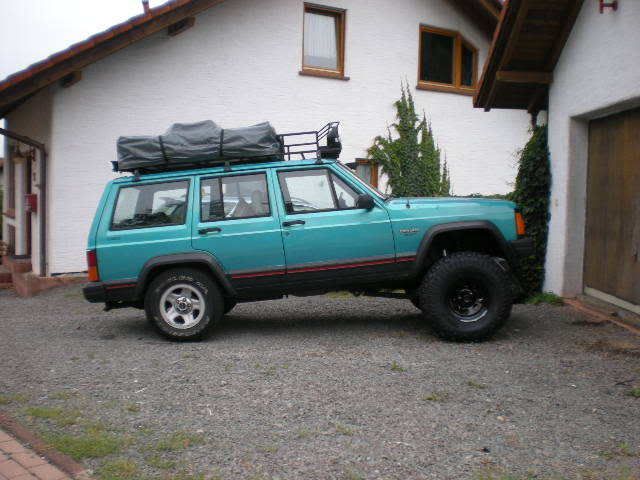
I had Wednesday off yesterday, so I started on the suspension. Got the crossmember welded/bolted on nice and securely, then installed the passgeger side upper and lower arms before running out of time. I plan to have the front mostly finished tommorow ( I have Friday off) and will post pictures of a jacked up/big tired jeep front end. I will not have enough time I doubt to start on the rear suspension. Here is how she sits right now. Half in my garage and half outside. It wont fit in anymore with the RTT and light rack....
Made some progress today. Got most of the front suspension on. I still am waiting on the track bar to get here (forgot to ship it) and I still have to hook up the brake lines and bleed them. I also have to set the track and caster, but that wont happen until the rear is finished. Hats off again to the Clayton guys, everything fit perfectly as it should, and looks killer. I cant wait to wheel/drive this thing when its finished the front suspension is super plush and flexy just by rocking the jeep back and forth.
As usual, getting the odl rusted/corroded stuff off is the hardest part, not to mention I am doing this in my gravel driveway. Its hard on the knees to say the least. I cant wait to get back to the states and build a real shop with 14 foot ceilings... hydraulic truck lift etc etc.
looking good! having a big ol shop is over-rated. it's always there begging you to be in the shop instead of on the dirt with this setup, you've got really good incentive to not have an in-progress truck!
looking good! having a big ol shop is over-rated. it's always there begging you to be in the shop instead of on the dirt with this setup, you've got really good incentive to not have an in-progress truck!
I am honestly not sure if I have ever NOT had an "in-progress" truck. I mean, are they ever really finished?
Yes, the approach angle is what I was shooting for by not installing the rear lift, but it tends to wander when going down the highway at speed. I also get this odd clunking sound from my diffs and transfer case when in 4Lo. I am not sure what it is, but it will probably fix itself.
Start hitting the upper shackle bolt in frame now, they have been known to be a major pita. Theres a captive nut in the unirail, if you break it your in for some cutting. If you remove the frear bumper you can get to it with some penetrant and straw type tip.
Thanks for the heads up John, I am sure it will be a major pita. The rear two lower arm bushing bolts on the front arms were completely seized to the sleeve in the rubber bushing. Had to cut them off, so my guess is the rear will be an uphill battle also. Not to fear though, I have a fresh supply of cut-off wheels, sawzall blades, breakerbars and BFH's to get most any stubborn item loose one way or the other. :violent-smiley-031:
This site uses cookies to help personalise content, tailor your experience and to keep you logged in if you register.
By continuing to use this site, you are consenting to our use of cookies.


.jpg)


") with this setup, you've got really good incentive to not have an in-progress truck!
with this setup, you've got really good incentive to not have an in-progress truck! 