Switch's 2022 Tacoma Access Cab Build

Switch

Observer
After all of my work to add lights inside and outside the bed of my truck, my wife pointed out that she couldn't see the tailgate itself or use it effectively as a table with just the LED lights inside the truck cap. She asked if a light strip could be placed on the truck cap hatch. I could have run more of the LED light strip that I did inside the truck cap but in looking at various products I thought it would useful to have a dimmable light and it might be fun to have a light strip with different colors.

So I found this product which, with some testing, I learned can be hard wired to a switch so I don't need to use the remote unless I want to:

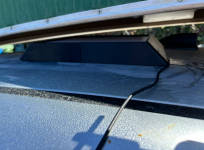
I opted to install it on the inside lip of the truck cap opening rather than on the hatch itself.

1685583057887.png

The fit was perfect on my ARE Z-Series truck cap. I almost wish I'd used this kit on the sides as well.

1685583256155.png

It has dimming controls as well a color options and annoying flashing patters. All controlled by a IR controller conveniently mounted on the shelf near the back.

1685583386467.png

It provides amble light on the tailgate even on the lowest setting.

1685583823604.png

And the colors are fun to play with.
1685584057208.png


1685584131074.png

In other news we just spent 5 days exploring trails and canoeing lakes and rivers in Northern California.
1685584837008.png


1685584909624.png

1685585257957.png
What a great start to an awesome summer. We are looking forward to many miles ahead!
 

Switch

Observer
I also added a Dual Battery on the passenger side of the engine bay.

View attachment 777534


I finally got the parts to finishing the aux battery project. The Hellroaring auxiliary battery isolator has an LED indicator and uses remote switch for connecting the aux battery to the primary.

I needed a place to mount that LED and switch and realized I could also add voltage meters for the primary battery, aux battery, and solar panel on the left side of the center console.

1689730703603.png

I only needed one switch for the battery isolator but this would be a great spot for some extra switches. So I just added a handy mount for my iPhone.

1689730867890.png
 

Switch

Observer
Today I figured out a stupid easy way to rig a table for cooking off my Yakima HD Rack
1697330257235.png

We always take this 2'x4' sheet of plywood to use a kitchen countertop on existing campground picnic tables or our folding aluminum table. Years ago I made a DIY awing that mounted the table in a similar position. Today I figured out how to mount is using just some cheap 1" webbing and two buckles.

The buckles allow to level the table even is the truck is not level
1697330295267.png


I just loop the strap through the horizontal bar on the end of the Yakima HD rack bar.
1697330327137.png


I had a couple of buckles left over from a forgotten project

1697330385006.png


1697330356309.png

I've also been working to mount my old DIY awning to the new Yakima rack. This is how it looked on my 2nd Gen Taco:

dscn8053-jpg.787835


I'll post some more details on the awning after I get a chance to see how it works (along with the table) next weekend.
 

Switch

Observer
Got a chance to test the new table and awning this weekend.

1698029855073.png

The awning is still a two person job to setup and I have not added mounts for the support legs to attach directly to the truck like on my old setup. I just wanted to get a feel for setup and take down time. It is just as sturdy and cumbersome as before. I'd really like to either improve my design or find something as sturdy but easier to set up.
1698029923920.png
Here at Artesia Dry Lake, I'm working on my model Falcon 9 and Falcon Heavy Rockets.
1698029961670.png
Back at camp this new table proved to be crazy easy to set up and very stable.
1698030403054.png1698030235302.png

Fajitas are always a camp favorite and aways hot using cast iron skillets.

1698030360150.png
 
Last edited:

Switch

Observer
Last year I installed the VLEDS foot well lights and they are awesome. Chloe Kuo does a great review of them here:

I noticed that the kit has an unused female connector and that got me thinking about adding puddle lights to the bottom of the doors.

The install is pretty straightforward since it just requires drilling a small hole for the wire in the bottom of the door panel. The parts needed are:

SKU: BAR_21_SE_W_5K
Color Temp
5000K NATURAL WHITE
qty 2
EXTENSION WIRE 2 PIN WP STYLE

SKU: 2_WP_EXT_4
Extension Length
4 FOOT
QTY 2

EXTENSION WIRE 2 PIN WP STYLE
SKU: 2_WP_EXT_8
Extension Length
8 FOOT
QTY 1

2 PIN WATERPROOF HARDWIRE Y ADAPTER
SKU: 2_WP_Y_2
Y Adapter Type
2 WAY
QTY 1

This was an amazing uplift that just took a couple of hours to do. The wiring is literally plug-and-play and runs through the existing conduit from the door to the body.

View attachment 5719506IMG_0592.jpeg


Switch

Observer
My old DYI awning earned it's weight on our most recent trip to Anza Borrego. Although it takes a few extra minutes to setup, it proved it's worth on a recent desert trip when it rained. The rain was coming in from the North West so we angled the awning down to create a rain shadow. I don't know if this is possible with traditional awnings that appear to be designed for shade rather than rain.

1712724319345.png
 
Last edited:

Switch

Observer
Here's a demo showing how my 360° 9 switch console works.


1713669878673.png

Each switch position corresponds to the geometric position of the light

Top center: Front LED light bar
Top corners: Left and right cornering lights on the bumper
Sides: Left and right side lights on the A Pillar
Rear corners: Left and right side lights on the ARE cap
Rear center: reverse light in bumper
Center: Rock lights[/MEDIA]
 
Last edited:

Switch

Observer
I guess 18 years is long enough. Its time to remodel the kitchen...

The "kitchen" in this case is three M548 ammo cans. They snap in the bed of my Tacoma like Legos™.

IMG_1460.JPEG

On longer expeditions, when I need extra fuel and water, they also snap like Legos™ but between the wheel wells.
1672453678061-png.758589


I posted about how I pack my Tacoma bed earlier in this build thread here.

My "kitchen remodel" started when I noticed how dirty and rusty the insides of my ammo cans had become. So that resulted in a lot of wet sanding and treating with phosphoric acid to prepare for painting. And why not use white paint to make the interior of the ammo cans easier to see and keep clean. I wish I had done that years ago.

1716951108033.png


When you decide you want hot food for breakfast, get a set of fajita skillets with wooden trays. These are also good for steak and other meals you want to serve hot and keep warm during the meal. Not so good for salads...
IMG_0707.JPEG

I have a pair of 4 quart pots with short handles that fit neatly in the ammo cans.
IMG_0708.JPEG

I put bowls and towels inside the pots.
IMG_0714.JPEG

So pots go in with plates with the fajita skillets
IMG_0716.JPEG

Followed by tablecloth, coffee press, cups, more towels, and propane stove fuel line. You'll notice I lined the sides with LDPE cutting board sheets to keep them from scratching and to have cutting boards handy if needed. Lastly I add a wire brush for the grill and metal spatula with the edges ground to fit the fajita skillets and some wet wipes and shop towels (not shown).
IMG_0718.JPEG


That's mostly it for the 1st ammo can.
 

Switch

Observer
The second ammo can i used to store utensils, spices, and miscellaneous kitchen supplies.

I use Akro-Mils 05905 Storage Cases because 3 fit snugly inside the ammo can leaving just enough for two 12oz MSR fuel cannisters and some olive oil. I store regular charcoal lighter fluid in one MSR cannister and Coleman (white gas) cooking fuel in the other.

IMG_0723.JPEG

Notice more thin LDPE cutting boards line the sides.

IMG_0719.JPEG

IMG_0721 (1).JPEG

IMG_0722.JPEG

I experimented with a couple of salt & pepper shakers before deciding to 3D print my own to fit the standard Morton size.
71d-7Eu4L7L._SX679_PIbundle-6,TopRight,0,0_SX679SY794SH20_.jpg


My holders use magnetic lids and have magnets on the bottoms and tops.
IMG_0725.JPEG

This way I can attach the lids to the bottoms and attach the whole shaker to the ammo can on the inside or the outside and never misplace them.
IMG_0724.JPEG


A Plano 23500-00 Size Stowaway with Adjustable Dividers is used for utensils and placed on top of the Akro Mills boxes. The utensils were mostly chosen for their low profile handles.
IMG_0727.JPEG

My 3rd ammo can is "The pantry" where I keep pancake batter mix, coffee, and various soups, canned products, smoked oysters, granola bars, and other dry goods. A 4th ammo can is used on longer trips to carry additional food and wine.

On the topic of wine storage I'll repost this info from an old post about wine storage:

I noticed that two 32 ounce Nalgene copolyester wide mouth bottles will hold exactly three 750ml bottles of wine. When I say exactly, I mean completely topped off so the wine does not get exposed to too much oxygen when stored this way - just a little "breathing" during the decanting process.

Using Nalgene bottles reduces weight and eliminates the possibility of broken glass. Also by decanting the wine beforehand, you won't shake sediment back into your wine during transportation.

Note:
  • I've found though extensive research that while 750ml is the right size "bottle" at home, 1125ml is the perfect size "bottle" when camping :).
  • Be sure to use Nalgene copolyester NOT polyethylene bottles. The polyethylene bottles are harder to clean and are smaller.
  • The narrow mouth 32 oz Nalgene copolyester bottles are slightly larger than the wide mouth bottles so you will you'll get more oxygen exposure than with the wide mouth but they are easier to pour.
  • I get my Nalgene bottles at the thrift store for $2 each.
 

Forum statistics

Threads
186,396
Messages
2,885,461
Members
226,303
Latest member
guapstyle
Top