Get your tickets to THE BIG THING 2026!
You are using an out of date browser. It may not display this or other websites correctly.
You should upgrade or use an alternative browser.
You should upgrade or use an alternative browser.
The Gubblemobile- Series III from hell.
- Thread starter Alaska Mike
- Start date
Snagger
Explorer
This sort of rebuild is expensive enough here, so I hate to think what it must cost to do over there.I am debating leaving the bulkhead unpainted. The galvy looks pretty cool, and even after it's weathered a bit I still think it has a certain charm. What do you think?
I have seen a few rebuilds with bare galvanised bulkheads, both at shows and in the magazines. It's a personal view, but I think it looks like complete ****, as if the owner was taking short cuts rather than a deliberate cosmetic choice, and the older the vehicle gets, the worse it looks. I was faced with the same choice during my rebuild, and have had no problems with the paint since it was thoroughly etch washed, etch primed and high-build primed before top-coating in two-pack.
Before you fit the bulkhead, make sure the hinge pin holes for the vent flaps are clear - they fill up with zinc and make fitting the flaps impossible until rectified, and the bonnet hinge curls can straighten out from the heat, so make sure they are correctly curled before fitting the wings (ideally before painting, if you do go that way) and that the inside faces are smooth to avoid eroding the plastic inserts (SIII).
Alaska Mike
ExPo Moderator/Eye Candy
The way I'm leaning now, the Rover will be more galvanized than painted. Frame, bulkhead, front bumper, sliders... instead of the galvanizing being an "accent", the paint will be.
We'll see.
The 2A windshield frame I got was painted on the outside, so I'll likely be removing that. From the looks of it, it was probably because the galvanizing was starting to fail and rust was forming. Anyone ever use the spray galvy over an existing hot-dip galvanization (after it was cleaned up a bit)? We don't have a galvanizer up here, so to do it "right" would cost a bit in shipping.
Yorker
Adventurer
The 2A windshield frame I got was painted on the outside, so I'll likely be removing that. From the looks of it, it was probably because the galvanizing was starting to fail and rust was forming. Anyone ever use the spray galvy over an existing hot-dip galvanization (after it was cleaned up a bit)? We don't have a galvanizer up here, so to do it "right" would cost a bit in shipping.
I did that to some cappings in 1996 and it is still sticking/not rusting through. I meant for it to be a temporary fix but haven't gotten around to regalvanizing them yet. I do not remember what brand I used.
Alaska Mike
ExPo Moderator/Eye Candy
You have no idea. I could have saved a lot of money by going with a basic, solid Rover in stock form. But no, I had to get all creative and bought a basket case that should have been left in the woods instead of a decent platform. Then I decided on custom components to further add to the expense. No Land Rover purist or poser will want it when I'm done, although it may appeal to the Jeep owner that admires the Land Rover styling (me). I'm spending a lot of money to create a vehicle that makes limited financial sense. I've done it before (many times), because I'm an idiot.This sort of rebuild is expensive enough here, so I hate to think what it must cost to do over there.
That was my understanding, that an epoxy primer would stick to the galvy and hold up well. I've always thought the fact that the owner decided to go with a galvanized coating instead of simply patching and painting indicated a calculated approach. As for aethetics, I could go either way.I have seen a few rebuilds with bare galvanised bulkheads, both at shows and in the magazines. It's a personal view, but I think it looks like complete ****, as if the owner was taking short cuts rather than a deliberate cosmetic choice, and the older the vehicle gets, the worse it looks. I was faced with the same choice during my rebuild, and have had no problems with the paint since it was thoroughly etch washed, etch primed and high-build primed before top-coating in two-pack.
Yep, a lot of the holes are going to get a tap or drill bit through them to clear the excess zinc. That task was already on the list.Before you fit the bulkhead, make sure the hinge pin holes for the vent flaps are clear - they fill up with zinc and make fitting the flaps impossible until rectified, and the bonnet hinge curls can straighten out from the heat, so make sure they are correctly curled before fitting the wings (ideally before painting, if you do go that way) and that the inside faces are smooth to avoid eroding the plastic inserts (SIII).
Alaska Mike
ExPo Moderator/Eye Candy
I was just thinking it would be cool to just have either a brushed or polished aluminum finish on the body to match the raw galvy bulkhead, it would have that classic grumman sea plane look
Unfortunately, that would just turn the whole project into a pile of galvanic corrosion. Without the paint to act as a barrier between the different metals, it wouldn't take long. We had one up here like that, which the owner was quite proud of, until I pointed out the areas where pitting had already started. He had to pull off all of the cappings (again) and ended up painting it after all.
Alaska Mike
ExPo Moderator/Eye Candy
Right now, aka rover is working on his project 109, and then we'll start on mine in the spring. He's got more experience and tools than I have for fabrication, and will likely correct some of the mistakes I would have made before they happen. The big thing is to get his project rolling.
aka rover
Adventurer
Truth be told Mike is no newbee to this kind of thing he just has a young family and not as much time as I do, we are helping each other out to get our projects done.
Mike has a ton of cool things in store for his Rover! I am looking forward to being part of his build!
Cheers Ed
Mike has a ton of cool things in store for his Rover! I am looking forward to being part of his build!
Cheers Ed
Alaska Mike
ExPo Moderator/Eye Candy
I must be seeing things, but the Roverpile has changed. It's quite bit longer than it was; seems to be about 3 years younger; says things like "aboot" in a crisp, radio-operator way; has the most hideous paint job; and has a nice Salisbury under the rear.
I must have a gas leak in my house, or I have become an alcoholic without realizing it. I'll look again on Friday, just to be sure.
I must have a gas leak in my house, or I have become an alcoholic without realizing it. I'll look again on Friday, just to be sure.
Alaska Mike
ExPo Moderator/Eye Candy
Not yet. It's over at aka rover's place, and I'm a little afraid the paint job would shatter any camera lens. Think 3-D Mossy Oak. I'm afraid to let the wife see it, and have only described it in very general terms until it can be made presentable. The bones are solid, but even the most hardcore Series guy would feel the need to repaint. Somewhere under the 23 layers of peeling MOD paint might be something resembling patina, but I doubt I'll ever be able to get back down to it.Any pictures?
Right now the plan is to only keep the rear tub, frame, axles, and a few other parts, then add a few from my pile and Ed's pile to make a serviceable Rover. The hardtop is too pretty to be placed near the body.
I have a wife, 3 kids, and a big Lab. aka rover (rightly) pointed out that an 88 might not be the best platform for family fun, even though I like short wheelbase rigs. Now's the time when I still have a choice in directions.
Alaska Mike
ExPo Moderator/Eye Candy

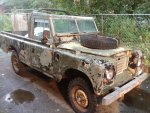
So here it is: The ugliest 1977 Series III ex-Canadian Military radio truck known to man.
It's getting a full hardtop to replace the soft top, a lot of replacement sheetmetal, and most of the parts originally intended for the 88.

akrover and I are tearing it down now, sorting out the various parts, and planning how to tackle the project. After years of inertia, it's just nice to be moving again.

Feel the MKIII Kodiak love.
Alaska Mike
ExPo Moderator/Eye Candy
Going with my current trend, I'm shifting plans a little bit and going with a P38 steering box instead of the Scout II box. The pitman arm is already pretty much the right length, and as aka rover pointed out to me, the bolt pattern is a little stronger. Since aka rover has the patterns for the mounting plates already and the experience of doing his own P38 conversion, this should be a relatively smooth operation.
Right now it's pouring down cold rain, and neither one of us wants to stand out there wrenching today. So, I did a little shopping for door, windscreen, and vent seals to keep the rain and snow out this winter. I have a gallon of SEM gloss black Rust-Shield on the way for the frame and other rusty bits, and plan on hopefully getting the front half of the frame cleaned and painted within the next couple weeks. Weneed to have this sucker semi-enclosed before the snow starts to fall. Considering that we've already had our first snow of the year in Anchorage, the clock is ticking...
Right now it's pouring down cold rain, and neither one of us wants to stand out there wrenching today. So, I did a little shopping for door, windscreen, and vent seals to keep the rain and snow out this winter. I have a gallon of SEM gloss black Rust-Shield on the way for the frame and other rusty bits, and plan on hopefully getting the front half of the frame cleaned and painted within the next couple weeks. Weneed to have this sucker semi-enclosed before the snow starts to fall. Considering that we've already had our first snow of the year in Anchorage, the clock is ticking...
Similar threads
- Replies
- 65
- Views
- 11K
- Replies
- 0
- Views
- 458
- Replies
- 2
- Views
- 540
- Replies
- 0
- Views
- 268
