Yeti and the Marshmallow

Basement Yeti

Explorer
There's an RV salvage yard in Fontana called Walt's. You can probably get there a sofabed to mount lengthwise in your van. They just screw down on top of a box, so you could build a storage box, access the inside by lifting the seat, and the whole thing folds flat for a bed. That's your ticket.

There may be a similar shop down in SD.

I've done some research on those beds and most of them are too long to fit across the 4' space I have going horizontally across my van. But I will hunt around and see if I can find a yard here, and call and harass them. =P
 

Basement Yeti

Explorer
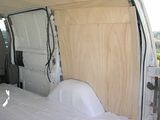
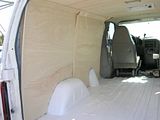
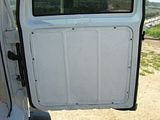
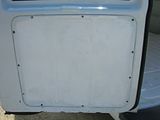
Today I got the doors insulated, the final trim paneling done, paint prep and painting done. I honestly didn't think I'd get it all done today but I did! So now all that's left is to lay some 1/2" plywood on the floor, run some wiring and lighting, and stain the wood!


Perhaps I should have used a roller but I think the brush texture looks cool.


The paint was nearly stink free and very easy to work with, but very thick. I left it in the sun for a while and it helped.

1 week till mom gets here, a bit more till the adventure starts!
 

Lichen

Explorer
If nothing else, you could just buy a really nice sleeping pad for ma. It's great to see the progress that you're making for a guy who couldn't even drive last month. We learn by our mistakes.
 

Basement Yeti

Explorer
Thanks man, I still hit curbs occasionally. :sombrero: But seriously, I am super proud and super happy about this project and the way my life is going.

That futon will fit PERFECTLY between my wheel wells with 10" of space on each side. I've been in communication with the seller and the dimensions of the couch are the same as the bed, the back just folds up and down. I have 5'7" width and the futon is only 3'9" long. My plan was to build some boxes over the wheel wells but I can extend them back and put some padding on them to get a full 5'7" long x 36" deep bed that folds into a couch. Leave them open to tie into the paneling I'll put on the bottom of the futon to make rear access storage.

The legs are too tall though, my wheel wells are 10" tall, let's say 13" with the box and sub floor. They're 16" tall, I could lop 3" off the legs easily. The main reason for this is for head room while sitting.

That would also still leave me 4'3" or so on that driver side wall, and about 12" on the passenger side wall up front from the bed/couch.

I could put my converter, inverter, fuse box, etc. in that 12" space, and kitchen stuff, clothes, etc. on the driver side wall. I could even get some of those plastic draws instead of building up the front of the futon and store my clothes and stuff in there, and still have some space behind those for rear access storage, super simple.

The possibilities are endless. All I know is that futon will be super comfy for mom, be good to lounge on while in couch mode, and save me tons of labor and head aches. It's perfect!
 

Basement Yeti

Explorer
Bought this here mini futon. It fits perfectly between my wheel wells with 9 1/2" on each side. I'll build boxes around the wheel well extending back beyond them on each side of the mini futon and pad the tops of the boxes to extend the sleeping area.
http://www.dormco.com/Modern_Dorm_Mini_Futon_Dorm_Room_Furniture_p/dormco-3103b.htm

I wanted this one but they were out of stock and wouldn't have them back until July. I'm just going to put a sheet over it anyway so it doesn't matter. To be honest I don't think the mattress part will last too long and I'll probably replace it in the future. The part that annoys me is that center missing section folds up and down separate from the rest of the back, ah well, I'll figure something out.
http://www.dormco.com/College_Mini_Futon_Dorm_Furniture_p/DORMCO-3102.htm

I also ordered this.
[ame="http://www.amazon.com/gp/product/B001P6FTHC/ref=ox_sc_act_title_1?ie=UTF8&m=A1UNWS4MSNTF2A"]Amazon.com: Fuse Block Ato 12 Circuit With Groun: Sports & Outdoors[/ame]

And this.
[ame="http://www.amazon.com/gp/product/B001PE6XTC/ref=ox_sc_act_title_2?ie=UTF8&m=A6AVNXH0138GC"]Amazon.com: 12V Rope Lights; 10Ft Pure White LED Rope Light Kit; Christmas Lighting; outdoor rope lighting: Automotive[/ame]

That should do me for a while. I got the templates made today, it was a real pain in the butt, but I accidentally threw one out. Tomorrow I'll re-make it and hopefully get the 1/2" plywood floor put in. Then I need to do a bit of wiring, stain the wood, build out a few plywood things and I should be done for a while.

I've decided not to put the bulkhead back in. The van feels roomier without it.

I've got a list of some stuff I need to buy too. Deadline is getting closer.
 

Basement Yeti

Explorer
Got the floor in. I'm not going to insulate it.

I did go with 5/8" OSB for the floor and I bought some peel and stick linoleum tiles to go over it, I'll chuck a small rug over that. Should give some insulation.

For the extra r-value it wasn't worth losing that much headroom.

I was going to go with the 1/2" but the 5/8" was on sale.

The back of the van sits lower now that the floor is in, that 5/8 is HEAVY. I nearly died lugging the two sections upstairs to cut. However, the 1/2" wouldn't be THAT much difference, maybe a few lbs. I went with the thicker wood too to secure stuff to as well.

Before I got it installed I was thinking up ways to secure the OSB to the van, but honestly there is no need, maybe a few screws through the OSB into the lower ribs, but it already sits snug. Now I did plug up all but 3 of the holes from where the bulkhead was installed, so tomorrow I am going to fill those 3 holes and let the caulk dry, as well as notch some spots into the OSB so it sits flush. Then I can peel and stick the linoleum. It was too dark for photos, but I will take some tomorrow.

After that I just need to run some wiring and I'm done with the conversion for now.

Still need to buy some stuff for the adventure, drop off some stuff to donate and go back to the DMV to add the vans title to my registration.

Here is how I spent my time while sick, thinning out my belongings.

To be donated/junked, round two.


I might recycle the desk for use in the van, TV and printer are staying here.


The rest of all I own now.


Last edited:

MrBeast

Explorer
you will learn to love to hate the lick and stick tile. Eventually you will want to replace it with a solid piece, but for now it will do just fine.

I know what you need to do, you totally need to put shag carpet all over the interior in the back and add a lava lamp.. :elkgrin:
 

Basement Yeti

Explorer
you will learn to love to hate the lick and stick tile. Eventually you will want to replace it with a solid piece, but for now it will do just fine.

I know what you need to do, you totally need to put shag carpet all over the interior in the back and add a lava lamp.. :elkgrin:

Awwww yeah. :victory:
 

r_w

Adventurer
you will learn to love to hate the lick and stick tile. Eventually you will want to replace it with a solid piece, but for now it will do just fine.

Look for a garage floor liner on sale and pick it up when the price is good enough. I picked one up at a garage sale for a few bucks--it was still in the shrinkwrap :wings:
 

Basement Yeti

Explorer
Finally feeling better!

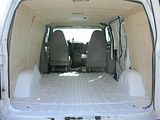
Today I got the floor nearly finished. I plugged the bulkhead holes with bolts and sealed them with self leveling caulk. Then while the caulk was still wet I put the front floor section in place to mark where the bolt heads stuck out 1/8" and I notched out cavities for them to rest in inside the wood so the floor sat flush to the rear section.

Next I laid down some linoleum tile, cutting it size where needed. I came up 10 tiles short so tonight I went to Home Depot and got a few more.

Now as I mentioned the floor is fine, sits in nice and tight, doesn't squeak or wobble. But I bought these L-shaped brackets just for safety sake. The only place that floor can go is up, so in the bizarre realm I hit a giant bump and the floor comes free or something else equally insane I bought these to secure the floor.

I also bought some anchor points to secure my tools, toolbox, etc. with tie down straps.

I tried 2 sets of batteries and this was the only shot I could get before the last set died, I then noticed there was gunk on the lens.


Uploaded with ImageShack.us

Tomorrow I will get those brackets in place, finish the floor tiles, mount those tie down anchors, and make the pieces for the wheel well boxes (waiting to make the boxes until I get the bed to be sure I allow enough space for it)

Still to do is acquire a fuse block and run a wire from my MELC to the rear for the vent fan and lights, and so I can re purpose that for charging the batteries from the alternator, when I get them.

Then there is the matter of the few living essentials I need, and to get down to a donation box and the DMV to add my title to my registration.

3 days left till my mother gets here, and 5 left until I depart.
 

MrBeast

Explorer
Finally feeling better!

Today I got the floor nearly finished. I plugged the bulkhead holes with bolts and sealed them with self leveling caulk. Then while the caulk was still wet I put the front floor section in place to mark where the bolt heads stuck out 1/8" and I notched out cavities for them to rest in inside the wood so the floor sat flush to the rear section.

Next I laid down some linoleum tile, cutting it size where needed. I came up 10 tiles short so tonight I went to Home Depot and got a few more.

Now as I mentioned the floor is fine, sits in nice and tight, doesn't squeak or wobble. But I bought these L-shaped brackets just for safety sake. The only place that floor can go is up, so in the bizarre realm I hit a giant bump and the floor comes free or something else equally insane I bought these to secure the floor.

I also bought some anchor points to secure my tools, toolbox, etc. with tie down straps.

I tried 2 sets of batteries and this was the only shot I could get before the last set died, I then noticed there was gunk on the lens.


Uploaded with ImageShack.us

Tomorrow I will get those brackets in place, finish the floor tiles, mount those tie down anchors, and make the pieces for the wheel well boxes (waiting to make the boxes until I get the bed to be sure I allow enough space for it)

Still to do is acquire a fuse block and run a wire from my MELC to the rear for the vent fan and lights, and so I can re purpose that for charging the batteries from the alternator, when I get them.

Then there is the matter of the few living essentials I need, and to get down to a donation box and the DMV to add my title to my registration.

3 days left till my mother gets here, and 5 left until I depart.
you are going to be hoofing it to be road ready in time but you can do it.
 

Basement Yeti

Explorer
you are going to be hoofing it to be road ready in time but you can do it.

My mini futon will be here the day after my mom gets here but it gets shipped whole and all I need to do is lop 4" off the legs, punch a hole in each leg, run a bolt through each hole and L-brackets on each side and screw it to the floor. Should take no more than an hour.

Everything else can be done on the road if need be. Stuff like securing plastic drawers to the floor with a few screws, popping a hole in the firewall and running a bit of wiring, mounting curtains, building the wheel well boxes, etc.

What's going to take time is collecting things I need. So far my list is 12" tall plastic drawers, curtain rods and curtains, washcloths, a pot and/or pan, camp stove, water jug, water filter, plastic silverware, paper plates, solar shower etc.

Oh, I do have a question. I am looking at a 30 dollar coleman single burner stove that uses a disposable bottle, can I adapt that burner to work with a bigger propane tank, like a grill tank?
 
Last edited:

r_w

Adventurer
Oh, I do have a question. I am looking at a 30 dollar coleman single burner stove that uses a disposable bottle, can I adapt that burner to work with a bigger propane tank, like a grill tank?

Yes, but the conversion hose will cost you almost as much.
http://www.walmart.com/ip/COLEMAN-8-PROPANE-HOSE/13848690
or with quick tach:
http://www.walmart.com/ip/Stansport-5-Hose-Connects-Appliance-to-Bulk-Tank/10899099

It may be worth spending more up front for one that includes the adapter. That single burner one really needs the 1 lb tank as the stand--you would be better with the 2 burner version.
http://www.walmart.com/ip/Brunton-2-Burner-Stove/15135797

Look at the BTU ratings of the burners--10,000 BTU is barely enough to boil water in the breeze.
 

Forum statistics

Threads
187,245
Messages
2,892,527
Members
228,046
Latest member
evilgirl
Top