1977 Pop Up Camper Rebuild

hesterj

Adventurer
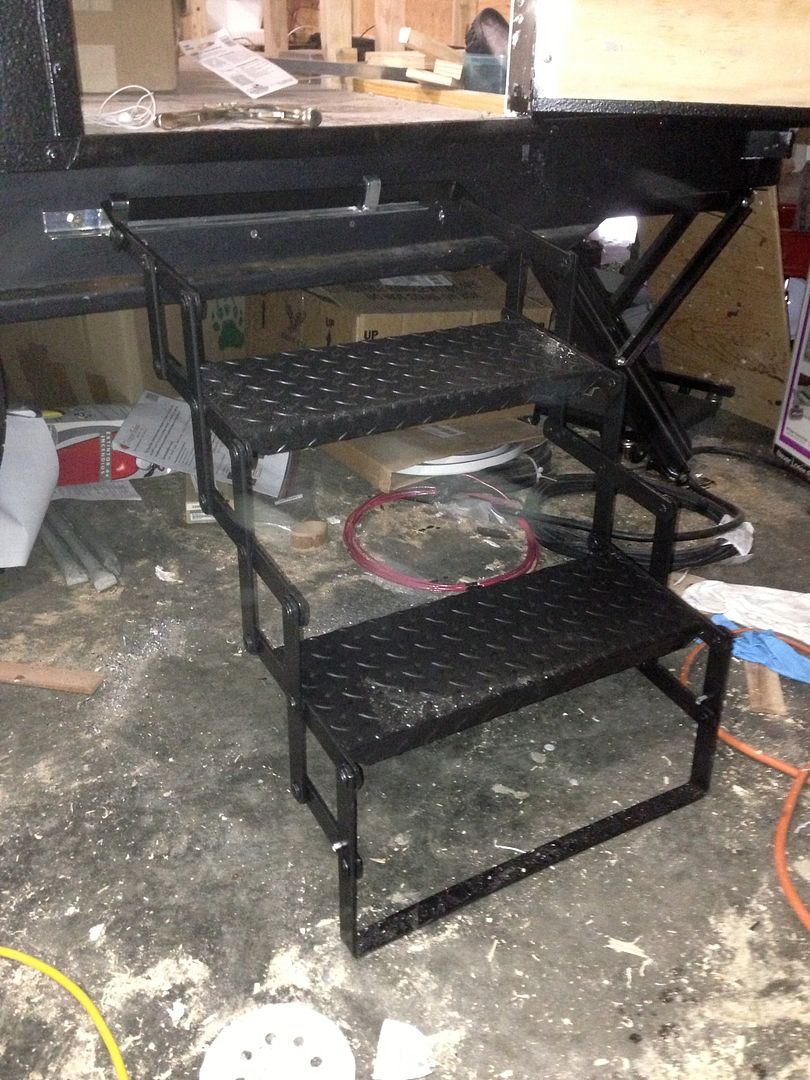
I really like that you decided to show the flaws in the bedliner. In no way do I think they look bad. In fact, I like it better!
It's no cookie cutter trailer thatbwas mass made by some far off company. It was built by one guy in his garage with nothing more then a desire to have it his way. Congrats on a well built project sir. I look forward to reading more.
 

Mark Harley

Expedition Leader
I think it turned out great! Hope your wife is healing well.
This has been a fun build and I have aquired many ideas.
 

TheThom

Adventurer
I got the water cans, license plate holder, and spare tire carrier mounted to the back of the camper. If anybody has any old Jeep spare tire covers they are will to donate, please feel free. Also, the water cans are mounted sideways to allow access after the bunkends are out - someone always asks.

Sorry, boxes are still strewn about the floor from when I painted it

IMG_0167.jpg


IMG_0161.jpg


I mounted the other two water cans on the front of the camper. I also put the propane tanks back on their mount

IMG_0163.jpg


IMG_0165.jpg


I'm pretty happy with the way they turned out. I bought them a long time ago and I'm glad they look OK. I had to pre-drill all of the holes, and use them to plan out my stud locations a few months ago.

Next I need to install tail lights, marker lights and Quick Fist clamps

Peace out

Thom
 

VanIsle_Greg

I think I need a bigger truck!
Looks great. Those Scepter water cans work great, I have a set and they are very sturdy. The best part, they do not flavor the water at all...which I was very pleased with. I like it with the spare tire on the back too, looks tight!
 

TheThom

Adventurer
Got the first cargo door all set up. It looks a little busy, but everything has its function. There are 2 cam latches to seal it shut. There's a black hasp that has 2 functions: 1) lock the cargo doors and 2) you can see in the pics that I installed an eye-loop before I painted it so I could use the hasp to prop the door open. That way it will stay open for loading and unloading. There's also a handle to pull the door open - I didn't want the hasp screws to get all of that torque.

IMG_0171.jpg


The chain looks plastic because of the flash, but isn't

IMG_0172.jpg


IMG_0173.jpg
 

Rbertalotto

Explorer
Looks GREAT!

My first camper was almost a carbon copy. A rebilt COX camper.

My storage doors opened up like yours at first. But I soon flipped them so they opened down. Much easier to access and they created a nice level shelf. But I guess with two chains yours would make a nice shelf at a better height.

My "kitchen" slid out for use at a roadside rest area, and then lifted off for use at a more permanent camping location. What are your plans?
 

TheThom

Adventurer
Looks GREAT!

My first camper was almost a carbon copy. A rebilt COX camper.

My storage doors opened up like yours at first. But I soon flipped them so they opened down. Much easier to access and they created a nice level shelf. But I guess with two chains yours would make a nice shelf at a better height.

That's one reason I used the chain, I can adjust the lid up more or use it as a shelf. I used the waterproof teardrop hinges because they're waterproof. That'll prevent me from flipping it, but I did mull over having them open down instead of up. I waterproofing beat function.

My "kitchen" slid out for use at a roadside rest area, and then lifted off for use at a more permanent camping location. What are your plans?

I thought about the slide out kitchen and I would've loved building something - you can be so creative with it. But I plan on camping around my aunt's cabin and we've seen bears there. I don't want to cook right next to or in the camper. That scared me away from the slide out kitchen. The utility door in front of the cabin door will have a slide out shelf and I'm going to build a custom chuck box to fit into that space. For a stove I have a camp chef explorer 2 burner stove
ONCO.jpg
I also have an O-Grill 3000 that will both run off the propane tank once I've bought the right hoses and connectors Ogrill_orange_vl.jpg

I picture this as a killer base camp setup - we'll see how it turns out.
 

TheThom

Adventurer
I've had some time for the camper, but it doesn't really show. I got all the lights attached and am wiring them up. It turns out that the junction box I bought uses randomly assigned colors of wires, so it took a bit to figure out what does what. I'm got the marker lights running, but not the turn/tail lights. I suspect they need a better ground. I wasn't planning on having back up lights originally, but "if you're going to build it, you should build it right...." They fit in OK on the back even though they weren't in my original layout.

Some pics of the lights in place. You can see that I finished up all of the doors as well. (please ignore the piles of boxes to go to recycling)

0B6E8D8A-6944-45CA-A4EC-8C6BC8D7089B-12129-0000072C445D0F8C.jpg


F9E57CD9-DEAF-424B-8D8C-A5A4AA0D1356-12129-0000072C4C1D50B6.jpg

3B0C0B50-0BA4-4555-A14A-1185D49E5D26-12129-0000072C3B6694F0.jpg


I'm anxious to get the wring done and start the interior. I have an idea that I think will work well.
 

Damaged 1

New member
Great work !!! I didn't read all of the posts but watched your progress with your pics ........ Keep them coming ! I am learning a lot from your great ideas .... I will go back and read the entire build for sure...........
 

TheThom

Adventurer
A lot of these rebuilds have various options for the camper steps. I decided to go with these

http://www.etrailer.com/Enclosed-Trailer-Parts/Brophy/SS02.html

I had a little trouble drilling the holes to line up - mostly because I'm not skilled, but in the end they're OK. Hopefully the extra holes (which you won't see close up) didn't do too much to weaken the frame.

Anyway, turned out nice, should be useful. They come off of the bracket that's bolted to the frame and fold down.

IMG_0215_zpsb70327bd.jpg


IMG_0214_zpscaf39c77.jpg


I'm still working on the ground for the tail lights. Once that's done, I can start working on the interior [:D]
 

TheThom

Adventurer
I've had a little time to work on the camper lately. I've got the bench seats finished off. I decided to use fabric to finish the walls. I found a felt that's made from recycled plastic bottles and is mildew resistant. It's also cheap. In the pics, the chrome circles are LED landscape lights. They will function as accent lights - that way I can have those on in the middle of the night and won't be pitch black for the kids.

CE2C0138-ED8E-47AA-ACE2-25AB78C1A3E2-521-0000003585BF6CC0_zpsf7693850.jpg


72F5078F-21E2-4F6F-AE48-FB38CBDCC077-521-0000003592992255_zpsefef8074.jpg


F7135562-DD51-49B4-8C8C-912C3B6B758E-521-000000359B59ABC0_zpse412a003.jpg


Next step is to put the interior side panels up. Then I attach the bed slide outs!

I have to have ankle surgery in the coming months, so I'm trying to push through and get this at least campable before then. I might not finish the interior wiring or the slide out chuck box before this season starts. I was also originally planning to rebuild the roof this year, but it looks like that might wait until next season.
 

AeroNautiCal

Explorer
I really like how you've designed and built this, and the cabin floor reminds me of a yacht interior.

Very nicely done.

Good luck with your surgery.
 

TheThom

Adventurer
Got some more done, including a pretty big mental milestone: I got the bed slide outs installed! They fit perfectly and if the measurements hold true, the bed platforms should fit perfectly. Pretty stoked. My goal for the long President's Day weekend was to get to where I am now.

Pics

5C93BDC7-A0AC-410E-922A-D67ED977CBCA-721-0000005CB381527B_zps63a178d5.jpg


BC0E010B-0B2F-4D38-A101-4701EBC4A5DF-721-0000005CBB2BD800_zps61f6bca4.jpg


There is no way to access the under bench storage from inside the camper, so I cut out a small door in case I need to reach/adjust something in the middle of the bench area

AD17EA96-5D1E-4B2F-B9C4-7F3644C0E246-721-0000005CC7306E0D_zps7ba85b4c.jpg


Peace out
 

Forum statistics

Threads
186,736
Messages
2,889,514
Members
227,012
Latest member
dalewelsh
Top