1983 Chevrolet K10 (Canadian)

chilliwak

Expedition Leader
Two questions for somebody more familiar with the board:
1) Why are my pictures now turning up as thumbnails?
2) Is there away to print the thread off with the pictures?

THANKS

Try hosting your opictures and a website like www.photobucket.com and then taking the image link and posting it in your thread. works every time and its free..:wings:
 

Sponge

Adventurer
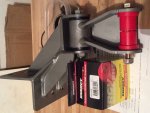
Slowly inching towards ORD rear shackle replacement....
Energy Suspension Part #3.2126R
 

Attachments

  • image.jpg
    image.jpg
    516.4 KB · Views: 35
Last edited:

arveetek

Adventurer
I'm going to have to find a hitch that mounts to the outside of the frame or modify this one when the time comes.

Just FYI: I'm in the trailer hitch business, and I am not aware of any hitches on the market that mount on the outside of the frame; they all mount to the bottom of the frame rail. You'll probably need to modify your existing hitch.

Casey
 

Sponge

Adventurer
Just FYI: I'm in the trailer hitch business, and I am not aware of any hitches on the market that mount on the outside of the frame; they all mount to the bottom of the frame rail. You'll probably need to modify your existing hitch.

Casey

Thanks! Good to know. I won't spend much time looking for one then!
 

Sponge

Adventurer
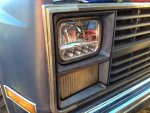
Got a bit crazy and bought some lights today.
Grote LED 5x7 Headlamp #90951-5 $588 from Gregg Distributers. (3 year warranty)
Fixing the high/low light becomes a priority!lol
 

Attachments

  • IMG_0123.jpg
    IMG_0123.jpg
    560.7 KB · Views: 33

chilliwak

Expedition Leader
Cool looking lights but WOW the price tag! I have bought whole functioning vehicles for less....:wings:
 

Sponge

Adventurer
If your upgrading headlights pick up:
HELP! #42119 Headlamp adjusting screws for $6.42 at Auto Value.
When I adjusted the new lights the screw clips were brittle and broke causing a trip to the parts store!
 

Sponge

Adventurer
Started popping the rivets out to replace the shackle hangers this afternoon.
IMAG0767.jpg

First I would cross cut the head with a zip disc then use the chisel to break the head off.
IMAG0768.jpg

Next step was to use the punch to knock the rivet off and drill the hole out to 7/16" I replaced the rivets with a bolt and stover nut to secure the old hanger for now.
IMAG0769.jpg

I removed four of the twelve rivets before darkness started to hamper progress. Might finish the rest of the job at work, kinda felt bad for the neighbours its a noisy process...

Tools used for the job:
IMAG0770.jpg
 

chilliwak

Expedition Leader
Good work Sponge! We all know its a pain removing those rivets. Keep it up. you know you will like the end result. Cheers, Chilli..:wings:
 

Sponge

Adventurer
Finished busting out the final 8 rivets today. Need to borrow some gunnage from work and a garage from a friend for the next phase of the reverse shackle mount install.
 

Attachments

  • IMG_0124.jpg
    IMG_0124.jpg
    515.8 KB · Views: 32

Sponge

Adventurer
After a nice run of -30C to -40C weather got the truck backed into a friends shop to thaw out.Did some reference measuring and found:
Floor to Fenderwell height-PF 42 1/2"
PR 42 1/2"
DF 41 1/4"
DR 42"

To check degree of the differential I measured:
Bottom of the cooling fin on diff= 10 degree
Driveshaft= 10.5 Degree
Transfer case= 7 degree
 

Attachments

  • IMG_0126.jpg
    IMG_0126.jpg
    522.2 KB · Views: 28
  • IMG_0127.jpg
    IMG_0127.jpg
    538.2 KB · Views: 30

Sponge

Adventurer
I obviously managed to get the passenger side block out but went at it half retardly by lowering the differential to remove the block. On the driver's side I will remove the shackle mount/ shackle then I can lift the spring and remove the block should be safer and easier.
 

Forum statistics

Threads
186,633
Messages
2,888,281
Members
226,767
Latest member
Alexk
Top