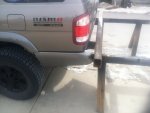
2001 R50 Pathfinder Build-up.

Weekender41

Ready to Learn
Looks great! And very sorry to hear about the death wobble, I have the same issue with the trailing arms' movement, but don't have the wobble. I'm having trouble finding the right terminology to explain, but here's a link to the death wobble thread. It's the lower control arms' bushings which cause the issue.

Thanks for the link! I think ill just replace the whole arms because that is only 58 more dollars and I can do that myself no problem. If the stock ones lasted this long then that's good for me.
 

Weekender41

Ready to Learn
So a little thought here. Most of us know how the Xterra rear tire carrier bumper comes... it is basically replacing the plastic in the middle section of the bumper with a metal bumper. Well I got to thinking.. Because it would be kind of hard to make side wings off my bumper, I thought that I could make something similar to the Xterra idea. The stock plastic bumper attaches with a bracket and two bolts right next to the wheel well and along the rear of the vehicle close to the hatch with pop-tabs. My idea is to cut the sides off the stock bumper and attach them to my metal bumper. I would only want the sides of the stock bumper and will even trim those up because they hang so low. My only question is attaching plastic to the metal stout enough to drive with.

I will continue to play with this idea until it frustrates me and I just build metal on the sides or if anyone else has a good idea, so please let me know. I will add a photo of what I am thinking when I get back from school.

Cheers
 

stioc

Expedition Leader
Nice work! I'll be watching the progress with interest as I had pretty much the same plans for my rear bumper...but it's taking the back seat after figuring out I could keep my tire in the OEM location and the hilift on the front bumper. I still want to build one though when I have some additional time.

Just replace the whole control arms, a whole lot easier and not much more expensive than getting the bushings pressed in, it's what I did and I have a press.
 

rgallant

Adventurer
Just a point I replaced my rear control arms and only got a year out of them, to fair I had a shock bushing go that might have contributed. I went poly after that and 2 years down the road no issues. I average around 3000KM of forest service road travel a year everything from most flat and level, heavy washboard, and what looks like left over rocky creek bed.

Just something you may want to consider.
 

Weekender41

Ready to Learn
Nice work! I'll be watching the progress with interest as I had pretty much the same plans for my rear bumper...but it's taking the back seat after figuring out I could keep my tire in the OEM location and the hilift on the front bumper. I still want to build one though when I have some additional time.

Just replace the whole control arms, a whole lot easier and not much more expensive than getting the bushings pressed in, it's what I did and I have a press.

the area to mount the tire in the oem location gets really big once you take off all the un necessary junk. If you leave just the chain device down there then you should have about 32" between frame horns (its 36" from outside to outside) and most 32" tires do not really measure in at 32". Many are 31 1/4" up to 31 7/8" but im not sure what yours are. Well so far I have spend 100 bucks and this includes all the steel, the shop cutting the mounting brackets (I wasn't spending that kind of time with a grinder), the latch system and the welding supplies (just a .035 wire spool). I will be spending another 75 plus shipping for the spindle assembly and maybe 40 more in steel. Definitely a lot less than 1500 and I can live with it not looking like a million bucks.
 

Weekender41

Ready to Learn
Just a point I replaced my rear control arms and only got a year out of them, to fair I had a shock bushing go that might have contributed. I went poly after that and 2 years down the road no issues. I average around 3000KM of forest service road travel a year everything from most flat and level, heavy washboard, and what looks like left over rocky creek bed.

Just something you may want to consider.

Thanks for stopping by! The only negative side I can see to the poly bushings is how it makes the ride more stiff. Im not sure if the valving on the shocks were off or my springs were a little stiffer than most but it is a very stiff ride. The harsh ride is also why I am now making front and rear bumpers. If I add something to make it even stiffer it would no longer be comfortable to drive. It feels like my work truck as is.
 

Weekender41

Ready to Learn
What are you planning to make the swingout hinge from?

A to Z fabrication MEGA spindle. it holds like 2000 lbs when installed correctly and after I weighed everything I MIGHT be at 200 lbs. Not worried haha. But I went with the mega spindle because the standard one if for a 31" tire and no options. Some folks use a trailer hub and that is just...idk, to buy a trailer hub then cut off the flange then clean it (because I wouldn't buy a new one) then install it and pray it works just does not sound like the peace of mind I like haha. This is 74 bucks and whatever shipping is. The latch for the other side is 9 dollars with amazon prime shipping so I figured if I am going to spend money anywhere on this bumper.... it will be to the shop to cut some of the things I can not and a good darn spindle. :ylsmoke:
 

Weekender41

Ready to Learn
Okay so the xterra idea was shut down. Haha ugh. I cut the bumper the way it would need to be to sit correctly and it sticks back not far enough. This bumper is probably going to stick out 2 inches farther than the stock one did but it is also almost a foot higher from the bottom most point. So for right now I am going to make the rest of the bumper and have it fully operational and not put any side pieces on it. I am also going to leave the ends of the bumper open for now so when I do go to put something there I can shape whatever I need to. I will probably end up getting pipe bent to the shape I want and have it along the sides because the sides are purely aesthetics and therefore last on my list.
 

wreckdiver1321

Overlander
A to Z fabrication MEGA spindle. it holds like 2000 lbs when installed correctly and after I weighed everything I MIGHT be at 200 lbs. Not worried haha. But I went with the mega spindle because the standard one if for a 31" tire and no options. Some folks use a trailer hub and that is just...idk, to buy a trailer hub then cut off the flange then clean it (because I wouldn't buy a new one) then install it and pray it works just does not sound like the peace of mind I like haha. This is 74 bucks and whatever shipping is. The latch for the other side is 9 dollars with amazon prime shipping so I figured if I am going to spend money anywhere on this bumper.... it will be to the shop to cut some of the things I can not and a good darn spindle. :ylsmoke:

I'll be interested to see how it wprks out for you. I don't like the idea of a single shear hinge for a tire carrier personally, but a lot of people have them and a lot of them work just fine. I'm a bit cauious I guess. I'm using a 1 inch bolt with a sleeve and 2 bushings between a couple brackets for my bumper build.

What latch did you get?? 10 bucks is awful cheap. I think mine were 43.

Not to crap on your bumper build! I'm just curious.
 

Weekender41

Ready to Learn
I'll be interested to see how it wprks out for you. I don't like the idea of a single shear hinge for a tire carrier personally, but a lot of people have them and a lot of them work just fine. I'm a bit cauious I guess. I'm using a 1 inch bolt with a sleeve and 2 bushings between a couple brackets for my bumper build.

What latch did you get?? 10 bucks is awful cheap. I think mine were 43.

Not to crap on your bumper build! I'm just curious.

No man its totally cool! I understand the questions. I was thinking dual swing outs to make it even less stress on the hinge but after talking to the guy from a to z I feel comfortable, plus that saves me some money. The spindle for mine is 1.5" diameter and the sleeve is 2.25" diameter so its pretty stout. Haha that's what I thought about the clamp. Its a "powertec 20306 2000lbs latch action toggle clamp" the exact same type latch below it only shorter was 45 bucks or so. This one is kind of long at 8 inches but that only means the u-bolt is long. My buddy got one and put a smaller u bolt and it works great. 8" clamp can be tightened down to fit my 6.8" needs. Plus if it does not work, return it and upgrade or if it breaks... 9 bucks out of luck and pray it doesn't fail on the highway.
 

Weekender41

Ready to Learn
Brackets 80% done

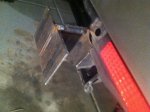
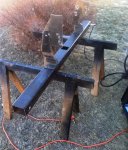
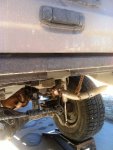
Well the brackets are welded in to the point they are not going anywhere but there are still the back sides that needs to be welded. The angle didn't work with the mounts on the vehicle and before I take them off I will weld the mounts and shims together so they are a breeze to put back in. Here are some more cell phone photos.
This is me trying to use the stock wings from the oem bumper. As you can see it just doesn't go back far enough. And it has about 4.5" cut off from the bottom of it. Anyways I will just have pipe bent to the same shape and then weld 1/8" flat stock on top of that to give it the same look. I have to thank my dad for the idea. The pipes and flat stock will be welded to the main bumper and then bolted to the existing sheet-metal using a little hole that is pre-existing. I can get a photo if anyone wants to see that.
003.jpg
Here is the way I welded the brackets on. At 20 bucks per pair of 6x6 blanket, I don't feel bad for cutting one.
005.jpg
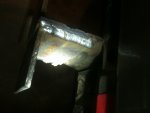
Here is a photo of the welds on the top of a bracket. The bottoms are welded also and once I take off the mounts I will weld the backs. I wont be grinding down any of the welds until the very end unless I need to redo it so if you see a terrible goopy weld, as long as there is good penetration and no air bubbles in it its good for now.
009.jpg
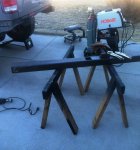
And a close up. This is .035 solid wire with 75% Oxygen 25% Argon shielding gas on a Hobart Handler 140. For 400 bucks this thing is fantastic. Just my skills are not :elkgrin:
010.jpg
It started snowing so I stopped. When it gets better outside I can tack the mounting plates together and finish the brackets. Once the brackets are done I will take the bumper to the shop to have them cut the hole for the receiver sleeve and the spindle then I will line it up and tack it to the mounts. Remove the whole thing and finish welding bumper to mounts. Then the fun begins with putting the hinge and swing arm in :)
 

Shanfari

DhofarX.com
It must be fun to do things by yourself, but I'm too lazy for that :ylsmoke:. Really nice work with your pathy ^_^.

I just hate that the pathfinder has turned into a momfinder in 2013! Pure insult for these cars :(

Greetings :)
 

Weekender41

Ready to Learn
Bumper is getting Closer!

Its time to get ready! Today was crazy warm (like 57!) So today was going to be productive!
006.jpg
This was not where I welded the mounts onto the bumper but here is where the shims were welded to the mounts.
008.jpg
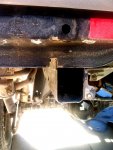
Here is the area that had to be ground down so the receiver tube has clearance.
009.jpg
This is the area next to the mounts that have to be ground down so the mounts could be more flat (stronger)
010.jpg
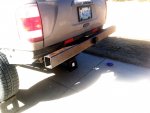
Here is the end of the day ( I had to go to work :( bummer ) Anyways everything is mounted up and fully welded. Very few have been ground down as I will go through once I am done building the whole thing and make them all clean.
It is stupid strong. I put a chain through the middle of the bumper and pulled on this huge tree and the tree started moving :wings:
012.jpg
So tomorrow I will buy the thin metal for the wings of the bumper and these side wings will be sneakily bolted to the side. Usually you cant bolt the wings of the bumper to the vehicle because during flexing the frame will twist. Due to the subframe on the pathfinder the vehicle does not twist as much if at all. During heavy flexing the stock bumper does not have a large gap on one side and is smashed up on the other. To be sure I will weld the wings of the bumper on and the raise one side of the vehicle off the ground to max the suspension flex. I will mark how much the wings drop and go from there but I don't believe it will be much. Anyways the wings need to be bolted closer to the wheel so that during highway speeds they will not catch wind and flare out. Its either that or add a gusset to the wings and leave them free hanging to allow flex. Suggestions would be appreciated.
On a side note to wreckdiver especially... I found a new way to attach the swing arm to the bumper. On the back side of the bumper I will weld a piece so the swing arm can not swing into the rear hatch. This piece will have a thin piece of rubber on it so metal is not rubbing on metal. This rubber also has a second role. Ok so on the front of the swing arm a strong angle iron piece will be welded on and it will extend down halfway into the main bumper. It will have a hole in it where a linch pin stud that is pressed through the main bumper will go through it. The hole in the stud for the linch pin will be far enough back so I have to actually push the swing arm into the rubber stop to get the linch pin through the stud. This causes constant horizontal pressure to keep the swing arm from shaking. The hole for the stud will be snug enough so that covers the vertical pressure. These studs are for tractors hit pins that pull plows through fields. The same pressures are applied on that tractor hitch that will be on the swing arm. This 200 pound swing arm is nowhere near the multiple thousand pounds from the plows so I am not worried at all. Oh and it costs 3.45 for the linch pin & stud. HAHA yes.
 

Forum statistics

Threads
186,880
Messages
2,888,969
Members
227,437
Latest member
Top Jimmy
Top