You are using an out of date browser. It may not display this or other websites correctly.
You should upgrade or use an alternative browser.
You should upgrade or use an alternative browser.
2013 Toyota 4Runner, Equipt Edition Build
- Thread starter Equipt
- Start date
Littlehouse
Adventurer
Any updates? Awesome build thus far. I'm trying to decide between 06 LX470s in the 90,000 mile range and a slightly used 4Runner trail since they're is the same ballpark. Barring the advertising angle, would you still go the 4Runner route? I'm trying to move to Colorado or Utah, and i need to get rid of the truck for something more snow worthy. The AWD might made it a DD as well.
Last edited:
Equipt
Supporting Sponsor Presenting Sponsor of Overland
I would honestly say it comes down to how you feel sitting in them. The 06 LX would be very nice, and the miles don't sound bad at all. The TE is quick and light, and get much better gas mileage. And a hoot to drive. This is all so late a response, you probably have the vehicle by now. Sorry for the delay. Both are excellent choices, and come down to personal feel.
Cheers,
Cheers,
Equipt
Supporting Sponsor Presenting Sponsor of Overland
Switching
Switching and Electrical
FINALLY! Finally, I have something worth writing about. I took your comments to heart and started working on a solution for the electrical and switching in the 4Runner. I already have a Blue Sea fuse block off the auxiliary battery that is live full time. Great for the fridge, and a few outlets around the truck. What the goal of this electrical system is to have power from the auxiliary battery that is controlled at the key for switching lights and running the aftermarket seat heaters, etc. Items that I don't want on when the truck is off. The switches are mostly for lighting, which tends to have more of a draw that what you want to run through a switch. So relays come into play to manage the higher draw requirement through a remotely mounted switch.
I took a good hard look at the SPod system as a solution for the 4Runner. I think it is a terrific turnkey solution for relays and switching, and very well made product. The do not offer a switch panel solution for the 4Runner specifically, and I wanted to learn more about the concept of switching relays. For some reason, relays have always been a mystery to me. Time to figure that out.
Relay/Fuse Block
I sourced a relay/fuse solution from Bussmann, as suggested by Mario at AT Overland. They had just found this product themselves. It is a sealed Fuse & Relay Panel, with 10 mini fuse locations and 5 micro relay locations. 5 of the 10 fuse locations are used by the relays, and 2 more of them will feed the seat heaters. This leaves me 3 spares for switched power.
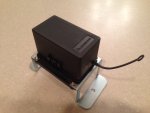
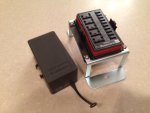
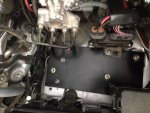
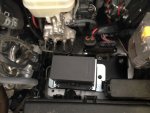
Where to put the relay/fuse block was the next task. The only real area left for me under the hood was right behind the OEM main fuse block. There is an open area on the driver side wheel well that has several OEM threaded inserts available. It also happens to be right in front of where I installed the Blue Sea aux. fuse block. It keeps all the electrical connections in a single easy to access area. Very clean. The trick is how to mount the panel. The inserts gave me locations for mounting base plate without drilling holes in the truck, but the surface is uneven. My solution was a flat steel bracket with hole appropriately located for mounting down to the wheel well, and up for the the panel. We also relocated an OEM bracket to the new steel bracket, due to tight quarters in the area.
Switches
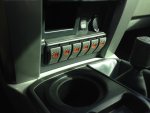
With the panel in place, I turned next to the interior and the fitment of the switches. I really like the look of the style of switch that ARB uses for their compressors and lockers. The switch is called a Contura II, made by a company called Carling Technologies. There are an infinite amount of options out there. Multiple styles, colors, and pre-labeled options. I chose to go with a set of 6 Contura II switches with a soft black face and amber light. I didn't want a big wall of lights coming on when I turned on my headlights, so I chose the model that only illuminates when turned on. Carling also makes a couple modular panel components that comprise either an end or a center section of a switch panel. I chose 2 ends and 4 centers to create a 6 switch panel. 5 of them will run through the relay/fuse panel, and I will have a 6th switch for something with a higher load than the 30 amps allowed through the panel. Perhaps a compressor. More on that later.
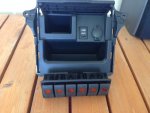
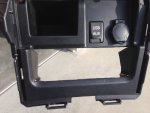
Now, where to put them. The choice for 6 switches was based on my location choice. At the bottom of the center dash, under the USB and 12V outlet, is a rather odd shaped cubby hole. Pretty useless space, until now. The space measures roughly 6-1/2" wide, and 2" tall. After a bunch of measuring, I figured out I could squeeze the panel in there. The center dash faces pull off easily, and a couple screws hold in the lower section. I removed this section, and proceeded to cut the majority of the cubby hole off. Some careful fitment finally allowed the switch panel to fit in there. The angle of the switches left the top of the panel visible, so I whittled (literally) a piece of plastic molding to fit into place.
Now the relay/fuse panel is in place, and the switches are fitted. Next is to install the electrical to both. That will consist of a separate relay from the key to a line feeding the panel, a wire harness from panel to switches, and finally the wiring of a complete range of lighting on the truck. Stay tuned!
Cheers,
Switching and Electrical
FINALLY! Finally, I have something worth writing about. I took your comments to heart and started working on a solution for the electrical and switching in the 4Runner. I already have a Blue Sea fuse block off the auxiliary battery that is live full time. Great for the fridge, and a few outlets around the truck. What the goal of this electrical system is to have power from the auxiliary battery that is controlled at the key for switching lights and running the aftermarket seat heaters, etc. Items that I don't want on when the truck is off. The switches are mostly for lighting, which tends to have more of a draw that what you want to run through a switch. So relays come into play to manage the higher draw requirement through a remotely mounted switch.
I took a good hard look at the SPod system as a solution for the 4Runner. I think it is a terrific turnkey solution for relays and switching, and very well made product. The do not offer a switch panel solution for the 4Runner specifically, and I wanted to learn more about the concept of switching relays. For some reason, relays have always been a mystery to me. Time to figure that out.
Relay/Fuse Block
I sourced a relay/fuse solution from Bussmann, as suggested by Mario at AT Overland. They had just found this product themselves. It is a sealed Fuse & Relay Panel, with 10 mini fuse locations and 5 micro relay locations. 5 of the 10 fuse locations are used by the relays, and 2 more of them will feed the seat heaters. This leaves me 3 spares for switched power.


Where to put the relay/fuse block was the next task. The only real area left for me under the hood was right behind the OEM main fuse block. There is an open area on the driver side wheel well that has several OEM threaded inserts available. It also happens to be right in front of where I installed the Blue Sea aux. fuse block. It keeps all the electrical connections in a single easy to access area. Very clean. The trick is how to mount the panel. The inserts gave me locations for mounting base plate without drilling holes in the truck, but the surface is uneven. My solution was a flat steel bracket with hole appropriately located for mounting down to the wheel well, and up for the the panel. We also relocated an OEM bracket to the new steel bracket, due to tight quarters in the area.


Switches
With the panel in place, I turned next to the interior and the fitment of the switches. I really like the look of the style of switch that ARB uses for their compressors and lockers. The switch is called a Contura II, made by a company called Carling Technologies. There are an infinite amount of options out there. Multiple styles, colors, and pre-labeled options. I chose to go with a set of 6 Contura II switches with a soft black face and amber light. I didn't want a big wall of lights coming on when I turned on my headlights, so I chose the model that only illuminates when turned on. Carling also makes a couple modular panel components that comprise either an end or a center section of a switch panel. I chose 2 ends and 4 centers to create a 6 switch panel. 5 of them will run through the relay/fuse panel, and I will have a 6th switch for something with a higher load than the 30 amps allowed through the panel. Perhaps a compressor. More on that later.
Now, where to put them. The choice for 6 switches was based on my location choice. At the bottom of the center dash, under the USB and 12V outlet, is a rather odd shaped cubby hole. Pretty useless space, until now. The space measures roughly 6-1/2" wide, and 2" tall. After a bunch of measuring, I figured out I could squeeze the panel in there. The center dash faces pull off easily, and a couple screws hold in the lower section. I removed this section, and proceeded to cut the majority of the cubby hole off. Some careful fitment finally allowed the switch panel to fit in there. The angle of the switches left the top of the panel visible, so I whittled (literally) a piece of plastic molding to fit into place.


Now the relay/fuse panel is in place, and the switches are fitted. Next is to install the electrical to both. That will consist of a separate relay from the key to a line feeding the panel, a wire harness from panel to switches, and finally the wiring of a complete range of lighting on the truck. Stay tuned!
Cheers,
Equipt
Supporting Sponsor Presenting Sponsor of Overland
OK, don't laugh.
I cut down an left over 100 Series ARB Sahara bar rubber bumper I found in my misc. bin. I did mention whittling. And honestly, it looks pretty dang good. Most any 1/4" smooth black material would work in there, so be creative.
The door covers a small upper cubby and the USB/12V Outlets, and is still functional with the switches. A nice, clean, stock look when closed.

Cheers,
I cut down an left over 100 Series ARB Sahara bar rubber bumper I found in my misc. bin. I did mention whittling. And honestly, it looks pretty dang good. Most any 1/4" smooth black material would work in there, so be creative.
The door covers a small upper cubby and the USB/12V Outlets, and is still functional with the switches. A nice, clean, stock look when closed.

Cheers,
Equipt
Supporting Sponsor Presenting Sponsor of Overland
Absolutely! The OME suspension is simple and bomb proof. It's a bit stiff in the set up I have, but that was intentional. More weight coming. I'd put the OME set on, and forget it. It does it's job, for a very long time, without issues.
Cheers,
Cheers,
Equipt
Supporting Sponsor Presenting Sponsor of Overland
Is there more to your write up or are you done? All that info is very helpful and looks super clean!
More to come! I had to run off to a show in LA this week, and haven't put together the wiring harness for it yet. That is the next step, so stay tuned!
Cheers,
Similar threads
- Replies
- 1
- Views
- 766
- Replies
- 9
- Views
- 3K
- Replies
- 3
- Views
- 1K
- Replies
- 0
- Views
- 655
