You are using an out of date browser. It may not display this or other websites correctly.
You should upgrade or use an alternative browser.
You should upgrade or use an alternative browser.
2013 Toyota 4Runner, Equipt Edition Build
- Thread starter Equipt
- Start date
Equipt
Supporting Sponsor Presenting Sponsor of Overland
I have thought over the communications component quite a bit. My 100 had both a CB and a 2 meter HAM in it, and I found that I really didn't use the CB that much. Since I had both, I usually ended up being that guy passing on info from the 2 meter to the 1 or 2 guys on the trail still using CB. The circles I am running in now all use 2 meter, and usually carry a couple portables with them for the few that don't have one. So I have decided to only put a 2 meter in the truck. I thought about a simple portable with an antenna hook up, but the power output seems too low for me. The last unit I had was an Icom with a remote face. Pretty cool unit, but the remote face adds a bunch of cost. Sticking with Icom was purely selfish. I didn't want to learn where everything was on a different unit, and I found a spot to mount a single unit in the truck.
So here is what I put together.
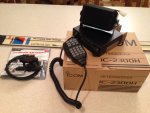
Icom IC-2300H Transceiver
Diamond K400SNMO Antenna Base
Comet SBB5NMO Antenna
Powerwerx External Speaker
Now I need to install it. The plan is to put the transceiver in the center console, vertically mounted against the driver side. External speaker under the dash, and the antenna on the lip of the hood. I'll follow up with the install when I can. I have a lot of electrical to do.
Cheers,
So here is what I put together.

Icom IC-2300H Transceiver
Diamond K400SNMO Antenna Base
Comet SBB5NMO Antenna
Powerwerx External Speaker
Now I need to install it. The plan is to put the transceiver in the center console, vertically mounted against the driver side. External speaker under the dash, and the antenna on the lip of the hood. I'll follow up with the install when I can. I have a lot of electrical to do.
Cheers,
Equipt
Supporting Sponsor Presenting Sponsor of Overland
Composite Drawer System
Composite Drawer System
Roughly a year ago I put together a small build out of the rear of the 4Runner. My goal at the time was to get something in there that was functional in the short term and would allow me time to get more familiar with the interior space of the vehicle. Over the past year I have thought a lot about what I want in the back. Location of equipment, accessibility and function were all factors. Weight was crucial, as was durability. The 4Runner was a bit different than the 100, where I could throw everything I wanted at it and the truck didn't care. This build needed to be a bit more time.
So here is what we created. I recruited Mario Donovan of AT Overland to help me make my concepts come to being. Mario and I designed a 3 stage drawer and clam shell cabinet system for the interior of the 4Runner.
Stage 1
Stage one is the back area, including a fridge/stove combo slide, a 25"x36"x12" drawer, and a 15"x8"x12" companion box in front of the fridge. This stage of the build allows a truly efficient use of the space behind the second row seats. The drawer fills the maximum space between the combo slide and the rear passenger side panel, and matches the split of the 60/40 rear bench split. The depth of the drawer is based solely on the height of a long neck beer bottle, because, well, that's important. Mario raised an eyebrow at this, but played along. The companion box in front of the combo slide will serve as my tool case, filled with tool rolls very soon. The seats can fold down, giving more storage.
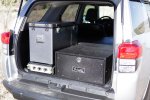
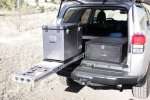
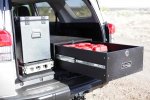
Stage 2
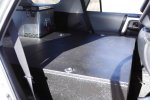
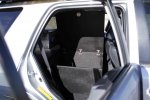
Stage 2 is a passenger side 60% rear seat replacement clam shell cabinet, 25"x30"x15". It is the same height as the rear drawer, giving us a completely flat upper surface. The goal here was to provide an interior sleeping platform. I found that if I move the passenger seat full forward and tip it full forward, I have a platform 25" wide and 81" long. That is 6'9", perfect for a XL Thermarest Camprest pad and a 6'4" guy like myself. A small fold up shelf will be attached to the front of the cabinet to extend the platform when the seat is forward, and folds down when the seat is back. Another factor was the comfort of my co-pirate on long trips. The Passenger seat must have sufficient reclining capacity. This was an ongoing bone of contention in the 100. Won't do that again. So the clam shell was designed far enough back to allow for one sleeping boss. The cabinet itself has a stepdown design, from back to front, to maximize the space available. The floor in the 4Runner steps down where the rear seats mount. It is a cavernous cabinet, with the future capability of storing a 13 gallon water bladder with a spout mounted in the side of the cabinet. A shelf can be fitted over the bladder inside the cabinet to allow storage on top.
Stage 3
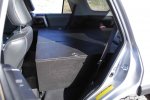
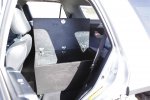
Stage 3 is the driver side 40% rear seat replacement clam shell cabinet, 15"x30"x15". It matches the 60% side in height and depth, and is a bit narrower. It is the same width as the combo slide and companion box behind it. Same step down floor inside too.
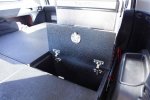
Stage 2 and 3 are independent, so either side can be removed and the seat can be put back in. Full removal and install of rear seat to cabinet or cabinet to seat in about a 1/2 hour. When all installed, the 3 stage system creates one rather large flat platform through out the interior of the vehicle. It allows for a multitude of options for storage above, and not as compartmentalized as the cabinets below.
The cabinet system is made of a fiberglass foam resin composite material. 3/4" thick and strong as any material I have ever come across. Yet it is incredibly light. I am pretty sure we lost weight pulling the seats and installing this system. The material is sprayed with a Linex type coating for looks and durability. The combo slide is a unique multi tiered fridge and drawer system. Two sets of mobile rated slides allow the fridge 100% pull out, and the another set below the fridge allow a drawer to 100% pull out. The drawer is designed to perfectly fit a Partner's Steel dual burner propane stove, as an option. I took the option. So with the drawer as the pantry, and my previous water solution mounted to the drawer above, I have the complete kitchen in the rear hatch without having to unpack a single thing. One of the best parts of the build is the fact that we used all factory mounting points for the support of this system. Not one new hole.
I am really happy with how the build went together. I owe Mario many, many thanks for his expertise and long hours. This was the proto-type for a system that both AT Overland and Equipt will be offering sometime soon.
Cheers,
Composite Drawer System
Roughly a year ago I put together a small build out of the rear of the 4Runner. My goal at the time was to get something in there that was functional in the short term and would allow me time to get more familiar with the interior space of the vehicle. Over the past year I have thought a lot about what I want in the back. Location of equipment, accessibility and function were all factors. Weight was crucial, as was durability. The 4Runner was a bit different than the 100, where I could throw everything I wanted at it and the truck didn't care. This build needed to be a bit more time.
So here is what we created. I recruited Mario Donovan of AT Overland to help me make my concepts come to being. Mario and I designed a 3 stage drawer and clam shell cabinet system for the interior of the 4Runner.
Stage 1
Stage one is the back area, including a fridge/stove combo slide, a 25"x36"x12" drawer, and a 15"x8"x12" companion box in front of the fridge. This stage of the build allows a truly efficient use of the space behind the second row seats. The drawer fills the maximum space between the combo slide and the rear passenger side panel, and matches the split of the 60/40 rear bench split. The depth of the drawer is based solely on the height of a long neck beer bottle, because, well, that's important. Mario raised an eyebrow at this, but played along. The companion box in front of the combo slide will serve as my tool case, filled with tool rolls very soon. The seats can fold down, giving more storage.


Stage 2
Stage 2 is a passenger side 60% rear seat replacement clam shell cabinet, 25"x30"x15". It is the same height as the rear drawer, giving us a completely flat upper surface. The goal here was to provide an interior sleeping platform. I found that if I move the passenger seat full forward and tip it full forward, I have a platform 25" wide and 81" long. That is 6'9", perfect for a XL Thermarest Camprest pad and a 6'4" guy like myself. A small fold up shelf will be attached to the front of the cabinet to extend the platform when the seat is forward, and folds down when the seat is back. Another factor was the comfort of my co-pirate on long trips. The Passenger seat must have sufficient reclining capacity. This was an ongoing bone of contention in the 100. Won't do that again. So the clam shell was designed far enough back to allow for one sleeping boss. The cabinet itself has a stepdown design, from back to front, to maximize the space available. The floor in the 4Runner steps down where the rear seats mount. It is a cavernous cabinet, with the future capability of storing a 13 gallon water bladder with a spout mounted in the side of the cabinet. A shelf can be fitted over the bladder inside the cabinet to allow storage on top.


Stage 3
Stage 3 is the driver side 40% rear seat replacement clam shell cabinet, 15"x30"x15". It matches the 60% side in height and depth, and is a bit narrower. It is the same width as the combo slide and companion box behind it. Same step down floor inside too.


Stage 2 and 3 are independent, so either side can be removed and the seat can be put back in. Full removal and install of rear seat to cabinet or cabinet to seat in about a 1/2 hour. When all installed, the 3 stage system creates one rather large flat platform through out the interior of the vehicle. It allows for a multitude of options for storage above, and not as compartmentalized as the cabinets below.
The cabinet system is made of a fiberglass foam resin composite material. 3/4" thick and strong as any material I have ever come across. Yet it is incredibly light. I am pretty sure we lost weight pulling the seats and installing this system. The material is sprayed with a Linex type coating for looks and durability. The combo slide is a unique multi tiered fridge and drawer system. Two sets of mobile rated slides allow the fridge 100% pull out, and the another set below the fridge allow a drawer to 100% pull out. The drawer is designed to perfectly fit a Partner's Steel dual burner propane stove, as an option. I took the option. So with the drawer as the pantry, and my previous water solution mounted to the drawer above, I have the complete kitchen in the rear hatch without having to unpack a single thing. One of the best parts of the build is the fact that we used all factory mounting points for the support of this system. Not one new hole.
I am really happy with how the build went together. I owe Mario many, many thanks for his expertise and long hours. This was the proto-type for a system that both AT Overland and Equipt will be offering sometime soon.
Cheers,
X2Very nice... Does AT plan on making this available to the public? $$$s?
Equipt
Supporting Sponsor Presenting Sponsor of Overland
Very nice... Does AT plan on making this available to the public? $$$s?
Yep! It will be available through AT and Equipt. Still sorting out some of the pricing, but I will let you know as soon as can.
Cheers,
Equipt
Supporting Sponsor Presenting Sponsor of Overland
paul, do you happen to by chance have a couple more photos of the ARB bumper install? I'm trying to find out what the bumper looks like before the wings (side sids) are placed onto it
I looked through all my images of the install and found a couple lousy shots. The first is with the bumper on and before the lower skids, but it doesn't show much. The second one is of the wheel well liner before I trimmed it back to match the bumper. I will say this. The skids make all the difference. It is not very good looking without them.
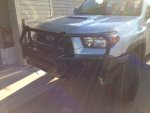
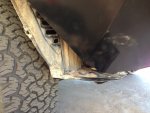
Cheers,
Tie Down Rail / Water Solution
Tie Down Rail.
Loose gear in your vehicle quickly becomes a weapon out to hurt you when things go bad. An accident, a quick turn or stop, a roll over, etc. Unintended, and unexpected actions can make your tool box and tent poles lethal. You should always have a means of securing your gear. So for my 4Runner I installed slotted rail along both side of the IGT shelf. It has infinite adjustment for the spring release rings installed. Just right for the rear deck.
View attachment 180426View attachment 180427
Water Solution
Integrating a proper water solution in your vehicle is always a trick. Water is heavy and takes up a great deal of space. I have always found it to be a bit of a pain in the neck too, always having to lug it in and out of the vehicle. And it takes up valuable space on your table in camp as well. A necessity of overlanding, and so we labor for a solution. Much like the eternal search for the best camp chair. That is for another day.
So with these thoughts in mind, I set about creating a solution for the 4Runner. What I came up with was a fabricated bracket that mounts over my tie down rail, and holds a 4 gallon flat pak water container vertically. It allows me to leave the water in the truck, and access it from a custom spout. And it has the added feature of being a storage barrier, keeping gear from falling behind my fridge when I pull it out. I drew up my design and with the help of the local metal supply and Carlo at AT, I created the container storage bracket. It is fastened to the tie down rail with 4 adjustable studs with tightening rings.
View attachment 180429View attachment 180430
The flat pak water container is something I have had for a while. I sourced it some time ago from Expedition One. The container came with a traditional pour spout and a small plastic cap. This wouldn't work, so with a little Ace Hardware adventure I was able to "invent" a spout solution. The container is secured to the bracket with a couple hard mounted bolts, fender washers and wing nuts.
View attachment 180431View attachment 180432
The end result turned out great! It fills an area previously unused as the space was needed as a buffer from gear against or falling behind the fridge. Removal for filling is easy, and access is very nice. When loaded with water, it does tend to wabble a bit. Though with gear stowed tightly against it, it doesn't move much at all. We will see how it holds up over time, or until I find the next great solution.
Cheers,
Now that is a cool solution and a great use of normally wasted space. Something like that would fit very nicely in my FJc. You aren't thinking about marketing that one are you?
Last edited:
Equipt
Supporting Sponsor Presenting Sponsor of Overland
Clam Shell Mounting
The front cabinets are mounted in several locations to make them solid. The rear of the cabinet sits on top the front several inches of the base that covers the rear floor, held in place with 1/4x20 hardware. The front is supported by 4 brackets (2 per cabinet) that are fabricated to attach to the seat mount threaded fastening points and to the bottom front of the cabinet. Here is a photo of those brackets. Again, first gen prototype. They will get all dolled up when production is released.

Cheers,
The front cabinets are mounted in several locations to make them solid. The rear of the cabinet sits on top the front several inches of the base that covers the rear floor, held in place with 1/4x20 hardware. The front is supported by 4 brackets (2 per cabinet) that are fabricated to attach to the seat mount threaded fastening points and to the bottom front of the cabinet. Here is a photo of those brackets. Again, first gen prototype. They will get all dolled up when production is released.

Cheers,
Ramjet
Explorer
Ok! one last question on the storage set up. How long did it take from once Mario got started, until it was ready? I think this is what I need for my FJ, just wondering how long it will take to get measurements over to Mario and get pricing back. Thanks, and the build is well thought out and executed.
Similar threads
- Replies
- 1
- Views
- 745
- Replies
- 9
- Views
- 3K
- Replies
- 3
- Views
- 1K
- Replies
- 0
- Views
- 630
