2013 Toyota 4Runner, Equipt Edition Build

Equipt

Supporting Sponsor Presenting Sponsor of Overland
K9 Roof Rack Accessories

K9 Roof Rack Accessories

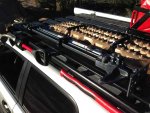
K9 Rack Accessories 1.JPGK9 Rack Accessories 2.JPG

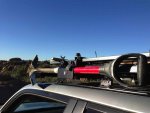
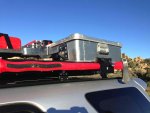
I came back from my adventures in South Africa this summer with a hand full of great prototype K9 accessories in my luggage. Try explaining that to TSA. Anyway, I have been trying out the accessories on the 4Runner and I have to say that they turned out great. I have attached the shovel mount, axe mount and hi lift mount to the truck.

K9 Shovel Mount

Shovel Mount 2.JPG

The shovel mount has a great design. I is a cradle for a round handle with a hinged clamp to hold the handle in place. There is a steel tab that runs through the clamp for attaching a pad lock. A rubber liner inside the clamp keeps things rattle free. The back of the clamp is flat, so it could be used with any flat mounting application. Eezi-Awn includes an accessory adapter to the back, so it is ready to clamp onto the side of the K9 Rack System with a couple 6mm hardware sets.

K9 Axe Mount

Axe Mount 1.JPG

The axe mount shares much of the same design as the shovel mount. The key differences are that the cradle for the handle is deeper and narrower, to more compliment the shape of an axe handle. Same lock tab, flat back and accessory adapter as the shovel mount.

K9 Hi Lift Mount

Hi Lift Mount Bracket 1.JPGHi Lift Mount Base 1.JPG

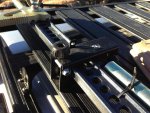
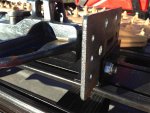
The Hi Lift mount is a 2 piece system. There is a heavy gauge bottom bracket with a centering pin that had a large hardware set included to hold the jack base tight. The other end is a mount designed to cradle both the ladder and the handle of the jack, with a steel tab through the ladder for a pad lock. The mount comes with bracketing to allow side mount capability, and a dust covers to keep the business end of the jack clean.

These are the first 3 of a list of accessories that Eezi-Awn has produces. We received a limited stock for the fall season. They are now available through Equipt's site.

Cheers,
 

Equipt

Supporting Sponsor Presenting Sponsor of Overland
Seat Heater Switches
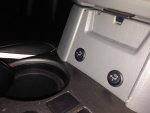
Seat Heater Switches.JPG

This is a follow up to a project I started on last spring, when the weather was starting to warm up. I installed a leather interior in the 4Runner, and in the process of the swap out I installed seat heaters under the leather upholstery. Since the weather was headed toward spring and summer, I didn't get to the wiring portion of this modification. Well, the hills of Arizona are cooling off. I was also handed a directive from my boss to make this happen. I can't blame her much on that as I wanted them too. Getting soft I guess.

Plan A revisited

My lofty plans were to install Toyota factory seat heater switches and masterfully tap into the wiring harness available with the switches to meet the needs of the heaters. A close friend even sourced the wiring diagrams for the switches and what each wire pin was for. Thanks Will. But after staring at the diagrams and the wiring of both systems for quite some time, I talked my way out of it. It wasn't going to be an easy modification, and I was not comfortable that the result would work. So back to plan A.

The Wiring

The wiring harness was pretty straight forward. Install switch, plug in relay, fasten grounds to vehicle ground and source switched power. The placement of the switches was a subjective matter. Several locations were available. I looked at installing the switches in the heads of the OEM seat heater fill caps in the center console first. The switches are close to the same width as the cap material, and there is a significant amount of material under the surface of the cap. I wasn't sure if the switches would seat well. I decided to install them in the vertical surface at the front of the center console. Out of the way, intuitive touch control, and very easy access for wiring. The switches are designed for Low/Off/High positions, so you can tell with the pad of your finger what setting you are in. Clearance behind the face of the console was sufficient to run the wiring. I ran the harness for each seat into the center console, and attached the grounds to a transfer case cover screw. I ran the hot leads into the dash and up around the drivers side console to the OEM fuse block. Each seat has a draw requirement of 11.5 Amps, or so the instructions note. The source wire it a 16 gauge, which I thought interesting. There are 2 unused switched fuse locations in the block. I used a couple NAPA tapa circuit fuse links to connect into the block. They are a neat little gizmo that you can plug into a fuse block and tap a circuit onto it while still supplying that fuse location with a fuse. I inserted 15 Amp fuses in each. The fuse link listed a rating of 10 amps max, but I am not using any of the original location capacity so I believe we will be alright here. Pretty slick. But I don't believe this is a permanent solution. They stick out of the OEM block and don't allow the fuse block cover to be attached again. I think a more permanent switched power auxiliary fuse block would be a more elegant solution. It just got added to the list.

In the mean time, I have heated seats in my Trail Edition now. And much better ones than the 100 had. The 100 Series had a heater in the lower seat only, and it was about half of the length of the cushion. These bad boys run from my knees to my neck. Ah, the good life. A toasty butt.

Cheers,
 

Equipt

Supporting Sponsor Presenting Sponsor of Overland
Any worries about the shovel or axe hitting the body if they somehow come loose.

The clamp on the mounts is held in place by a threaded knob on a stainless steel thread set. The interior of the clamp is lined with rubber pad. The combination holds the handles tight and dampens the vibration pretty well. With a lock in place the knob could only back off so far before the clamp would stop against the lock. I do check it all the time, concerned that it might loosen. But it has yet to loosen at all. My larger concern is the blade on the shovel I currently have is curved quite significantly and the edge is close to my roofline. A washboard road vibration make tap the blade on my roof. So I am looking for a better shovel.

Cheers,
 

Equipt

Supporting Sponsor Presenting Sponsor of Overland
@equipt where did you find the water spout for your expedition one container? Thanks for your help.

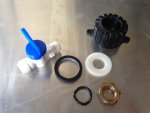
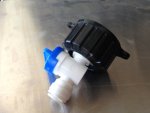
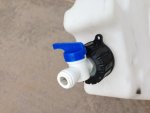
The spout was of my own design, and a little digging at Ace Hardware. It is the original threaded cap, and I cut the plastic spout that came with the container down to use as a gasket. The spout is designed as a water line valve, threaded on one side and quick connect on the other. A nylon fender washer was drilled out to fit the valve threads. A brass nut and gasket hold it together.

Spout 2.JPGSpout 1.JPGWater Spout 1.JPG

Cheers,
 

WarnerD9

Builder
The spout was of my own design, and a little digging at Ace Hardware. It is the original threaded cap, and I cut the plastic spout that came with the container down to use as a gasket. The spout is designed as a water line valve, threaded on one side and quick connect on the other. A nylon fender washer was drilled out to fit the valve threads. A brass nut and gasket hold it together.

View attachment 197410View attachment 197411View attachment 197412

Cheers,

Awesome, thanks! You gotta love Ace hardware.
 

SDDiver5

Expedition Leader
Any updates, Paul?

Still waiting to get my TE. Hopefully June or so. I hope to make it look as good as yours some day. Keep up the good work!
 

Equipt

Supporting Sponsor Presenting Sponsor of Overland
Thanks for asking. I have been on the down low the last couple months. Not much progress at all through the holidays. More thinking than doing. It's a new year and time to get back at it. I have a list of "To Do's" for the vehicle for this spring, but I haven't put together a game plan. Here's what I am contemplating and perhaps you guys can chime in on where to start.

Wish list.

Interior build out 2.0 (drawers and second row)
Front Bumper lights
LED light bar under front of rack
National Luna LEDs, maybe on rack, definitely on rear hatch
Aux switching panel
Switched power fuse block
Compressor
Rear Bumper
Aux Fuel Tank
2 meter radio
Satellite Antenna relocation

Where do you guys think I should start this year?
 

SDDiver5

Expedition Leader
Well, my weak spot when dealing with cars is definitely wiring/electronics so any type of fuse box wiring, accessory lighting, etc I am stoked to see. Especially with the vehicle I want most! Id say do the lighting and hook them up to an Aux switch panel!

Do you want to go custom bumper or get one from one of the companies that supply them?
 

Forum statistics

Threads
186,790
Messages
2,888,067
Members
227,280
Latest member
Smithmds77
Top