37 on stock quigley

derjack

Adventurer
tried 37s with stock h1 rims on my 96 quigley and in the front the backspacing didnt work. Rim rubbed on tie rods and tire rubbed in control arms with very little turning radius. bumbed as i had bought 5 new tires/rims...
Cjken has a dually and at the front the dually hubs. See the pictures at the start. For normal hubs the h1 have way too much back spacing.
 

derjack

Adventurer
Why not just swap hubs?
Possible for sure but it adds weight and is not ideal to add " spacers" and then ultra backspacing wheels.
H1 rims are cool and heavy duty stuff but you can easy save a lot of weight at that critical point of suspension with an aluminium wheel. Would be my choice.

Though a heavy truck like cjkens it's maybe a different thing.
 

mp_tx

Observer
Just finished updating myself on the build. I have a 91 F350 factory 4x4 ambo modded by Wheeled Coach. I am not as close to finishing as yours, but thought I would comment on a couple of issues that we have in common. Maybe be of interest to you or someone else following along.

H1 rims:
I am running the 37" military MTR's. Truck was once a dually but now singles in the rear--I have a wide box so they look a little funny tucked in the rear. Spacers scare me on the rear (Sterling) as the box is heavy and aluminum and weight do not mix. I fear I will wind up like the broke ambo in Baja. Just finished recentering a set of 5 each 12 bolt H1 rims to 3.5" backspace--still need to pick them up from the powder coater and install my new to me load range E BFG Baja tires.

H1 rims come in several versions: 8 bolt, 12 bolt, new version 12 bolt (sometimes called 13 bolt), and the 24 bolt--bolt referring to the number of beadlock bolts. All beadlock H1 rims require an "insert" to keep the beads pressed against the rim. Factory backspacing is in the neighborhood of 7". 8 bolts are for the old 36" Bias tires and came with a two piece magnesium runflat insert. 12/24 bolts are for the radial tires - 36" Goodyear MT, 37" Goodyear MTR, and 37" BFG Baja. MTR's and BAJA can be load range D or E. The 12/24 rims have a heavy rubber one piece runflat insert instead of the magnesium insert. There are some aftermarket options--PVC pipe, Staun internal beadlocks. Many rockcrawlers cut down the magnesium runflats--in our case with top heavy ambo's, the runflat is nice if you get a flat or blowout--instead of dropping to the rim, it drops to the runflat. Might keep you from ending up on your side. Replacment tires are farily easy to find--you can even buy a pallet from GovLiquidations if you want!

rear box AC:
When I bought my ambo, the rear AC did not work. It came from Antarctica, and although religiously maintained, I guess they were not too worried about rear AC. the AC unit was enclosed and located by my head to the front of the box as entering the side door. Replacement parts were crazy expensive and hard to find. Further research indicated the rear AC unit relied on the stock 1991 F350 compressor to cool the cab as well as the box, connected by the longest set of AC lines you have ever seen (like 11 feet or so)? Found a pinhole in that long line, and after pricing a replacment since it could not be repaired, coupled with the fact the stock compressor could barely keep the cab cool, as well as Wanting the ability to run the AC wihtout the noisy IDI running the compressor under the hood, I ripped out the rear AC system. Bought the smallest window unit I could find at Walmart (great return policy!) since the truck is already tall and did not want more heigth with a top AC unit. Did some window AC unit research (those hydroponic growers have these things figured out!) Found a marine rated pop top exhaust fan to get rid of the heat--pop the top and it vents. Rains and I can close the vent. Only required me cutting a whole in the roof about the size of a coffee can to pop in the vent. Vent is about 2 inches tall when collapsed, and 4 inches tall when extended. Plenty of room to add solar on the roof later. Kept the factory vent (to the right of the side door) for air intake. Welded a bung to the case to route the condensation out the bottom of the truck. The install looks pretty good, and I only had to add a small hinged door next to window unit to access the fan vent (hooked the power to old AC unit power switch). I have not had a chance to try it yet in the real world, but looking forward to it.

The best thing about this forum is seeing and sharing with other guys so that we don't have to keep recreating the wheel..... Keep up the good work!
 

mp_tx

Observer
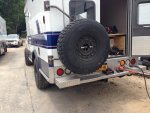
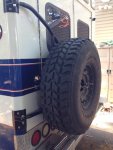
I really like your swing away spare tire rack. Do you have any other pics in regards to how you mounted it and any internal reinforcements you made to the box? I was going to build a swingaway off the bumper but I like yours better.
 

cjken

Explorer
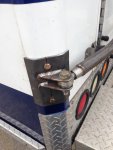
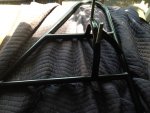
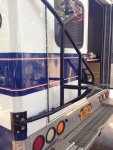
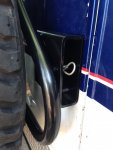
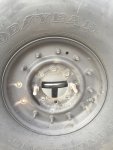
Here are some photos of the tire carrier
The rear corner of the box is really strong. We just bolted plates that we bent to match the shape of the corner through the corner with washers on the inside it is really solid I can jump up and down on it with the tire on it and there is no noticeable flex.
ImageUploadedByTapatalk1421164758.608692.jpg
ImageUploadedByTapatalk1421164774.310215.jpg
ImageUploadedByTapatalk1421164800.623096.jpg
ImageUploadedByTapatalk1421164811.382522.jpg
ImageUploadedByTapatalk1421164824.501444.jpg
ImageUploadedByTapatalk1421164835.740131.jpg
ImageUploadedByTapatalk1421164843.694553.jpg
 

flightcancled

Explorer
2 things: First did anyone else just realize that the corner trim piece on the bottom corner makes a perfect template for the tire carrier mounts?

Second: My plan has been to keep the stock rims, I wonder if you made the "backspacing" on the tire mount big enough if you could mount both a dually rear tire, (a spacer?) and a front tire. Problem is it would probably stick out pretty far, and the weight would be considerable.
 

tgreening

Expedition Leader
Couldn't you redo the mounting point of your current setup so it shifts the tire to the left enough so it doesn't overlap the passenger side door, and then put a mirror image of the mount on the passenger side and mount your other tire over there? Essentially the two tires side by side, but on different mounts.


Or...and just go with me on this a minute...rather than redo the current tire mount, you could pull it off and send it to me as a thank you for the awesome idea above, and then redo the whole thing along with it's matching passenger side twin. :)


Seriously though, how did you actually mount this? How did you gain access to put washers/nuts on the inside? I need to come up with a spare tire mount that doesn't include a roof mounted crane and this is pretty much what I had in mind.
 

cjken

Explorer
Haha!! Yes I had thought about a double wide, but wanted to keep it as simple as possible and have access to easily open at least one door.
I used a hole saw to access the rear corner.if you drill carefully the plugs will fit right back in the holes.
 

cjken

Explorer
ImageUploadedByTapatalk1443229760.268595.jpg
So I blew two bolts off one of my rear 12-bolt rims. Heard it happen so pulled over.
Swapped it out for the spare.
Didn't know that could happen!!
 

tgreening

Expedition Leader
Did you mount the tires or some shop do it? If shop done I can hazard a guess. A lot of those places have no idea what a torque wrench is and hop on that crap with an impact and crank on it till it runs out of steam. Pet peeve. :)
 

Forum statistics

Threads
188,191
Messages
2,903,667
Members
229,665
Latest member
SANelson
Top