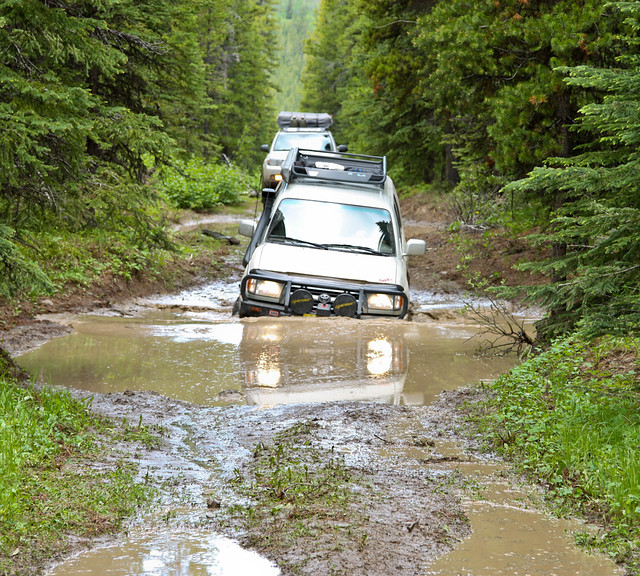
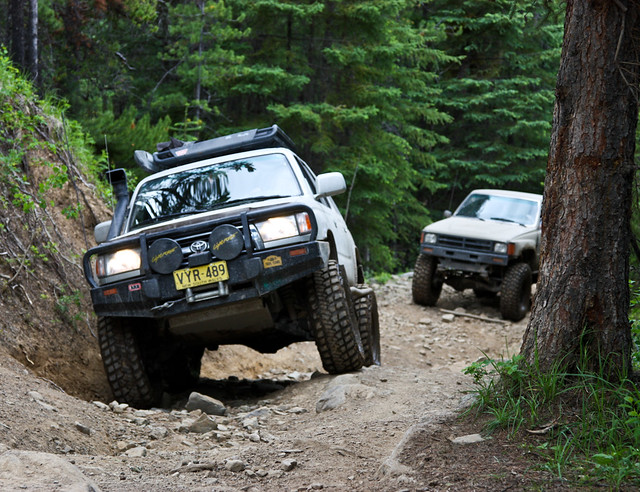
98 4Runner - Dirt Duster Build

rickashay

Explorer
No problem! T4R is pretty active so it probably got bumped out of sight in a day or two. How many wraps are your LC's? Do you have a build thread for me to check out?! Your gunna love the Tundra/LC setup, honestly every time I'm driving around town I think to myself: "wow I'm in a lifted 4Runner with M/T's and it feels better than it did on the stock setup!"
 

rickashay

Explorer
^LOL, I'm kind of a slacker over here on Expo - more lurking than posting!

On that bombshell, here's some needed updates to this thread:

I changed the suspension as I mentioned previously. I have had quite a bit of DD seat time with the new setup and a few offroad excurtions. As a whole I am VERY pleased. The only area the OME setup outperforms the new suspension, is on the highway at speed. The OME is just way stiffer and handles a lot better with my sway bars off. However, the cons of the OME far outweigh the pros and with some quick disconnects on my front sway bar coming in the spring, I will not be regretting the switch at all.

I also installed some Tundra 199mm brakes. These are the smaller ones but still perform awesome and had less clearance issues with my 16" LC80 wheels. I still had to get a machined spacer made to clear the brakes but it's just less than 1/4" thick and I can still safely run the stock lugs. When I did the Tundra calipers, I also did new front pads, rotors, and some Crown (All-Pro) extended stainless steel brake lines front and rear.


20111022-IMG_0519 by Headlight Hookup, on Flickr

I Also have some armor sitting in the garage waiting to get painted when it warms up:

Lotus Development LCA mount skids:

20111209-IMG_0795 by Headlight Hookup, on Flickr

Budbuilt IFS skid:

20111209-IMG_0797 by Headlight Hookup, on Flickr

Budbuilt Belly Pan (thinking of getting the center strengthened to avoid the bending that people report on the belly skid.)

20111209-IMG_0798 by Headlight Hookup, on Flickr

Did a projector retrofit with Bi-Xenon EvoX-R projectors and some extra bling:

20120103-IMG_0916 by Headlight Hookup, on Flickr

Picked up some Lightforce Blitz 240's for a stupid price as the PO got a job in New York and had 3 days notice to relocate, thank you very much....

20120130-IMG_0991-2 by RickaShay24, on Flickr

Here you can see how I cut into the grille to get them to fit nicely on the stock bumper: (new bumper coming SOON) haha

IMG_0999 by Headlight Hookup, on Flickr

I also have the parts sitting on my desk to convert the Blitz's to 50W HID's. I will probably do a write-up on the conversion if I get time but these suckas are gunna be bright as hell!

More recently I added some LED pods like I have on my rear hatch, into my engine compartment. I wish I did it sooner, just going to make things sooo much nicer at night when you need to be under the hood for whatever reason! Wired to a constant 12v switch in the cabin to turn them on and off as I please.


20120131-IMG_1001 by Headlight Hookup, on Flickr

And finally a recent shot of how the new suspension has settled. Just over 1.5" of rake unloaded - I think it looks great!
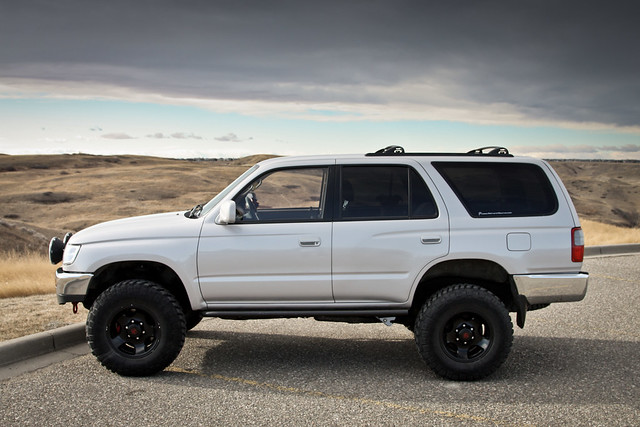
IMG_0996 by Headlight Hookup, on Flickr
 

rickashay

Explorer
UPDATES:

Sold my Lightforce Blitz
Sold my LC80 wheels and BFG KM2s

- CBI rear bumper on order and is "supposed" to ship June 1
- Purchased new wheels/tires

A few pics with tha new kicks:

Wheels - ProComp 7069, 16x8, 4" BS (same wheel as the popular 8069 but is 'matte' finished instead of gloss - 8069 is discontinued; clearing the Tundra brakes with space to spare!)
Tires - 285/75/16 MTZ's


20120514-IMG_1582 by Headlight Hookup, on Flickr


20120514-IMG_1579 by Headlight Hookup, on Flickr


20120514-IMG_1587 by Headlight Hookup, on Flickr

Also ordered some QuickFist clamps for my shovel and axe in order to mount on my Thule basket:


20120514-IMG_1573 by Headlight Hookup, on Flickr


20120514-IMG_1571 by Headlight Hookup, on Flickr

Seeing as how the tires poke a little more than my last set, I thought I'd try to keep some of the mud/rocks under control by using some old mudflaps I had lying around. Actually, the old mud flaps were ripped off of my previous black Toyota on my first-ever wheeling trip with CT4WD to Maclean, where I got stuck for several hours.... hahah oh reminisce.... Hope they will stay on the Duster a little longer!


20120514-IMG_1570 by Headlight Hookup, on Flickr

Some bolts with rounded heads to keep from thrashing the new tires.

20120514-IMG_1569 by Headlight Hookup, on Flickr

I'm heading out this weekend to do some wheeling and camping and looking forward to comparing the MTZ's to the KM2's as there will be a variety of conditions we will encounter (snow, mud, rain, rocks). It is even an hour and a half commute to the mountains so I will get to see how much of a difference the bigger tires make on the stock gears. A report to follow after the weekend...
 

BeratE

Observer
That is a very well thought out looking truck! What happened to your HID's? I am looking to do a similar retrofit, so I would be curious to hear your thoughts on the kit you used and the result.
 

rickashay

Explorer
That is a very well thought out looking truck! What happened to your HID's? I am looking to do a similar retrofit, so I would be curious to hear your thoughts on the kit you used and the result.

Thanks, the build is finally starting to take shape! I sold my projector headlights to a friend of mine. I actually have a small headlight modification business and I build retrofitted headlights for people. I sold mine because I am currently building another set for my truck using Lexus LS460 Bi-Xenon projectors. IMO the best projector, for all-around use, is the FX-R. Easy-ish to install, awesome cutoff, good width, good light distribution, and reasonably cheap. Once you do a projector retrofit, you will never look back. You will wonder how you've been driving with factory headlights for so long! GL
 

rickashay

Explorer
Did I miss your grill mod post? That new (old) look is awesome.

Thanks! Yah I didn't really document the process as I guess I should have. It's just your "regular" Satoshi grille mod. I used some mesh with the round holes vs. the chicken wire style. The TOYOTA emblem is from a 1990 4Runner.

Very nice build.
Cam-shaft.

Thanks a lot for the compliment!

Here are a couple shots from my wheeling/camping trip last weekend. To view all of the pics just click on the flickr image links as there are WAY more in my flickr gallery.


20120521-IMG_1714 by RickaShay24, on Flickr


20120521-IMG_1711 by RickaShay24, on Flickr


20120521-IMG_1693 by RickaShay24, on Flickr


20120520-IMG_1649 by RickaShay24, on Flickr


20120520-IMG_1641 by RickaShay24, on Flickr
 
Last edited:

rickashay

Explorer
Some more trail-run pics and a few updates:

Bumped my front coils up, now on the 3rd notch. Also installed a reman'd "Toyoda" power steering rack and put on OEM LBJ's. After all that stuff was done, threw on the Budbuilt belly skid (finally) and got it aligned. Then went wheeling!! (http://www.toyota-4runner.org/3rd-gen-t4rs/116034-rickashays-wheeling-pics-thread-2.html#post1096280)

Finally, BOTH of my Budbuilts installed:

20120617-IMG_1909 by RickaShay24, on Flickr

Oh wow am I excited! Not installed yet but getting close. I am in the process of rattle canning it. I plan on having a swing out fabbed up which is why I'm not powder coating it yet. I should have it installed tomorrow.


20120622-IMG_1975 by RickaShay24, on Flickr


20120622-IMG_1977 by RickaShay24, on Flickr


20120622-IMG_1978 by RickaShay24, on Flickr

Wheeling pics:
I went wheeling for the CT4WD June Official Run over the weekend. The weather did not really cooperate and therefore I have a limited number of photos to show off the trails/trucks/scenery. It was VERY wet all weekend and we dipped into the clouds on a number of occasions. Still a ton of fun to meet some new people and see some new trucks. A night spent in the woods in the 4Runner beats a night spent at home any day, regardless of the weather!

At least the fog made for some cool B&W photos.

Lunch, while I waited for the rest of the group to meet me. I bet there's some fish in there!

20120623-IMG_1987 by RickaShay24, on Flickr

A small break in the clouds:

20120623-IMG_1999 by RickaShay24, on Flickr


20120623-IMG_2006 by RickaShay24, on Flickr


20120623-IMG_2007 by RickaShay24, on Flickr


20120624-IMG_2010 by RickaShay24, on Flickr

5th and 3rd 4Runners Unite:

20120624-IMG_2012 by RickaShay24, on Flickr

Vic disappearing into the clouds:

20120624-IMG_2013 by RickaShay24, on Flickr

Looking up the side of the mountain that we were traversing across:

20120624-IMG_2014 by RickaShay24, on Flickr

Kinda creepy:

20120624-IMG_2016 by RickaShay24, on Flickr


20120624-IMG_2019 by RickaShay24, on Flickr

My fave:

20120624-IMG_2020 by RickaShay24, on Flickr

Usually this waterfall is a tiny stream. Lots of snow and lots of rain = tons of runoff.

20120624-IMG_2023 by RickaShay24, on Flickr


20120624-IMG_2024 by RickaShay24, on Flickr

Waiting for the clouds to break:

20120624-IMG_2025 by RickaShay24, on Flickr


20120624-IMG_2030 by RickaShay24, on Flickr

Just before we were about to all head home, a man came and asked us for help recovering his overturned quad from the river. After a short 7km blast on the Dutch Creek - Atlas Creek connecter, we found his vehicle overturned and pinned under a log jam. Apparently it had been stuck overnight. The man stated that as he attempted a river crossing, it simply got too deep and swept him away. I'm not sure why he left it overnight, but he also mentioned the water had risen several feet overnight due to the HUGE amount of rain we had. We rigged up a snatch block to the front of one of the Tacoma's in order to get a better angle at the pull. We reeled the quad in from under the raging current and had it back on the river bank in quick time. It was a pretty cool recovery to watch but it sucks for the man and his new ATV. I should have a video of the "ordeal" in time.

Thanks for reading!
 

rickashay

Explorer
Nice pics Addison! Where was this at?

Thanks Tim! The pics were taking in the Crowsnest Pass Alberta for the June CT4WD trail-run.

By the way, where have you been and how are you doing? It seems I haven't seen any funny sarcastic remarks lately from our favorite Southerner!
 

TangoBlue

American Adventurist
Thanks Tim! The pics were taking in the Crowsnest Pass Alberta for the June CT4WD trail-run.

By the way, where have you been and how are you doing? It seems I haven't seen any funny sarcastic remarks lately from our favorite Southerner!

The dismal weather gives Crowsnest a really mysterious and dramatic appearance - I'd say you lucked out.

I was in AZ in May with freeze, dragonlady, fjtent, and Mike... and where were you? Better get your truck ready for next years CT4WD trip to Moab and OX13 - it will be epic!
 

rickashay

Explorer
I was in AZ in May with freeze, dragonlady, fjtent, and Mike... and where were you? Better get your truck ready for next years CT4WD trip to Moab and OX13 - it will be epic!

Are you joining up for the CT4WD "Hole in the Rock Trail" in 2013?? Count me in for that and CM13, the truck is almost ready.

Speaking of the truck, here are some more updates.

The new CBI all mounted up:


20120628-IMG_2035 by RickaShay24, on Flickr


20120628-IMG_2037 by RickaShay24, on Flickr

Bumper/body clearance:

20120628-IMG_2038 by RickaShay24, on Flickr

Slightly more gap on the back end, but I have not shimmed the bumper at all with washers. I honestly don't think I will either as you don't even notice the slight difference in spacing in person.

I also wanted to try and eliminate my rear tire rub. Now that the CBI is cut back farther than the stock bumper, I should not rub in the exact location. However, I didn't like how the pinch welds stuck out farther than the CBI, so I trimmed them down:

20120628-IMG_2033 by RickaShay24, on Flickr

Here you can see the piece I trimmed off. Unfortunately despite me checking and re-checking, I cut a little too far and ended up with a small hole leading into the body where the two pinch welds met. About the size of a dime. Next time I need some welding done I am simply going to get the welder to throw a bead on the edge of the pinch weld I trimmed, filling the hole and sealing up the trimmed pinch weld. For a temp. fix I primed the bare sheet metal and filled the hole with some black gasket maker to avoid moisture entering the body. Here is the end result from the side, nice and flush:

20120628-IMG_2034 by RickaShay24, on Flickr

I'm kinda bummed about the hole but I should have triple checked for clearance and I think I will be happy with the "mod" once I get it welded shut. No rear tire rub should be nice.

Here are a couple photos from our trip last week.

The suspension setup is working pretty good:

20120702-IMG_2180 by RickaShay24, on Flickr


20120702-IMG_2176 by RickaShay24, on Flickr


20120702-IMG_2169 by RickaShay24, on Flickr


20120702-IMG_2147 by RickaShay24, on Flickr


20120701-IMG_2136 by RickaShay24, on Flickr


20120701-IMG_2113 by RickaShay24, on Flickr


20120701-IMG_2106 by RickaShay24, on Flickr


20120701-IMG_2099 by RickaShay24, on Flickr


20120701-IMG_2097 by RickaShay24, on Flickr


20120701-IMG_2086 by RickaShay24, on Flickr


20120701-IMG_2083 by RickaShay24, on Flickr


20120701-IMG_2077 by RickaShay24, on Flickr


20120701-IMG_2071 by RickaShay24, on Flickr


20120630-IMG_2047 by RickaShay24, on Flickr

Sorry for the overload of visual stimulation....
 

Forum statistics

Threads
186,790
Messages
2,888,067
Members
227,280
Latest member
Smithmds77
Top