You are using an out of date browser. It may not display this or other websites correctly.
You should upgrade or use an alternative browser.
You should upgrade or use an alternative browser.
AmbuLand build thread
- Thread starter Abitibi
- Start date
maxhuve
New member
Found this coolant flow diagram for a power stroke idi: http://photos.thedieselstop.com/showphoto.php/photo/35135/size/big/cat/
Abitibi
Explorer
It's plumbing time!
When starting from scratch there's a few things that needs to be considered before going crazy with building the interior. Plumbing and electrical are the big ones for me.
I got some great ideas from fellow expo and SMB members that set me in the right direction or got me great deals on some of the parts like my Espar, mixing valve...
My task this weekend was to plan the plumbing, get every missing parts and find a place to mount them.
I separated the plumbing in two, coolant & water.
First picture is coolant.
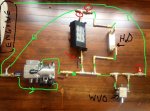
Tapping at the rear of the engine, through the Espar and into a manifold allowing heating of 3 systems in parallel, (rear heat, hot water, Wvo and engine warming).
I've added shut off valves before and after the Espar so the unit can be removed for servicing.
I also added another valve to the rear heat loop. No point heating the cabin if all you want is hot water in the summer...
At the end of each load I've added a bleeder valve (helps filling the coolant and removing air in lines), circled in red.
I still need to figure a secondary expansion tank somewhere in there, probably 1-2 gallons.
Gotta love those stainless and brass fittings!
Next the water system.
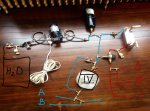
Hopefully the picture can explain better than I can but these are some highlights.
Right after the 22 gallons tank there a on/off valve followed by a garden hose hookup so I can either
- open valve and fill tank from city hookup
- close valve and pull water from another water source (city hookup, lake...)
Sediment filter, Shurflo pump with flex hoses to help with pump noise along with extension tank.
Cold water splits to heat exchanger side with a small bleeder valve at the top and a drain valve at the bottom (for winterizing) then into a mixing valve.
The "IV" hand drawn in black is a Seagul IV filtration system. I'm plumbing a bypass loop so I get to use it only as needed (drinking water). If it wasn't loop it would wear the filter faster and restrict the flow in the long run.
At the end there's 3 outlets (A,B,C) for sink, shower and outside tap/shower.
I started building the water cabinet by the rear driver side door (where the electrical used to be) and I'm hopeful all this mess will fit in there. It will be tight!
Next couple days I'll tackle the WVO conversion and some more plumbing, stay tuned
Cheers
Mr. D
Sent from my iPorn using Tapachat HD
When starting from scratch there's a few things that needs to be considered before going crazy with building the interior. Plumbing and electrical are the big ones for me.
I got some great ideas from fellow expo and SMB members that set me in the right direction or got me great deals on some of the parts like my Espar, mixing valve...
My task this weekend was to plan the plumbing, get every missing parts and find a place to mount them.
I separated the plumbing in two, coolant & water.
First picture is coolant.

Tapping at the rear of the engine, through the Espar and into a manifold allowing heating of 3 systems in parallel, (rear heat, hot water, Wvo and engine warming).
I've added shut off valves before and after the Espar so the unit can be removed for servicing.
I also added another valve to the rear heat loop. No point heating the cabin if all you want is hot water in the summer...
At the end of each load I've added a bleeder valve (helps filling the coolant and removing air in lines), circled in red.
I still need to figure a secondary expansion tank somewhere in there, probably 1-2 gallons.
Gotta love those stainless and brass fittings!
Next the water system.

Hopefully the picture can explain better than I can but these are some highlights.
Right after the 22 gallons tank there a on/off valve followed by a garden hose hookup so I can either
- open valve and fill tank from city hookup
- close valve and pull water from another water source (city hookup, lake...)
Sediment filter, Shurflo pump with flex hoses to help with pump noise along with extension tank.
Cold water splits to heat exchanger side with a small bleeder valve at the top and a drain valve at the bottom (for winterizing) then into a mixing valve.
The "IV" hand drawn in black is a Seagul IV filtration system. I'm plumbing a bypass loop so I get to use it only as needed (drinking water). If it wasn't loop it would wear the filter faster and restrict the flow in the long run.
At the end there's 3 outlets (A,B,C) for sink, shower and outside tap/shower.
I started building the water cabinet by the rear driver side door (where the electrical used to be) and I'm hopeful all this mess will fit in there. It will be tight!
Next couple days I'll tackle the WVO conversion and some more plumbing, stay tuned
Cheers
Mr. D
Sent from my iPorn using Tapachat HD
Last edited:
flightcancled
Explorer
Abitibi
Explorer
Sorry if it's a bit confusing! I was hoping to lay it all out to show what goes where and in which order but no worries 
The mixing valve simply regulates its output to a set "hot" temperature so you don't burn yourself. I believe it's also called an anti-scalding valve.
You still have cold and hot outlets at each taps but your hot ends up at a set temperature...
Aside from avoiding burning yourself with hot water it should also help reduce the waste of cold water trying to adjust your hot water. I hope I'm not confusing this even more than it needs to! Hahaha!
Cheers
Mr. D
Sent from my iPorn using TapaChat HD
Last edited:
ZukiCAMPER
Banned
You're going to want to put shut off valves on the parallel engine circuit as well the so that when you're out camping you are not constantly block heating the engine (huge thermal load) as it will drop your overall system coolant temperature ( making your water to air cabin heat exchangers work less efficiently) and burning an unnecessary amount of fuel through the night... MegAmbo has a webasto thermo 90st (31,000 btu) , a very similar unit to your d10 and on a cold night it could not produce enough heat to keep the heat exchangers working efficiently with the engine block as a huge heat sink in the circuit. You end up with luke warm air for the heat exchanger instead of HOT air.... Which makes your fans blow longer to raise cabin temps, eating more battery..Also you end up burning 2.5 gallons of diesel throughout the night frivolously heating the engine rather than .5 gallons without the engine in the circuit. Then in the a.m. just open the valves and the the engine preheat if you're going to start the engine.
Abitibi
Explorer
Thanks for the input.
I initially planned it as you described (with 12v solenoid on/off valves on each circuit) but my concern was to have the Espar shut down for too fast of a temperature if only using the short hot water loop (engine & rear heater loops closed).

Was your system designed similarly where you could use only a short hot water loop and never had that described issue?
Cheers
Mr. D
Sent from my iPorn using Tapachat HD
I initially planned it as you described (with 12v solenoid on/off valves on each circuit) but my concern was to have the Espar shut down for too fast of a temperature if only using the short hot water loop (engine & rear heater loops closed).

Was your system designed similarly where you could use only a short hot water loop and never had that described issue?
Cheers
Mr. D
Sent from my iPorn using Tapachat HD
Last edited:
ZukiCAMPER
Banned
Thanks for the input.
I initially planned it as you described (with 12v solenoid on/off valves on each circuit) but my concern was to have the Espar shut down for too fast of a temperature if only using the short hot water loop (engine & rear heater loops closed).

Was your system designed similarly where you could use only a short hot water loop and never had that described issue?
Cheers
Mr. D
Sent from my iPorn using Tapachat HD
Yes I had an 5 gallon acustom aluminum boiler tank that was always circulating in the circuit. but yes just the boiler tank and the domestic water-water heat exchanger was used fine in the summer. the thermo 90 had a minimum circulating volume requirement of 2.6 gallons and never had a problem with short cycling.. It will just heat the system to 165-170 then idle and within seconds of a thermal demand it would throttle up and keep up the temps then when the demand went away back to idle.
Abitibi
Explorer
I looked into the 5 ports valve, it could work but it's thermostat regulated which works for some but I prefer full control. They're pretty decently priced though...
I'll give it a try with the manifold and I can only change it if it doesn't work.
Thanks again for the suggestions!
Cheers
Mr. D
Sent from my iPorn using TapaChat HD
I'll give it a try with the manifold and I can only change it if it doesn't work.
Thanks again for the suggestions!
Cheers
Mr. D
Sent from my iPorn using TapaChat HD
Abitibi
Explorer
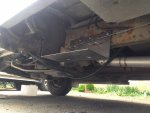
The heater is mounted, very happy with its hideaway! Like I posted earlier it's basically directly under the driver's seat.
Nothing to see, neatly tucked away

Once I hook up the intake, muffler and fuel line I'll be able to build a new skid plate as the current one only protects the front end.
Question, how sensitive are these Espar to mud and water? Will a front and bottom skid plate do the trick? Most installs I've seen were out in the open by the frame but never heard of issues. A friend of mine used an old tool box and sealed it to protect his D4...
My good friend Simon from Winnipeg stayed at my place these last couple days. He made the trip to buy a super clean E350 24' RV with the venerable 7.3!!!
Once we brought the camper back to my place we got to play on the ambo
Simon is a skilled mechanic with tons of experience on veggie installs so I didn't argue when he offered to help with my conversion...
First on the menu was to delete the stock fuel filter by filling the empty fuel bowl with marbles.
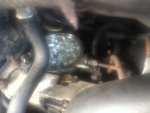
I'm replacing the stock filter with a custom heated filter unit which will be mounted against the frame (driver's side) nearby the tranny crossbar. I haven't decided yet if I'll use the heat function or not, any advantages? (My Patrol came with the winter package and has a heated fuel filter...) Filter change will now be a breeze!
So next in line was another skid plate (or skid box!) to protect the filters and valves associated to the veggie conversion.
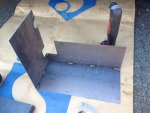
Better pictures to follow but this is one of the two filters and more less where it will reside...
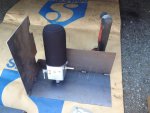
We already added a few drain holes on the bottom skid, mounted the filters with valves and test fitted it to the frame, all good! I took it all apart to give it a good coat of paint.
Next; put it all back together, cut into the stock fuel lines, tap into the coolant lines for heat (joint venture with the Espar plumbing) and at some point build one or two new aluminum tanks.
If anyone has decent pictures of what space the transfer case takes in a 4x4 conversion that'd be greatly appreciated. Obviously I have a good idea but nothing precise. I haven't seen much aside from some of Chris's videos but it's not easy to tell with the angle... Just need to know where to stay away from when I'm mounting new items!!!
Still without a garage so the paint job will have to wait for good weather...
Cheers
Mr. D
Sent from my iPorn using Tapachat HD


Nothing to see, neatly tucked away

Once I hook up the intake, muffler and fuel line I'll be able to build a new skid plate as the current one only protects the front end.
Question, how sensitive are these Espar to mud and water? Will a front and bottom skid plate do the trick? Most installs I've seen were out in the open by the frame but never heard of issues. A friend of mine used an old tool box and sealed it to protect his D4...
My good friend Simon from Winnipeg stayed at my place these last couple days. He made the trip to buy a super clean E350 24' RV with the venerable 7.3!!!
Once we brought the camper back to my place we got to play on the ambo
Simon is a skilled mechanic with tons of experience on veggie installs so I didn't argue when he offered to help with my conversion...
First on the menu was to delete the stock fuel filter by filling the empty fuel bowl with marbles.

I'm replacing the stock filter with a custom heated filter unit which will be mounted against the frame (driver's side) nearby the tranny crossbar. I haven't decided yet if I'll use the heat function or not, any advantages? (My Patrol came with the winter package and has a heated fuel filter...) Filter change will now be a breeze!
So next in line was another skid plate (or skid box!) to protect the filters and valves associated to the veggie conversion.

Better pictures to follow but this is one of the two filters and more less where it will reside...

We already added a few drain holes on the bottom skid, mounted the filters with valves and test fitted it to the frame, all good! I took it all apart to give it a good coat of paint.
Next; put it all back together, cut into the stock fuel lines, tap into the coolant lines for heat (joint venture with the Espar plumbing) and at some point build one or two new aluminum tanks.
If anyone has decent pictures of what space the transfer case takes in a 4x4 conversion that'd be greatly appreciated. Obviously I have a good idea but nothing precise. I haven't seen much aside from some of Chris's videos but it's not easy to tell with the angle... Just need to know where to stay away from when I'm mounting new items!!!
Still without a garage so the paint job will have to wait for good weather...
Cheers
Mr. D
Sent from my iPorn using Tapachat HD
Abitibi
Explorer
A few more pics...
The veggie cage in position
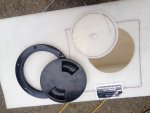
Here I cut a 5" opening into my 20 gallons tank. That way it will be much easier to clean it up annually.
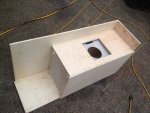
Tank moving into its cabinet, 1/2" close cell foam all around and still a bit of room left for expansion. As is, the tank has room to slide which allows me to secure the cabinet to the floor (via the top opening) before closing up the last end wall.
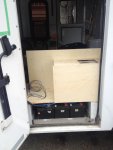
And its final destination. Most of the plumbing will be mounted where you can see wires hanging down at the end of the tank, easy to be serviced...
Ok, gotta go to my real work
Cheers
Mr. D
Sent from my iPorn using Tapachat HD
The veggie cage in position

Here I cut a 5" opening into my 20 gallons tank. That way it will be much easier to clean it up annually.

Tank moving into its cabinet, 1/2" close cell foam all around and still a bit of room left for expansion. As is, the tank has room to slide which allows me to secure the cabinet to the floor (via the top opening) before closing up the last end wall.

And its final destination. Most of the plumbing will be mounted where you can see wires hanging down at the end of the tank, easy to be serviced...

Ok, gotta go to my real work
Cheers
Mr. D
Sent from my iPorn using Tapachat HD
Last edited:
Similar threads
- Replies
- 0
- Views
- 657
- Replies
- 16
- Views
- 3K
- Replies
- 41
- Views
- 8K
- Replies
- 1
- Views
- 796
