AT Comanche upgrades

ddog45

Adventurer
The golen sounded like a good option for me to but after reading about the hassels of tuning the engine it seems like kind of a pia for a guy that has no interests in gadgets and fine tuning via a laptop. My chaser trailer gets a little heavy sometimes behind my lj maybe I should just enjoy the slow ride.
 

nwoods

Expedition Leader
The first picture shows the water fill on the passenger side. This is a marine grade stainless steel inlet, 1 1/2" line.

The second picture is the solar panel inlet on the drivers side. The 4 screws and washers are holding the junction box for the controller on the inside as shown in previous post.

That looks awesome!
 

saburai

Explorer
Battery box

Very nice, I wish it were mine:sombrero:

Pleas tell us more about the power pack/ power system. Is the PP commercially produced or did you fab it up?
 

elcoyote

Supporting Sponsor, Overland Certified OC0004
So Mario, that is at least 2 less water bottles that Anne can stash on the floor board. At some point, the pinging has got to be more tolerable than the nagging (Just kidding Anne!!! I'm busted )

Uh oh...you're in trouble Gabe

Right on Mario, glad to see it hopefully running better. What does that system cost?

$582

The golen sounded like a good option for me to but after reading about the hassels of tuning the engine it seems like kind of a pia for a guy that has no interests in gadgets and fine tuning via a laptop.

Really not too difficult. If you are comfortable with a basic spreadsheet and have a couple of hours to drive around, observe what the engine is doing, then it is simple. It's even easier if you have a base map to start with which is a easy as asking me for a copy of mine! The FTC comes with neutral programming which means that when you hook it up, it makes no changes to your system, so no worries about your rig not running as you are accustomed to. Changes are small and I find it to be a very entertaining and informative process.

That looks awesome!

Thanks! More to come

Pleas tell us more about the power pack/ power system. Is the PP commercially produced or did you fab it up?

The Power Pack is made by National Luna and available from AT or Equipt. It contains all of the smart battery isolator features that NL is known for but is a self contained unit rather than multiple parts that would have to be installed. It has some neat features like not connecting to the starting battery for 5 mins after starting the vehicle to give the start battery a chance to recover from the momentary deep discharge. If will remain connected to the start battery until the start battery drops below 12.7 volts. This gives the advantage of using some of the start battery capacity for house duties. By using the optional remote battery controller, it is possible to remotely link the start & house batteries together in the event that more amperage is needed such as a hard cold start or using a winch. The PP in the MJ is used for powering a NL Weekender fridge/freezer, lights, fan, water pump and rare inverter duties.
 

elcoyote

Supporting Sponsor, Overland Certified OC0004
The lower control arm brackets on MJ/XJ vehicles can be quite vulnerable. Mine over the years have taken quite a beating. I don't think the factory mounts are much more than 12 gauge material. They have broken off, been rewelded in place, the bolt holes elongated and repaired with welded on plates, been modified. Suffice to say that they quite simply have got quite ragged in 340,000 miles. Time to upgrade.

Fortunately Ballistic Fab makes a very suitable replacement, a combo LCA/Spring mount assembly made from laser cut from 1/4 steel.
http://www.ballisticfabrication.com/XJ--TJ-Jeep-combo-bracket-upgrade-kit_p_1542.html
We modified them slightly to accomodate the alternate shock mount position for the MJ as you can see in the pictures. The new mounts should resolve the weak link and retain the spring more solidly than the OEM set up.

I'll post some cleaner pictures later but these will give you a good idea.
 

Attachments

  • MJ D-30 LCA bracket.jpg
    MJ D-30 LCA bracket.jpg
    187.4 KB · Views: 212
  • MJ D-30 LCA bracket 1.jpg
    MJ D-30 LCA bracket 1.jpg
    187.3 KB · Views: 164
Last edited:

Explorer 1

Explorer 1
nice welding!!!

Mario,

I'm just now learning TIG welding, had my first class last Saturday. Did you do the welding and was it TIG or MIG?

Thanks,
Fred
Explorer 1
 

elcoyote

Supporting Sponsor, Overland Certified OC0004
You still running ABS?

No, never had it. Wasn't available on MJ. The front axles have the sensor hub so the pictures are deceiving

I'm just now learning TIG welding, had my first class last Saturday. Did you do the welding and was it TIG or MIG?

MIG welding was done by 4LCF using a Millermatic. Not sure which model.
 

elcoyote

Supporting Sponsor, Overland Certified OC0004
Better quality pictures of LCA /Spring mounts
 

Attachments

  • LCA DS1.jpg
    LCA DS1.jpg
    239 KB · Views: 225
  • LCA DS2.jpg
    LCA DS2.jpg
    197.2 KB · Views: 144
  • LCA PS2.jpg
    LCA PS2.jpg
    230.5 KB · Views: 132
  • LCA PS1.jpg
    LCA PS1.jpg
    207.6 KB · Views: 118

elcoyote

Supporting Sponsor, Overland Certified OC0004
I haven't posted up in a while about ongoing mods to the MJ so I thought is was about time. The project still has a ways to go but it is getting closer to becoming the small platform self contained vehicle I envisioned.

Latest mods have been:

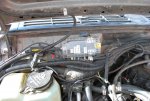
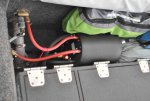
- Removed old accessory wiring birds nest and consolidated everything into a 12 terminal Blue Sea fuse block, one terminal feeding a separate aux fuse block in the cab.

- Replaced my four roof mounted Hella 500s with two Baja Designs Feugos. I chose the Feugos because of their uncompromising quality of construction, internal HID ballast making installation hassle free, and the fantastic warranty that covers everything, for life. Oh yeah, did mention that they make my halogen headlights look like flickering candles? I am so impressed with these lights that we have started to recommend and install them on customers vehicles.

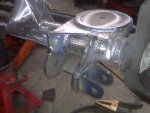
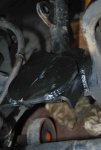
- Replaced the hand fabricated front upper shock mounts with some JKS units. Let's just say that this was a text book lesson in metal fatigue.

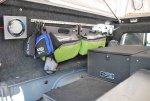
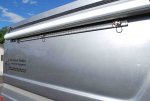
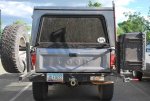
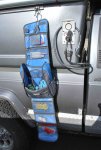
- On the organizational front I added Macs tie down track to the inside and outside of the AT Flippac. They back each other up to spread the load across the shell surface. Also a couple of Anchor Plates were added to the bed to give more tie down options. On the inside of the shell, Thule storage bags have been secured to the rails using quick release cargo hold downs. This keeps them in place but allows easy removal. One is for toiletries, another is dry food items, another is electrical accessories, another is #1 & #2 waste bags. The track & anchor plates also allow me to use Load Tamer cargo nets on the wall for my PETT as well as accommodate the occasional odd load.

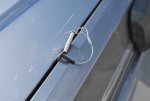
- It's a small thing but the AT Flippac requires hairpin cotters to secure the uprights when deployed. I kept losing them so I added some ss lanyards with a little piece of heat shrink tubing to prevent abrasion on the paint...my limb scratches not withstanding.

more to come
 

Attachments

  • AT MJ fuse box.jpg
    AT MJ fuse box.jpg
    326.4 KB · Views: 136
  • AT MJ Feugos.jpg
    AT MJ Feugos.jpg
    245.4 KB · Views: 151
  • AT MJ interior track and thule.jpg
    AT MJ interior track and thule.jpg
    335.6 KB · Views: 198
  • AT MJ track and load tamer.jpg
    AT MJ track and load tamer.jpg
    245.3 KB · Views: 154
  • AT MJ Flippac lanyard.jpg
    AT MJ Flippac lanyard.jpg
    150.9 KB · Views: 125
  • AT MJ anchor plates.jpg
    AT MJ anchor plates.jpg
    315.8 KB · Views: 125
  • AT MJ exterior track.jpg
    AT MJ exterior track.jpg
    184.8 KB · Views: 117
Last edited:

elcoyote

Supporting Sponsor, Overland Certified OC0004
The other significant modifications are:

- The addition of hood vents. I know a lot of discussion has touched on this subject. My experience is that my engine temperature dropped about 5 degrees. The stroker is a little over a year old now and I have put about 25 K on it. With the vents first installed, I would not go over 235 where as prior to the vents, I would kiss the bottom of the red zone at 240.

- We split the swing away into two. Moved the spare off to the left and made room on the right for a Pelican case and HiLift jack. The goals were to reduce the stress that a single sided swing away has on both the bumper and frame as well as shorten the radius of the swing to allow access with a trailer attached.

- The Pelican case is a proof of concept exterior kitchen. The idea is to keep cooking and utensils outside and create easy access for a quick road side snack and caffeine break. Using a blend of back packing cooking equipment, compatible sized containers and a drop out work surface made from Fiberthane, this has turned out to be the cats meow. Next upgrade for this is a quick disconnect system so the whole unit can be taken indoors in the event of foul weather, cleaning & re-stocking or in a the occasional hotel room we hit when on the road.

- Hot water system. This has been a challenging modification and one of the most welcomed on the comfort front. Simply put, it is an insulated stainless steel 1.6 gallon tank with a heat exchanger on the inside that draws heat from engine coolant. Fresh water is pumped from the on board tank and split off to the heat exchange tank before it meets back up at the shower mixer valve with the cold water from the fresh water tank. The hot water matches the engine coolant temp post thermostat and reaches upwards of 185 degrees. Adjustable blending and on demand nozzle at the blending valve make for a very nice shower indeed. The water does lose temperature over night but my initial tests showed that a mere 10 minutes of idling made the tank contents piping hot again. The additional hose and heat exchanger added 2.5 more quarts of capacity to the cooling system. An interesting side effect of the additional coolant and the exchange was that my engine temp seems to have dropped significantly from an average running temp of 210 to 185.

there are more mods in the works...stay tuned!
 

Attachments

  • AT MJ hood vents.jpg
    AT MJ hood vents.jpg
    193.7 KB · Views: 138
  • AT MJ split swingaway closed.jpg
    AT MJ split swingaway closed.jpg
    336.4 KB · Views: 217
  • AT MJ swingaway open.jpg
    AT MJ swingaway open.jpg
    330.6 KB · Views: 187
  • AT MJ kitchen open.jpg
    AT MJ kitchen open.jpg
    365.1 KB · Views: 335
  • AT MJ hot water tank.jpg
    AT MJ hot water tank.jpg
    224.5 KB · Views: 202
  • AT MJ heat exchange plumbing.jpg
    AT MJ heat exchange plumbing.jpg
    318 KB · Views: 211
  • AT MJ shower and toiletries bag.jpg
    AT MJ shower and toiletries bag.jpg
    322.1 KB · Views: 223
Last edited:

Root Moose

Expedition Leader
Fantastic per usual, Mario.

I noticed that you seem to have a "washer" welded onto the ARB bumper where the shackle is hanging. Did you beef up this mount further?

I've been thinking about how to make these mounts true shackle mounts when I pull the bumper for reconditioning (stupid salt). If you have any insights...
 

elcoyote

Supporting Sponsor, Overland Certified OC0004
Fantastic per usual, Mario.

I noticed that you seem to have a "washer" welded onto the ARB bumper where the shackle is hanging. Did you beef up this mount further?

I've been thinking about how to make these mounts true shackle mounts when I pull the bumper for reconditioning (stupid salt). If you have any insights...

Actually the "washer" is standard issue ARB. The first time I used one of the points by itself, it got tweaked. I now always use both shackles with a lanyard to spread the load.
 

DrMoab

Explorer
Do you know the number of that pelican case or have the rough dimensions? I have a couple of spare cases that I'm thinking of doing something similar with but I bought them with my trailer and don't have the model numbers.
 

Forum statistics

Threads
189,715
Messages
2,920,040
Members
232,810
Latest member
WhiskeyAndRain
Top