Barn Door for JK factory hardtops

jscherb

Expedition Leader
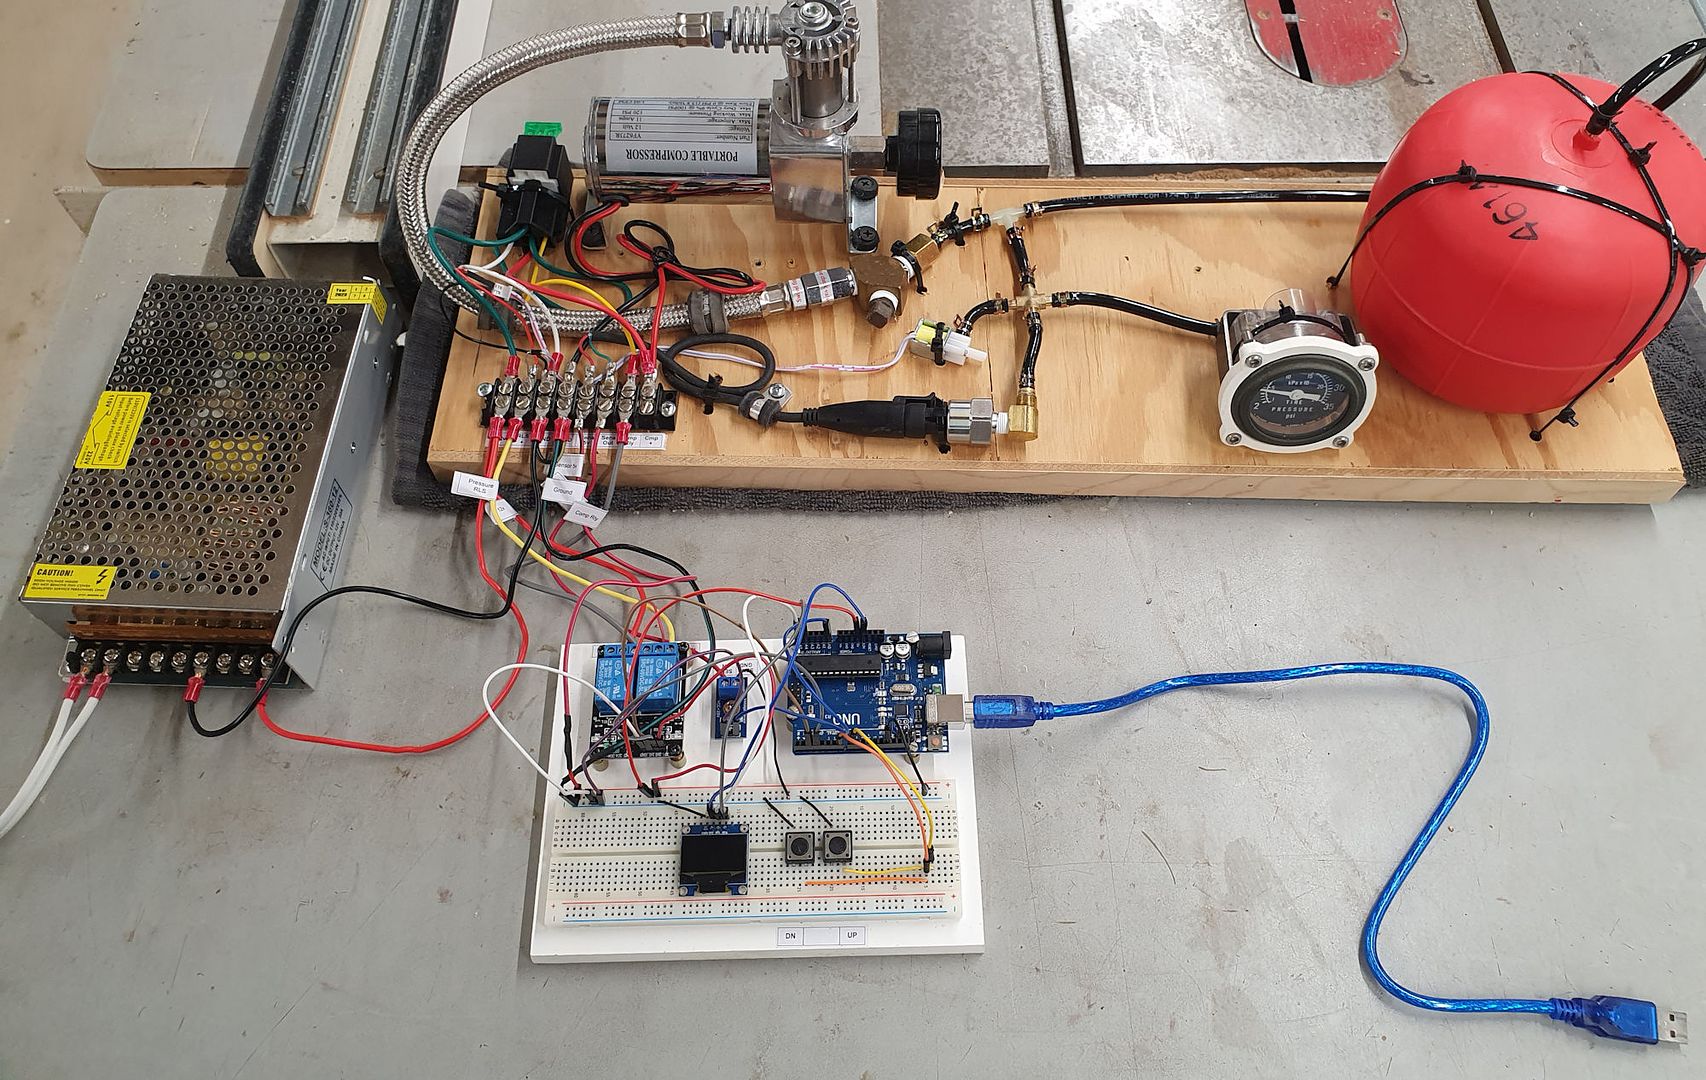
Science Experiment Step 1 was to check out the voltage sensor and the OLED display. In this photo, the Arduino microprocessor board is connected to the laptop through the blue USB cable; the source code is on the laptop screen and the USB cable both powers the microprocessor and provides for downloading the compiled code to the microprocessor. The voltage sensor is on the right and the display is at the bottom. The red and black clip leads are connected to a benchtop variable DC power supply so I can vary the input voltage to test everything. The relay that will control the compressor isn't connected yet, it's in the lower right of the photo.

VoltageSensorTest1.jpg


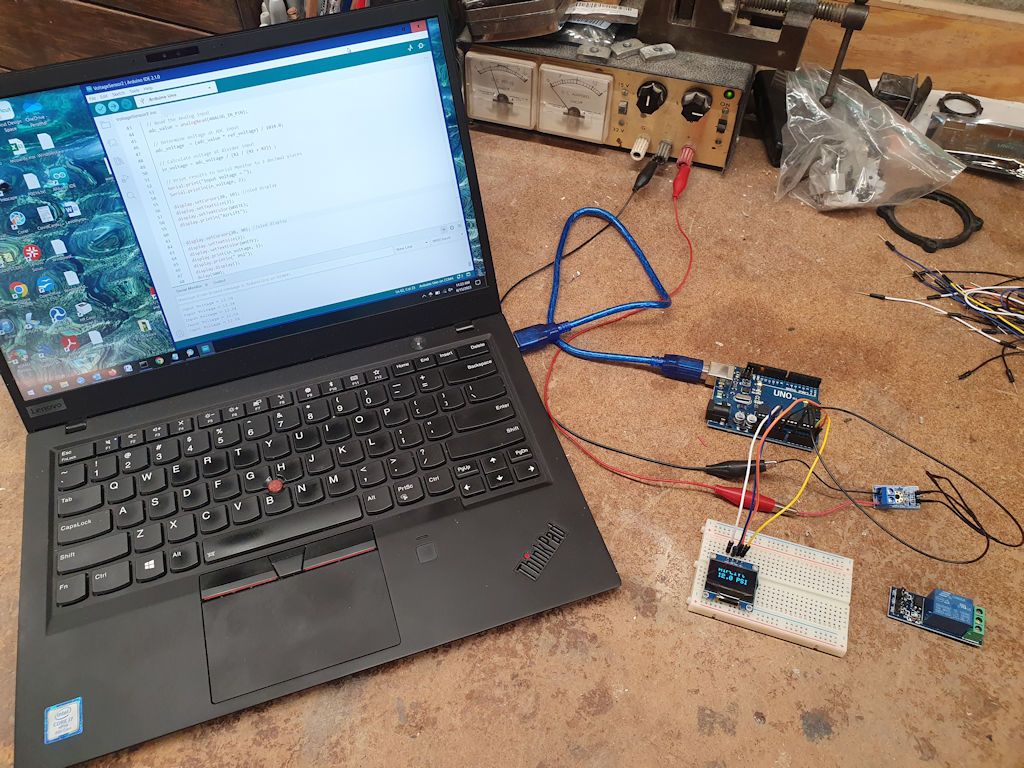
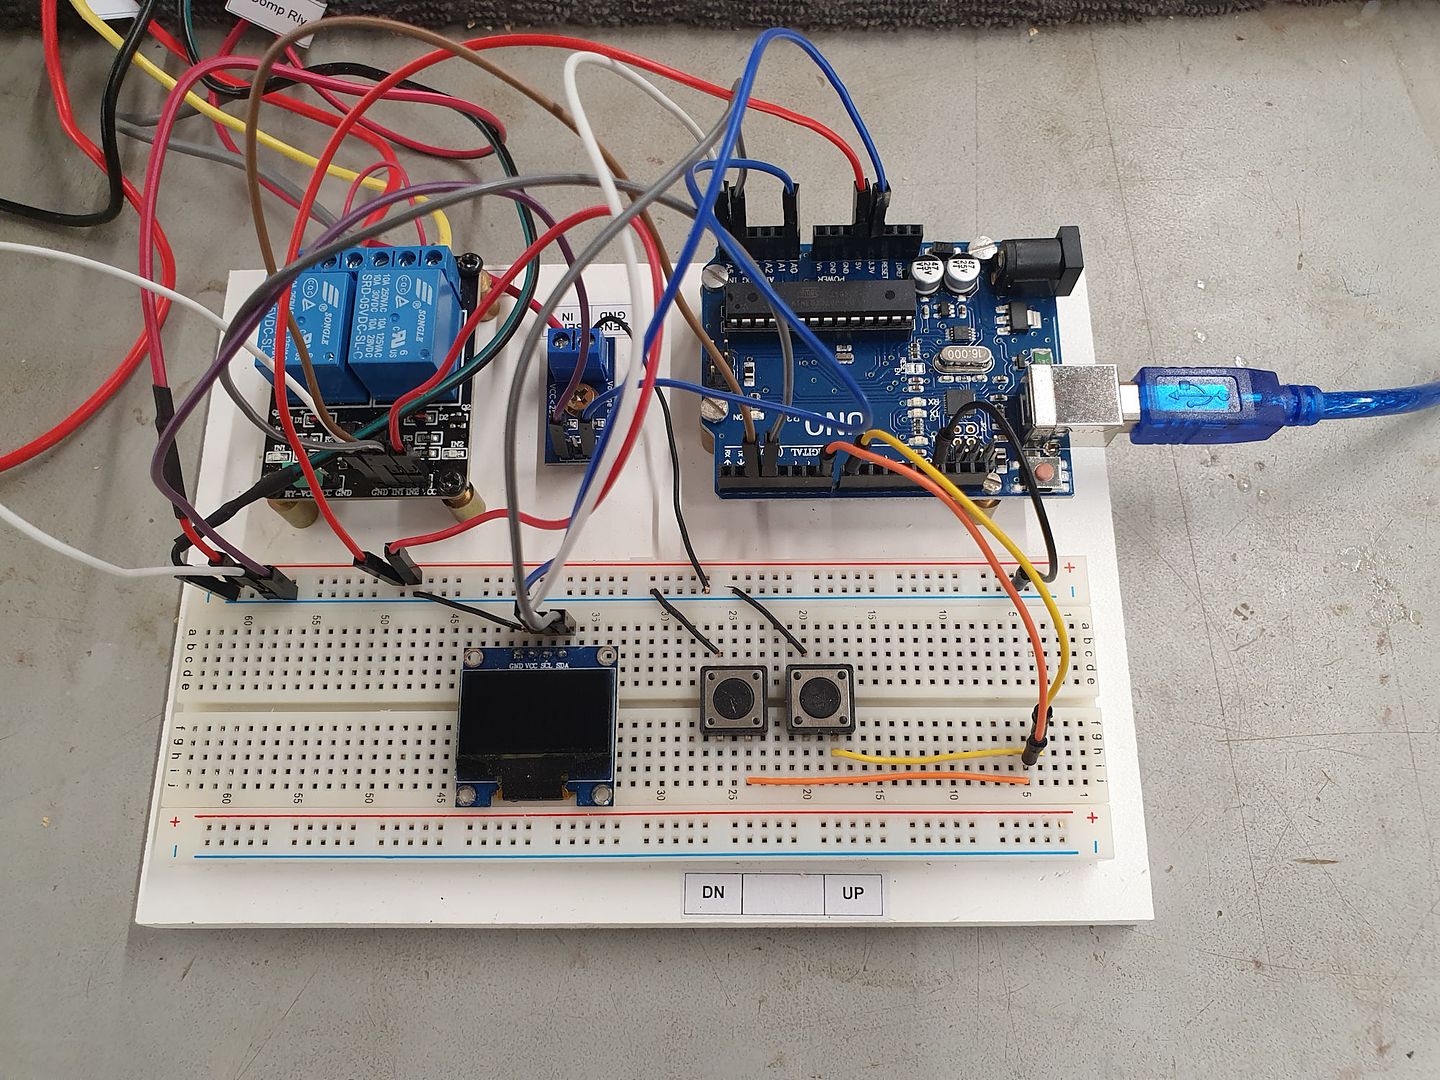
Everything checks out ok. For now, the display is showing the voltage from the benchtop power supply, and when the voltage output of the benchtop power supply is varied, the display tracks the changes. A closer look at the display:

DisplayTest1.jpg


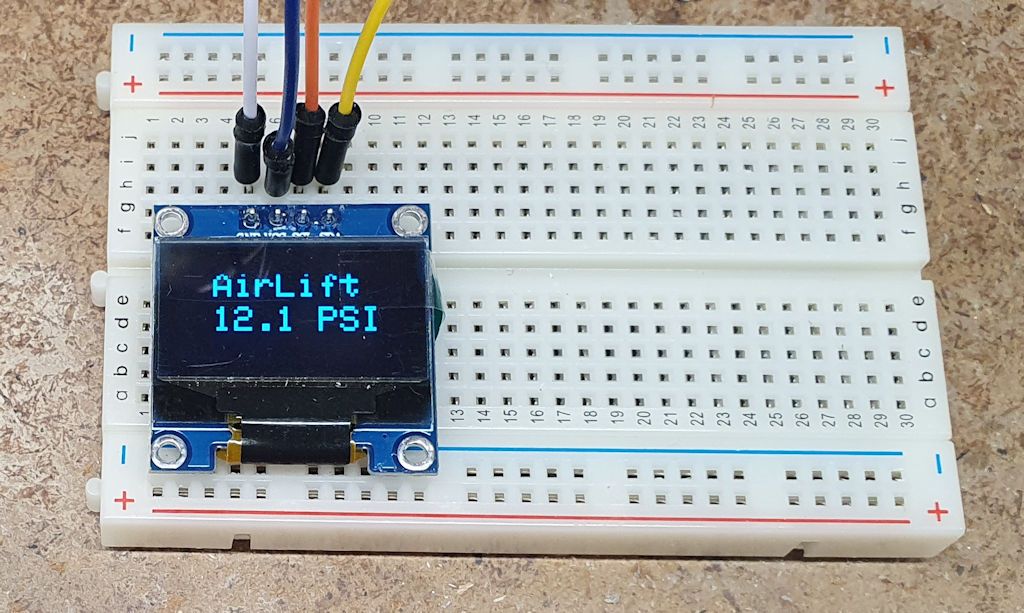
The next step is to change the code to convert the output voltage of the pressure transducer into PSI so the PSI can be displayed instead of voltage. Then connect the relay and write the code that will turn it on/off at appropriate times to control the pressure in the system. And once that's done I'll connect the compressor and the pressure transducer and hopefully watch the microprocessor control the compressor to manage the air bag pressure.
 

jscherb

Expedition Leader
On the Bantam trip a week ago the JK's traction control light started lighting up intermittently so I checked the error with my phone:

BrakeSwitchCodes.jpg


Something with the brake light circuit. (The traction control light also functions as a malfunction indicator for errors not requiring a check engine light). The light would go out each time I started the Jeep but a few times it was accompanied by the check engine light.

I texted the screen shot from my phone to the lead Jeep mechanic at my local dealer and he replied with this screen shot and recommended a replace the brake light switch even though the brake lights were functioning normally. The JK has 281,000 miles on it so it's not inconceivable that the switch contacts were going bad, so I had them order a switch for me to pick up when I got back.

BrakeSwitchDiagList.jpg


On the way home from the show, the light went out and stayed out all last week so even though I picked up the new switch last Monday I didn't install it. Partly because I wasn't looking forward to bending myself to lay on the floor of the Jeep and look up to work on the switch.

Yesterday I had to drive my better half to JFK airport for a flight (a long trip from where I live) and the light started coming on again, so today I installed the switch. It turns out that it's a very quick job and no laying on the floor is required.

Step 1 - pull the trim panel under the steering wheel off.

BrakeSwitchStep1.jpg


Step 2 - using a 10mm wrench, remove the two bolts holding the steering column bracket brace in place and remove it. The switch will now be visible and accessible without laying on the floor.

BrakeSwitchStep2.jpg


Step 3 - the switch is removed by turning it 1/4 turn counterclockwise.

BrakeSwitchStep3.jpg


Step 4 - remove the plug from the switch.

Then put the plug into the new switch, insert the switch in its hole (it's keyed so it only goes in one way) and turn it 1/4 turn clockwise. Done. Steps 3 - the end are best done with the brake pedal depressed so its not pressing on the switch; I used a length of scrap wood for that.

Now all I have to do is drive it long enough to have confidence that the problem was actually the switch, because it's been an intermittent problem as I describe above.
 

jscherb

Expedition Leader
I decided that the cranky factory tailgate prop rod had to go. It's a very poor design and prone to failure, mine was cracking along the curved part of the rod. It's useful to have something to prop the tailgate open, so I'm replacing it with a gas strut.


There are gas struts on the market, but I don't like how they mount, so this one is custom. An overall view:

TailgateStrut1.jpg


The body side bracket mounts to the inner fender. It's up high so the strut can mount horizontally and almost all of the bracket will be hidden by the subwoofer enclosure when I'm finished. I also made a block-off plate for the hole the factory prop rod assembly mounted into.

TailgateStrut2.jpg


On the tailgate side I made a bracket that mounts to the barn door support. On a Jeep without a barn door a bracket would mount to the tailgate itself.

TailgateStrut3.jpg


The white strut in the photos has a 15-lb. force, which is right for the liftgate glass but a little weak for a heavy tailgate with a large spare and other gear, so I've ordered a 30-lb. black one. I'll finish up this project when it arrives and post some final photos then.
 

jscherb

Expedition Leader
Great idea!
how long of a strut is needed?
The strut I'm using has a 19.72" extended length and 11.85" compressed length.

According to UPS the 30-lb. strut I ordered is out for delivery today so if it arrives at a reasonable hour I'll finish the project today and post final photos.
 

jscherb

Expedition Leader
The 30-lb. strut arrived so I finished the installation. The barn door opens itself very nicely and the 30-lb. strut should be enough to prevent accidental closing on most inclines (at least with the tires I have).


TailgateStrutFinal1.jpg


A closer view, open.

TailgateStrutFinalOpen.jpg


Closed:

TailgateStrutFinalClosed.jpg


Next, a closer view of the body side bracket showing how the inner fender panel was trimmed slightly to accomodate the bracket. One change I made since yesterday's photos - I made new brackets for each end of the strut, raising the strut 1/2". I did this to minimize the amount of trimming required to the inner fender panel.

TailgateStrutBodySide.jpg


Note that if you're doing this project to work with a factory liftgate, the height at which I mounted the strut may be a bit too high to clear the bottom of the liftgate - not having a liftgate on this Jeep I don't know that for sure, but if you take on this project make sure the strut is mounted so it clears the liftgate.


Update on another project: I'm waiting for a few components to arrive before I can finish the Microprocessor-controlled Airbag Science Experiment. I've got most of the code done to interface to the devices involved and when the rest of the pieces arrive I'll continue that project.
 

jscherb

Expedition Leader
On a trip back from India a few months ago I was watching bags go around the carousel at the airport and I noticed that some had locks on their zippers. I did a little research and found that the locks are available on eBay for installation on your own bags, so I ordered one to experiment with.

TSALockEbay.jpg


I'm thinking these could be used to make "tamper proof" storage for inside soft top/open Jeeps. The lock could be used to secure the zipper and the bag could be designed so it attaches to the Jeep in a way that the attachment can't be undone unless you can get into the bag.

I use the term "tamper proof" rather than "secure" or "theft proof" because as long as a bag is made from a material that can be cut with a knife, theft can happen, but if the zipper was locked and the bag secured so it couldn't be removed from the Jeep without destruction that might deter casual theft.

A mockup of what the lock might look like on a roll bar bag:

TSALockMockup.jpg


I've got some ideas for storage bags that would be able to securely attach to places in the Jeep and I plan to sew a prototype of at least one of the ideas. But before I go to the trouble of sewing a prototype "tamper proof" bag I'm wondering if anyone thinks it's a useful idea. Looking forward to your thoughts.
 

jscherb

Expedition Leader
I sewed a sample bag using the zipper lock. I'll call it a "theft-resistant" bag, I use that term because as long as a bag is made from a material that can be cut with a knife, theft can happen, but if the zipper is locked and the bag secured so it can't be removed from the Jeep without destruction that might deter some theft.

And since bags designed to be theft resistant in an open Jeep could also be rained on if the Jeep is open, they should be weather resistant as well. I made this new bag using fabric OO sent me that they're using for their series of "Storage on the Spare" bags so it would also be weather resistant.

Installed in the JKU:

TRBagInJKU1.jpg


TRBagInJKU2.jpg


TRBagInJKU3.jpg


Unclipping and lifting the lid reveals the lock, in the photo at right the TSA key is inserted and you can also see the combination (currently set at 0,0,0):

TRBagInJKU4.jpg


It's also possible to make theft resistant bags that attach to the roll bar - I've done a design for roll bar attachment that can't be removed without access to the inside of the bag. I keep an OO roll bar bag on the vertical bar behind the driver's seat in my LJ, it holds my recovery strap, it might be a good candidate for a theft-resistant version. I keep other recovery gear in the Overland Outfitters saddlebag also in the photo below - form-fitted to the inner fender, the saddlebag might also be a good candidate for a theft-resistant version.

RollBagInLJ2.jpg


I'm also working on ideas for a few other locations. Not sure if I'll sew prototypes of a theft resistant roll bar bag, saddlebag or of any other theft resistant ideas, for now I'll probably just put this one in use and see how I like it.
 

jscherb

Expedition Leader
The rest of the hardware bits arrived so I assembled a test fixture for my microprocessor-controlled suspension air bag "science project".

AirliftTestFixture.jpg


I've tested the components individually and everything works and I've also written code fragments to control the compressor and pressure release and to read the pressure from the transducer and display the pressure on the screen. I've also written and tested code fragments for two pushbutton control - one button to increase the pressure and one to reduce it. All I've got to do is wire all those things to the microproccessor board and combine the code fragments into a single program. Hopefully will get to that by this weekend.

BTW the manual pressure release and the pressure gauge are just for test purposes, if this were ever to be installed in a vehicle those wouldn't be necessary because the pressure can be released by holding the pressure down button down and the pressure will be displayed on the OLED display.
 

jscherb

Expedition Leader
I sewed a prototype theft-resistant/weather-resistant roll bar bag this morning. I used the same dimensions as the Overland Outfitters roll bar bag, but made these changes:

- DWR-treated (durable water resistant) ripstop polyester fabric
- Puncture-resistant zipper almost impossible to break into
- Theft-resistant mounting straps, can't be undone without access to inside of bag
- Provision for lock at closed end of zipper.

This bag has the strap buckles on the inside, so it can't be unbuckled without access to the inside of the bag:

TRRollBarBagStraps.jpg


The new bag also has a puncture-resistant zipper. Most standard zippers can actually be opened without moving the slider by poking a pen into them. These zippers are pretty much immune to opening with a pen. This photo shows a standard zipper (left) and a puncture-resistant zipper (right). You can see that the puncture-resistant zipper has two rows of teeth.

PunctureResistantZipperCompare.jpg


Zippers aren't watertight, so this bag has a flap that covers the zipper. It also has a hasp at the closed end of the zipper for a small padlock. There's an elastic strap to hold the lock and keep it from swinging around.

TRRllBagBagFlapAndLock.jpg


In two places in my LJ:

TRRollBarBagInLJ.jpg


With the theft resistance it's a good place to store a tool roll...


In my JKU, also showing the theft-resistant inner fender bag:

TRRollBarBagInJKU.jpg


This roll bar bag is a proof-of-concept prototype and there are a few details I would change if I were to sew another one or if it were to be picked up for production, but I'm pretty happy with it so far.
 

jscherb

Expedition Leader
"Science Project Update": My microprocessor airbag control system is moving right along. This is the hardware test fixture and the microprocessor circuit connected on the workbench:

AirBagTestFixture1.jpg


A closer view of the microprocessor and related circuitry:

AirBagMicroprocessor1.jpg


Most of the code is done and working. The microprocessor controls the compressor and the air pressure release valve and reads the pressure transducer to decide whether airing up or down is called for. The transducer readings have been calibrated to match the analog pressure gauge on the test fixture. I just have a few more code bits to finish and when that's done I'll do a video demonstrating how it all works.

Explanation of some of the components: at the left in the first photo is a 30amp 12v power supply, it's easier to use that for testing than to bring a battery from the Jeep into the workshop. All of the circuitry is breadboarded together, I'd make a PC board if I plan to use this in one of the Jeeps. The two round black things on the breadboard are momentary pushbutton switches which are used to request airing up or airing down, right now it's set to 5 lbs. psi. increments because less than that isn't really meaningful to the Airlift air bags, but the increments are easily changed in the code. Also the last requested pressure setting is saved in the microprocessor's EEPROM so when the vehicle is shut off and later restarted the airbag system will revert to the last pressure setting. The square black thing to the left of the switches is the OLED display, nothing is showing on it because the circuit isn't powered up right now but it shows both the current pressure in the bags and the requested pressure as entered via the switches. The blue USB cable connects to my laptop and is used to download compiled code to the microprocessor.

So far everything is going more or less according to plan. There have been a few small electronic engineering issues to work out and a few anomalies of the hardware components to account for in the microprocessor code, but these are minor details and not surprising in a project like this.
 

jscherb

Expedition Leader
Science Project Update: I've completed the code for the microprocessor-controlled suspension airbag system and it is working as intended. But I do have one final issue to work out - the pressure transducer I'm using to supply the pressure in the air bags to the microprocessor has some "bobble" in it. When the pressure changes, it takes a while for the transducer to settle down and because of that the microprocessor obeys the transducer and cycles on and off around the exact pressure until the transducer settles on a final reading. I've got some ideas on how to minimize the bobble in the code but probably I won't fully solve it until I get a transducer that settles down more quickly. I'll post a video of it in action soon.

--

On another subject... I was talking with OO this afternoon and they told me they sold a bunch of several different products in the last couple of hours, which they thought was unusual. I told them I wasn't surprised because Quadratec sent a marketing email out this afternoon promoting "The Five Best Products For Your Jeep's Interior", three of which were the OO products in question:

QTEmail0712.jpg


Actually the email featured 7 products, when I did the screen shot I left off the last row of three. I guess they can't count?

All three of those OO products first appeared in this thread in prototype form, they were ideas I came up with that I sewed prototypes of for my own use, thinking the ideas might be useful, and not knowing that OO would pick up the designs and put them in production. I guess they are useful for more people than just me, and it's nice to see that :).
 

jscherb

Expedition Leader
Air Bag "Science Project" Update...

After combining all the code fragments into a single main program there were a few electronic issues to solve, for example when the solenoid air valve shut off it sent a reverse voltage spike through the system that sometimes crashed the microprocessor (a diode fixed that). Also the pressure transducer has some "bobble" in it - when the pressure changes, it takes a while for the transducer to settle down and because of that the microprocessor would obey the transducer and cycle on and off around the exact pressure until the transducer settled on a final reading. I was able to work around the bobble in the code. Both of these are things that ordinary coding on a computer would never experience, but when you're dealing with the real world to some degree real world anomalies are more in control than your code. But all is working now, so here's a demo:


So what? That's a lot of technology to replace what I currently do with a bicycle pump. True, but this is just a first step - now that the basic system is working, it could be expanded, perhaps to create an active suspension system that can control airbags at all 4 corners of the Jeep to maintain ride height and load balance, or with different air bags than the Airlift 1000's it could be used to control a variable lift system - no lift for daily driving or higher lift for trail clearance. With the addition of an attitude/angle sensor (a less than $1 component), the air bag(s) at the low corner/low side of the Jeep on the trail could be increased in height to improve trail stability. Or, using a different version of the Arduino board with a Bluetooth interface an app could be built to control the airbags. There's a lot that could be built based on the simple starting point that I've implemented.

I will be turning the over the code, circuit diagram and component specs of the airbag project to the compressor company - they expressed enough interest in the project to give me the compressors; I don't know if they'll want to do anything with it now that's it's working but perhaps they'll be interested in marketing a low-cost digital controller for load-management air bag systems based on this project. The electronics could easily be turned from the breadboarded wiring I've done into a very compact PC board and the total electronic component cost at the manufacturing level would be less than $25 so a simple plug and play digital airbag controller is practical.

I'm not sure where I'll take this project next but it's been a lot of fun making all of these components work together and interfacing the microprocessor to the real world. The quirks of real world devices provided coding challenges I'd never experienced in my tens of thousands of lines of code experience so it was a great learning project as well. I do have some other ideas I might pursue, such as interfacing the microprocessor to the OBDII port; in my '06's it wouldn't be able to do much except monitor engine parameters but in my JK it could possibly control accessories on the Jeep's CAN bus. But for the moment I'll call this "science project" done.

Happy to provide more details or answer any questions anyone might have.
 

jscherb

Expedition Leader
I was near a Micro Center the other day so I stopped in to pick up some additional components for further microprocessor experiments, but their stock was so disorganized I didn't buy anything. Afterwards I placed an order with one of my favorite electronics places and among the things I ordered was a 3-axis Gravity/Acceleration Sensor.

3AxisAcelerometer.jpg


It's a less than $3 part and it can tell the microprocessor about its angular orientation in three dimensions, and it can also report on how fast the orientation is changing. There are several interesting things I could do with this.

1. With different air bags (see below for more about types of air bags), it could be used to automatically level the Jeep. I should say "automatically level the Jeep to some degree" because sometimes we get our Jeeps in crazy orientations on the trail that no air bags expand far enough to compensate for, but within the limits of airbag travel the Jeep could be leveled. And by also reading the acceleration of the change, the microprocessor could determine how fast the Jeep was changing attitude and perhaps could adjust the speed of leveling accordingly.

2. As a first test, I'll prototype a simple inclinometer, which with an appropriate display, could show you the current angles of the Jeep and perhaps let you know when you're too far off-camber for your particular Jeep to remain stable. How about a warning light or sound when you get close to the off-camber angle you've set as a danger level?

I also ordered a MicroSD card R/W module (a $1.95 component), so as a second phase of the inclinometer prototype maybe I'll log the angles and vertical acceleration of the Jeep on the trail so the data can be reviewed later if desired. It's way bigger than real life in this photo (as is the photo above):

MicroSD.jpg


I'll report on these further experiments and prototypes as I get time to write the code and test them.

I've also sent the compressor company information on a few product ideas based on the air pressure management code I've already written, if they express any interest in going further with the ideas I'll report on that too.
 

jscherb

Expedition Leader
I was in a Rockler Woodworking and Hardware store yesterday looking at new drill presses; mine is 35 years old. It wasn't an expensive one and it's seen so much use over the years it's starting to show its age. But that's not why I'm posting - being in Rockler reminded me of a project I did back in 2017 using Rockler parts. I'll post about it again because I still think it's an easy and useful project.

The parts are their heavy-duty powder coated shelf brackets. They are 8x12 and work very well for making jerry/ammo can mounts for the tailgate.

ShelfBrackets1_zpsqygmonbz.jpg


I'll repeat what I wrote back then:

They're a perfect size, all it takes is drilling an extra hole or two in them to match up to the holes in the hinges.

ShelfBracketsJK_zpsl5x9eend.jpg


They would work for mounting an ammo can, they're shown here with a 30 cal ammo can tray:

ShelfBrackets30Cal_zpsmxuhxfdc.jpg


Or a jerry can. The jerry can tray in the photos below is available [from MORryde], so there's no fabrication involved, just drilling a few holes in the bracket and the tray.

ShelfBracketsJerry_zps4vmauiru.jpg


At the time I didn't post any photos of the brackets attached to the Jeep, but in 2020 I used them to carry ammo or jerry cans; at that time I mounted them opposite my original post. That post is here: https://forum.expeditionportal.com/threads/barn-door-for-jk-factory-hardtops.127687/post-2782088

They could also be used to mount a propane tank, later in 2020 I made a custom set of brackets for a propane tank holder but the Rockler brackets would work for that as well. The reason I didn't use the Rockler brackets for that project is because of the diameter of the tank, the tank needs to sit a bit higher than the small size Rockler brackets I had would permit. Rockler sells a larger set of brackets that would work perfectly for this, but rather than order a set I just made my own.

The Rockler brackets (and the larger ones I made) work perfectly on the MORryde hinges on both my JKU and my LJ...

BracketsOnJKU_zpssspixuu0.jpg


BracketsOnLJ_zpsdj0sqgp1.jpg


The posts on the custom brackets begin here: https://forum.expeditionportal.com/threads/barn-door-for-jk-factory-hardtops.127687/post-2793186

A walk down memory lane after being reminded of an easy project I did 6 years ago. Still a worthwhile project and the brackets are still available from Rockler.
 

Forum statistics

Threads
186,046
Messages
2,881,311
Members
225,825
Latest member
JCCB1998
Top