Boden Build - 2015 Tacoma DCLB 4wd

tacozord

Adventurer
I love that flippac! Any pics of the inside? How hard was the install into the truck? Any issues/annoying rattles driving on washboard dirt roads?

I don't have any pics of the interior yet. But I'll get around to that for sure.

The installation was extremely easy. The only difficult part is the weight. The Flippac weighs almost 300 pounds. So it took four of us to transfer it from the sellers truck to mine. As for clamping it, the new Tacomas come with a rail on both sides of the bed. Within this track slides six t-nuts. But the threads are vertical and not horizontal. To secure, the bolt drops down through the fiberglass footing at the base of the Flippac that sits on the trucks bed rail.

The Flippac was missing one clamp, so I purchased a replacement at Truck Outfitters Plus. The specific part I bought was: 85467 - Toyota Tacoma/Tundra Leer Clamp. When visiting the page, the part is about half-way down. Unfortunately, it doesn't list the part number on the page. But here's a pic of the part I bought:

clamps_82975.JPG


With regards to rattles, the only thing that stands out at the moment is the metal tube that surrounds the torsion bar. It's loose and rattles even while driving on the highway. I haven't attempted to quiet it yet, but I've got an idea that I might try.
 

tacozord

Adventurer
Greetings and thanks for such great detailed write ups.

I have a 2012 Tacoma which came with the stock electric mirror -- looks very similar to the one you purchased. I looked at Bird Dawgs mirror riser but they state its only for the standard non-electric mirror. It looks like you were able to make it work. Any issues or was it plug and play?

Thanks

I had no problems installing this mirror with their mirror riser. The only odd thing that I remember was their instructions were inaccurate with regards to how to remove the stock mirror. But it wasn't that big of a deal. A little common sense and it's done.

Anyway, the mirror riser is nothing more than a displacement of the current mount on the windshield. With the stock mirror removed, install the mirror riser and then attach the new mirror. The electrical for my mirror is a small pigtail that tucks up under the headliner, and this has nothing to do with the mirror riser. Perhaps there's something I'm unaware of with trucks that are sold with the electric mirror. But in my case, it wasn't a problem at all.

Hope this helps.
 

P2W

Observer
Greetings and thanks for such great detailed write ups.

I have a 2012 Tacoma which came with the stock electric mirror -- looks very similar to the one you purchased. I looked at Bird Dawgs mirror riser but they state its only for the standard non-electric mirror. It looks like you were able to make it work. Any issues or was it plug and play?

Thanks

I don't know if this helps or not but I recently installed the Bird Dawg mirror riser in my '13 Taco.
I cut a 3/4"x1" opening in my headliner and removed the larger of the plastic trim covers on the mirror.

The Hardware:

Bird Dawg-01.JPG

Before:

Bird Dawg-02.JPG

The cut -n- fit:

Bird Dawg-03.JPG

After:

Bird Dawg-04.JPG
 

tacozord

Adventurer
Sound Dampening

After removing the rear seats, I noticed a significant increase in road noise. This, in combination with mud tires, is adding a significant increase in ambient noise. Now I'm sure my plans of an equipment platform in place of the rear seats will help dampening the sound, but before doing so, I have a good opportunity to more thoroughly sound dampen the vehicle. Furthermore, I may or may not upgrade the stereo system sometime in the future. In any case, a quieter vehicle is something I'd like to get.

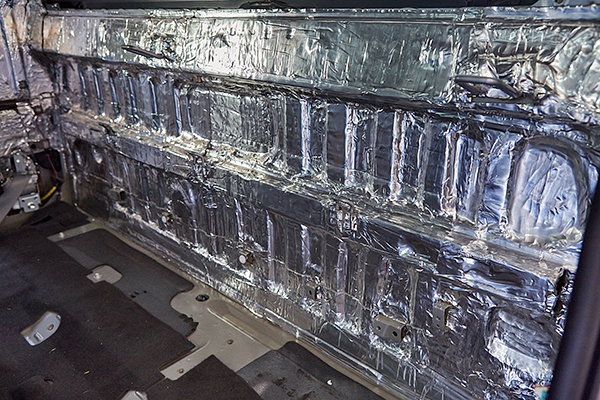
So this project is ongoing and was started it about a month ago. At this point, the back wall, rear doors, and floor are complete. When I get a window of time, I'll continue with the front doors and then the roof. For now, here's some pics. The first layer is RAAMmat BXT II. Over the top of that, I installed 
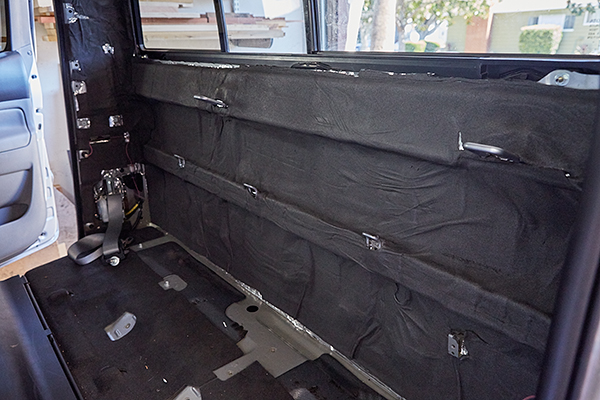
Ensolite IUO Peel and Stick.

The back wall was done first.
2015-09-17_TacomaSoundProofing_Z2A5584_web600.jpg


[
2015-09-17_TacomaSoundProofing_Z2A5588_web600.jpg


Next up was the rear doors, but I didn't take any pics. When I do the front doors, I'll take some photos, which will be done in the same manner.

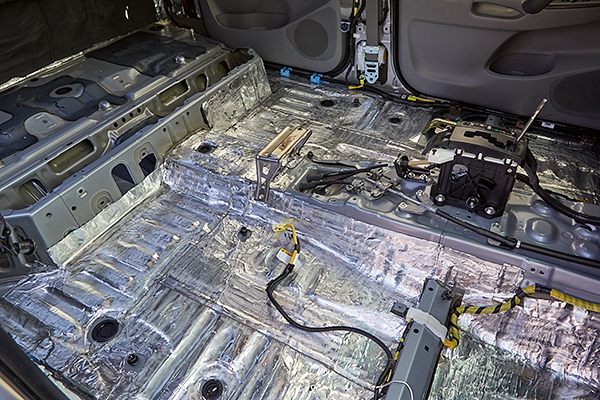
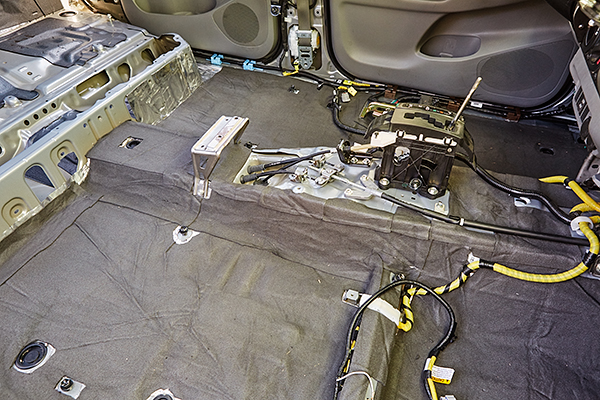
Before doing the front doors, however, I decided to do the floor. Unfortunately, I ran out of material partway through the installation. This is what I was able to complete before ordering more.
2015-09-22_TacomaSoundProofing_Z2A5605_web600.jpg


2015-09-22_TacomaSoundProofing_Z2A5614_web600.jpg


Luckily, it allowed me to re-install the carpet and front seats before completing the remaining section in the far back. When the new supplies arrived, I was able to complete without too much trouble. I just didn't have as much working room.
 

tacozord

Adventurer
I installed a front rail seal a couple days ago. This molding seals the large gap under the Flippac at the front of the bed, which is caused by the bed side caps sitting higher. I'm not sure why the Tacomas are designed this way. I would think the bed should be flush all the way around.

The one I purchased was from Extruded Solutions, model # FRSXL5.5.

Sorry, no pics of installation. Maybe I'll shoot a pic later and add.
 

tacozord

Adventurer
I've got a big trip in two weeks, and this one will need a better stove than my Jetboil. I used to own a Coleman stove that used white gas, but after 20+ years of use and a crapload of frustration near the end, it was time to upgrade. If the stove is as good as everyone says it is, then this will be the last stove I ever buy!!

2015-11-05_PartnerStove_Z2A6526_web600.jpg
 

tacozord

Adventurer
I finally got started on my back seat platform. There's still lots to do. I want to make removable panels to access the storage underneath, and I need to mount the L-Track and bolt the platform into the vehicle. Finally, I'll be covering it with carpet.

2015-11-05_TacomaBackSeatPlatform_Z2A6529_web600.jpg


2015-11-09_TacomaBackSeatPlatform_Z2A6587_web600.jpg


2015-11-09_TacomaBackSeatPlatform_Z2A6605_web600.jpg


2015-11-09_TacomaBackSeatPlatform_Z2A6588_web600.jpg


2015-11-09_TacomaBackSeatPlatform_Z2A6606_web600.jpg


2015-11-09_TacomaBackSeatPlatform_Z2A6612_web600.jpg


2015-11-09_TacomaBackSeatPlatform_Z2A6620_web600.jpg
 

tacozord

Adventurer
Made some more progress today on the platform. I didn't get as much done as I thought I would. For some reason, bolting the platform into the vehicle was a very tedious process.

To locate the rear mounting holes, I fabricated some locating bolts by cutting off the head and grinding the tip down to a point. This was first done using a grinder with the bolt in a bench vise. I then chucked it into a drill press and spun that while grinding it down to a symmetrical fine point.
2015-11-10_TacomaBackSeatPlatform_Z2A6624_web600.jpg


After screwing them in, I put the platform in place and banged on it with a mallet. This resulted in perfect alignment holes.
2015-11-10_TacomaBackSeatPlatform_Z2A6638_web600.jpg


Next up was mounting the front of the platform. The bolts up front are on the side, so I chose to use angel brackets. I had to enlarge the holes to accommodate the 10mm bolts.
2015-11-10_TacomaBackSeatPlatform_Z2A6653_web600.jpg


To align them, I installed the platform, secured the rear bolts, fastened the brackets in place, and marked their location with a pencil. Then it was simply installing the angle brackets.
2015-11-10_TacomaBackSeatPlatform_Z2A6654_web600.jpg


After this, it was a ton of minute adjustments to the mounting holes to get them all to line up properly. This is what took me a long time, but I was finally successful.

Tomorrow, I plan on making the cut-out panels and installing the carpet, which should arrive today. The last step will be installing the L-Track.
 

tacozord

Adventurer
I finally finished building and installing a Bussmann RTMR and switches. I took many photos along the way, so I plan on detailing the process in greater detail later. But for now, here's a few pics.

I completed my Bussmann RTMR tutorial that I mentioned a while back. This took me quite some time and was spread out over the last six months. I thought about publishing it here in my build thread or in a separate thread, but it's very long, and I'd have to completely reformat it.

So, here's a link to it on one of my personal websites: DIY Bussmann RTMR Fuse Block

I also published it over at Tacoma World: DIY Bussmann RTMR Fuse Block
 

Adventurous

Explorer
With how well documented and well written all of your stuff is I'm surprised you actually have a chance to do anything. I can only imagine how much time putting stuff like that write up together takes.

That being said it is now bookmarked and will be referenced in the future. So thank you for that.
 

Forum statistics

Threads
186,725
Messages
2,887,513
Members
227,160
Latest member
roamingraven

Members online

Top