Buying & Building a Medium Ambulance into an RV – The FAM-BULANCE

rlrenz

Explorer
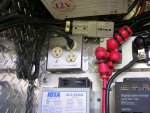
I've also been wondering where I could hang a fire extinguisher inside the module - the photos show 4 screws on the door of the cabinet that match up with the screw holes on a fire extinguisher bracket I have, but this would be a real bump hazard. Right now, it looks like I'll have room to hang one on the bottom of the cabinet, just below the electrical panel.

MNtal stopped by last night, and we spent a few hours waving our hands in the air about ambulance builds. I've been trying to figure out where to carry a spare tire, and how to build a bed without destroying a lot of interior storage. We figured out that I have a rear cabinet that can be used for a quick solution to tire storage (4 bolts to remove a shelf), and that building a fold out couch for the rear of the module could solve both bed space, and allow storage for a spare tire under the couch. I wonder if the RV folks make something like that already (but probably without tire storage capability)? I could either build the frame from baltic birch / marine plywood, or weld it from aluminum.

Tune in tomorrow...
 

rlrenz

Explorer
Yep - Blue Sea is beautiful. There are other brands out there, such as Paneltronics, but Blue Sea is very available very easily. If you dig into their web site / catalog, and the Paneltronics web site, you'll see that they regularly show emergency vehicles in their photos. I have friends who are emergency vehicle upfitters (those folks that turn a normal vehicle into a fire chief's car) who also use Blue Sea components.

They also have good customer support. My DC panel had a dead section on the LED strip that lights the labels. I e-mailed Blue Sea, told them that I bought the panel about a year ago, and they sent me a replacement LED strip at no charge.

In my case, a lot of my total panel build was for the 120 volt section -- Onan generator start panel, source circuit breakers (shore & generator), source selector, and finally the 120 breakers. The DC section will be fed from a dedicated deep cycle battery that will be charged via a Xantrex Echo Charger, so it is much more straightforward to work with. The first breaker in my panel was changed a bit so it is the main breaker for the panel.

DSCN4838.jpg

DSCN4839.JPG

Note that I had to feed the main breaker from the LINE side, and then jumper to the rest of the breakers from the LOAD side. I'm using a 40 amp breaker as my main for this panel.
 
Last edited:

EXPO365

Adventurer
Hmmm...I should do the same on mine fore the main breaker (still don't have one yet).

If your plugged into shore power does it allow you to turn on your over head lights? I don't have any 110v lighting in my rig.
 

rlrenz

Explorer
I can run the lights just fine.

My Iota battery charger is fed from the 120 panel, and it connects directly to the batteries. The charger is rated at 55 amps output - I had originally planned a 75 amp charger, but I wanted to limit the 120 volt load, so I decided to reduce the load by converting the lighting from halogen to LEDs.

I have a full set of LED interior lights that I'm installing, which will reduce the ceiling light load from about 30 amps down to about 7 amps. Ambulance ceiling lights can get spendy, but I found a dealer who had bought out the inventory of a closed ambulance builder, and he had them for about 1/4 of retail. I'm not too worried about the exterior scene and warning lights since they will be an intermittent load. If a nice Whelen scene light jumps up in front of me, then it might get installed, but definitely a tomorrow thought.
 

rlrenz

Explorer
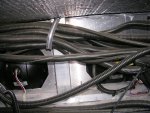
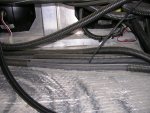
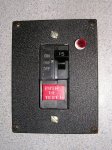
As I dig deeper into the project, I see occasional bursts of wisdom - both from the builder, and from me. I was tracing the cable from the power inlet, and saw that it went past the Vanner charger and into the overhead. After some thinking, I realized that it went to a GFCI breaker mounted on the bottom of the top (?) of the action station, then back to the Vanner. I managed to take a photo of it by laying the camera flat and guessing at the aim. It took a few tries, but success finally. It will be replaced by a main-inlet GFCI breaker located in the old oxygen cabinet close to the power inlet.

DSCN4926.JPG

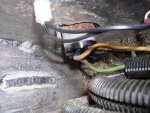
I also need to get into the overhead above the old oxygen cabinet to reroute some wiring, but today, the driveway folks showed up to do their thing, so it was parked in the street. Since I don't like using a stepladder in traffic, I cheated, and stuck my hand with a small camera over an interior partition so I could take some blind photos of what I had to work with. Success again! And just to tempt fate, I managed to get some photos of the existing 15 amp power inlet wiring as well.

DSCN4931.jpg DSCN4932.jpg

DSCN4916.jpg
 

patoz

Expedition Leader
I use my cell phone camera to shoot pictures and video of tight spaces all of the time. The 'selfie' (rear camera) is handy to use the phone like a mirror to see under a vehicle, etc. because the camera and monitor is on the same side...so it works like a mirror.

Do you remember the conversation we had about adding GFCI main breakers to the AC panel, and whether it was necessary or not? I guess it must be, since the builder of yours installed one, and it's much newer than mine. My whole system was really just a recessed male receptacle for the shore power cord, and a series of extension cords and outlet boxes running through the ceiling and walls, with no breakers or protection of any kind. But, there was only two outlets on the walls and one from the inverter. All that will change seriously though!

If I had all the room in the overhead you have, I'd cut out the center section and give myself another foot of headroom! :agree:
 

bobrenz

Observer
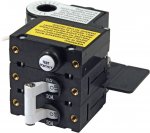
I didn't put a GFCI breaker in the main panel due to it's shape and size - the main panel breakers are there more as switches. I dedicated space on the oxygen cabinet panel for a GFCI breaker, plus it will be closer to the inlet. The GFCI breaker will be installed in a box about 3x4x6". After looking at what was available, I bought a Blue Sea breaker --photos to follow.
 

rlrenz

Explorer
OK - why the Blue Sea GFCI breaker? I did some checking on line, and I was able to track down conventional GFCI breakers with no problem, but the challenge came in finding a cabinet that would work and that wasn't designed to handle an entire house full of breakers. One cabinet looked perfect, but the fine print stated that it wasn't capable of being used with their GFCI breaker. When I priced a conventional GFCI breaker, and a Blue Sea GFCI breaker, there wasn't much difference.

I went with just the bare GFCI Blue Sea breaker since I have cast aluminum enclosures available that will work fine (Hammond or Bud). If you want sticker shock, though, look at the Blue Sea version that has a panel with it - the bare breaker is #306100, with a list price of $168.27 (on line price of $119.95) - - the same breaker with a panel is #8100, and a list price of $266.81 ($200.80 on line) - any way you do it, though, it's a pricey little panel. Since it will be located adjacent to the shore power inlet, there wasn't any reason to get fancy with the panel - the aluminum enclosure will be carefully labeled with my Brother labelmaker.

3106100.jpg 8100.jpg
 

patoz

Expedition Leader
That's the same breaker I was considering using. It wouldn't look right, but it would mount in the vacant slots at the bottom of my panel, unless I got creative and moved everything down to make room for it at the top. Much too early in the game for me to worry about it's location right now though.

If it doesn't stop raining and cool off some, I'm never going to even get to that point. The high yesterday was 96°, with a heat index of 111°, then we had thunderstorms for about four hours. :(

Too bad you already have your panels mounted, because you could use the bottom half of one of them as a template to make a panel for the ELCI.
 

rlrenz

Explorer
OUCH - your temperature & humidity certainly offset your warmer winter.

Mounting this won't be a problem - I earmarked space in the old oxygen cabinet (now a utility closet) for it along the route for the lead from the new outside shore power inlet. My utility closet will also wind up with fresh and gray water storage tanks and the water pump. There is also space for the water heater as well.

You can accomplish the same thing by using GFCI receptacles. I suggest that if you go that route, you use a heavy duty receptacle. Marine grade would be one option, but I think they aren't any better than a heavy duty receptacle (they just cost a LOT more - do a Google search for what others think). I thought about a heavy duty (Hubbel) GFCI, but then I figured hospital grade should be as good as they come - so I bought new takeout hospital grade GFCI receptacles from Foster Coach for $10/each.
 

patoz

Expedition Leader
It's been awhile since I researched this, but from what I remember the basic difference between an ELCI and a GFCI (as applied to marine and camper use) is the ELCI will provide protection for the entire metal body of the vehicle or metal structures on a vessel if there is a fault, and someone touches it while grounded (standing on the ground barefooted or in the water), whereas a GFCI will only provide protection for the specific tool or appliance plugged into the receptacle.

https://www.bluesea.com/resources/1381

I really need to do more research on this to be sure. Maybe even make a call to Blue Sea's Tech Support people.
 

rlrenz

Explorer
Progress has been proceeding! The new electrical panel is being connected to the downstream loads so I can install the new 30 amp inlet and the ELCI. I mounted an outdoor box on the wall of the old oxygen cabinet, with a 3/4" PVC conduit segment going through the wall. Nothing fancy - just solid.

DSCN4958.jpg

The buggy presently has an ELCI, but it's only a 15 amp version, and mounted under the cabinet over the action station, so it will be totally replaced,

DSCN4926.JPG

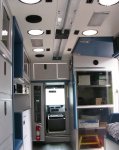
I decided to celebrate a little bit today, and took the time to install the new LED ambulance ceiling lights and a fire extinguisher. The lights will help both the power load (8 amps total versus 35 amps total with the old halogen lights), and will also reduce the cooling load on the AC.

DSCN4961.jpg
 

patoz

Expedition Leader
Looking good as usual!

Those LED lights really make a difference, not only in being able to see, but making everything else look shiny and new also.
 

bobrenz

Observer
Thanks, Pat. I thought about saving the old halogen fixtures, but then reality set in--why save them? The lenses are showing yellowing, and there's no way I'd reinstall them. I did save the bulbs, though -- they might fit something else. The extinguisher is a halon that I'very had for years - you can't buy a new one, but I can still get this one serviced.
 

bobrenz

Observer
By the way, Pat - the interior was very clean when I bought it. I went with a refurbished ambulance instead if a junk yard special, it could have gone back into service when I took delivery.
 

Forum statistics

Threads
186,624
Messages
2,888,208
Members
226,766
Latest member
Josh00333
Top