Canadian Disco 2 Build

R_Lefebvre

Expedition Leader
Oh, also, I was crawing around under there last night, and looking at the location where the range extender tank would go and... It just wouldn't work with this setup. The lower fender has so much material removed, it doesn't leave much room for a tank anymore. I'm sure that the LongRanger tank would end up being exposed if it were installed. It should be pretty obvious when looking at the photos now. A custom tank could probably be built, but you'd be lucky to get 5 gallons in it.

Here's the picture of the LongRanger auxilliary tank. You can see how the bottom of it parallels the bottom of the factory fender. I've removed up to 8" of the fender.

land_rover_discovery_tr56_long_ranger_fuel_tank_rear_view.jpg


Also note how the transer system works. I believe this tank must be used with the oversize main tank that they sell.

land_rover_discovery_long_ranger_fuel_tank_fuel_transfer_guard.jpg


Look at the picture of the oversize main tank and how much clearance it removes due to it hanging below the frame a good ways. It's a good system, and would be great for exploring long dirt and gravel roads. But it's not really compatible with trails requiring high clearance.

land_rover_discovery_tr56_long_ranger_fuel_tank.jpg
 
Last edited:

LandyAndy

Adventurer
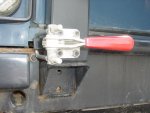
How about using a catch like this, I have the same style on the tire rack I built for my D90. Once closed it clamps the rack up really tight and you have to give it a good tug to open again. Some models I believe have a cross locking pin also.

I looked at the Longranger tanks also for my truck. Decided that they'd be great for long distance on forest roads but as you say not ideal for rocky tracks in the mountains.

I'll be going with jerry cans in a rack in the back of the truck. Have worked out that you can get 3 x 20L ones along side the Engel fridge on their back edge and their is enough room for a 10L in front also. So, can carry a total of 90L of either water or fuel depending on the trip. Weight is kept fairly low and it's not on the roof getting caught up in low branches. Fridge should arrive this week so can finally start my rack build :wings:
 

Attachments

  • tiresw04.jpg
    tiresw04.jpg
    23.6 KB · Views: 28

R_Lefebvre

Expedition Leader
I like the idea of aux fuel tanks under the floor in the center of the truck, alongside the frame. But they require a complex transfer system.
 

Root Moose

Expedition Leader
Is there anything special required to transfer fuel between tanks in a OBDII vehicle? As long as it is sealed it should be good?

The Long Ranger guys haven't gotten back to me since my initial contact. I should give them a poke.
 

R_Lefebvre

Expedition Leader
I don't think anything special... though I'm no expert. It's possible if an extra tank is in the system, it could confuse the vent/purge system?
 

R_Lefebvre

Expedition Leader
Ok, I'm pretty close to getting this thing finished now. At least the bumper part anyway, still a bit of work on the tire carrier. Anyway, here's a shot to show the mount to the rear crossmember holes. These are the holes to which the factory trailer hitch used to bolt. The nuts visible are two of 4 into which the tow bar fasten with bolts.

mBumperBuild_20100207_1035.jpg


Next up is showing the backside of the shackle mounting brackets where they are welded to the mounting plates directly. That's better than a full 1/4" of weld thickness since it started out fully V-knotched right to the root.

mBumperBuild_20100207_1036.jpg


Next up, is the reinforcements for the sliders back to the frame. These are absolutely mandatory. Even with the stout central mount to the rear crossmember, I can flex the forward end of the sliders up and down about 1/2" by hand. This is about as far as these will go. I plan to weld a bracket to the frame which will bolt to the reinforcing arm. I wanted the bracket to go on either side of the arm so the bolts are in double shear, but it seems it will make it too complicated to actually fit this big beast to the truck. So, I'll just use 1/4" plate to make a bracket and have the bolts single shear through the arms.

I also intend to have mudflaps on this, and probably will have them bolted to these arms. I could hang it from the forward face of the rear beam, not sure pros/cons of either. I supposed further back would help prevent them getting caught on the wheels. I intend to have some sort of quick-release system for the flaps to remove them before doing a difficult trail. Any ideas?

I've been planning on welding on a 14ga. triangular plate that will cover the sheet metal between the slider, rub strip, and fender flare. But thinking about it more, I wonder if it's not more trouble than it's worth. The forward edge would end up being completely unsupported, and possibly flappy. I know some others have done something like this, but I'm not sure what exactly. Thoughts?

mBumperBuild_20100207_1046.jpg


And, here's a shot of the whole thing. Yes, it's rather large. I think it's still under 100lbs due to selection of wall thickness. Most of it is only 1/8", and just reinforced where needed. And yes, I have test fit it to the vehicle and you can still get it on. It's actually not too bad, though a second person would help, I've done it twice so far by myself.

mBumperBuild_20100207_1030.jpg


Oh, and interesting note, I cut the exhaust hanger and lashing eye from the frame on the drivers side, and discovered that the welder blew a hole in the frame when welding the lashing eye on. Nice. I bet that really would have helped if somebody had been really yanking on it.
 
Last edited:

Root Moose

Expedition Leader
I've been thinking about your support beam that attaches to the frame rail the last few days.

As an alternate way to shore of the structure and keep it from moving...

I suggest welding the support beam to a flat plate at the frame end. Use four bolts to attach the plate to the frame rail.

At the frame cut some steel tubes into the frame so that the bolts pass all the way through and are bolted from the back side of the frame rail. I don't have a sense of scale of the frame from the photos, the issue becomes having too many tubes welded into the frame too close together. Maybe you can get away with few bolts of distrbute them in a diamond pattern so that the plate is properly flush to the frame. Or fish plate the entire area to strengthen and distribute the load.

Where the support tube is welded to the plate, add a triangular gusset that flares from the outside end to the bottom of the plate. If that makes sense.

I generally like what you have in mind for this part but...

If you weld a plate to the frame I am not certain that you will have the desired strength. The plate will stress and eventally crack or rip the frame I'm thinking. You would be better served to have steel tubes welded into the frame to support the load. FWIW, this is not a terribly unusual way to do it... the TNT lift on my XJ is constructed this way - tubes placed through the unibody pseudo frame rails to support the structure.

I guess the big difference between my idea and yours is that I want a plate welded to the frame and tubes pressed through and the structure bolted to this.

Anyway, just some thoughts to get the creative juices flowing.
 

R_Lefebvre

Expedition Leader
Basically, you are thinking to have it bolted to the frame instead of welded. And you would weld reinforcement plates and bolt tubes to the frame to reinforce it? That might be one way to do it if I had the body off, but I'm not sure I could accomplish that as it sits now. In fact, it would be impossible without removing the fuel tank at the very least.

I think a proper mount can be welded to the frame, just need to design it. I'm pretty sure instead of a simple flat plate, I'll use some L-angle for extra weld area to the frame.
 

LandyAndy

Adventurer
For your mud flaps put a reinforced eyelet in the bottom of them. Get a stout bungee cord & strap back to the rear bumper.... no messing around in the dirt having to refit them in the dark. If you wanted to have them removable how about using some antiluce latches as per 90/110 tailgates through reinforced holes... keeps it real simple then :ylsmoke:
 

R_Lefebvre

Expedition Leader
The brackets are welded to the chassis now. That was a fun job with the TIG. The whole thing is very very solid now. Can jack up the truck from the forward edge of the rear quarter slider.

BumperBuild_20100307_1070.jpg


Next, I had to get the gas tank skid plate built before I could continue on the bumper. This replaces the existing tank bottom strap. The frame is built from 1x2 tube, the plate is 12 ga. I think I'll be adding some additional reinforcement to the sides.

BumperBuild_20100307_1078.jpg


And here's the system coming together. I moved the spare tire mount closer to the door, and tipped it in towards the top as per AlaskaMike's recommendation. It does look better and I'm sure will help. I've got only 1" clearance to the swing-away now, just enough to hopefully squeeze on a wider tire in the future. With the massive drop hitch bolted to the bumper, the hitch is rock solid and does not move at all due to the stabilizing effects of the 1/4 slider mounts. Backstays won't even be necessary for lighter trailers. I'll probably still use backstays just to support a skidplate for a special short drop hitch I'll build for my big trailer.

BumperBuild_20100307_1076.jpg
 
Last edited:

94Discovery

Adventurer
i love the rear bumper design and your garage can i come and sleep next to the truck :drool:.
one thing the bracket that you welded on the frame it does not interfere with the tire at a full flex ,or if you install a bigger tire ? i cannot see all the angles from that picture .
Naj
 
Last edited:

AlexJet

Explorer
Nice coming setup. I'd suggest to work out the corners underside. Similar to what I have (do you remember my bumper?). In this case you'd be protect from sharp rocks.
 

Forum statistics

Threads
186,701
Messages
2,889,111
Members
226,872
Latest member
Supreet.dhaliwal
Top