Converting Whelen 900s/Similar Scene lighting to LED?

patoz

Expedition Leader
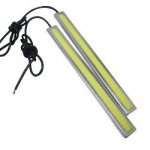
I'm having great luck with the chip on board or COB lights
cheap as heck to boot 6$ for four on fleabay

Sent from my iPhone using Tapatalk


Do you have a link for these, by any chance? Can't tell much about them from the pictures, except they do look pretty bright.
 

patoz

Expedition Leader
41jEe2DVqTL.jpg

These look like they would be great to put under the door on the camper shell on my F250, to light the tailgate area when it's down, and maybe inside the shell also.

The Xterra thread shows the lights in operation and that's what I like to see. People with like interest showing the products in real world applications. Reading a review can only tell you so much, and that's only if the person writing it knows what they are talking about, but seeing is believing.

I see by reading that thread you are an EMT also. I had my license for almost 30 years, until I retired in 2003.
 
Last edited:

emtmark

Austere Medical Provider
There's also a gent over there who put a few under his hood for work lights, they seem to be doing well and at that price you can buy a grip and always have soared. Gurney pusher with pride I say


Sent from my iPhone using Tapatalk
 

cjken

Explorer
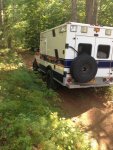
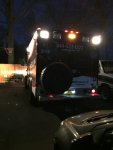
Any updates. I have 12 900 size floods I'd like to convert at least 6 to LED. trying to find a cost effective solution. ImageUploadedByTapatalk1452263174.430373.jpg
ImageUploadedByTapatalk1452263032.329674.jpg
 

patoz

Expedition Leader
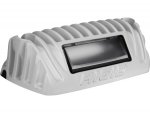
Java, I thought about doing the same thing, but my lenses are so bad that it's not worth it. I'm now looking at going a different route and possibly installing some Rigid Industries Lighting units. They just came out with a DC Scene Light for $94.00, and it comes in a white or black housing.

View attachment 314348

View attachment 314349

View attachment 314351

http://www.rigidindustries.com/led-lighting/86620

Since they are waterproof (IP68 Compliant) and surface mount, all we would need to do is make a cover plate for the existing hole and mount these on top of it. Or, you can use the old lense as a template and make a cover plate that will sit inside of the old bezel, and use both with the new light mounted on the plate for a little extra bling. They don't have the exact dimensions up yet, but the shipping dimensions are: 5.75 × 4.875 × 2.375 in, so they should fit just fine.

They're a little expensive, especially when you need 4 - 6 of them, but they will definitely get the job done.


Ken, I received these a while back but never really got a chance to test them outdoors. I fired one up inside, but couldn't really tell much about it because it was early evening (not very dark yet) and I didn't have any distance or height to work with.

I will try to test them tonight if it's not foggy like it was last night, but the forecast is saying it will be, so I don't know.
 

rlrenz

Explorer
I think it makes more sense to convert some lights more than it does other lights.

Any interior lights could be converted to LED, and probably exterior lights that would be used for camping - but if you keep any of the existing warning lights (converted to amber), they could probably be kept as halogen without any problem. When you need a warning light, you want to be seen, and the existing halogen would do this very well.

All my interior lights are LED, the compartment lights are being converted (slowly) to LED, and my side-mounted work lights are now LED, but I'm planning to keep my Halogen warning lights. They are there, they work, and I don't plan on running them when I'm living on batteries.
 

patoz

Expedition Leader
Bob, if the Rigid lights do the job for work lights, then I'm probably going to keep the four side warning lights halogen, and just try to find 4 amber lenses for them. LED all around would be nice, but this is turning into a nightmare trying to find all the pieces and parts at a reasonable cost.
 

patoz

Expedition Leader
This is my review and evaluation of the Rigid Industries 1x2 65º DC Scene Light - White - # 86620 (1 pr.). See their website for full specs.
86620_Scene_DC_1x2_White_Angle.jpg

IMG_7067.jpg

Location of test – Pensacola, Florida in my backyard.

Date of test – 01/08/2016

Weather conditions

sshot-2016-01-08-[1].jpg

Camera used – HP-945 Digital 35mm

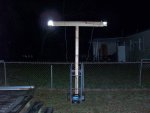
Test Platform – The two lights are mounted 6’ apart and 8’ high, the same as they are on my ambulance. The lights are mounted vertically against the top board, the same as they would be on the side of an ambulance or camper. The house next door is vacant and that's why it looks so bad.
HPIM1396.jpg

Power Supply – Fully Charged 12VDC ‘Marine Starter-Up 400’ Jumper Pack

Connecting Wire Used – 12’ for each light of 16/3 shielded cable removed from my ambulance. This is the same wire used to supply the existing Halogen light heads.

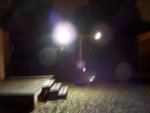
First, let me apologize for the crappy pictures. It was somewhat hazy and the camera was taking time delayed exposures, since there was no other light in the backyard and I was not using the flash except for the one picture of the test platform. This is why they are blurred. Had I known this in advance, I would have used a tripod and a remote or timed release. The pictures showing the amount of illumination and distance were all taken with the camera at eye level, directly under the lights, with it braced somewhat against the support post.

Second, the light on the right side of your screen in the picture above, was only functioning at about 30%. This also explains why when I first received them, I was disappointed when I tested one light inside the house. This was the light I used, and I know this because the other box was still sealed with tape just before this test.

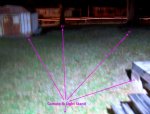
In the next picture you can see the color temperature of the light, which is very white. I also included some distances to give you an idea of the coverage area. If both lights were function at 100%, I’m sure it would be even better. The red and white streak is a car going from right to left at about 20 mph.
HPIM1393 - modified.JPG


Coverage is nice and even, including straight down to the base of the stand. This is good because they would also light up a table or cooking operation next to the side of the ambulance/camper.
HPIM1395.JPG

Pros: Small and compact, well made, waterproof, good even light output, low current drain (0.75A).

Cons: Somewhat expensive at $94.00 each, one light was defective upon arrival.

Bottom line: Yes, I would recommend these to a friend, however I would also recommend they test them immediately once they are received.

I believe they will get the job done as far as using them for area/work lights for camping. They are plenty bright to see around the vehicle to set up camp in darkness, but not so bright as to tick off any neighbors next to you, or in a pay campground. They appear very bright if you look directly at them, as do any LED lights.

Until I get a replacement for the one defective light I can’t say for sure, but I believe one on each side would be adequate for a small or midsize vehicle/camper. For an ambulance or larger camper, I believe two on each side would be better due to its length, but that may also just be my preference. Better too much than too little, I say. You can always turn some off or dim them down, but you can’t increase the amount of light if you don’t have them.

Well, I hope this helps ‘shed some light’ on the subject. :)
 
Last edited:

patoz

Expedition Leader
Ken,

I believe that would do it myself also. And, once they are mounted on the side of an ambulance, I believe the area to the side will be even brighter due to the reflection from the white side. Of course, in your case that won't help much.

I just wish I had better pictures to show you with. Once I get a replacement for the defective light, I'll probably update the pictures with some better ones using a tripod.

The lights themselves are pretty small in size, so they could be mounted almost anywhere. They are surface mounted using two stainless screws (included), and only require a single 3/8" hole for the wires to pass through. The wires can also be led out either side through a removable wire tab if need be. When I break down the test platform, I'll take a few more pictures of the lights themselve shown with something for size comparison, and include dimensions also.

Update! I submitted a return request to Amazon last night around 2 am. My phone was ringing at 8:45 am this morning and it was the owner of the company I actually purchased them from. Super nice guy, and he is going to pay for the return shipping and send me a replacement even before he receives the defective one. I was so pleased with the customer service, I went ahead and ordered two more for the other side.
 
Last edited:

rlrenz

Explorer
I was thinking tonight - and here's a thought.

Make an aluminum lens-sized plate that can be installed in place of the red/blue lenses. The plate can be painted whatever color is correct for your ambulance, and you could even mount a LED floodlight on the plate. By not removing the entire fixture, the existing chrome trim ring will make the aluminum plate look more like a finished part, plus it would be easy to install a lens when/if one ever comes along.

It might take a bit of fiddling, and maybe a second gasket (depending on the maker and style of your existing halogen light fixtures), but the end result might do the job nicely.

Food for thought.
 

patoz

Expedition Leader
I was thinking tonight - and here's a thought.

Make an aluminum lens-sized plate that can be installed in place of the red/blue lenses. The plate can be painted whatever color is correct for your ambulance, and you could even mount a LED floodlight on the plate. By not removing the entire fixture, the existing chrome trim ring will make the aluminum plate look more like a finished part, plus it would be easy to install a lens when/if one ever comes along.

It might take a bit of fiddling, and maybe a second gasket (depending on the maker and style of your existing halogen light fixtures), but the end result might do the job nicely.

Food for thought.


Bob, you must be reading my mind again, because that's EXACTLY what I'm planning on doing!

Only difference is, I'm planning on polishing the plate to get it as close to matching the chrome bezel as possible, and then mounting the Rigid light in the center of the panel. That way it will match the other Whelen lights somewhat and no permanent mods to the body itself.
 

rlrenz

Explorer
Bob, you must be reading my mind again, because that's EXACTLY what I'm planning on doing!

Only difference is, I'm planning on polishing the plate to get it as close to matching the chrome bezel as possible, and then mounting the Rigid light in the center of the panel. That way it will match the other Whelen lights somewhat and no permanent mods to the body itself.

Let me know if you need help making the aluminum blank plates.
 

Forum statistics

Threads
187,643
Messages
2,896,176
Members
228,596
Latest member
donaldsonmp3
Top